SEARCH FINESCALE.COM

Enter keywords or a search phrase below:

He-111B Pedro makes slow progress

3431 views
14 replies
1 rating 2 rating 3 rating 4 rating 5 rating
  • Member since
    November 2003
  • From: Manila, Philippines
Posted by shrikes on Sunday, January 4, 2004 7:51 PM
Swanny: looking good, my friend! i can't wait to see her when all the major parts go together! though, my favorive of your creations has to be the fortress. Wink [;)]

Chukw: Don't think anyone's mentioned this before, but welcome to the forums!! I like your drawings especially the little bloodrayne number! any recent pics on your H-10?
Blackadder: This plan's as cunning as a fox that used to be Professor of cunning at Oxford University but has now moved on and is working with the U.N at the high commission of cunning planning
  • Member since
    December 2002
  • From: Whidbey Island, Washington
Posted by chukw on Sunday, January 4, 2004 7:23 PM
Shucks, Madda- thanks! Draw all day, build on weekends- I'm one lucky dude! Smile [:)]
  • Member since
    March 2003
  • From: Broken Arrow, Oklahoma
Posted by maddafinga on Sunday, January 4, 2004 12:31 AM
Hey Chukw (I'm assuming you'e a Chuck?) I just checked out your site. I like your stuff quite a bit! I always liked that cartooney style, but never could work in it myself. Tons of good detail as well, I'm very impressed. I wish I could make a living drawing pictures. I take way too long anyway, I'd starve Smile [:)]

Anyway, I just wanted to say I like what you're doing.
Madda Trifles make perfection, but perfection is no trifle. -- Leonardo Da Vinci Tact is for those who lack the wit for sarcasm.--maddafinga
  • Member since
    December 2002
  • From: Whidbey Island, Washington
Posted by chukw on Saturday, January 3, 2004 7:19 PM
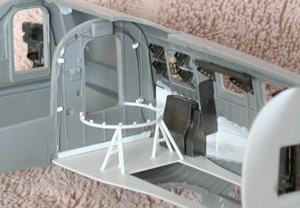
Okay, Swanny- here's a pic I have handy of the early stages of the interior- you can see the blanked-off wing root, bulkhead, floor and gunner's foot ring that I scratched, plus the Eduard brass. I've been taking pics, but have yet to upload them to my site.... stay tuned! I haven't gotten to the Kposter parts yet (I have the transparencies only), but they look pretty darn good. I really want to use the gunned-up gondola, the big MG/FF in the nose and, most of all, the fixed rear section to the dorsal gunner's position. I'm opening every hatch I can to show of the interior, so I wanted the bomb bay doors open. Later variants seemed to always use an external PVC rack, so that's why I'm going with the H-10. Only one boring splinter scheme found so far... Black Eye [B)].. but with yellow Eastern Front bands....Smile [:)]

  • Member since
    February 2003
  • From: Sandusky Ohio, USA
Posted by Swanny on Saturday, January 3, 2004 1:28 PM
Just a minute Chuck while I get my head-wackin hammer out. I looked at those flaps also but thought better of it. An H-10 eh, I would love to see some pictures of that when you get it done. What do you think of the Koster pieces? I've used some of his stuff before and found it to be fairly well engineered.
  • Member since
    December 2002
  • From: Whidbey Island, Washington
Posted by chukw on Saturday, January 3, 2004 12:59 PM
Wow,Swanny,that's pretty swank. I know a little about where you're comin' from on this- I'm currently building one of these babies up as an H-10 version, using the Eduard, Koster, Cutting Edge and True Details bits. What a job! I went a bit further than was necessary by separating the flaps- what was I thinking? It looks like SOP was to lock the flaps up, so my flaps-dropped version will be, ummmm, undergoing maintenance. I'm currently blending the nacelles in (putty should dry about now), and wondering how much extra to put in the wheel wells. Please- try to talk me out of it!. Wink [;)] The interior andbomb bay are all done up and painted- soon it will be off to main asembly. Fingers in crossed position aaaand ... locked!
  • Member since
    February 2003
  • From: Sandusky Ohio, USA
Posted by Swanny on Saturday, January 3, 2004 10:46 AM
QUOTE: Originally posted by maddafinga


One question I have for you, how did you relocate that fire extinguisher? I'd think that if you just cut it off it'd want to curl up and notch itself, but I've neve done anything like that before so I don't know, that's just my impression when I think about slicing something like that off.

If you cut it from the top to bottom it will indeed curl up. I cut it along the length with a fresh blade and made seveal light passes which prevented it from distorting. That's also the same method I used to remove the trim tab actuators. I find having one of those 39 cent paint trays on hand it great for keeping track of these little pieces during construction. At least right up until when you knock it off the desk into the deep, dark carpeting of no return.
  • Member since
    March 2003
  • From: Broken Arrow, Oklahoma
Posted by maddafinga on Saturday, January 3, 2004 10:13 AM
I'd be frightened of the pace you could work at if you stayed off the computer Swanny. You already work about 50 times faster than me, and at a higher level of quality. I'm continually amazed.

One question I have for you, how did you relocate that fire extinguisher? I'd think that if you just cut it off it'd want to curl up and notch itself, but I've neve done anything like that before so I don't know, that's just my impression when I think about slicing something like that off.
Madda Trifles make perfection, but perfection is no trifle. -- Leonardo Da Vinci Tact is for those who lack the wit for sarcasm.--maddafinga
  • Member since
    February 2003
  • From: Sandusky Ohio, USA
Posted by Swanny on Saturday, January 3, 2004 4:27 AM
QUOTE: Originally posted by nmayhew

ps where are you getting the markings for this bird from?

I'll be using the "Pedros in Spain" sheet #2 from Cutting Edge

It provides marking for two aircraft; one is all gray with the comet and chimney sweep (that's the one I'm leaning towards) and the other is a tricolor splinter scheme with the old woman with dog on the fin.
Glad you found some useful stuff on my site. When I started collecting kits I would see stuff on Ebay and wonder "just what comes in that box?" but could never find reviews of them so am trying to fix that problem along with answering some of the more common questions in the hobby. Sometimes I think I should spend more time building and less time on the computer.Wink [;)]
  • Member since
    July 2003
  • From: Kent, England
Posted by nmayhew on Saturday, January 3, 2004 4:07 AM
Swanny hi,
this must be a real labour of love!!Smile [:)]
i did take a look at your website - very impressiveCool [8D] - and saved a whole bunch of your "weathering" and "complete future" articles into my favourites!! i'll let you know how it goes when i do some stuff to my 109 for the group build.
i have by the way been posting link after link to your site when people ask about future etc etc!!!Smile [:)]Smile [:)]Smile [:)]
keep up the good work!
regards,
nick
ps where are you getting the markings for this bird from?
Kind regards, Nicholas
  • Member since
    November 2005
Posted by Anonymous on Friday, January 2, 2004 7:49 PM
Great stuff Swanny. Looks like a tough conversion,good luck.
  • Member since
    December 2002
  • From: United Kingdom / Belgium
Posted by djmodels1999 on Friday, January 2, 2004 7:22 PM
Amazing stuff!
  • Member since
    January 2003
  • From: NE Georgia
Posted by Keyworth on Friday, January 2, 2004 7:18 PM
Swanny, looks like quite an adventure with this build! Big Smile [:D] Thanks for posting the pics. Looking forward to the completed bird.Big Smile [:D]Big Smile [:D]Big Smile [:D]Cool [8D]
"There's no problem that can't be solved with a suitable application of high explosives"
  • Member since
    February 2003
  • From: USA
Posted by mark956 on Friday, January 2, 2004 6:57 PM
Looking good so far Swanny. Thanks for sharing.
mark956
  • Member since
    February 2003
  • From: Sandusky Ohio, USA
He-111B Pedro makes slow progress
Posted by Swanny on Friday, January 2, 2004 6:05 PM
After two more evenings of modeling time devoted to the wings, many dry fit sessions and a review on how to swear like a sailor the wings have been assembled – mostly. Here we can take a quick review of all the various modifications and some of the problems encountered. Arrows numbered 11 illustrate the many areas where I had to use repeat applications of super-glue and accelerator to fill gaps. Arrows numbered 12 indicate the engraved hinges that have been filled with Squadron White Putty. On the lower side of the wing the hinge material had to be cut out of the hinge line to make it a continuous engraved line. Arrow number 13 indicates one of about four different areas where very small gaps had formed along the new leading edge. These were filled by putting some putty on a cotton swab with some acetone based fingernail polish remover and then rubbing it into the gap. Arrow 14 is the new extended trim tab and 15 is the reattached actuator. Arrow 16 is the rhomboidal baffle installed forward of the aileron on the lower side of each wing.

The complete story of this build is availible on my web site.
JOIN OUR COMMUNITY!

Our community is FREE to join. To participate you must either login or register for an account.

SEARCH FORUMS
FREE NEWSLETTER
By signing up you may also receive reader surveys and occasional special offers. We do not sell, rent or trade our email lists. View our Privacy Policy.