SEARCH FINESCALE.COM

Enter keywords or a search phrase below:

Wingnut Wings Sopwith Pup (Finished May 1,pics on page 3)

19964 views
62 replies
1 rating 2 rating 3 rating 4 rating 5 rating
  • Member since
    August 2003
  • From: Connecticut, USA
Wingnut Wings Sopwith Pup (Finished May 1,pics on page 3)
Posted by Nachtflieger on Sunday, April 11, 2010 1:55 PM

Hi All'

Here's a few pics of my latest project, the 1/32 scale Sopwith Pup from Wingnut Wings. These are shots of the completed cockpit before I installed it into the fuselage. Everything that has been written on the internet about these kits is true! Phenomenal detail, and fit. I consider myself an average modeler, but you can't go wrong with these kits! Big Smile

Nate


  • Member since
    May 2005
  • From: Eugene, Oregon
Posted by hughes2682 on Sunday, April 11, 2010 2:21 PM

Nate,

That CP is exquisite!  The rigging you've done really brings it to life.  What did you use for rigging? I will most assuredly be following this build.  I'm not sure if you are into a group build right now but, there is one going on, "Classic Aviation GB 1903-1938', hosted by Aaronw. This would fit right in.Wink

Aren't those WW kits amazing? Don't be surprised if you start to discover more detail, especially when you start to shoot some color on the rest of the kit.  I'm working on a Junkers J.1 and discovered that they "stressed" the leading edge where it meets the corrugation.  It wasn't readilly apparent until I laid down some color.  They are apparently planning some releases of uber detailed kits.  Like around 250 PE parts. Great for the one in your life with raging OCD.  It sounds kind of like what Eduard did with their Royal Class kits. 

Keep the updates coming

Cheers

Dave

http://img.photobucket.com/albums/v317/Aaronw/Groupbuilds/ClassicAviationGB2010bomb.jpg

With enough thrust, pigs fly just fine.

  • Member since
    October 2009
  • From: SURREY ,B.C.
Posted by krow113 on Sunday, April 11, 2010 2:46 PM

Nate- Excellent work .Are you adding to the kit  or is that cockpit detail  shown supplied in the kit?

Thank you ,Krow113

  • Member since
    August 2003
  • From: Connecticut, USA
Posted by Nachtflieger on Sunday, April 11, 2010 3:34 PM

Hi Guys,

Thanks a lot for the comments and interest. I am building the kit OOB with the exception of the rigging. For the cockpit rigging, I've used 2 lb. test fishing line called Maxima Chameleon. It has a natural bronze-ish color which I'm leaving as is.

When it comes time for the wing rigging, I'm planning on using a product called 1/4" flying wires from RB Productions. These are a flat, stainless steel affair, much like PE. These look to be perfect for replicating the flat flying wires that British bi-planes used. I'll let you know how it works, as I have not used it yet.

Thanks for the invite for a GB, but I think this one is just gonna be solo. Maybe the next: I have the WnW Albatros D.V, D.Va, LVG, and an SE 5A.Big Smile

Nate


  • Member since
    April 2005
  • From: Piscataway, NJ!
Posted by wing_nut on Sunday, April 11, 2010 6:45 PM

Looks good Nate.  Been hearing lots of good things about those Wingnut Wings.  Hey, gotta love that name rightWhistling

Marc  

  • Member since
    August 2003
  • From: Connecticut, USA
Posted by Nachtflieger on Sunday, April 11, 2010 7:24 PM

Thanks Marc. Yeah, the name does have a certain ring to it doesn't it?Wink

Nate


  • Member since
    December 2009
  • From: Fort Worth, Texas
Posted by FastEagle1 on Sunday, April 11, 2010 8:26 PM

Hi Nate,

Brilliant work on your Pup.  The cockpit looks excellent and the rigging is a great touch.  I cannot believe the detail in the instruments!

I've been observing the WingNut Wings series with keen interest and will be following your build closely. 

Thanks indeed for sharing.

  • Member since
    January 2009
  • From: Algonquin, IL
Posted by model geek on Sunday, April 11, 2010 8:48 PM

Nate,

Really nice work so far!!! That scale really leand itself to a lot of nice detail.

Look forward to seeing progress on this kit.

Tom  


  • Member since
    August 2003
  • From: Connecticut, USA
Posted by Nachtflieger on Monday, April 12, 2010 4:09 AM

Thanks Fast Eagle, and Tom. I installed the cockpit, and glued the fuselage halves together. I had to putty a nasty seam down the middle which I caused myself when I cleaned the attachment points. Unfortunately, I sanded a touch to much, and caused a gap to form!  After I clean the seams, I'll post further pics.

Nate


  • Member since
    February 2003
  • From: A Spartan in the Wolverine State
Posted by rjkplasticmod on Monday, April 12, 2010 7:39 AM

Excellent work Nate.  Keep it up & you'll have a real winner.

Regards,  Rick

RICK At My Age, I've Seen It All, Done It All, But I Don't Remember It All...
  • Member since
    October 2004
  • From: Colorado
Posted by StephenLawson on Monday, April 12, 2010 8:13 AM

So far, nicely Done!


Stachel...unconfirmed by Armee means unconfirmed!!!!

  • Member since
    August 2003
  • From: Connecticut, USA
Posted by Nachtflieger on Monday, April 12, 2010 3:10 PM

Thanks Rick, and Stephen! Hopefully I'll be able to post some more progress pics sometime this week.

Nate


  • Member since
    April 2003
  • From: 41 Degrees 52.4 minutes North; 72 Degrees 7.3 minutes West
Posted by bbrowniii on Monday, April 12, 2010 3:37 PM

Nate

That is SOOOOOOOOO-PURRRRRRRRRR!!!

Can't wait to see it come to life some more!

'All that is necessary for the triumph of evil is for good men to do nothing' - Edmund Burke (1770 ??)


  • Member since
    March 2010
  • From: Brisbane
Posted by Julez72 on Tuesday, April 13, 2010 1:05 AM

Nate...

Very cool, that is a nice looking pit.....I already went out and got me an Eduard Airco DH2 after seeing your fokkers and now your doing another one....

I'll be watching this build with interest so keep it coming...

Jules....


  • Member since
    November 2008
  • From: Biding my time, watching your lines.
Posted by PaintsWithBrush on Tuesday, April 13, 2010 10:39 AM

'Nachtflieger',

Beautiful work so far. I have a 1/32 Sopwith Camel I am looking to do sometime soon. Who carries the 1/4" flying wire by RB Productions?


A 100% rider on a 70% bike will always defeat a 70% rider on a 100% bike. (Kenny Roberts)

  • Member since
    August 2008
  • From: S.W. Missouri
Posted by Pvt Mutt on Tuesday, April 13, 2010 10:50 AM

MAN, I know right now what i would be building if these jobs had come out a couple years back instead of SPGs.YesHeart

Tony LeeSmile

Shoot Low Boys They're Ridin Ponys

  • Member since
    January 2007
Posted by Gigatron on Tuesday, April 13, 2010 12:25 PM

Generally, I have no interest in bi-planes, but after seeing this one and a few others from this company, I may have a change of heart.

That pit is looking sweet and I look forward to seeing the rest of this build.

-Fred


  • Member since
    August 2003
  • From: Connecticut, USA
Posted by Nachtflieger on Tuesday, April 13, 2010 3:35 PM

Wow! Thanks a lot for all of the interest guys! I wasn't going to post any more pics until I sanded the putty down, but what the heck.......since you all are interested, I'll oblige!Wink

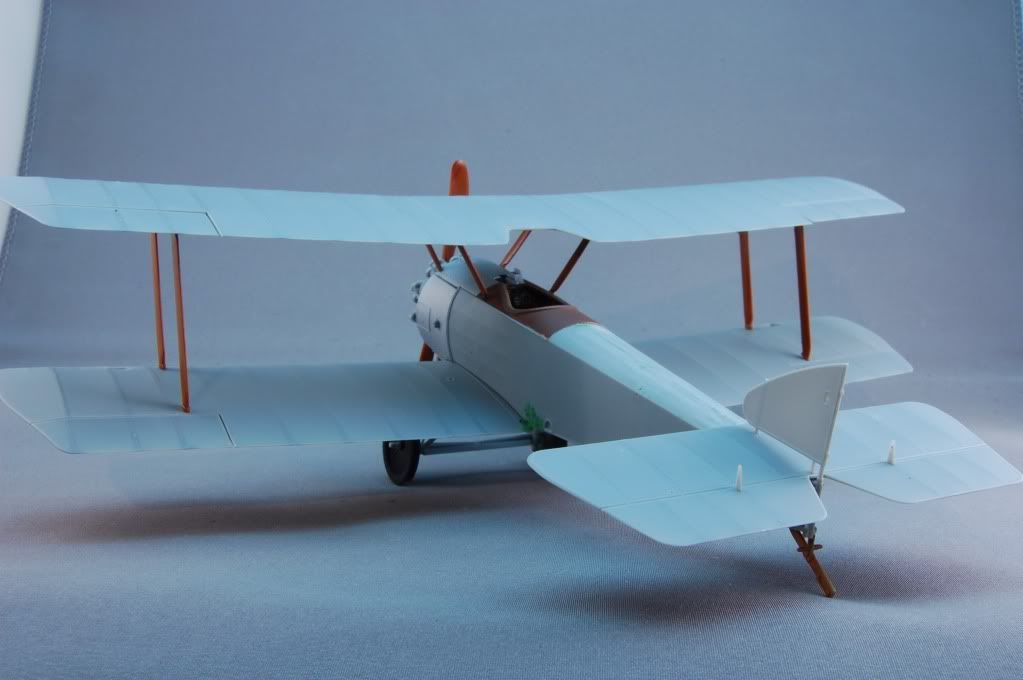
As it stands right now, the fuselage has been assembled, and the seam that I created has been smoothed out. I glued the lower wings, and undercarriage to the fuselage, and applied a small amount of putty to a seam on the bottom of the join.  The tail surfaces are glued together, but they aren't glued to the fuselage yet.

The wing struts, and the upper wing, along with the engine, prop, and wheels, are all just placed on the model for show only.

After I sand the putty, I'll apply masking on the underside of the wings, which I have already painted Pollyscale Clear doped linen, in preparation of painting the upper surface camo. Obviously, I still have to touch up the attachment points on the struts, and I think I might paint the tires a different color too. Maybe a dark gray versus this flat black.

The build portion is just about done already! Next will be paint, decals, and rigging. Stay tuned!Big Smile

Oh, and in response to the request for RB Productions website, here it is:

http://www.radubstore.com/index.php?main_page=product_info&cPath=2_68&products_id=323


Nate


  • Member since
    March 2010
  • From: Brisbane
Posted by Julez72 on Tuesday, April 13, 2010 8:19 PM

She's looking really nice Nate, you must be looking forward to doing all the rigging eh.....


  • Member since
    August 2003
  • From: Connecticut, USA
Posted by Nachtflieger on Wednesday, April 14, 2010 3:22 AM

Thanks Jules.Big Smile Actually, I really am looking forward to the rigging! Call me sickStick out tongue, but I think the rigging is what bi-planes are all about. Plus, I'm really curious how those RB production flying wires are going to look.

Nate


  • Member since
    March 2010
  • From: Brisbane
Posted by Julez72 on Wednesday, April 14, 2010 3:45 AM

Ok your sickTongue Tied but your right, it's all in the rigging, gives it that wow factor....

Keep us posted...


  • Member since
    May 2005
  • From: Eugene, Oregon
Posted by hughes2682 on Wednesday, April 14, 2010 10:41 AM

Nate,

Ok, You are sick.  How many votes for it to pass that you are sick? Big Smile  I agree with you about the rigging and the biplane.  I took a look at RB Productions site and their rigging...oh yeah, and the shackles that they mount to.  Oh boy howdy! I'm gonna have to get a set of these for my Hisso and F.2b. 

Your Pup is looking fantastic!Yes Again, I'll be following along with this one and, taking notes on the rigging as I may go the same route with my kits. This one is so close (it would seem) to getting some color on it but, don't rush it.  I think that the rigging you've chosen will look superb.

Cheers

Dave

http://img.photobucket.com/albums/v317/Aaronw/Groupbuilds/ClassicAviationGB2010bomb.jpg

With enough thrust, pigs fly just fine.

  • Member since
    August 2003
  • From: Connecticut, USA
Posted by Nachtflieger on Wednesday, April 14, 2010 3:45 PM

Thanks Dave!Big Smile I'm glad I could help with the link to RB's website. Color soon for the Pup!Wink

Nate


  • Member since
    December 2009
  • From: Fort Worth, Texas
Posted by FastEagle1 on Wednesday, April 14, 2010 7:18 PM

Nate, 

She's coming along quite nicely.  I've never rigged a biplane myself and am imagine I'm going to learn a few things from you. 

Great work my friend!!

  • Member since
    August 2003
  • From: Connecticut, USA
Posted by Nachtflieger on Thursday, April 15, 2010 3:29 AM

Thanks FastEagle1. I plan on getting quite a bit done this coming weekend, including a bit of rigging if all goes well.

Nate


  • Member since
    November 2008
  • From: Biding my time, watching your lines.
Posted by PaintsWithBrush on Saturday, April 17, 2010 9:21 AM

A word of warning to those of you who may wish to purchase the RB Productions wire rigging set.

While Mr. Brinzan is a very helpful person, PayPal may cause you great problems. I have been going round and round with them for 3 days now with the same problems. I called American Express to see if there was some snag on my end and was informed by them that PayPal had charged me a $1.00 service charge to decline my payment. Evidently they COULD process THAT fee.

Perhaps you are required to sign up with them, even though there is a feature for making payment without doing so.

A 100% rider on a 70% bike will always defeat a 70% rider on a 100% bike. (Kenny Roberts)

  • Member since
    May 2005
  • From: Eugene, Oregon
Posted by hughes2682 on Saturday, April 17, 2010 9:54 AM

Thank you for the heads up on PayPal.  That would make Hulk angry.  Hulk SMASH!

Cheers

Dave

http://img.photobucket.com/albums/v317/Aaronw/Groupbuilds/ClassicAviationGB2010bomb.jpg

With enough thrust, pigs fly just fine.

  • Member since
    April 2005
  • From: Piscataway, NJ!
Posted by wing_nut on Saturday, April 17, 2010 12:08 PM

Between looking  at this fine build and seeing the Albatros D.V in the box yesterday... man I gotta get me one of these.  Nice Nate.

Marc  

  • Member since
    August 2003
  • From: Connecticut, USA
Posted by Nachtflieger on Saturday, April 17, 2010 3:36 PM

I agree Marc, these kits are awesome! I've got this one, the SE 5a, both Albatros kits, and the LVG, and they are all superb!

I'm sorry you are having problems with paypal, Paintswithbrush. I've been using paypal for many years without issue including my payment to RB Productions. I'm not sure what the problem is, but I hope it gets resolved for you.

I have been making slow progress this week, and right now, I am masking the underside of the wings along the edge to replicate the wrap around effect of the upper paint onto the lower wings. After I paint, it's time to gloss, and decal. Hopefully, I'll get some new pics up soon. I'm still plugging away at it!Big Smile

Nate


  • Member since
    August 2003
  • From: Connecticut, USA
Posted by Nachtflieger on Sunday, April 18, 2010 9:23 AM

Hi Guys,

Ok, here is were I'm at with this build. Most of the main painting is done, as is the majority of construction. I used Tamiya XF -62 Olive Drab for the upper surfaces, and Pollyscale Clear Doped Linen applied over flat black pre-shaded lines for the ribs, on the underside. Obviously, I'll have to touch up the paint here and there, and I still have to paint the aluminum engine panels on the fuselage, but it's starting to look like a Pup!Big Smile

Taking a hint from my armor building, I applied MiG filters to the top and bottom to add depth. Unfortunately, my photographic skills aren't the greatest, and the effect is washed out in the pics. I used brown for dark green paint on the top, and tan for tri-tonal schemes on the bottom.

Next up: gloss coat, and decaling.

Nate


JOIN OUR COMMUNITY!

Our community is FREE to join. To participate you must either login or register for an account.

SEARCH FORUMS
FREE NEWSLETTER
By signing up you may also receive reader surveys and occasional special offers. We do not sell, rent or trade our email lists. View our Privacy Policy.