SEARCH FINESCALE.COM

Enter keywords or a search phrase below:

Ju 388- Planet Models 1/48 Resin

108028 views
340 replies
1 rating 2 rating 3 rating 4 rating 5 rating
  • Member since
    December 2002
  • From: Whidbey Island, Washington
Posted by chukw on Sunday, September 11, 2011 6:46 PM

Thanks, guys- man, that pup is cute- and good as gold, too.  :D

Here's the latest update on this resinous adventure- show 'em, Fritzi!


  • Member since
    February 2003
  • From: Rothesay, NB Canada
Posted by VanceCrozier on Monday, September 12, 2011 6:49 AM

Great little how-to on the gear doors - not bad work on the rest of it either... trim tabs?!?! Are you kidding me?! Wink

On the bench: Airfix 1/72 Wildcat; Airfix 1/72 Vampire T11; Airfix 1/72 Fouga Magister

  • Member since
    October 2008
  • From: italy
Posted by bsyamato on Monday, September 12, 2011 9:44 AM

great vacuforming solution Stick out tongue

  • Member since
    January 2010
Posted by CrashTestDummy on Monday, September 12, 2011 12:23 PM

Awesome work.  And who woulda thunk about making _two_ copies to add the inside panel details but Chuk?

Interesting that an old friend (who does not participate in this hobby now) were lamenting the fact that we both miss our Vac-U-Form machine from back in the day.  And again, I miss that machine!

Gene Beaird,
Pearland, Texas

G. Beaird,

Pearland, Texas

  • Member since
    December 2010
  • From: Memphis TN
Posted by Heavens Eagle on Tuesday, September 13, 2011 9:06 PM

Enlightening as always Chuk! Noticed some changes to your formats. Looking good and as they say a photo is worth a thousand words (well at least a few hundred anyway) Wink

I also have my old Mattel Vac-U-Form still.  All the parts molds etc, and even a couple 3 of the original plastic sheets. Made a jig years ago to drill the holes in new replacement sheets.

As to plastics I have used, Styrene seems to take too much heat, thus as I see you have the aluminum heat cover.  I found that .010 rigid vinyl works great in the MVUF. It seems to have a lower softening temp and vacs perfectly. Pulls down quite easily and is as rigid and glueable as styrene.  I have used rigid vinyl sheet, cut to size in red and transparent blue.  Still have quite a stock of the transparent blue sheets.  They vac, cut, glue, paint and about anything else that evergreen does.

Check with a plastic supply house in your area. If they don't have any, they can get some and the base color shouldn't be too much of a problem. It is also a lot more economical than buying Evergreen sheet.  I like Evergreen, just not for the Mattel.

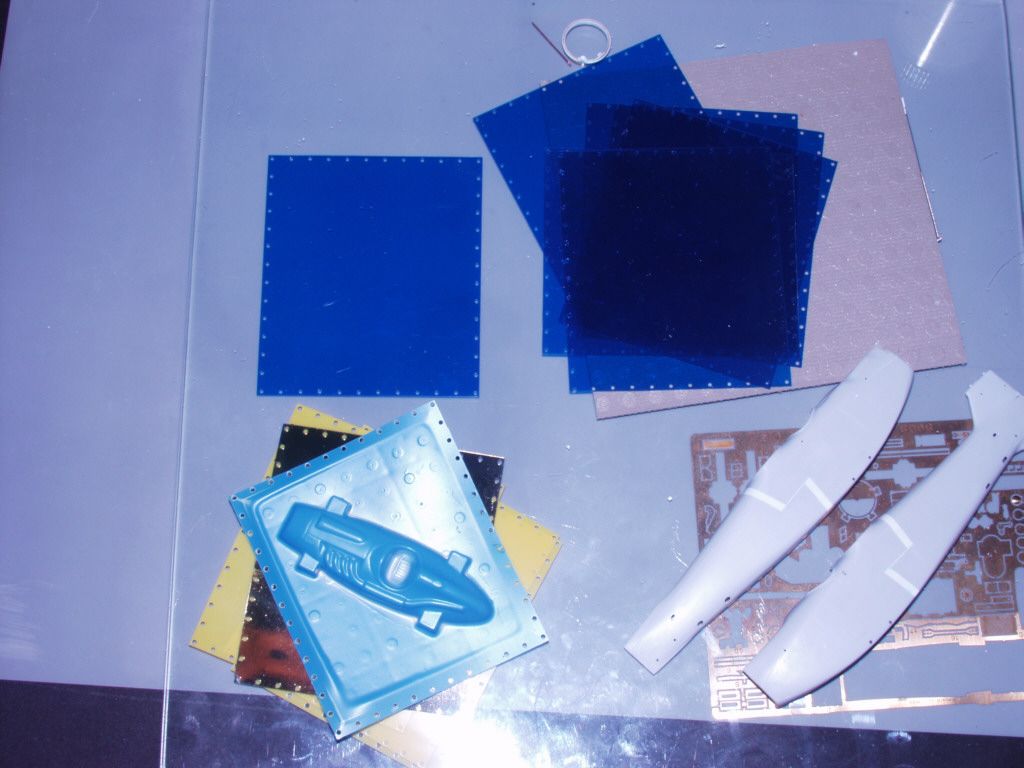
Here's a pic. One gold chrome, 3 yellow and a molded blue original Mattel sheets of plastic. The dark transparent blue sheets were cut and drilled from some stock .010 rigid vinyl I bought and cut up years ago.  I have over 100 sheets of this stuff and it works great.  Just wish I could have gotten some clear or solid color stuff.  Have used red in the past and it worked just fine too.


Cheers!    

Paul

P.S.  The fuselage halves are my WW1 Hannover CL.IIIa  that I am building over in the Great War Build.  Thinking about starting another thread to cover it as I have been doing a Chuk style documenting of the build. So far my posts are on pages 47, 50, and 51 if you are interested, or PM me.

Keep up the great work Chuck!  You keep pushing me to do better and it's FUN!

  • Member since
    April 2005
  • From: Piscataway, NJ!
Posted by wing_nut on Wednesday, September 14, 2011 6:34 AM

Chuk you never cease to amaze.  I like the use of other products too.  Spackle and white out.  A question... when the buck is seal with the CA and sanded smooth... s it good enough to make a clear vac copy... like for a canopy?  Seeing the heat cover reminded me of a site seen a longtime back for the vacuum upgrades.  I just ordered the kit to improve the old girl.

Marc  

  • Member since
    February 2003
Posted by Jim Barton on Tuesday, September 27, 2011 4:31 PM

Way to go!

"Whaddya mean 'Who's flying the plane?!' Nobody's flying the plane!"

  • Member since
    November 2009
  • From: Saskatchewan, Canada.
Posted by Ernie_SK on Sunday, October 23, 2011 12:21 PM

Looking forward to next episode.  Great tips and of course the gals are always fun.Smile

  Seeing double is a good thing...when it comes to wings.

  • Member since
    August 2011
  • From: Panhandle Fl
Posted by Noah T on Sunday, October 23, 2011 8:39 PM

Your style blows me away. This is the way directions should be. Tons of pics displaying "ample" talents...Stick out tongue


On the bench: 72nd scale P51D, P47D Razorback

---Everything Is What It Is, And Not Another Thing.---

  • Member since
    August 2009
  • From: Borlando Fla home of the rat
Posted by TREYZX10R on Sunday, October 23, 2011 8:55 PM

Great looking progress,nice tip with the white out thanks for sharing!

  • Member since
    December 2002
  • From: Whidbey Island, Washington
Posted by chukw on Sunday, October 23, 2011 9:18 PM

Thanks, guys! 
Well, I'm back, and have been sneaking time at the bench over the last several weeks.  Sorry to be absent for so long- life has been keeping me busy! Take it away, Hauptmann Hannah!


  • Member since
    October 2008
  • From: italy
Posted by bsyamato on Monday, October 24, 2011 5:55 AM

The beast get final shapes , awesome !!! Bow Down

  • Member since
    February 2003
  • From: Rothesay, NB Canada
Posted by VanceCrozier on Monday, October 24, 2011 6:58 AM

Welcome back Hannah! Uhh, I mean, Chukw! Shaping up nicely,

On the bench: Airfix 1/72 Wildcat; Airfix 1/72 Vampire T11; Airfix 1/72 Fouga Magister

  • Member since
    March 2010
  • From: Democratic Peoples Republic of Illinois
Posted by Hercmech on Monday, October 24, 2011 9:11 AM

Your skills amaze me Bow Down


13151015

  • Member since
    February 2003
Posted by Jim Barton on Tuesday, October 25, 2011 4:46 PM

Was the coffee black or with cream and sugar?Big Smile

"Whaddya mean 'Who's flying the plane?!' Nobody's flying the plane!"

  • Member since
    June 2007
  • From: Germantown, Wisc.
Posted by Hartmann352 on Friday, November 4, 2011 7:48 PM

Patience of a saint I tells ya. Wow!


"Yesterday is history, Tomorrow a mystery, but Today is a gift. That is why it is called the "present".


  • Member since
    December 2002
  • From: Whidbey Island, Washington
Posted by chukw on Sunday, November 6, 2011 9:32 PM

Thanks, guys?  Jim, whazzat about?   Tongue TiedWink


A brief but significant update today.  With Pfennig and Hauptmann Hannah on special assignment, Fritzi will debrief us on recent events.


  • Member since
    December 2010
  • From: Memphis TN
Posted by Heavens Eagle on Sunday, November 6, 2011 10:39 PM

Hey Chuk!

The plane is looking good! Making great progress there!

Never thought of the beading tool idea. Have one of those sets around (got it brand new back in watch school took a couple of jewelry classes) Will have to figure out where I put it.  Am always finding tools etc. when digging through storage stuff these days.

Have been scratch building an engine for my 1/48th Hannover  coming along quite well.  WW1 Argus engines weren't used in many planes and there aren't any good kits out there with one to pattern, so just using drawings and scratching it.  It is getting old with all the scratch building on that kit and really need to try out my new airbrush, so am building a new paint booth.  (can't find all of the old one) Want a BIG one and want to vent the fumes outside.  About 1/2 done on that.

Keep up the great work!

  • Member since
    February 2003
  • From: Rothesay, NB Canada
Posted by VanceCrozier on Monday, November 7, 2011 6:48 AM

chukw


http://www.chukw.com/Hobby/Ju388/388_172.jpg

Oh good, I wasn't the only one making bomber noises last night! (I had dry-fitted Airfix's old 1/72 He177, chased the cats around a little bit....)

On the bench: Airfix 1/72 Wildcat; Airfix 1/72 Vampire T11; Airfix 1/72 Fouga Magister

  • Member since
    December 2002
  • From: Whidbey Island, Washington
Posted by chukw on Sunday, November 13, 2011 8:13 PM

Thanks, fellas!

Got a little bench time in- I'll let the Hauptmann take over!


  • Member since
    February 2003
  • From: Rothesay, NB Canada
Posted by VanceCrozier on Monday, November 14, 2011 8:04 AM

You had me at "smooth flowing curves".... Yes

I've gotta try that thinned-putty trick some time, could save some sanding hassle if done right.

On the bench: Airfix 1/72 Wildcat; Airfix 1/72 Vampire T11; Airfix 1/72 Fouga Magister

  • Member since
    December 2010
  • From: Memphis TN
Posted by Heavens Eagle on Monday, November 14, 2011 7:14 PM

Remember that part of the "trick" is that this is a RESIN kit.  The resin doesn't react to acetone and lacquer thinners as styrene does.  There is a story someplace on here where a guy tried to strip the paint off of a model in order to "redo" it.  Placed the model in a tub of lacquer thinner and came back a short while later to find a tub of goo.

Great job Chuk!  The 388 is coming along quite nicely!  Wish I had your skills at drawing your little helpers.  They do add some fun to your posts.

  • Member since
    February 2003
Posted by Jim Barton on Tuesday, November 15, 2011 2:31 PM

I like that curved rasp; I don't have anything like that in my tool kit.

"Whaddya mean 'Who's flying the plane?!' Nobody's flying the plane!"

  • Member since
    February 2011
  • From: Launceston, Australia
Posted by the real red baron on Wednesday, November 16, 2011 3:42 AM

These are some funny little animations you've got there, all these captions I each picture is really helping me learn more, thanks!


  • Member since
    February 2007
  • From: Brunswick, Ohio
Posted by Buckeye on Wednesday, November 16, 2011 9:14 AM

Always look forward to your updates.  Keep up the great work! Yes

  • Member since
    December 2002
  • From: Whidbey Island, Washington
Posted by chukw on Thursday, November 17, 2011 10:19 AM

Thanks a bunch, fellas! 

Good call, Paul- do not use acetone on styrene!   Use nail polish remover instead- it's basically thinned-down acetone that will not only NOT melt your model, but leave smelling as fresh as a spring morning.  ;)  BTW, your Hanover build is Top of the Pops!

  • Member since
    September 2006
  • From: Bethlehem PA
Posted by the Baron on Thursday, November 17, 2011 11:47 AM

Great updates, Chuck!  I like the recovery on the tail wheel doors, especially, well played!

Regarding using acetone, I use it--but not to strip paint, that's insane!  I use it to thin putties and make my homemade Mr. Surfacer (either to remove excess putty applied to the seam/gap, or to mix on the palette and then apply).  The quantities are small enough not to damage styrene parts, since the acetone is so volatile that it evaporates immediately.

For stripping paint, I've started using the automotive de-greaser  SuperClean.  Not only does it remove paint really well, and you can use a batch of it over and over, but it completely removes grease and oils from the surface.  I use it now, to clean sprues on new kits, a couple of drops in a bath of warm water.

The bigger the government, the smaller the citizen.


  • Member since
    March 2010
  • From: Democratic Peoples Republic of Illinois
Posted by Hercmech on Thursday, November 17, 2011 3:22 PM

Chuck,


Where did you get your bead tools (Rivet maker)?


13151015

  • Member since
    December 2010
  • From: Memphis TN
Posted by Heavens Eagle on Monday, November 21, 2011 8:26 PM

Chuck  Thanks for the complement!  It is very appreciated coming from you.  When I looked through your Me 410 build a few months ago, it really fired me up to do a challenging build.  (didn't expect it to be quite that challenging when I started it  ConfusedOops )

Hercmech  The beading tools are a jewelers tool used for setting stones on jewelry.  Mainly for rounding over the prongs that hold the stones in place.  You can find a reasonably priced set  ( $29) at Rio Grande .  I set the link to the page with the set.  If you are interested check out their catalogue as it has all kinds of useful tools for model building.  Files, saws, saw blades, pliers, etc.  Some items are pricey, some not, one thing though is that there are some really nice tools if you have a need or want.

  • Member since
    December 2002
  • From: Whidbey Island, Washington
Posted by chukw on Sunday, November 27, 2011 8:47 PM

Thanks, guys!

Back with more!   Even with a four-day weekend I feel like I haven't gotten much done- you be the judge.  Hey. Fritzi!


JOIN OUR COMMUNITY!

Our community is FREE to join. To participate you must either login or register for an account.

SEARCH FORUMS
FREE NEWSLETTER
By signing up you may also receive reader surveys and occasional special offers. We do not sell, rent or trade our email lists. View our Privacy Policy.