SEARCH FINESCALE.COM

Enter keywords or a search phrase below:

BIG Russian Jet Groupie GB

186389 views
1790 replies
1 rating 2 rating 3 rating 4 rating 5 rating
  • Member since
    February 2003
  • From: Rothesay, NB Canada
Posted by VanceCrozier on Tuesday, February 11, 2014 3:07 PM

Ahhhhh - Flanker noses!!!

On the bench: Airfix 1/72 Wildcat; Airfix 1/72 Vampire T11; Airfix 1/72 Fouga Magister

Dre
  • Member since
    June 2007
  • From: here, not over there
Posted by Dre on Tuesday, February 11, 2014 2:57 PM

Also, to follow onto Dean's advice....   instead of using a fairly aggressive sandpaper, I'd use something around 600 or lower to sand with.  You'll remove far less material so final shaping can be better controlled and it will start polishing the surfaces back to normal for painting.  

You probably hate us now...Wink  but it will be worth the effort to make the front of the plane match the awesomeness of the burner cans.

  • Member since
    September 2013
Posted by Dean30 on Tuesday, February 11, 2014 1:17 PM

If there's any irregularities in the shape of the nose I would suggest putting some filler in a large amount on the areas where the nose appears to be smaller and the join is obvious, like using the filler as a clay, let it dry and see if you can sand it to shape. It is a hassle but I managed to use filler in that way when I did the SU-37.

  • Member since
    June 2007
Posted by Porkbits on Tuesday, February 11, 2014 1:02 PM

Well, I grabbed a pair of tweezers and shoved it into place--nothing bad happened and now it's straight. :-)

OK, that problem taken care of.

Now back to the nose. I sprayed some primer which revealed a lot of ugliness. Hope I can smooth it out.

Dre
  • Member since
    June 2007
  • From: here, not over there
Posted by Dre on Tuesday, February 11, 2014 11:14 AM

Sorry to hear that.  I'd probably just shove it into place and wind up breaking it....

  • Member since
    September 2013
Posted by Dean30 on Tuesday, February 11, 2014 11:13 AM

Would twisting it with tweezers gently so it breaks from the attachment and then putting a drop of glue behind the ip work?

  • Member since
    June 2007
Posted by Porkbits on Tuesday, February 11, 2014 10:02 AM

Thanks, Dre!

Yeah, the IP is slightly askew. For whatever reason, the attachment points at the ends of the consoles (where the panel attaches) in Eduard's resin cockpit aren't aligned, so the IP is crooked. Unfortunately, I didn't see this until later. It's one of things I'm going to look at again before I paint. The IP cover will hide the panel, so not sure it's worth fixing. I had a hard time wrestling the panel into place.

Dre
  • Member since
    June 2007
  • From: here, not over there
Posted by Dre on Tuesday, February 11, 2014 8:39 AM

It does look much better, PB.   Is the IP sitting at an odd angle?

  • Member since
    June 2007
Posted by Porkbits on Sunday, February 9, 2014 8:52 AM

Awesome, thanks, Dean. Appreciate the critique. I know you guys want this to turn out as good as I do.

  • Member since
    September 2013
Posted by Dean30 on Sunday, February 9, 2014 12:12 AM

Much better.

  • Member since
    June 2007
Posted by Porkbits on Saturday, February 8, 2014 7:25 PM

OK, second attempt. I know it's not perfect, but I think it's about as good as I'm going to get the fit with this nose, or might have to be, or I'm going to get hung up on a half-a-millimeter shape issue and not finish the rest of the build. :-)

Hope everyone is having a good weekend,

PB

  • Member since
    June 2007
Posted by Porkbits on Friday, February 7, 2014 7:25 PM

 Wow, tough love intervention! Stick out tongue

But you guys are right--I can make it better. Round 2, let's see what happens…..

  • Member since
    September 2013
Posted by Dean30 on Friday, February 7, 2014 6:35 PM

I was thinking the same thing PB the nose looks good, but a little more work and you could have a great join, use some surface primer to check, as it will stand out big time when you add paint, and you don't want to start painting and realise then man, I say do what Dre said. I know we're constantly saying to go back over this but it will be worth it man, I have faith in you PB!

Dre
  • Member since
    June 2007
  • From: here, not over there
Posted by Dre on Friday, February 7, 2014 4:56 PM

I think that your gonna need to go back and add putty to smooth out the join between the fuselage and nose, PB.   IMO, that's too much of a step to leave untreated.... sorry. (I had the exact same issue on my Su-27B sometime back- the kit nose simply didn't match the fuselage cross section- and I wound up using a ton of putty to smooth out the mismatch).

  • Member since
    June 2007
Posted by Porkbits on Friday, February 7, 2014 3:31 PM

So do I! :-) Thanks for the encouragement, it's helping me to press on through some of these issues.

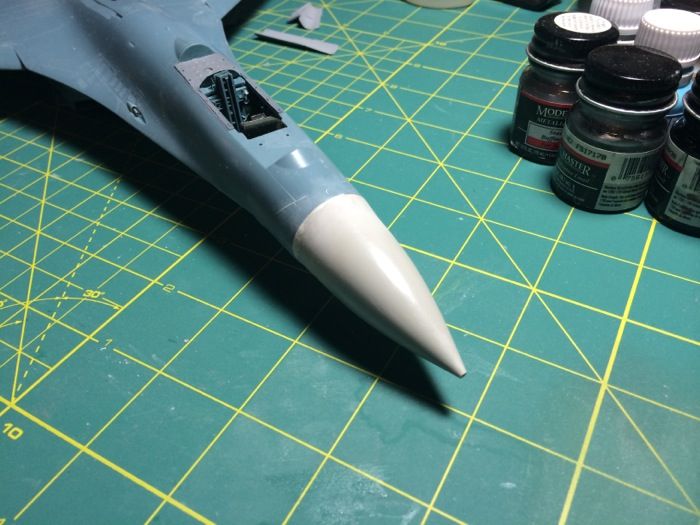
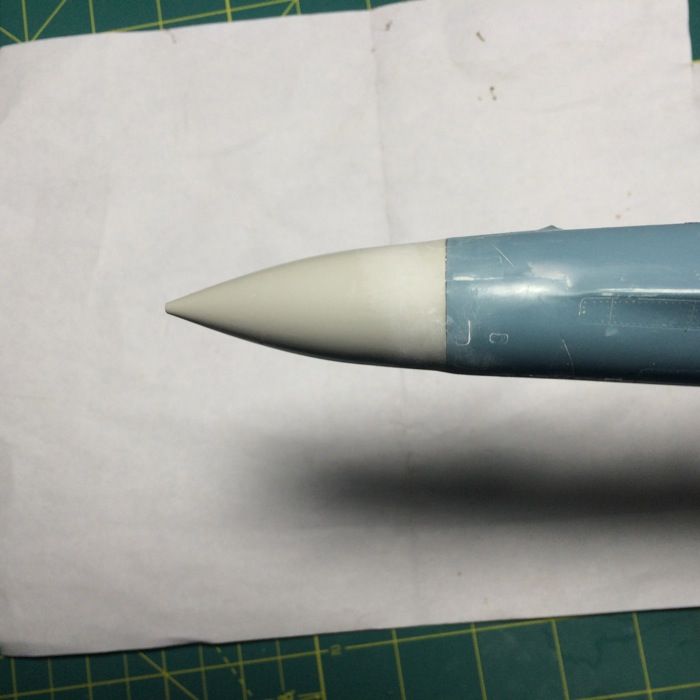
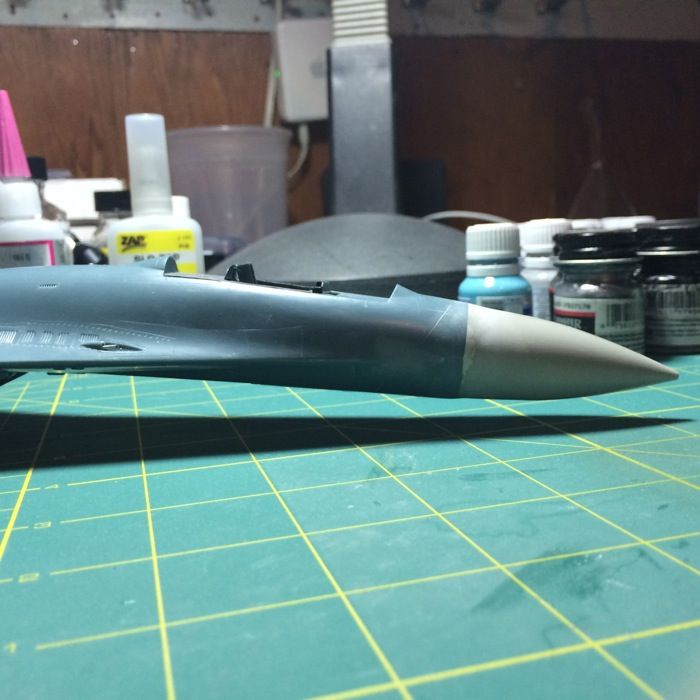
Well, here's what I ended up with after sticking on the Neomega nose (the one that's too small), applying CA, and sanding for about three hours. The fit isn't perfect; if you look closely you can see slight steps at the nose/fuselage join, esp at the bottom (the nose doesn't flow perfectly into the fuselage). But I can live with it--between a compromise between slightly bad join and a nose that is completely the wrong shape (ie, the kit nose), I'll take the former.

Also added a couple of fishing sinkers to make sure she isn't a tail-sitter.

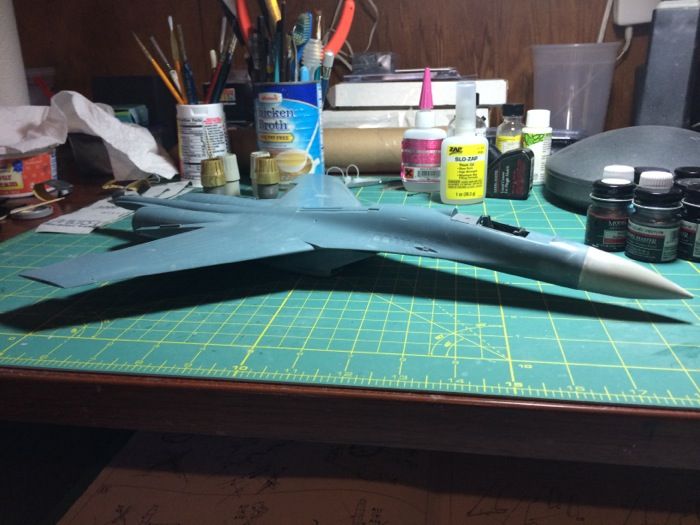
Next--rear wings/stabilizers, then I tackle Eduard's Alamo A and B aftermarket missile set. I'm sure that will offer a whole set of different challenges. :-)

PB

Dre
  • Member since
    June 2007
  • From: here, not over there
Posted by Dre on Friday, February 7, 2014 1:33 PM

I do hope something works out for ya.   I look forward to seeing this one painted up and ready for display.

  • Member since
    June 2007
Posted by Porkbits on Thursday, February 6, 2014 9:37 PM

It does suck, Dre.. :-(

The good news is that I fiddled with the Neomega nose some more and the fit wasn't quite as bad as I originally thought, so I said "F it" and put it on. Fingers crossed that some simple putty/CA will do the trick……

I like the template idea, Dre, thanks for that tip. If the Neomega nose doesn't ending up working, I'll hack it off and try the QB.

Dre
  • Member since
    June 2007
  • From: here, not over there
Posted by Dre on Thursday, February 6, 2014 11:32 AM

Kinda sucks that you dropped that $$ on AM resin that doesn't fit, PB.

I'll second Dean and say go for the larger nose and then spend a ton of time sanding it down.

Since I wet sand resin whenever possible (that dust is nasty) I wouldn't glue down the nose cone for sanding but keep the fuselage close by for constant test fittings.

I would be strongly tempted to make some kind of clearance template based on the fuselage cross section and use that to gauge the shape and size of the resin as I worked it down...

  • Member since
    June 2007
Posted by Porkbits on Wednesday, February 5, 2014 8:45 PM

Got it, that's what I thought. I will have to work up my nerve to attempt. I'm kind of ham-fisted with sandpaper, and I can easily imagine ending up with a hunk of resin that looks nothing like a nosecone. Maybe I'll use white glue as a temporary affixer, so in case something goes horribly wrong, I can just punt and use the kit nose.

  • Member since
    September 2013
Posted by Dean30 on Wednesday, February 5, 2014 6:30 PM

Yeah, it has to have the same look, basically you are scaling down the nose, I would cement the nose and simply follow the shape of the nose and with that continue until the nose is flush, it should not be too hard, but I would not use that misshapen nose considering the work you have put in, look at photos of the real thing, I never use drawings, the most accurate shape you will see is from a photo. If the nose gets a bit rough either change the sandpaper for a finer grit, or if the nose is lumpy use filler to correct the shape.

  • Member since
    June 2007
Posted by Porkbits on Wednesday, February 5, 2014 5:09 PM

Thanks, man. :-)

I thought about that, but I'm worried that I'll just screw up the outline of the nose when sanding it down. I just imagine that I'll sand too much off and the nose-to-fuselage join will be flat all around the nose, or lumpy. Any suggestions on how to keep it even? Is the trick to sand down the whole length of the cone, and not just the area where it joins the fuselage?

  • Member since
    September 2013
Posted by Dean30 on Wednesday, February 5, 2014 4:44 PM

Stick the resin nose on and sand it down, lt will take a while but it will look better considering everything else you have done to this aircraft I think you would be doing yourself a disservice to use the easy option now PB, it's such good work so far, take your time man.

  • Member since
    June 2007
Posted by Porkbits on Wednesday, February 5, 2014 3:43 PM

Aftermarket fail! 

One of the known issues with the Academy kit is the nose, which is too bulbous in the middle. Aftermarket to the rescue! I wanted the Pisco nose, but it seems to have been out of production for some time.

So I ordered the Quickboost replacement:

Too big!

Hm. No problem! I ordred the Neomega replacement from the UK:

Too small! (resin probably shrunk)

So the good news is the kit nose fits JUST RIGHT, but the bad news is that it is the wrong shape. Oh well.

Here's a comparison between the Quickboos and Neomega noses, illustrating the size difference between them:

The saga continues….!

Thanks!

PB

  • Member since
    June 2007
Posted by Porkbits on Thursday, January 30, 2014 5:42 PM

Thanks, Dean!

Sorry for any confusion, Dre. I'm building the Ukrainian bird in the pic, so giving it a base coast of Flanker blue and then the splinter camo.

  • Member since
    September 2013
Posted by Dean30 on Thursday, January 30, 2014 5:25 PM

That is some fine work on the landing gear, looks superb!

  • Member since
    June 2007
Posted by Porkbits on Thursday, January 30, 2014 4:21 PM

Ha--thanks, Dre. The door is nothing more than this…..

Dre
  • Member since
    June 2007
  • From: here, not over there
Posted by Dre on Thursday, January 30, 2014 3:30 PM

Those wheels look great, PB, but the flash of Flanker Blue on that nose gear door has me more intrigued...  

  • Member since
    June 2007
Posted by Porkbits on Thursday, January 30, 2014 2:37 PM

Hey, guys:

In the midst of the main gear. The Eduard wheel set is really nice, highly recommended. I added my own hydraulic line detail using fly fishing lead wire (saw this tip on another forum). Man, I love this stuff! Bend easily into shape, cuts like paper, and glues well with CA. Even sprayed a bit of the base color on the nose landing gear door, which only gets me anxious to paint the airframe. But for now, I push on through the sub-assemblies. :-)

Hope everyone is well.

PB

  • Member since
    February 2003
  • From: Rothesay, NB Canada
Posted by VanceCrozier on Tuesday, January 21, 2014 5:56 PM

They're almost too nice to throw paint at. :(

On the bench: Airfix 1/72 Wildcat; Airfix 1/72 Vampire T11; Airfix 1/72 Fouga Magister

  • Member since
    June 2007
Posted by Porkbits on Tuesday, January 21, 2014 5:55 PM

Thank you, Vance! :-)

I'm trying to fiddle my best, since the Flanker and this kit are worthy of it.

Dreading painting those burner cans. I'd hate to screw them up with a bad paint job. Gulp. So as mentioned, I'll be leaning on you guys for Alclad help when I reach that point. Have never used it.

JOIN OUR COMMUNITY!

Our community is FREE to join. To participate you must either login or register for an account.

SEARCH FORUMS
FREE NEWSLETTER
By signing up you may also receive reader surveys and occasional special offers. We do not sell, rent or trade our email lists. View our Privacy Policy.