SEARCH FINESCALE.COM

Enter keywords or a search phrase below:

Complete: 1/72 Fiat CR.42 / Swedish J11

5267 views
13 replies
1 rating 2 rating 3 rating 4 rating 5 rating
  • Member since
    November 2009
  • From: SW Virginia
Posted by Gamera on Monday, January 20, 2014 8:26 AM

Wow, looks great Vance! Love the red cowling and spats, and despite your problems with the whitewash I love how it came out in the end.

"I dream in fire but work in clay." -Arthur Machen


  • Member since
    February 2003
  • From: Rothesay, NB Canada
Posted by VanceCrozier on Monday, January 20, 2014 8:15 AM

This one is a REALLY nice kit overall, good detail, 6 solid markings options, the only build issue was really my lack of experience with biplanes. The forward cowling in 2 pieces is a bit of a head-scratcher but certainly no deal-killer. Recommended!

On the bench: Airfix 1/72 Wildcat; Airfix 1/72 Vampire T11; Airfix 1/72 Fouga Magister

  • Member since
    November 2003
  • From: Naples, FL
Posted by tempestjohnny on Monday, January 20, 2014 7:23 AM

Very nice. Some Italeri kids are so nice and others are a bear


  • Member since
    December 2009
  • From: West Chester,Ohio
Posted by roger_wilco on Monday, January 20, 2014 7:17 AM

A unique and very cool scheme! Awesome build Vance!

"Build what YOU want, the way YOU want, and above all have fun!" - RIP Modeler Al. 

  • Member since
    March 2003
  • From: Canada
Posted by dogsbody on Sunday, January 19, 2014 7:40 PM

I'm liking this.

"What young man could possibly be bored
with a uniform to wear,
a fast aeroplane to fly,
and something to shoot at?"

  • Member since
    February 2003
  • From: Rothesay, NB Canada
Posted by VanceCrozier on Sunday, January 19, 2014 7:03 PM

$5USD worth of quarters verifying that my wings are properly spaced after having the 4 central braces added. Letting that set a bit before handling again this evening.

Posted Image


Posted Image

Posted Image

Annnnnnd the spots that'll be harder to hide, dead-centre in the pics:
Posted Image

Second pic is kinda blurry, same deal as on the other side.
Posted Image

So - a crop of CA in the mounting hole, a drop at the spot where the strut actually makes contact now, some touchup paint.

That air inlet along the bottom, HAS only one way to slot in there, so I put that on ahead of the undercarriage. When I went to add those gear braces... mis-aligned? Tilted it, glued it, let it set & (after this pic) sanded down the bump & filled in the gap. Weird. Blaming that on the lizard too.
Posted Image

Took the pic, THEN realized I haven't yet added the manufacturer's badges to the prop blades.
Posted Image

I see a little touchup is required on that exhaust stub.
Posted Image

Posted Image

On the bench: Airfix 1/72 Wildcat; Airfix 1/72 Vampire T11; Airfix 1/72 Fouga Magister

  • Member since
    February 2003
  • From: Rothesay, NB Canada
Posted by VanceCrozier on Sunday, January 19, 2014 7:01 PM

OK, so, recap time. Krylon ultra-matt for the primer. Tamiya acrylics for the topside Italian-style camo colours. sealed up with Future, decals applied. Decals sealed with another coat of Future. Decals masked with GOOD poster-tac, from Germany. One application of hairspray. Thin patches/streaks & overall dusting using Tamiya flat white with a drop of buff...

Problem #1 - don't think I used enough hairspray? Or maybe I pussed out on scrubbing any harder, afraid that I'd damage the whole thing somehow??

Problem #2 - apparently, my sealing coat of Future missed a spot.  (Good news, it was NOT one of the roundels.)

Yep, the last bit of putty I removed looked like this:
Posted Image

Meaning the "9" now looks like this:
Posted Image
I'll dig around, I've gotta have some black digits from something that I can assemble the missing pieces with.

Happy with the overall effect so far, even without the hairspray thing having much effect. I'm calling this a late-winter application that has started to wear allover. Some streaking & highlights with the weathering pastels should help, and allow me to get in closer to the markings on the fuselage as well.
Posted Image

OK, so this was the situation after all the masking putty came off. All decals survived except one of the "9"s. Bothersome, but at least I don't have to replace/repair a "" tre kronor.

Posted Image

Airfix decals to the rescue! (wait, did that *** just say Airfix decals to the rescue?) YES!! Airfix decals to the RESCUE!!!!

Posted Image

Took one of the "0"s from 004, snipped it into corners that I could use to complete the digit:
Posted Image

The tail on the newly rebuilt 9 is a touch long, I touched it up with a dab of the sand paint.

On the bench: Airfix 1/72 Wildcat; Airfix 1/72 Vampire T11; Airfix 1/72 Fouga Magister

  • Member since
    February 2003
  • From: Rothesay, NB Canada
Posted by VanceCrozier on Sunday, January 19, 2014 6:58 PM

Yellow tips painted on the prop blades:
Posted Image

The skis, painted metal in this case from what I've seen, have been painted in Testors enamels, 7parts flat white, 1 part aluminum. Should give them a slightly different sheen than the full-on flat white. (the actual attachment plate area will be getting dirty aluminum.)
Posted Image

Humbrol flat red is my favourite for most "military red" applications, good colour depth without looking like a race car.
Posted Image

Second coat of Model Master "duck egg blue" applied by brush. Still slightly streaky - perfect, weathering already started!
Posted Image

Annnnnnd.... DECALS!! I pulled "white 8" from the Special Hobby Seversky sheet, assuming it was a safe number. I couldn't have gone double-digits on this one anyway as the 8 barely fits on the rudder. Still need to add the smaller 8s to the cowling and the underside roundels. Other than the digits, all decals are straight off the Italeri sheet. Thicker compared to the Special Hobby decals, but they seem to behave just fine.
Posted Image

Roundels on the wing undersides and ID#s on the cowling. Future coated various bits & pieces. Brush-painted the small yellow panel near the tail on the underside. Cleaned up the struts etc but left them attached to the sprue at one point, so I don't lose track of which part # each is. Gave them a first brush-coat of the duck egg blue.

Posted Image

Red spinner + spats hit with a coat of Future...

Posted Image

Engine not installed yet, just dry-fitting the cowling. (same with the spats)

Posted Image

On the bench: Airfix 1/72 Wildcat; Airfix 1/72 Vampire T11; Airfix 1/72 Fouga Magister

  • Member since
    February 2003
  • From: Rothesay, NB Canada
Posted by VanceCrozier on Sunday, January 19, 2014 6:56 PM

Green spots only:
Posted Image

Green + brown spots:
Posted Image

Green + brown spots + future:
Posted Image

On the bench: Airfix 1/72 Wildcat; Airfix 1/72 Vampire T11; Airfix 1/72 Fouga Magister

  • Member since
    February 2003
  • From: Rothesay, NB Canada
Posted by VanceCrozier on Sunday, January 19, 2014 6:56 PM

Snipped & sanded & new prop shaft attached...

Posted Image

OK, it's official, skis with spats it will be. need to fill a couple of ejector pin marks tonight before I can paint the red. The "axle holes" on the skis have been trimmed a bit to let the spats drop down close enough. Will likely add a bit of sprue to strengthen the join.

Posted Image

Tamiya Desert yellow on upper surfaces:

Posted Image

Tamiya NATO green splotches freehanded, they look greener in person.

Posted Image

This also doubles as an exercise to see how happy I'd be with these colours & freehanding an Italian "splotch" camo. ;)

Posted Image

MM Duck Egg Blue for the undersides.

Posted Image

On the bench: Airfix 1/72 Wildcat; Airfix 1/72 Vampire T11; Airfix 1/72 Fouga Magister

  • Member since
    February 2003
  • From: Rothesay, NB Canada
Posted by VanceCrozier on Sunday, January 19, 2014 6:54 PM

Well... it's been generic up until now. THEN I snipped off the tailwheel & added the skid.

Posted Image

Landing gear bits snipped, & cleaned up, ready to be assembled. Manny, I tried the full spats with no luck, but it was too late in the evening for my brain to fully process. I'll check around for more refs and see if I can make it work. If nothing else, I can paint the upper portions of the landing gear in red to match the ID numbers.

Posted Image

Four-part cowling bits + upper wing + upper fuselage with primer. Too "putty", not enough "sand" for my plan of show-thru Italian camo. Think I'll be giving this another thin coat. I do have some Tamiya Sand in the stash, will probably use that.

Posted Image

Kit landing gear assembly as supplied looks sorta like the upper section of the spats assembly, with the actual wheel fairing portion removed:
Posted Image

Here's the ski with the full spat - pin & hole don't line up.
Posted Image

Annnnd the mount on the ski seems a little wide, so I may need to add a little shim, or do a little thinning on the attachment point.
Posted Image

On the bench: Airfix 1/72 Wildcat; Airfix 1/72 Vampire T11; Airfix 1/72 Fouga Magister

  • Member since
    February 2003
  • From: Rothesay, NB Canada
Posted by VanceCrozier on Sunday, January 19, 2014 6:51 PM

Really good detail on all the parts to be honest, the little bit of flash to deal with is hardly worth mentioning..
Posted Image

The engine in particular looks really good.
Posted Image

Nicely flattened wheels.... into the spares box!
Posted Image

Because I'll be using the skis! (Also a pair of nicely done small anti-personnel bombs)
Posted Image

Cockpit parts really nicely done.
Posted Image

Oh, and shortly after I unwrapped the box, I spotted this on the floor:
Posted Image

Not a gun muzzle? But it has a slight hollow on one end? Same colour plastic as the Italeri kit. I held onto it just in case.

And a good thing I DID hold onto it, because... it's part of the exhaust ring assembly. Will need to glue it on before going any further. "Red leather" base will be followed up with some metallic washes to give me my rusty/burnt metal look.

Posted Image

Annnnnnnd - cockpit before getting closed up.

Posted Image

I even used the decal seatbelts. As far as I can tell the Swedes replaced the Italian-style chain-belts with their own, and there won't be a great deal visible through the cockpit opening.

Posted Image

Posted Image

It'll get a quick shot of dullcoat this evening & fuselage halves can be closed up.

On the bench: Airfix 1/72 Wildcat; Airfix 1/72 Vampire T11; Airfix 1/72 Fouga Magister

  • Member since
    February 2003
  • From: Rothesay, NB Canada
Posted by VanceCrozier on Sunday, January 19, 2014 6:49 PM

Build pics for those interested:

The wife was flipping through a book I got for Christmas and suggested I build something white, as, apparently, "everything you build is green".

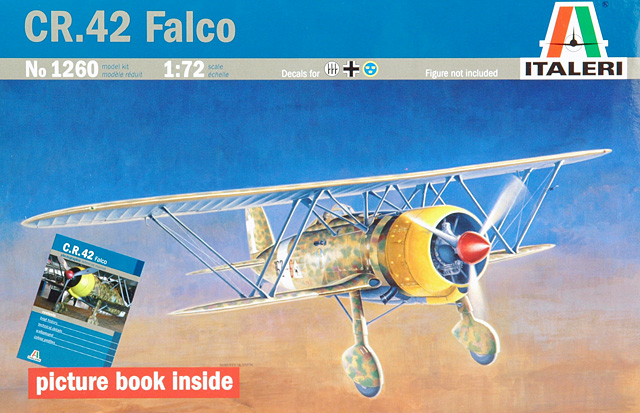
The box:
Posted Image

Posted Image

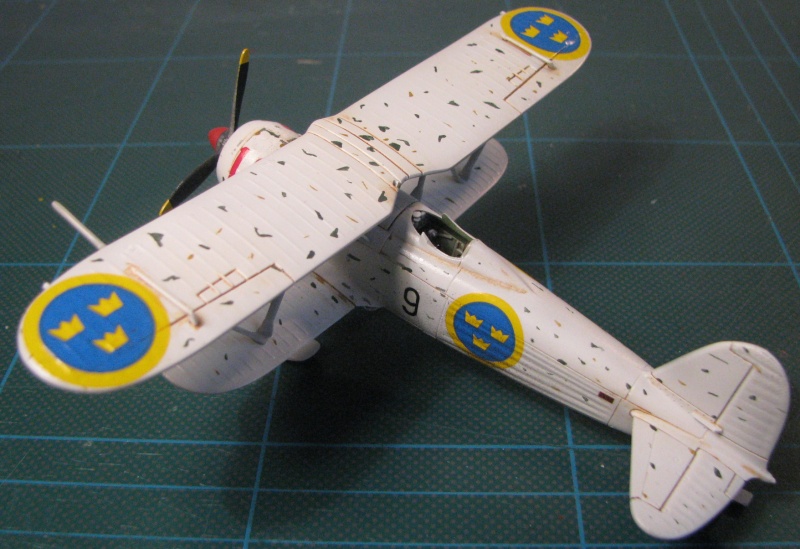
I'll be building a white-washed Swedish J-11 with skis. Found some pics of a complete model that was BUILT pretty good:
Posted Image

That was too white though, I don't like how he did the camo show-through, it looks sorta like a splinter pattern? The look SHOULD be standard Italian delivery colours, overpainted. (the colour plate inside the kit box also looks kinda goofy, if you ask me, and shows green-over-green as the show-through??)

I was going for something more like this:
Posted Image

Included reference book & really nice decal sheet. Of course I'm going with the Swedish machine, but all of the schemes are interesting.
Posted Image

One upside with a biplane... windscreen & a pair of lights...
Posted Image

The sprues, a lot of parts here are taking care of the various options & will be bagged up & dropped in the spares box.
Posted Image

Posted Image

On the bench: Airfix 1/72 Wildcat; Airfix 1/72 Vampire T11; Airfix 1/72 Fouga Magister

  • Member since
    February 2003
  • From: Rothesay, NB Canada
Complete: 1/72 Fiat CR.42 / Swedish J11
Posted by VanceCrozier on Sunday, January 19, 2014 6:37 PM

The first completion of 2014, Italeri's 1/72 Falco, with markings for a Swedish-service J11. Thanks to fermis, this was a Secret Santa kit, the guy made a good call. Very nice kit right out of the box, including well-printed decal options for 6 machines. (considering picking up another & building the nightfighter). The only fit issue was of my own doing, the rear of the upper wing lifted as I was assembling the various struts, so the forward attachments were fine but I had to do a little repair to the others.

There was one glitch on the decal sheet for the Swedish option though, with not enough numerals provided to apply digits to the cowling AND tail. I couldn't find any references that showed anything other than the typical cowl+tail combo, so I raided the spares and pulled "white 8" from the sheet from Special Hobby's Seversky P35. Following a colour plate I spotted online I went with full spats painted red to match the spinner. (Rivet counters MAY be able to de-verify this option, but I had been given clearance by a certain undead Field Marshall)

I applied the full "delivery camo" of overall sand + green and maroon splotches, then oversprayed the whitewash.

Posted Image

Posted Image

Posted Image

Posted Image

Posted Image

Posted Image

Posted Image

Posted Image

Posted Image

Posted Image
Welcome to the "Swedish Embassy"  ;)
Posted Image

On the bench: Airfix 1/72 Wildcat; Airfix 1/72 Vampire T11; Airfix 1/72 Fouga Magister

JOIN OUR COMMUNITY!

Our community is FREE to join. To participate you must either login or register for an account.

SEARCH FORUMS
FREE NEWSLETTER
By signing up you may also receive reader surveys and occasional special offers. We do not sell, rent or trade our email lists. View our Privacy Policy.