SEARCH FINESCALE.COM

Enter keywords or a search phrase below:

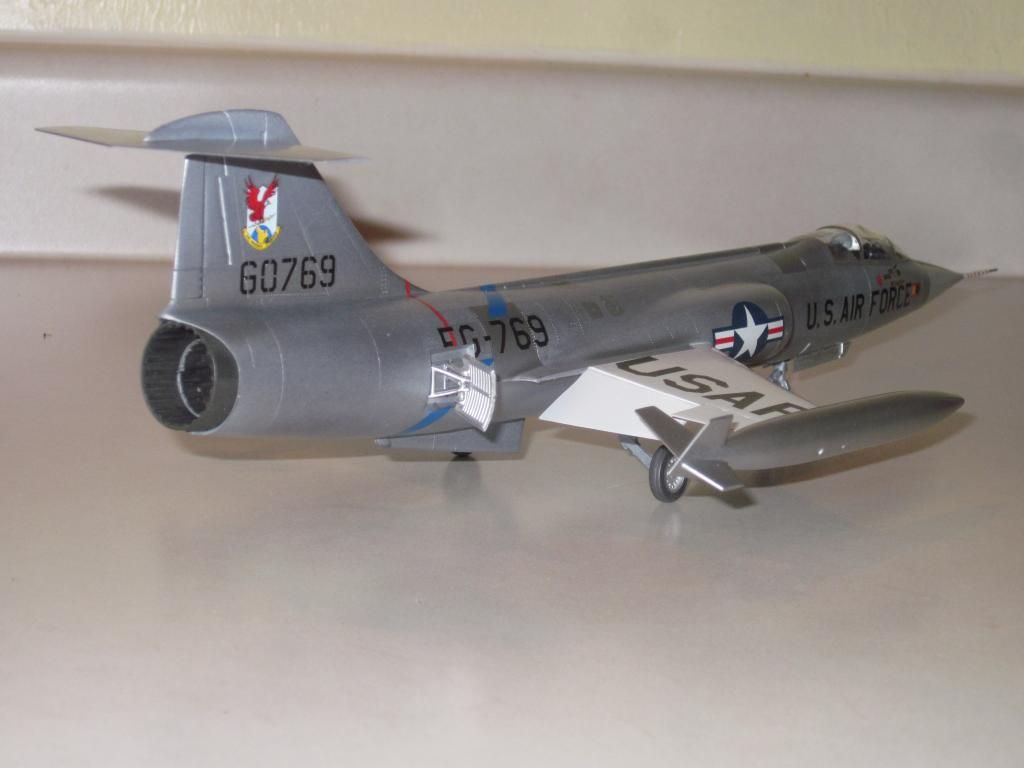
Finished: 1/48 Revell F-104 Hamilton AFB

1870 views
7 replies
1 rating 2 rating 3 rating 4 rating 5 rating
  • Member since
    February 2003
  • From: Green Bay, WI USA
Finished: 1/48 Revell F-104 Hamilton AFB
Posted by echolmberg on Saturday, August 2, 2014 10:25 PM

Hi everyone!

Okay, here it goes.  I'm primarily a prop guy so all this "jet" stuff is new to me.  Here is Revell's 1/48 F-104 with aftermarket decals for a bird stationed out of Hamilton AFB in Novato, CA.  My dad lived on the base as a kid.  My grandfather was a machinist there and my dad and his friends dug ditches to lay electrical wiring for runway lights when he (my dad) was a teenager.  My dad tells me stories of watching the F-104s and F-101s taking off.  The concussions from their afterburners would knock all the dirt they dug out of the ditches fall right back into them!

This model is going to go to my dad when I visit him in August.  It is finished with Model Master gloss white enamel for the wings.  The fuselage is a combination of Floquil Old Silver and Silver Mist.  Also, just to see how, or even if, it would work, I used some silver decal sheets from which to cut out some small "panels".  When you see the pictures, practically all of the differently shaded panels are from the silver decal film. 

After all was said and done, I applied a coat of clear metalizer sealer on the kit.  Interestingly enough, it actually reduced the contrast between the Floquil silvers and the silver decals.

One last thing, I know I kind of botched up the fuel tanks.  Each tank had a strake on it that is supposed to go OVER the wing tips.  However, when I glued the tank halves together, I mismatched them.  That being said, the strakes are actually under the wing rather than above. 

I also know that the leading edge slats should be deployed when the flaps are down but I have a couple of thoughts on that.  First, I tried something I've never done before when it comes to cutting out the flaps.  I used sewing thread.  I looped a length of it across my Flex-i-File and used it like a coping saw.  Holy cow!  That sewing thread cut through the plastic like a hot knife through butter!  As for not dropping the leading edge slats, I have nothing to blame but my own laziness.  Next time, I'll score under the slat hinge and droop the slats.  I think I just wanted to get the model done at that point.

So have at it, guys!  I'd love to hear the constructive criticisms!  Don't hold back.  I'm new to the jet scene so I'd love to hear what I did right and wrong so I'll know for next time.

Thanks!

Eric


  • Member since
    July 2004
  • From: Sonora Desert
Posted by stikpusher on Saturday, August 2, 2014 11:16 PM

Clean and pretty! Nice!


F is for FIRE, That burns down the whole town!

U is for URANIUM... BOMBS!

N is for NO SURVIVORS...

       - Plankton

LSM


  • Member since
    September 2005
  • From: North Pole, Alaska
Posted by richs26 on Saturday, August 2, 2014 11:57 PM

Using string or dental floss to cut plastic is a neat trick when applied to the modeling world.  Plumbers and electricians have used it for years to cut plastic pipe and conduit.  Thanks for bringing it up.  I will use it to cut apart my 1/72 Airfix A6M2  to make PO Koga's Zero as it was sitting on the dock at Dutch Harbor ready to ship out to the 48 States.  And great job on the F-104 by the way.

WIP:  Monogram 1/72 B-26 (Snaptite) as 73rd BS B-26, 40-1408, torpedo bomber attempt on Ryujo

Monogram 1/72 B-26 (Snaptite) as 22nd BG B-26, 7-Mile Drome, New Guinea

Minicraft 1/72 B-24D as LB-30, AL-613, "Tough Boy", 28th Composite Group

  • Member since
    November 2003
  • From: State of Mississippi. State motto: Virtute et armis (By valor and arms)
Posted by mississippivol on Sunday, August 3, 2014 5:29 PM

Nice!

  • Member since
    August 2009
  • From: Borlando Fla home of the rat
Posted by TREYZX10R on Sunday, August 3, 2014 7:44 PM

Great looking Star fighter Eric,I'm sure your Dad is going to be pleased with it!

  • Member since
    February 2003
  • From: Green Bay, WI USA
Posted by echolmberg on Monday, August 4, 2014 8:25 AM

Thanks guys!  It was a fun little kit to build.  For someone like me with so very little time to dedicate to model building, this "old" Revell kit fit the bill perfectly.  It didn't have a high parts count.  The seams were perfectly manageable.  The fit was very good and straightforward with no issues at all.

Since I'm far from being an F-104 expert, I can't speak for its accuracy but whether it's good, bad or otherwise, it made for a fun kit to build.  It looks so different to ahve this big silver needle sitting next to my collection of Corsairs, Mustangs, Thurderbolts, etc.

Eric

  • Member since
    February 2003
  • From: Cameron, Texas
Posted by Texgunner on Monday, August 4, 2014 1:07 PM

"The missile with a man in it"  

Eric, that's a very nice 104!  You done good.Big Smile  It looks fast just sitting there...Beer

Gary


"All you mugs need to get busy building, and post pics!"

  • Member since
    June 2004
  • From: 29° 58' N 95° 21' W
Posted by seasick on Monday, August 4, 2014 1:53 PM

Lawn Dart!

Toast

Chasing the ultimate build.

JOIN OUR COMMUNITY!

Our community is FREE to join. To participate you must either login or register for an account.

SEARCH FORUMS
FREE NEWSLETTER
By signing up you may also receive reader surveys and occasional special offers. We do not sell, rent or trade our email lists. View our Privacy Policy.