SEARCH FINESCALE.COM

Enter keywords or a search phrase below:

Hobby Boss 1/48 ME 262A -A1 build started

3864 views
20 replies
1 rating 2 rating 3 rating 4 rating 5 rating
  • Member since
    November 2011
Hobby Boss 1/48 ME 262A -A1 build started
Posted by 70gtvert on Friday, February 27, 2015 4:11 PM

After knocking out 3 BF109's since Christmas (1/24, 1/32 & 1/48) i am changing it up a little. Built the old Monogram 262 years ago and did not like the raised panel lines, but it came out good enough I didn't decide to replace it till now. Working on the cockpit and inner fuselage now. Using a Edwards Photo-etch set for the dash, controls and seatbacks. Made a seat pad from sculpty.

  • Member since
    December 2002
  • From: Bury St Edmunds, Suffolk, England
Posted by Bish on Friday, February 27, 2015 4:14 PM

Nice start there, great looking pit.

I am a Norfolk man and i glory in being so


On the bench: Airfix 1/72nd Harrier GR.3/Fujimi 1/72nd Ju 87D-3

  • Member since
    August 2013
Posted by Jay Jay on Friday, February 27, 2015 4:42 PM

Man that seat pad looks so realistic, great job


 I'm finally retired. Now time I got, money I don't.

  • Member since
    November 2011
Posted by 70gtvert on Saturday, February 28, 2015 11:28 AM

So after extensive research, I see that RLM66 can be multiple shades based on who interprets it, hence the photoetch being a darker tone then the Testors RLM66 I used to paint the tub. Going to live with it rather then tear it apart and repainting. This thing fits together tightly. Dry fitted the tub in the fuselage and it is one tight fit. had to remove paint off some tabs to get it to fit well. Also, my research has turned up the fact that those beautiful panel lines and rivets were only present durring assembly as at the end they filled them with putty and sanded smooth prior to paint. So bye-bye nice panel lines. I could not find anything that showed they did the same to the wing,although this kit has some incorrect panel lines on it that I will post down the road as I assemble and correct them. Decided to put in some extra detail but not tons of it. Just enough to make it look better. Any suggestions or tips from those who built this kit already/

  • Member since
    January 2015
  • From: Indiana USA
Posted by BlackTulip109 on Saturday, February 28, 2015 11:28 AM

Outstanding!!!!!

  • Member since
    June 2014
Posted by BrandonK on Saturday, February 28, 2015 11:36 AM

I'm curious how this HB kit will build up. I have an F6 I'm gonna start on and I want to have a heads up on HB kits in general. Looking good so far, keep at it.

On the bench:

A lot !! And I mean A LOT!!

2024 Kits on deck / in process / completed   

                         14 / 5 / 2  

                              Tongue Tied

  • Member since
    November 2011
Posted by 70gtvert on Monday, March 2, 2015 1:32 PM

Worked a little on detailing the wheel wells since they are so wide open. The rear bulkhead has lightening holes molded in. They were open and just on the other side was a solid bulkhead. I drilled out the holes that were supposed to be open and then put a backer sheet of plastic painted aluminum behind it. Provides some depth like the prototype. Speaking of aluminum, I sprayed the interior aluminum and then a light overspray of RLM 02 as research shows that at that time they had limited supplies of paint and also that the paint was not a priority, hence down the road where more and more "completed" 262's had a natural finish supplemented by the filled in seams.

I used various sizes of plastic to make some shapes that are predominant in the wheelwell but not included with the kit. Also used various sizes of wire to replicate hydraulic and other assorted lines that are also easy to see in the wheelwell. The wiring was made from stretched spru that was about a hairs width in diameter. Once you put the fuselage half's      together with the lower wing, all looks pretty close to the real thing.

  • Member since
    December 2002
  • From: Bury St Edmunds, Suffolk, England
Posted by Bish on Monday, March 2, 2015 1:33 PM

Looking real good. really nice work in the wheel bay.

I am a Norfolk man and i glory in being so


On the bench: Airfix 1/72nd Harrier GR.3/Fujimi 1/72nd Ju 87D-3

  • Member since
    June 2013
Posted by RobGroot4 on Tuesday, March 3, 2015 3:31 AM

That stretched sprue looks just like actual wire to me.  I've never been able to stretch sprue, most impressive.

Groot

"Firing flares while dumping fuel may ruin your day" SH-60B NATOPS

  • Member since
    February 2007
  • From: Brunswick, Ohio
Posted by Buckeye on Tuesday, March 3, 2015 11:15 AM

Nice work there!

Mike

  • Member since
    February 2003
  • From: Cameron, Texas
Posted by Texgunner on Tuesday, March 3, 2015 4:42 PM

The scratch built details look great!  Gonna turn out nice I bet.  Keep us up to date!Yes

Gary


"All you mugs need to get busy building, and post pics!"

  • Member since
    November 2011
Posted by 70gtvert on Wednesday, March 4, 2015 12:45 PM

Working on buttoning up the fuselage. Did the nose cannons and glued the halves together. Then the painful part......filling the fuselage seams and rivets...or most of them. Some love them too much but they wer filled in on completed aircraft and no matter how nice they are I'm not gonna leave them just because they are on the kit. My references show that a lot of the nose did not have seams filled in as they need access to the weapons. However, I don't like the fit so I'm going to work a bit more on the nose. I'm only    opening on gun bay door. The other was too short, I had to use some sheet stock to shim it as can be seen in the photo.

  • Member since
    November 2011
Posted by 70gtvert on Friday, March 6, 2015 1:45 PM

Went to place the fron canopy on, it was wrapped in foam so figured it would be alright....nope, cracked. Squadron is sending me a replacement but that may take weeks. I also bought another kit off E-bay, so whatever comes in first gits to be used. At this point I have all the panel lines and rivets that were filled in on the actual warbird filled in on the kit. So now it's as smooth as as silk except where the prototype had panels that were opened a lot. Since the canopy has me at a standstill with the fuselage (it's ready for paint otherwise) I will build and detail the landing gear. The engines are just pressed fit in place for the pics. For those interested in Hobby Boss kits my feelings to date are it's not a bad kit, parts fit very well, but it seems they will add detail such as the panel lines and rivets that were not present on the actual aircraft, however I've heard Tamiya took the same liberty with their 262 kit.

  • Member since
    January 2015
  • From: Indiana USA
Posted by BlackTulip109 on Tuesday, March 10, 2015 8:32 AM

Been really liking Hobby Boss these days as they are nice fitting kits not a lot of parts and look good and the prices are nice too

  • Member since
    November 2011
Posted by 70gtvert on Wednesday, May 13, 2015 4:21 PM

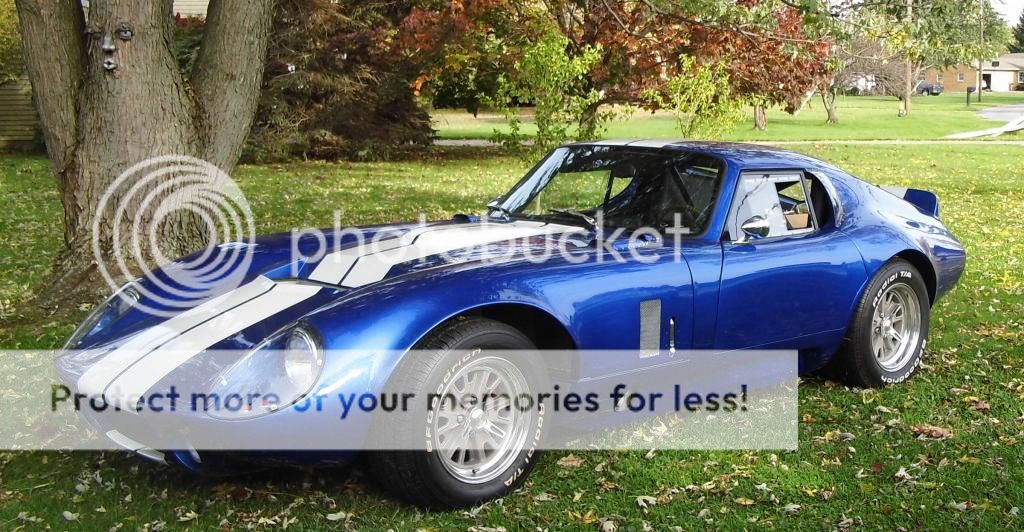
It's been a while but spring yard and house work takes precedence over model building over the spring and summer and in the summer my 1 to 1 scale model 65 Daytona Coupe will finally get the final bits done this summer, I hope. I tried Pledge floor care, never did before. Seemed to work okay. Decals laid down fine and even had the same gloss. Then when I went with a satin finish ( I couldn't find too many pictures of 262's that didn't look fairly freshly built) the decals took on a flat finish to the aircraft semi-gloss. So next I shot the whole thing with gloss and then tries the semi gloss again. This time the decals came out semi-gloss but the left a faint look as though the paint on them were pulling away from the paint on the plastic. What gives. Also all that extra paint work left too much paint on the finished product for my tastes. Oh well. Open to suggestions.

  • Member since
    January 2014
Posted by Offduty on Wednesday, May 13, 2015 4:53 PM

Turned out great love the weathering

  • Member since
    February 2003
  • From: Cameron, Texas
Posted by Texgunner on Wednesday, May 13, 2015 11:34 PM

Very nice Stormbird!   Man, I would love to see some pics of your Daytona Coupe; my 33 year old son (a gifted mechanic) and I have often talked about what a great project that would be.  Factory Five I assume?  I think their full package deal is a great bargain too.  Could you tell us more about that, and maybe some pics?   I'm somewhat fascinated by them (I guess that's obvious, no?)Big Smile

best regards, Gary


"All you mugs need to get busy building, and post pics!"

  • Member since
    January 2015
Posted by BrandonD on Thursday, May 14, 2015 12:33 AM

I like it! I think it came out really well, and it's good to see one of those being built, as I'd like to add a 262 to my collection at some point.

Did you have to weight the nose, or does it sit correctly on its own?

-BD-

  • Member since
    November 2011
Posted by 70gtvert on Thursday, May 14, 2015 9:09 AM

The nose is weighted via the nose wheel well which has both a plastic or metal option. I was looking at an old (2012) scale modeler magazine review on it and had I read it first I would not have bought I as I had the same fit issues they noted. On the real 262 the seams on the fuselage and top of the wings and tail were puttied and tapped over so you don't see them. But people seem to like those details even if incorrect and build it accordingly. I kind of rushed mine in the end an noted a few flaws I missed. Oh well. life goes on.

The Factory Five Daytona Coupe comes in two ways, one where you use a donor Fox body Mustang to supply the running gear and the other is called a "complete kit" that is not all that complete. It still requires you to come up with a rear end, transmission, drive shaft, engine, wheels and tires and a few other small odds and ends. I went with the donor kit and in 2010 it was $16,999. That gets you a tubular frame with a fiberglass body sitting on it and 13 boxes of parts. Most everyone can eventually get through the mechanical aspect of the build, its the body work that can throw them a loop. All the fiberglass panels are molded oversize so you have to trim to fit, or add extra material in other locations, all in all this can take as long as the mechanical aspect did, and if you aren't capable of it, your going to have to pay some one to do it an that can cost as much as the total kit cost did in the first place.
  • Member since
    February 2003
  • From: Cameron, Texas
Posted by Texgunner on Thursday, May 14, 2015 9:24 AM

That is fantastic!   Thanks for the pics and the info.   Did you have any trouble deciding on a color scheme; I'd think it would be tough to choose any other than the one you have.  Bravo!  The first time you fired her up and drove off under power must've been thrilling.  Wow, just wow.  i can't tell you how impressed I am!!   Now, that's a model!Bow Down

Gary


"All you mugs need to get busy building, and post pics!"

  • Member since
    January 2015
Posted by BrandonD on Thursday, May 14, 2015 2:53 PM
Thanks for the info.

Also, that Factory Five is NICE! I've got a '66 Mustang Coupe I restored with my dad, and we looked at doing a FF Cobra, but opted instead to save the money and maybe put a 331 or a 347 in the Mustang at some point.

Love that Daytona!

-BD-
JOIN OUR COMMUNITY!

Our community is FREE to join. To participate you must either login or register for an account.

SEARCH FORUMS
FREE NEWSLETTER
By signing up you may also receive reader surveys and occasional special offers. We do not sell, rent or trade our email lists. View our Privacy Policy.