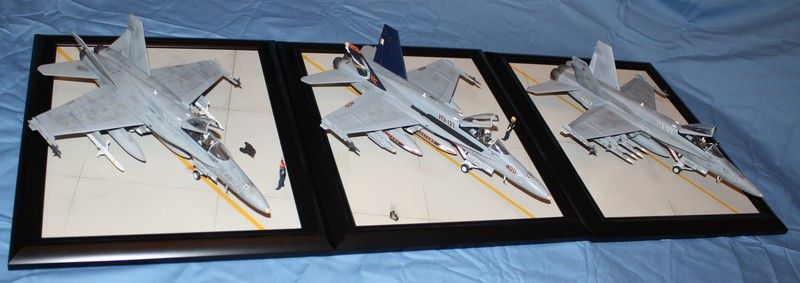
This is a project that had been in my head for over a decade, and I actually started it about 2 years ago now. Courtesy of life, a move, and other projects it took a little while. The subject is the squadron that my dad got to command shortly after Desert Storm in the mid-90's. The kits are 3 Revell 1/48 F/A-18C's, each has a legends cockpit and Hasegawa ordnance and ground crew. I also added some Eduard placards, scrounged up some PE for the HUD frames and cut out some thin clear plastic for the HUD glass (then I found the flimsy clear sheet included for the HUDs, DOH!).
The intent is that this would be 3 aircraft on the ramp at NAS Fallon loaded for a SEAD (suppression of enemy air defense) training mission. I did query dad on loadouts. A section of 3 is a little unusual as is an 8-pack of AMRAAM (AIM-120) but it works (theoretically).
The kits themselves lack some accuracy, though they aren't terrible. They also represent the early legacy Hornets (the white antenna on top is vertical and short vice longer and swept back, among other things). With a little TLC though, they can make pretty nice birds, and I wasn't overly hung up on rivet counting.
Each aircraft is mounted on a picture frame so that they can be wall-mounted. For the tarmac I used 1/4" ply covered with wall spackle (for filling nail holes) that I sanded. I then used google earth and printed out overhead shots of the Fallon flightline and adjusted the size and manner of the concrete squares as well as the ramp lines. Fallon has unique lines (they are generally yellow with black borders or dual yellow with a black strip in the middle, Fallon's are just a single yellow line) that are at an angle, vice side by side like most Navy bases. Once the spackle was dry I carved the lines in with my pin vise and a framing square. I then painted and stained and painted some more. The aircraft themselves are held on with super glue and fishing line.
Apologies for the poor photography. My wife left behind a pretty nice camera when she left town for the weekend, so I can't even blame the equipment 


This decal below was a huge pain. The set I had (I ended up with 3) had the entire vertical stabilizer in one big decal, the blue, the orange, all of it. Due to the size, it didn't want to settle real well, so I tried several applications of Micro Sol. That just cracked the thing. So, after getting some great advice from forum members, I carefully cut out the white, orange, and yellow parts and applied the section of the decal over the kit part which I had painted Tamiya blue. Worked like a charm!


I had a LOT of firsts on this build. I opted for custom decals for the names on the aircraft and the ones on the helmets. First time I had made decals. The names on the aircraft are actually 2 decals on top of each other so they'd be dark enough and not splotchy.


Gotta have a manual (it's modeled after an approach plate). I wanted to do full pub bags with pocket checklists (actually made them) but they wouldn't fit in the cockpits. In fact, 2 of the pilot figures are amputated below the knees so they would fit. One is the original Revell Pilot, but 3 of the same person wouldn't work real well. I did the below with some styrene strip and a black colored pencil.

For the ordnance (the bombs at least) I coated parts with baking soda to create the rough outer appearance in spots. I tried several mediums, but this seemed to be the best. I painted a grey coat, rolled it in baking soda while wet, and allowed to dry. Once dry I rubbed it gently with a finger to reduce the height, and painted again to color the baking soda. The yellow lines are dry transfers. For the standard GBUs (the grey and green, not the all-grey JDAMs) I did the bomb casing in grey with the textured finish, then chopped off the nose cone and used super glue. Once dry I applied some Tamiya clear yellow.

For the ground crew I kitbashed the heads from the Hasegawa flight deck crew and mounted them onto the standard Hasegawa USAF flight line set. I also had to modify the uniforms in places so it would look like coveralls, but some sanding and milliput took care of that. And no, I wasn't going to spend time hiding the underneath seams!

I learned a ton on this project and there is a laundry list of firsts for me. I did make a conscious effort to vary the amount of weathering on each aircraft (CAG birds generally being pretty clean). Ultimately, I'm pretty happy with how this came out, and I think Dad already has a spot picked out on his wall for them. At least I hope so, because I'm outta space!
Groot