SEARCH FINESCALE.COM

Enter keywords or a search phrase below:

Hasegawa 1/72nd MV-22B Osprey WiP

3637 views
65 replies
1 rating 2 rating 3 rating 4 rating 5 rating
  • Member since
    December 2002
  • From: Bury St Edmunds, Suffolk, England
Hasegawa 1/72nd MV-22B Osprey WiP
Posted by Bish on Monday, November 30, 2015 1:00 PM

I started off the year with a couple of mondern (ish) US aircrfat and i will be ending the year bang up to date with a MV-22B of the USMC. I stared this build just over a week ago but have been taking it easy, finally a build i don't have to rush.

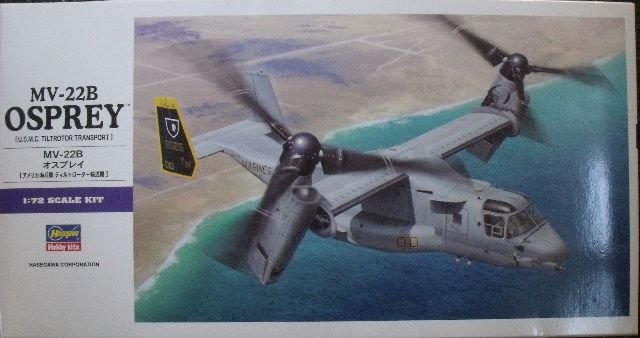
This is the kit.
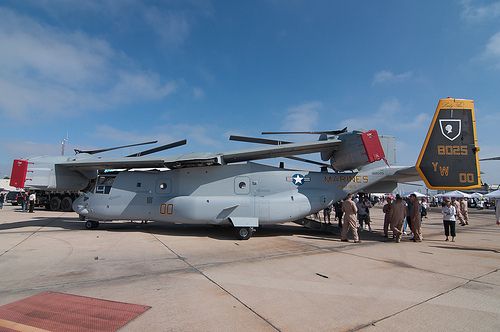
And i managed to find a couple of pics of the aircraft i am doing. The instructions give a date of 2011, and according to some research, the unit, VMM-165, formally HMM-165, was renamed and equipped with the Osprey in March of that year. So given that, i assume these tail markings are special ones to mark the units new piece of kit. With that in mind and the photo below clearly showing a very clean aircraft, i will keep weathering to a minimum and will try and resist filling in the panel lines.
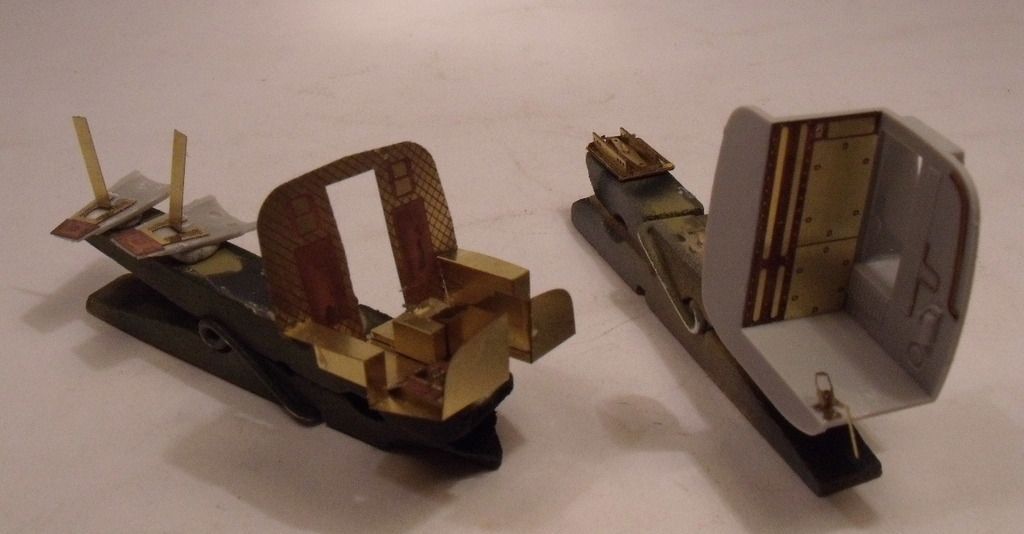
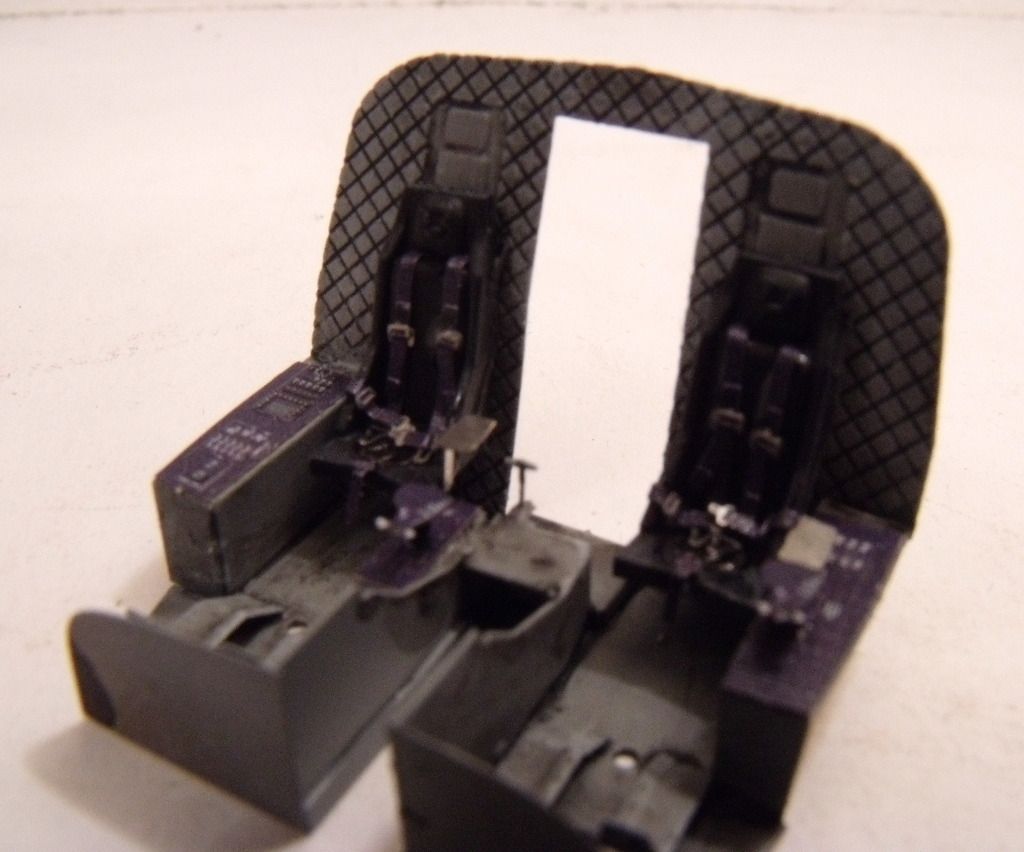
So, as usual, i strated with the pit, and this is mostly Eduard PE. The only kit parts are the seats and control sticks. The entry compartment is mostly kit with a few PE parts. There is a lot of pre coloured PE which will of course be added after painting.
So then it was primed and painted and i added a flory black wash and some light dry brushing and then all the Pre coloured PE. So this is the pit just about ready for fitting.
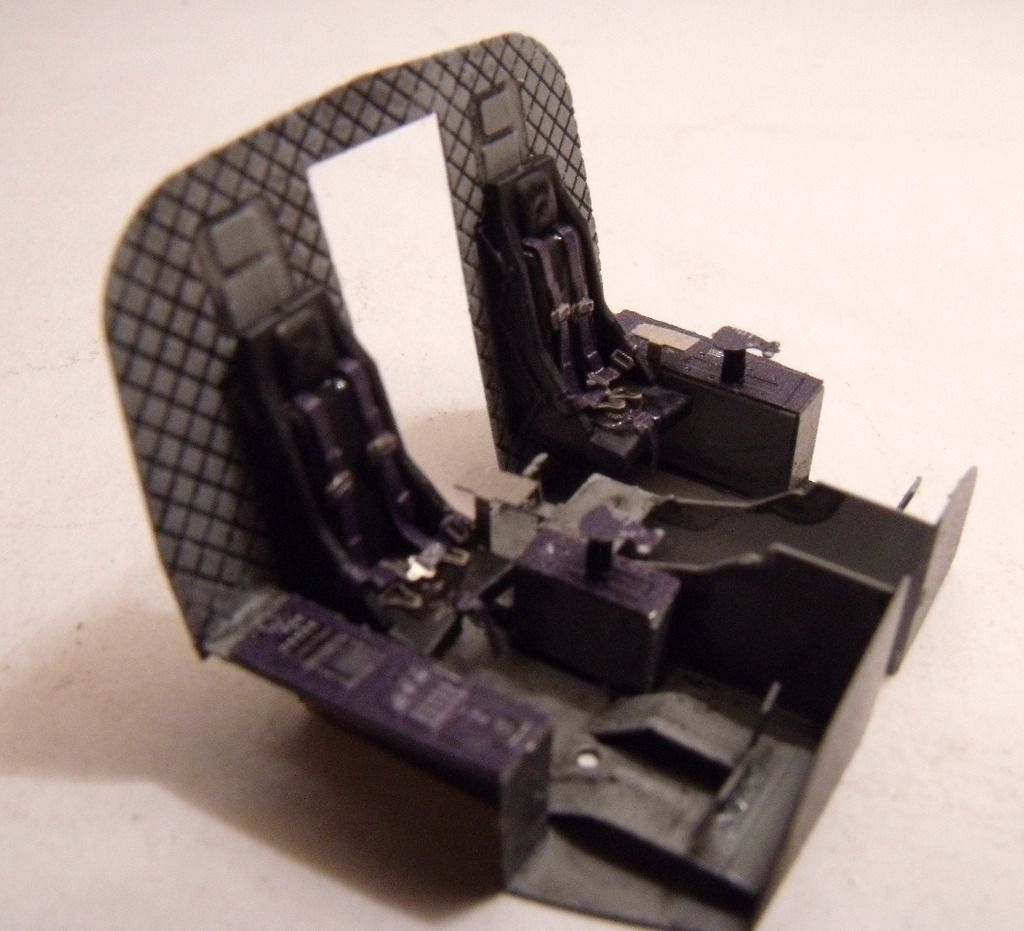
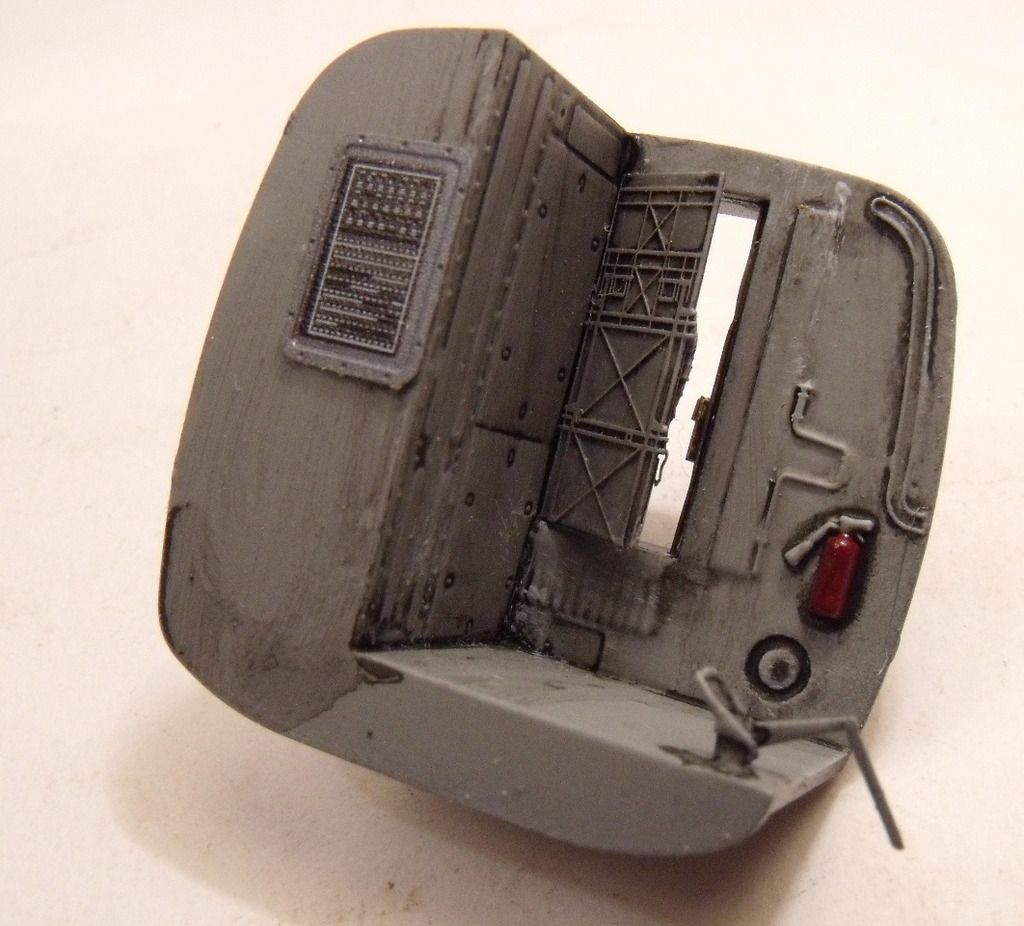
On the entry compartment, i still need to add another coat of red to the fire extinguisher. I can't find any pics of this area so have no idea if i am mssing anything. Any suggestions would be welcome as it will be a couple of days before i close the fuselage.
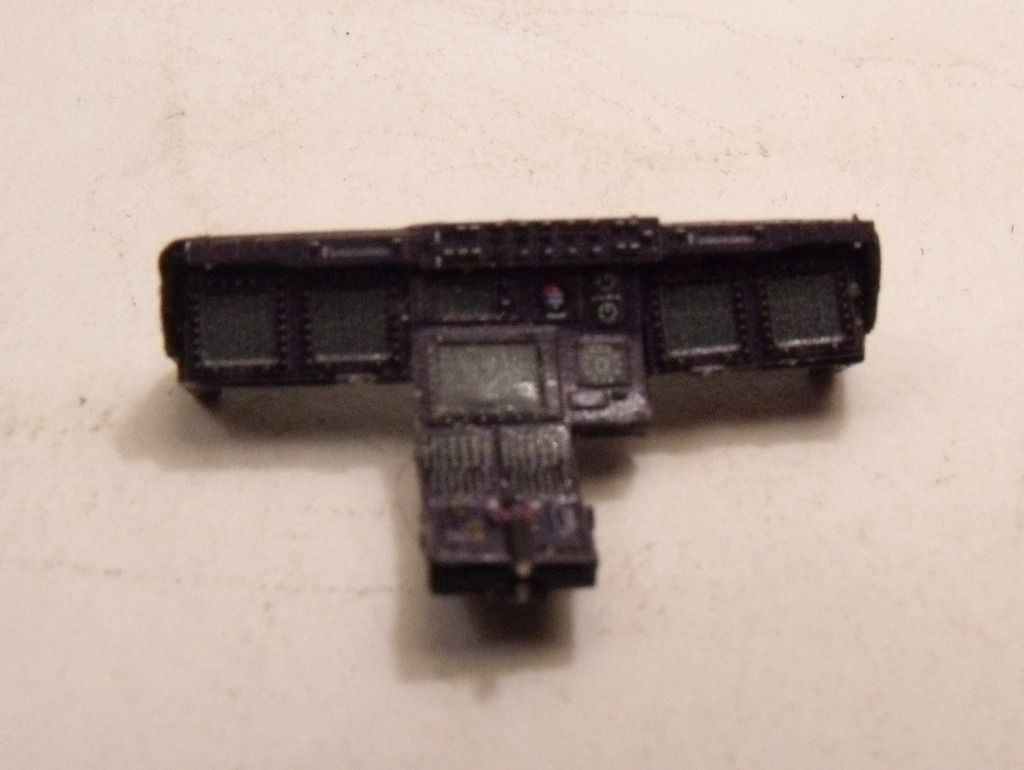
And finally the PE, whcih is the kit part painted black and with the PE added.
And thats it for now. Thanks for looking, and as always, all comments are welcome.

I am a Norfolk man and i glory in being so

 

On the bench: Airfix 1/72nd Harrier GR.3/Fujimi 1/72nd Ju 87D-3

  • Member since
    November 2015
Posted by The Migrant on Monday, November 30, 2015 2:02 PM

Such a cool subject, and a kit I've looked at a couple of times without actually adding to basket... Looking forward to seeing your progress, that's a nice start you've made on the cabin. 


Mike G

Western Canada

  • Member since
    May 2009
  • From: Poland
Posted by Pawel on Monday, November 30, 2015 2:48 PM

Hello!

It's a beauty of a kit! I've seen it at a hobby shop and barery resisted... :-)

You're doing a great job here, too - I like your build a lot! Good luck with it and have a nice day

Paweł

All comments and critique welcomed. Thanks for your honest opinions!

www.vietnam.net.pl

  • Member since
    December 2002
  • From: Bury St Edmunds, Suffolk, England
Posted by Bish on Monday, November 30, 2015 2:56 PM

Thanks Pawel, and ye, it is a nice looking kit even without the PE. But I can't take credit for chooseing this, it was a birthday pressie form my Mrs last year. One of her better modelling choices. Big Smile

I am a Norfolk man and i glory in being so

 

On the bench: Airfix 1/72nd Harrier GR.3/Fujimi 1/72nd Ju 87D-3

  • Member since
    June 2014
Posted by BrandonK on Monday, November 30, 2015 3:02 PM

It's looking great. I saw one of these flying a month or so back. Very distinctive bird in flight and makes quite a racket also. Nice to see someone build one up again.

BK

On the bench:

A lot !! And I mean A LOT!!

2024 Kits on deck / in process / completed   

                         14 / 5 / 2  

                              Tongue Tied

  • Member since
    December 2002
  • From: Bury St Edmunds, Suffolk, England
Posted by Bish on Monday, November 30, 2015 3:09 PM
Thanks BK. I am rather lucky in that I get to see them quite a bit, I saw 3 today. The USAF has their version at RAF Mildenhall and I currently work down the road at RAF Lakenheath. It is indeed distinctive and very loud.

I am a Norfolk man and i glory in being so


On the bench: Airfix 1/72nd Harrier GR.3/Fujimi 1/72nd Ju 87D-3

  • Member since
    March 2015
  • From: Streetsboro, Ohio
Posted by Toshi on Monday, November 30, 2015 3:19 PM

You know Bish, I've never seen a model of this aircraft before.  This is looking really great, I'll definately be looking forward to your progress with this build!

Toshi

On The Bench: Revell 1/48 B-25 Mitchell


Married to the most caring, loving, understanding, and beautiful wife in the world.  Mrs. Toshi


  • Member since
    December 2002
  • From: Bury St Edmunds, Suffolk, England
Posted by Bish on Monday, November 30, 2015 3:23 PM
Thanks Toshi. Italeri did one years ago when it was still in development. These hasegawa kits are very new, I think they now have 4 in this scale and Italeri now have a new one in 48th. Nothing in 32nd yet, but its a big beast and one in that scale would be on the huge side.

I am a Norfolk man and i glory in being so


On the bench: Airfix 1/72nd Harrier GR.3/Fujimi 1/72nd Ju 87D-3

  • Member since
    April 2005
  • From: Piscataway, NJ!
Posted by wing_nut on Monday, November 30, 2015 3:26 PM
Nice start.  Had 1 of those fly over my house last year.  A sound I won't soon forget.  


Very interesting 1:1 photo... I never knew the wing rotated like that.

Marc  

  • Member since
    December 2002
  • From: Bury St Edmunds, Suffolk, England
Posted by Bish on Monday, November 30, 2015 3:30 PM

Thanks Marc, ye, I know what you mean. It always seems to get eyes looking up and the look of it is something that won't be forgotten either.

I was not aware the wing did that either. I am guessing so it can be loaded into an aircrfat and for ship operations as well. Neat idea for saving space. I can only assume that pic was taken when it was delivered. I think the prop blades all fold as well.

Edit: Yes they do, found this.

I am a Norfolk man and i glory in being so


On the bench: Airfix 1/72nd Harrier GR.3/Fujimi 1/72nd Ju 87D-3

  • Member since
    November 2008
  • From: Central Florida
Posted by plasticjunkie on Monday, November 30, 2015 9:42 PM

That is one weird looking aircraft Bish. The pit looks outstanding. I like the wash you gave it to pop the details and gives it depth.

I hope you are not encountering any fit issues like with my Hasegawa 1/48 F-14A.

 GIFMaker.org_jy_Ayj_O


Too many models to build, not enough time in a lifetime!!

  • Member since
    December 2002
  • From: Bury St Edmunds, Suffolk, England
Posted by Bish on Tuesday, December 1, 2015 12:47 AM
Thanks PJ. So far I have not put much of the kit pars together, only the engines and vertical tail surface. The test will come in a day or so when the fuselage gets joined.

I am a Norfolk man and i glory in being so


On the bench: Airfix 1/72nd Harrier GR.3/Fujimi 1/72nd Ju 87D-3

  • Member since
    August 2005
  • From: Sydney, Australia
Posted by Phil_H on Tuesday, December 1, 2015 1:25 AM

Bish
The test will come in a day or so when the fuselage gets joined

I'd expect it to go together far better than the old Hobbycraft kit of the prototype.. Smile

  • Member since
    June 2003
  • From: Cavite, Philippines
Posted by allan on Tuesday, December 1, 2015 1:38 AM

You did really well with the cockpit there. Been considering getting this kit for some time now, and will surely be following your progress.


Not an expert on USMC aircraft, but since your subject shows "double nuts" (00) markings it appears to be CAG aircraft, hence allowed such special colored markings and is cleaner than most other aircraft in the squadron.

No bucks, no Buck Rogers

  • Member since
    December 2002
  • From: Bury St Edmunds, Suffolk, England
Posted by Bish on Tuesday, December 1, 2015 12:50 PM

Phil, I take it that kit was a PITA. Is it relate to the old Italeri kit of the prototype.

allan, thanks, and thanks for the info. I assumed the 00 numbers would indicate the aircraft of the unit commander, is that what CAG refers to. Excuse my ignorance.

I am a Norfolk man and i glory in being so


On the bench: Airfix 1/72nd Harrier GR.3/Fujimi 1/72nd Ju 87D-3

  • Member since
    November 2003
  • From: Naples, FL
Posted by tempestjohnny on Tuesday, December 1, 2015 3:10 PM
Nice start bish. I've seen them on the ground but never in the air


  • Member since
    June 2003
  • From: Cavite, Philippines
Posted by allan on Tuesday, December 1, 2015 7:46 PM
Bish, "CAG" stands for Commander, Air Group. In the USN, one aircraft per squadron is usually assigned to the CAG, called the "CAG Bird" (although Im not sure if the CAG actually flies, or flies in, each CAG Bird). This CAG Bird is usually denominated with a 00 number in the squadron. Hence, you'd usually see aircraft no. 100, 200, 300, and so on, usually a lot more colorful and a lot cleaner than, say, aircraft no. 103, 206, 304 and so on. Ive seen a picture of a Tomcat with number 114 or so having low viz gray fuselage and what appears to be gull gray framed canopy.

No bucks, no Buck Rogers

  • Member since
    November 2009
  • From: SW Virginia
Posted by Gamera on Wednesday, December 2, 2015 7:29 AM

Gee, you're on a modern subject kick here recently Bish! Very cool, looking forward to seeing how she turns out. 

"I dream in fire but work in clay." -Arthur Machen


  • Member since
    December 2002
  • From: Bury St Edmunds, Suffolk, England
Posted by Bish on Wednesday, December 2, 2015 11:38 AM

Thanks Johnny.

allan, thank you very much. As I am sure you know, my thing is anything Ww2 German, so all of this is new info to me and very nice to know. and it does explain nicely the scheme and clen appearance.

Gamera, thanks. And ye, I know. Going to have to overdose on RLM and RAL in the new year to make up for

I am a Norfolk man and i glory in being so


On the bench: Airfix 1/72nd Harrier GR.3/Fujimi 1/72nd Ju 87D-3

  • Member since
    December 2002
  • From: Bury St Edmunds, Suffolk, England
Posted by Bish on Tuesday, December 8, 2015 4:12 AM

Been making slow but steady progress on the Osprey. Managed to get the interiour parts fitted and the fuselage together. This largely went well. But there was a bit of a bulge on one side of the join underneath, not sure why as the top was fin and there was nothing inside pushing it out. But some clamps sorted that.

Gave the seams a rub down and all the external bits fitd. I also tried out a new tool. Joe Rix sent me over a Testors silver enamel marker. Testors is impossable to get hold of over here and i had asked Joe about the marker after seeing him use one. Seams have been my real weak point, so anything that can help is appreciated, and i really liked this. Shows up all the errors really well and i think the seam on this will be my best yet.

Just a bit of rubbing down to do on the underside and fit the canopy and the fuselage will be done.

I have got the wings together and can concentrate on finishing those off before i fit them.

The kit gives you 2 options for the tail markings. The first is one large decals with all the details on it. Or you can paint the tail and all the detail markings are provided seperatly. Given all the little bups on the tail, i figured the single dcal would be a pain, so decided to paint. Firstly some Xtracolour Insignia yellow.

After masking, i then sprayed Humbrol Gloss black.

Thats all for now, another update soon(ish)

I am a Norfolk man and i glory in being so


On the bench: Airfix 1/72nd Harrier GR.3/Fujimi 1/72nd Ju 87D-3

  • Member since
    April 2005
  • From: Piscataway, NJ!
Posted by wing_nut on Tuesday, December 8, 2015 7:14 AM

Looking good Bish.  Stabs are spot on.

Marc  

  • Member since
    December 2002
  • From: Bury St Edmunds, Suffolk, England
Posted by Bish on Tuesday, December 8, 2015 10:50 AM
Thanks Marc.

I am a Norfolk man and i glory in being so


On the bench: Airfix 1/72nd Harrier GR.3/Fujimi 1/72nd Ju 87D-3

GAF
  • Member since
    June 2012
  • From: Anniston, AL
Posted by GAF on Tuesday, December 8, 2015 7:54 PM

Bish,

This is a treat!  Nice work up on such an unusual aircraft.

I must admit, I was surprised to see you do a WIP thread on an aircraft.  Surprise  Maybe I have not been around long enough.

Gary

  • Member since
    December 2002
  • From: Bury St Edmunds, Suffolk, England
Posted by Bish on Tuesday, December 8, 2015 11:56 PM
Thanks Gary. I do now try and do WiP threads on all of my builds and most of those are aircraft. I think this is my 6th one this year.

I am a Norfolk man and i glory in being so


On the bench: Airfix 1/72nd Harrier GR.3/Fujimi 1/72nd Ju 87D-3

  • Member since
    November 2008
  • From: Central Florida
Posted by plasticjunkie on Wednesday, December 9, 2015 10:18 PM

Looks like your build is coming together very nicely Bish

 GIFMaker.org_jy_Ayj_O


Too many models to build, not enough time in a lifetime!!

  • Member since
    December 2002
  • From: Bury St Edmunds, Suffolk, England
Posted by Bish on Thursday, December 10, 2015 12:48 AM
Thanks PJ. I have put it on hold for a couple of days while I finished off my Stormtrooper. But I did that last night so now I can concentrate on this.

I am a Norfolk man and i glory in being so


On the bench: Airfix 1/72nd Harrier GR.3/Fujimi 1/72nd Ju 87D-3

  • Member since
    August 2013
Posted by Jay Jay on Thursday, December 10, 2015 9:15 AM

TY for posting this WIP.  I have a 1/72 Hobby Craft in the stash just itching to be built and yours is very inspiring.


 I'm finally retired. Now time I got, money I don't.

  • Member since
    December 2002
  • From: Bury St Edmunds, Suffolk, England
Posted by Bish on Thursday, December 10, 2015 9:26 AM
Glad I could help Jay, look forward to seeing some pics when you do yours.

I am a Norfolk man and i glory in being so


On the bench: Airfix 1/72nd Harrier GR.3/Fujimi 1/72nd Ju 87D-3

  • Member since
    December 2002
  • From: Bury St Edmunds, Suffolk, England
Posted by Bish on Thursday, December 24, 2015 3:14 PM

Its been a while since i updated. But i had to put the osprey aside to finish the Stormtrooper and then its taken me since last Fri to get this painted. But i am finally there.

This is how she looked after construction was done, i am leaving the engines of until the end.

Then it was into the paiunt booth. The demarcation between the light and dark gull grey is not as stark as it should be. It hardly shows up at all in the photo's and you can only just see it in the flesh. And for some reason, it does show more on the engines than on the fuselage.

I also noticed an error i had made during construction. The 2 antenna on the rear capped with a disk, this aircraft should only have one. The instructions do point this out and the pics of the real aircraft confirm it, so i had to remove one an di have to touch that up. And i have made a start on the detailed painting beginging with the wing leading edge.

Hopefully, i should not be so long before the next update.

I am a Norfolk man and i glory in being so


On the bench: Airfix 1/72nd Harrier GR.3/Fujimi 1/72nd Ju 87D-3

  • Member since
    December 2006
  • From: N. Georgia
Posted by Jester75 on Thursday, December 24, 2015 3:17 PM
Nice work on a very unique bird Bish!

Eric


JOIN OUR COMMUNITY!

Our community is FREE to join. To participate you must either login or register for an account.

SEARCH FORUMS
FREE NEWSLETTER
By signing up you may also receive reader surveys and occasional special offers. We do not sell, rent or trade our email lists. View our Privacy Policy.