SEARCH FINESCALE.COM

Enter keywords or a search phrase below:

1/72 Hasegawa F-18F mini WIP landing scene

2248 views
17 replies
1 rating 2 rating 3 rating 4 rating 5 rating
  • Member since
    August 2016
1/72 Hasegawa F-18F mini WIP landing scene
Posted by mobiusone on Monday, November 7, 2016 6:04 PM

Howdy guys! Not new to WIPs, but first one on this forum! They're wont be detailed updates, but kinda here and there in bigger chuncks. 


I'm building this for the IPMS show in Lake Charles, where the theme has to do with hooks. So naturally i'm uncreative and went with the suggestion on the flyer, and am doing a carrier landing scene. BUT to go outside the box, i'm wiring the plane up with LEDs to represent afterburners and such. First time doing that. The LED's and plastic rod are already on the way! As you can see I have plenty of goodies, mostly wolfpack for the flaps and refueling tanks. My plan is to model a refueling F-18F, usually the last plane to land during the sortee if I remember correctly. I also will be using Aires exhausts, as with the LED's they'll probably be seen quite well. The kit decals are pretty much shot, so i'll be making this Rhino as a VFA-211 Checkmates bird. I hope you following along, being a car modeler i'm still getting a hang of planes so do be kind with my silly questions :P 


  • Member since
    June 2004
  • From: 29° 58' N 95° 21' W
Posted by seasick on Monday, November 7, 2016 6:49 PM

"The Buddy Store" is the refueling setup you are talking about? 

Chasing the ultimate build.

  • Member since
    August 2016
Posted by mobiusone on Monday, November 7, 2016 7:22 PM
Exactly what i'm talking about seasick! Will be using Wolfpack's refueling pods for the S-3/F-18
  • Member since
    March 2015
  • From: Streetsboro, Ohio
Posted by Toshi on Monday, November 7, 2016 8:12 PM

I'll be following in on this build!

Toshi

On The Bench: Revell 1/48 B-25 Mitchell


Married to the most caring, loving, understanding, and beautiful wife in the world.  Mrs. Toshi


  • Member since
    January 2003
  • From: Washington State
Posted by leemitcheltree on Tuesday, November 8, 2016 8:27 PM

Mate....ain't no such thing as a silly question....EVER.  Remember that!  As they say - the ONLY silly question is the one you DON'T ask!

I don't think I've ever asked a question on FSM that doesn't return 4 or 5 different working solutions to the same problem.  That's what everyone's here for.

Can't wait to see how you get along with the build - sounds very cool.  Post LOTS of pics!!  We love that.  Remember - if you get stuck....just shout!

Cheers, LeeTree
Remember, Safety Fast!!!

  • Member since
    August 2016
Posted by mobiusone on Wednesday, November 9, 2016 6:57 PM

Well on the picture front, i did get a bit of ahead of myself and experimented a bit, but when the rods and LEDs come in i'm obligated. As you can see blue will probably be the main LED i'll use to represent the afterburners. Watching landing videos, when the pilots do hit full afterburners it goes from a purplish to blue to bright white, so i'll try to hit the blue-whitish area. First time playing with LEDs, this is kinda fun you know? Cool 


  • Member since
    February 2007
  • From: Brunswick, Ohio
Posted by Buckeye on Wednesday, November 9, 2016 7:42 PM

Neat project, looking forward to seeing how this comes out!

Mike

  • Member since
    November 2016
Posted by Marevic on Saturday, November 12, 2016 12:05 AM

Great plan. Looking forward to this and picking up some tips.

  • Member since
    August 2016
Posted by mobiusone on Saturday, November 12, 2016 11:10 PM

Thanks guys! Most of the internal wiring is in! It isn't pretty, but i've made every consession to as not let any light bleed out. Both upper and lower halves are painted black, i've added shims on both sides to block the joint of the upper and lower halves, as well as surrounded the LED's themselves in milliput and stuck them straight into the airers exhausts. I tried it out, and it worked really well! The extra planning really paid off. Also, since i'm using 2 LED's, i wired themm in series, with one neg and one pos soldered together. Now the tricky part, making the rest of the kit look good! I've alread seemed to have messed up one of my Wolfpack dropped flaps wing... Tongue Tied

  • Member since
    August 2016
Posted by mobiusone on Wednesday, November 16, 2016 8:17 PM

More work has been done. As you can see, there is plenty of putty to go around which is not quite what i was expecting for a bit newer of a Hasegawa kit. Or maybe i'm just crap at aircraft. My aircraft builds do always seem to have a ton more putty work... But anyway! Fit of the upper and lower halves is actually pretty good. Its the intakes that let this kit down in my opinion. Intakes only go back about 1 1/2 inches, then a solid wall of plastic. Also, the fit was pretty bad and as you can see cause a lot of putty. One area that really stopped me was the cockpit for some reason. My first suggestion, don't instert it into the lower nose like the kit suggests. Put it on the upper half, as I found this worked best. However, my biggest issue was the fitment of the instrument panel actually. It took me about 2 hours to get things lined up. I was not expecting this at all to be honest, so its put me a bit back. I just hope i'm not losing to much detail in all of this sanding im doing and hopefully it will turn out decent. 


  • Member since
    August 2016
Posted by mobiusone on Monday, November 28, 2016 6:20 PM

Howdy all! 

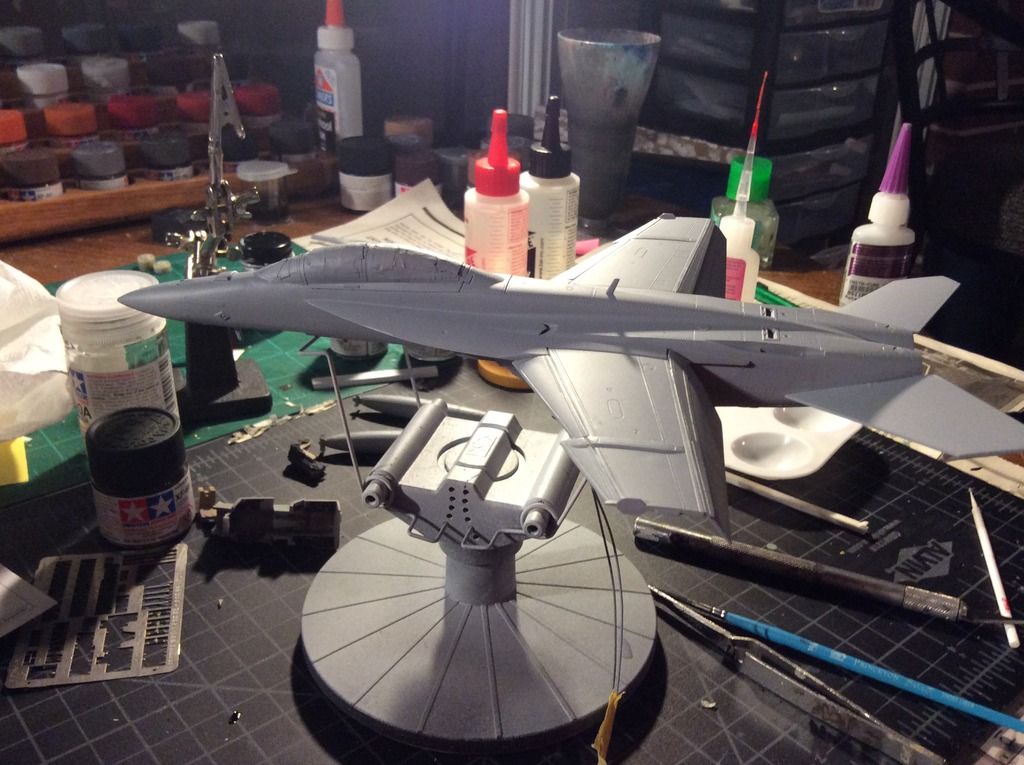
Been a while but a lot of work has been done. Everything is all squared away and painted now, I used Model Master Acrylics, both light and dark ghost grey. I layed the base coats on, but then went back with a mix of the two colors (2:1 Dark to light) to blend everything in, because RARELY in the real world are you able to tell the differences between the two ghost greys without a second look. I think it was pulled off quite well for my first time airbrushing a plane. And I know the light makes it look just allover grey, but the demarcation is subtly there. I will give high praise to Wolfpack, their dropped flap set for this kit was just superb. I completly cocked up my first go around (cut out way to much) so I had to order a second set, but once my idiocy was out of the way they fit snugly and look very good! 

If I can pose a question to the forum members, what is your prefered way to weather/spice up a ghost grey paint scheme? Right now things look a bit to fresh for me. The plane will be a CAG jet so it will be clean, but i want it to look a bit lived in. 
  • Member since
    June 2004
  • From: 29° 58' N 95° 21' W
Posted by seasick on Thursday, December 1, 2016 10:18 PM

Nice Super Bug!!

Chasing the ultimate build.

  • Member since
    March 2015
  • From: Streetsboro, Ohio
Posted by Toshi on Friday, December 2, 2016 3:37 AM

Great job for your first AB.  As for the lived in look, a wash would be one direction you could follow up with.

Toshi

On The Bench: Revell 1/48 B-25 Mitchell


Married to the most caring, loving, understanding, and beautiful wife in the world.  Mrs. Toshi


  • Member since
    August 2016
Posted by mobiusone on Saturday, December 3, 2016 5:42 PM

Alright guys minor set back. The authentic decals for the VFA-211 bird were just complete rubish. I'm not sure what was going on, but they split in half even on the back paper in the water. So I had to scrap that and start all over again :( 

However, I was lucky enough to have found a set of VFA-41 black aces decals on sale at two bobs site. So, this Rhino is changing from a Checkertail to a Ace! I actually do really like the black aces tail design, even if it is devoid of color. And the no color will be more authentic too, I doubt many colorful birds go up and do buddy refueling. 

  • Member since
    March 2015
  • From: Streetsboro, Ohio
Posted by Toshi on Saturday, December 3, 2016 10:30 PM

Sorry to hear about your decal issue.  On that note, the new decals look just great!

Toshi

On The Bench: Revell 1/48 B-25 Mitchell


Married to the most caring, loving, understanding, and beautiful wife in the world.  Mrs. Toshi


  • Member since
    January 2009
  • From: hamburg michigan
Posted by fermis on Sunday, December 4, 2016 1:13 AM

I have yet to have had a good experience with "Authentic Decals". Made that mistake a couple times....enough time had passed between using them, that I had forgotten. To make them usable, I sprayed a coat of clear gloss over the whole sheet...just to hold them together. Not only do you have to trim very close to the decal, but this also makes them thick, requiring you spray another thick sealer coat, sand, spray, sand, spray to blend them in...it also makes them impervious to micro-sol.

Authentic Decals are at the bottom of my list...unless they are the ONLY option, for something I HAVE to have.

  • Member since
    August 2016
Posted by mobiusone on Thursday, December 8, 2016 8:42 PM

Alright all the twobobs decals are on, and the plane is in the process of getting its flat overcoat. Of couse, i forgot to check if I had anymore TS-80 which I did not, so i only made it half way through haha. The twobobs are quite excelent, especially the decals for the vertical stabilizers. Of course I found a way to mess them up! As you can see in the photo (it is at an extreme angle to the light and can't be seen much in the photo but still...) there is still plenty of carrier film to be seen, especially for example the small decals on the nose and the squadron markings on the spine. I know what happened, and I wont make the mistake again. I washed before I decaled basically. I went ahead and put a wash on it before I put the decals, and that probably is the biggest mistake I've made on this project and i'm gutted. Certain angles it looks decent, but nothing ruins a build in my opinion more are big honkin decals sittin out their with their carrier film shining for all to see :( 

  • Member since
    August 2016
Posted by mobiusone on Sunday, December 11, 2016 7:33 PM

So one step forward many steps back :( The final coat is on, interior in, pilots placed, landing gear on, aaaaaannnnddddddd I managed to crack the canopy. Crying I tell you guys this kit is fighting me every step of the way. Its more like i'm crap but i'll refuse to believe that for as long as possible :P So for now, there might be a lul on here as I wait for the replacement kit to arrive (only $5 on eBay, there is a guy who told me a distributor sold 200 of these kits to him for an insane low price so now he's just selling them all. Worth picking up! Great eBayer). 

Until then, I'm cracking open my Tamiya F-14!! I need a fun, easy to build GORGEOUS kit, which i've heard it is. 

JOIN OUR COMMUNITY!

Our community is FREE to join. To participate you must either login or register for an account.

SEARCH FORUMS
FREE NEWSLETTER
By signing up you may also receive reader surveys and occasional special offers. We do not sell, rent or trade our email lists. View our Privacy Policy.