SEARCH FINESCALE.COM

Enter keywords or a search phrase below:

1/48 Hasegawa Scooter wip

2382 views
28 replies
1 rating 2 rating 3 rating 4 rating 5 rating
  • Member since
    May 2004
  • From: Land of Lakes
Posted by cbaltrin on Thursday, June 22, 2017 12:56 PM

Yes looking good

On the Bench: Too Much

  • Member since
    March 2015
  • From: Streetsboro, Ohio
Posted by Toshi on Thursday, June 22, 2017 11:30 AM

Excellent work sir.  It is superb!

Toshi

On The Bench: Revell 1/48 B-25 Mitchell


Married to the most caring, loving, understanding, and beautiful wife in the world.  Mrs. Toshi


  • Member since
    April 2010
Posted by Theuns on Thursday, June 22, 2017 11:23 AM

Here it is, pitty about the tail decal but not the end of the workl.

I think this is a really nice well detailed kit, might be that my decals were just old.


Theuns

  • Member since
    April 2010
Posted by Theuns on Sunday, June 18, 2017 11:35 PM

The HU tail decals just broke up :-(

The slat seats are red like this - 

Do you mean the actual slats being grey on the under side? 


Theuns

  • Member since
    May 2009
  • From: Poland
Posted by Pawel on Sunday, June 18, 2017 3:26 PM

Hello!

Looking good! Pity about the decals - maybe you can still seep some future under there to wipe that silvering out? I don't know if you checked it out, but the slats are also grey underneath, not red like I painted them in my model - just in case you wondered...

HU - what tail code is that?

Good luck with your build and have a nice day

Paweł

All comments and critique welcomed. Thanks for your honest opinions!

www.vietnam.net.pl

  • Member since
    April 2010
Posted by Theuns on Sunday, June 18, 2017 11:16 AM

The satin clearcoat revealed the decals in some places to have slight silvering on the edges, rather dissapointing after about 4 rounds of microsol and seating the decals into decal fix :-(


Theuns

  • Member since
    June 2017
Posted by Chemteacher on Sunday, June 18, 2017 10:04 AM
Looks good. Even with the decal issue, it still made a great build. I have the old ESCI A-4N Israeli version in my stash that will probably be my next build after my two current projects are done.

On the bench: Revell-USS Arizona; Airfix P-51D in 1/72

  • Member since
    June 2014
Posted by BrandonK on Sunday, June 18, 2017 9:28 AM

That looks really nice. The preshading works well and the rudder looks the part too. Nice.

BK

On the bench:

A lot !! And I mean A LOT!!

2024 Kits on deck / in process / completed   

                         14 / 5 / 2  

                              Tongue Tied

  • Member since
    April 2010
Posted by Theuns on Sunday, June 18, 2017 9:15 AM

After several attempts to mask and paint and hand paint the rudder I ended up painting the whole rudder red and cutting strips of white decal to sit in between the ribs.

The kits decals were OK however the large fin decals just broke up in the water so I am screwed on that, I will just get this model done now and set it away, pitty it had a real chance of being a very nice model :-(


Theuns

  • Member since
    April 2010
Posted by Theuns on Wednesday, June 14, 2017 11:39 PM

Indeed I thought the same :-)

I started with the decals lant night, they are a little fragile but workable. The only hassle is the red decal that goes onto the rudder, I tried to put it on but it simply would not conform to the ribs and valleys. So I will need to mask off each of the valleys and paint it red, that's gonna be fun!

Theuns

  • Member since
    December 2002
Posted by Bossman on Wednesday, June 14, 2017 8:01 PM

Theuns

Here it is with primer on, I added some white to "fade" the paint and preshaded.

Seeing this - at first I thought "What a cool aggressor scheme !"

Looks great under the real finish too.  Very Nice Theuns.

Chris

  • Member since
    August 2013
Posted by Jay Jay on Wednesday, June 14, 2017 7:50 AM

Nice save and ty for sharing.

I'm going to stick with Allad aqua gloss considering the problems others have shared with various clear coats. so far i have had no problems with it


 I'm finally retired. Now time I got, money I don't.

  • Member since
    April 2010
Posted by Theuns on Wednesday, June 14, 2017 7:28 AM

Thanx mate.


Theuns

  • Member since
    March 2015
  • From: Streetsboro, Ohio
Posted by Toshi on Wednesday, June 14, 2017 3:25 AM

It still looks fantastic Theuns.  Even with the TS 13, that's because of your technique of which is superb!

Toshi

On The Bench: Revell 1/48 B-25 Mitchell


Married to the most caring, loving, understanding, and beautiful wife in the world.  Mrs. Toshi


  • Member since
    April 2010
Posted by Theuns on Wednesday, June 14, 2017 3:10 AM
I decanted the TS13 and airbrushed it on for the first 3 coats to build up a barrier. It worked OK but the finish was not as smooth as I wanted so I took a big gamble and shot on some more from the tin, lightly at first and the last coat was a nice wet coat.
The finish still has a slight pebbly texture but I can sort that out.
Image

I think I will rather stick to my acrylic as a gloss coat in the future.

Theuns


  • Member since
    April 2010
Posted by Theuns on Wednesday, June 14, 2017 1:14 AM

I sanded the affected areas that the TS 13 melted and resprayed the dark marks.

Here you can see the affected RH wingroot.


Theuns

  • Member since
    April 2010
Posted by Theuns on Tuesday, June 13, 2017 3:34 AM

Thanx, just a pity I have to sand most of the grey and respray after the TS 13 oopsy.


Theuns

  • Member since
    December 2002
  • From: Bury St Edmunds, Suffolk, England
Posted by Bish on Tuesday, June 13, 2017 2:44 AM

Looks good Theuns, nice effect with the grey on top.

I am a Norfolk man and i glory in being so


On the bench: Airfix 1/72nd Harrier GR.3/Fujimi 1/72nd Ju 87D-3

  • Member since
    April 2010
Posted by Theuns on Tuesday, June 13, 2017 2:28 AM

I used Tamiya TS13 out of the spraycan for the first time after testing it on other plastic first without hassles.

It went on nicely on the bottom white enamel, but the top grey enamel was blistered by it. I will leave it for a few days to cure and see if I can sand it out and re-paint the affected areas.


Theuns

  • Member since
    April 2010
Posted by Theuns on Sunday, June 11, 2017 2:04 AM

I did a grye pinwash on the bottom, I had to be careful of not going to dark and heavy. It shows up better to the naked eye.

As for the top weathering I am not sure what I will do yet.


Theuns

  • Member since
    April 2010
Posted by Theuns on Saturday, June 10, 2017 8:20 AM

Thanx mr T. In this case I guess one could call it "pre-lightning" LOL

I am still having a hard time with my AB, i think it is time for a new on in the near future so all models I had on my wishlist for the next year or two is on the back burner. Atleast I have a few very nice kits in the stach that deserve the best AB I can afford ;-)


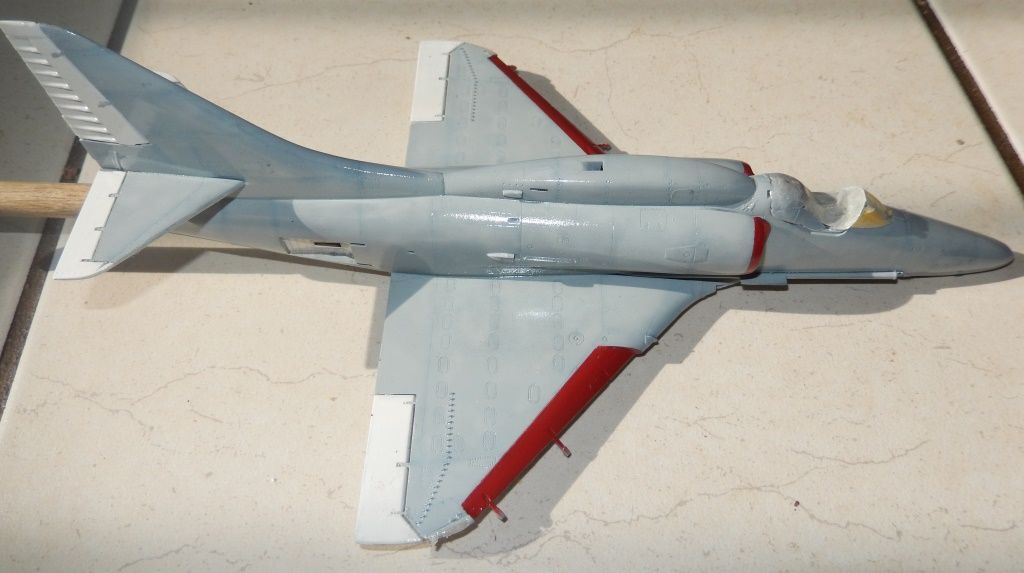
I have added the red to all the "movable bits" that is so prominent on USN craft, as for the red borders around the undercart doors, I saw a friend using a red permanent marker instead of paint, I will give this a go.


Theuns

  • Member since
    March 2015
  • From: Streetsboro, Ohio
Posted by Toshi on Saturday, June 10, 2017 6:41 AM

Your pre-shading technique is flawless.  That looks fantastic, what a great job you're doing!

Toshi

On The Bench: Revell 1/48 B-25 Mitchell


Married to the most caring, loving, understanding, and beautiful wife in the world.  Mrs. Toshi


  • Member since
    April 2010
Posted by Theuns on Saturday, June 10, 2017 5:21 AM

My Air brush has been acting up lately so I serviced it, still not OK but went ahead anyway and painted this scooter. 

Here it is with primer on, I added some white to "fade" the paint and preshaded.

results...


Theuns

  • Member since
    June 2014
Posted by BrandonK on Tuesday, April 4, 2017 9:56 AM

These are pretty cool. Nice work thus far. And all those tiny fiddly bits that protrude off the edges of wings, yup, I break them many times before I'm done. I feel your pain.

BK

On the bench:

A lot !! And I mean A LOT!!

2024 Kits on deck / in process / completed   

                         14 / 5 / 2  

                              Tongue Tied

  • Member since
    April 2015
Posted by Mopar Madness on Tuesday, April 4, 2017 9:48 AM

I have one waiting to be built.  Nice progress so far!

Chad

God, Family, Models...

At the plate: 1/48 Airfix Bf109 & 1/35 Tamiya Famo

On deck: Who knows!

  • Member since
    November 2003
  • From: Naples, FL
Posted by tempestjohnny on Tuesday, April 4, 2017 5:23 AM
Have got two in the stash. Definitely following this.


  • Member since
    December 2002
  • From: Bury St Edmunds, Suffolk, England
Posted by Bish on Tuesday, April 4, 2017 4:23 AM

Nicestart.Ilike the Scooter, will be following.

I am a Norfolk man and i glory in being so


On the bench: Airfix 1/72nd Harrier GR.3/Fujimi 1/72nd Ju 87D-3

  • Member since
    April 2010
1/48 Hasegawa Scooter wip
Posted by Theuns on Tuesday, April 4, 2017 2:03 AM

Here is my 1/48 Hasa scooter.

Not much to say about it that is not known. The detail in the wheelwells are just outstanding

I will give it a pinwash to give some depth to all the lines and hoses.

The cockpit detail is also really nice, I just added PE straps to the seat.


Theuns

JOIN OUR COMMUNITY!

Our community is FREE to join. To participate you must either login or register for an account.

SEARCH FORUMS
FREE NEWSLETTER
By signing up you may also receive reader surveys and occasional special offers. We do not sell, rent or trade our email lists. View our Privacy Policy.