SEARCH FINESCALE.COM

Enter keywords or a search phrase below:

1/72 B-17G: FINISHED!

8604 views
39 replies
1 rating 2 rating 3 rating 4 rating 5 rating
  • Member since
    June 2010
  • From: Rochester, New York USA
Posted by rocker286 on Saturday, December 8, 2018 1:08 PM

Ole - Yes indeed! Born and raised! 

4badges

Ole
  • Member since
    October 2018
  • From: Central VA
Posted by Ole on Thursday, November 1, 2018 10:25 AM

Nice work! You've gotta be from Rochester with that Genesee bottle cap!

  • Member since
    June 2010
  • From: Rochester, New York USA
Posted by rocker286 on Wednesday, October 24, 2018 5:30 PM

Thanks Johnny! 

Good news! My Flying Fortress is DONE! It only took ten months, but it's all set and waiting patiently for some shelf space to clear up....perhaps I better use some of the wedding money and buy something already! 

The decals of the plane went on really well, I had no issues with them tearing. However there are A LOT of them, especially ones that are no bigger than a caraway seed. I think the most tedious part of the build was applying these things to the aircraft! The weathering was done using craft acrylic paint mixed with water and a bit of dishsoap. I had "help" during the weathering process from our one cat who was dangerously ill two months ago. The son of a gun is healthy as can be now, and back to invading my workshop! 

Thanks for the positive vibes and well wishes, folks. This build took forever but it was so worth it in the end!

2018-10-24_04-51-03

20181023_180557

20181023_233726

20181023_233653

20181023_233739

20181023_233946

4badges

  • Member since
    November 2003
  • From: Naples, FL
Posted by tempestjohnny on Friday, September 7, 2018 6:17 AM
Looks great


  • Member since
    June 2010
  • From: Rochester, New York USA
Posted by rocker286 on Thursday, September 6, 2018 8:02 PM

Thanks for the tips on those display cases! I don't have an Ikea nearby- the closest one is four hours away in Pittsburgh....but I'm always looking for an excuse to go there Cool


Again I must extend my apologies for not responding to this thread all summer. It's been a busy one with wedding planning (T-minus ten days and counting till the big day), and a cat that needed medical attention after a pretty serious condition. With all of the stress I've been experiencing recently, it was extremely important to get down to the workshop tonight and make some progress on my neglected B-17. After all, building models is therapeutic! At some point this summer I was able to start painting this beast, and painted one wing panel and the top part of the aft fuselage model master olive drab with medium green splotches. The natural metal finish on the rest of the aircraft was done using a testors aluminium, steel and chrome silver. I also glued the props on the engines this evening. 

I have the underside of one wing left to paint, and then i can spray it with a coat of gloss and start the decaling process! 

2018-09-06_08-31-50

2018-09-06_08-32-17

2018-09-06_08-34-19

4badges

  • Member since
    June 2008
Posted by lewbud on Wednesday, July 4, 2018 10:06 PM

Here is a picture of my display case. The Billy bookcase from Ikea with glass doors (I don't know what Ikea calls them).

Buddy- Those who say there are no stupid questions have never worked in customer service.

  • Member since
    January 2017
  • From: Colorado Springs
Posted by mawright20 on Sunday, July 1, 2018 12:10 AM
Nice job! What scale is the -24?
  • Member since
    July 2003
  • From: Cincinnati, Ohio
Posted by ridleusmc on Saturday, June 30, 2018 9:03 PM

Awesome looking Fortress.  I love those big old Boeing Birds.

As for your display case issue: I bought an old glass-shelved piece at the local goodwill.  I sanded off the old finish, and I put on a new one.  Then, it got some glass sides and a wood back on it.  It turned out pretty nice.  You could go that route.  Buy something second hand and modify it to suit your needs. 

 IMG_2564 by Christopher Ridle, on Flickr 

  • Member since
    June 2008
Posted by lewbud on Saturday, June 30, 2018 6:50 AM

That's looking good Rocker! If you have an IKEA nearby, might I suggest their Billy bookcase with the glass door option. The bookcase is 11 inches deep and with the glass doors 11 3/4 inches deep. That just might be deep enough. I know I can get 6 WWII fighters to a shelf in mine.

Buddy- Those who say there are no stupid questions have never worked in customer service.

  • Member since
    November 2003
  • From: Naples, FL
Posted by tempestjohnny on Friday, June 29, 2018 7:30 PM
Oh I like that


  • Member since
    June 2010
  • From: Rochester, New York USA
Posted by rocker286 on Friday, June 29, 2018 4:28 PM

More work has progressed on my Fortress! Landing gear, bomb doors, and guns are all on. I've since primed it, and have begun to paint.


20180620_210224

20180620_210041

2018-06-29_05-01-45

4badges

  • Member since
    June 2010
  • From: Rochester, New York USA
Posted by rocker286 on Saturday, June 2, 2018 10:06 PM

Johnny - I hear you on that, this thing is one huge beast! 

Scott- I don't get it either. You would think that these companies would want people to experience the least amount of stress with these models and would make things fit correctly !

Well the weather got nice up here (finally), and I've spent the last month outside building a chain link fence for my dogs...or working on wedding planning. My poor Flying Fortress and the rest of my workshop sat dormant for almost a whole month! But I finally got a chance tonight to do a bit more work on my bomber. I attached the cowlings and the turbo superchargers tonight. Let me tell ya folks, the cowlings don't go on easy. Those highly-detailed engines are so bulky that I had to sand down the interior of the cowlings a bit just to get them to fit over the engines without breaking any pieces off. A little patience pays off! Also the turbo superchargers on the outboard engines are a tad difficult to work with. Pipes run off of them and are supposed to connect with the exhaust on the inside of the engine. The problem is, they're too long and will not allow the rest of the part to lay down properly on the nacelle. The solution? Cut the pipes off. They won't be visable anyways! 

2018-06-02_10-12-01

2018-06-02_10-12-11

2018-06-02_10-12-56

4badges

  • Member since
    November 2003
  • From: Naples, FL
Posted by tempestjohnny on Wednesday, April 18, 2018 6:04 AM
That left wing alone is bigger then the last kit I finished


  • Member since
    December 2003
  • From: 37deg 40.13' N 95deg 29.10'W
Posted by scottrc on Tuesday, April 17, 2018 11:08 AM

Your coming along well on your B-17.  I built the Acedemy F model a while back and it looks like the ProModeler is a lot like the Academy. It has parts for the C F and G and the instructions kinda mixed things up and made the build interesting.  What is it with poor fitting narcells on all these kits anyway?

Hope the wings go on good and look forward to more updates from ya.

Scott

  • Member since
    June 2010
  • From: Rochester, New York USA
Posted by rocker286 on Sunday, April 15, 2018 8:58 PM

More progress on the Flying Fortress. I glued both wing halves together this morning. The port wing halves fit together a bit poorly, and there are quite a few gaps that'll need to be filled along the seams. The top starboard wing half was actually warped from sitting in the box for a few years. I figured that one would be a pain to work with...but surprisingly the starboard wing went together with no problems! 


2018-04-15_09-26-27

4badges

  • Member since
    June 2010
  • From: Rochester, New York USA
Posted by rocker286 on Sunday, April 8, 2018 4:02 PM

Johnny- it certainly is! I'm still working on finding a new display case and/or making my own so I've got a place to store it. I really thought this build would take me forever and give me more time to find/build a case.... but it's going along rather quickly!


I completed the landing gear bays and started working on the engines tonight. The instructions were a bit tricky to follow when it came to this step...but I checked my references and attached the parts accordingly.

2018-04-08_04-48-53

2018-04-08_04-49-05

4badges

  • Member since
    November 2003
  • From: Naples, FL
Posted by tempestjohnny on Wednesday, April 4, 2018 5:24 AM
I can see that it is going to take up some real estate in the display cabinet


  • Member since
    June 2010
  • From: Rochester, New York USA
Posted by rocker286 on Tuesday, April 3, 2018 9:27 PM

I've done a bit more work on the B-17 recently. All the windows are on, the nose is on, and so is the rudder and tail gunner's position. The masks are also all on, and the next step will be to flill some gaps and do a bit of sanding. Then it'll be time for wings and engines! 

2018-03-29_06-35-45

4badges

  • Member since
    June 2010
  • From: Rochester, New York USA
Posted by rocker286 on Saturday, March 17, 2018 3:31 PM

Thanks Keyda! 

I've stumbled upon a HUGE flaw in the kit's directions...one that made me assemble, break apart, and then reassemble the tail gunner's position. I should have trusted my gut that something looked fishy in those instructions.. but I figured the good folks at Pro-Modeler knew what they were doing. I was mistaken. So if you're building this kit someday, and you get to this step: 

20180308_214625

Yup, just don't even try. Because you'll end up attaching those guns to part # 165, and you'll assume that part 165 will face the interior of the plane once you've glued the two halves of the tail position together. You'll THINK there's a seperate piece that will go on the outside that will allow you to attach the machine gun barrels. And you'll be wrong. It was right around the time I started searching the part sprues for such a piece - and found that it didn't exist- that I decided to look ahead in the instructions to see what the heck I was supposed to do. And that's when I discovered a big old flaw: 
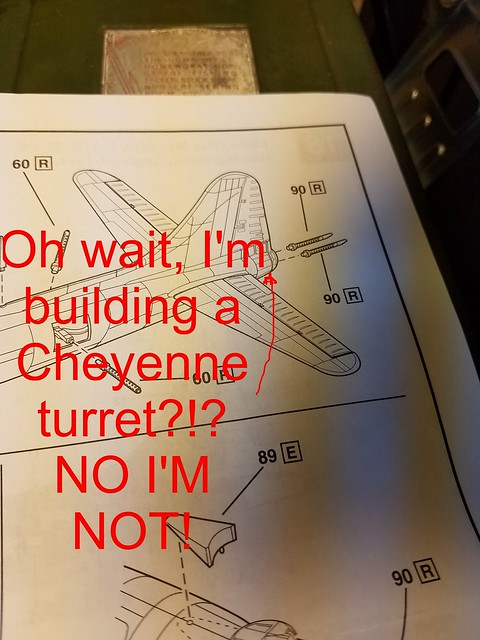
2018-03-17_04-00-24

The instruction manual told me I wouldn't have a problem fitting those gun barrels onto a CHEYENNE TURRET, despite the fact it told me in a few previous steps that I was to build the CONVENTIONAL TAIL POSITION for the B-17. Well, after letting loose a few choice words, I took an #11 blade to the seams of the tail and split it apart: 

20180308_214427

But I wasn't mad for too long. It was easy to see how the tail position was SUPPOSED to go together. I re-attached the two halves with cement, re-attached the ammo boxes/belts, and then laid the two machine guns inside of the tail with some super glue. Part #165 was flipped and is now facing the CORRECT way, with the holes facing out. The gun barrels will fit nicely now! 

20180309_111345


I've also completed the ball turret and it's associated machinery. I painted the turret Neutral Grey, because I figured it'd be too tough to paint once the fuselage halves are closed! 

20180308_214347

20180309_111506

And finally this morning, I glued the two halves of the fuselage together. Though the back end fit alright, the front end still has plenty of gaps in the seams. Even with all of that sanding I did, there are STILL gaps. Guess I'll have to break out my filler putty next! 

2018-03-17_03-34-44

4badges

  • Member since
    August 2016
Posted by Keyda81 on Sunday, March 4, 2018 8:34 PM

Looking good!  That drives me nuts when the halves won't go together properly!  There's been more than a few times that has happened to me. 

  • Member since
    June 2010
  • From: Rochester, New York USA
Posted by rocker286 on Saturday, March 3, 2018 9:33 PM

Jay Jay - Thanks man! It's amazing what kinds of tricks one can pull with a file, tan paint, artists oils and a stiff paint brush! 

fotofrank - Yep, this kit allows you to put the barrels on AFTER you're done painting! It's such a great design. The .50s for the top turret are (so far) the only guns that are molded in one piece...although I suppose there's no real danger in breaking those off in the painting process because they are somewhat flush with the fuselage and don't stick out.

Mike - When that day comes for me, I suppose I'll have to start hanging my planes from the ceiling ! 

Between wedding planning, enjoying unseasonably warm weather and then a subsequent snow storm, I've somehow managed to log some hours in with my B-17. I also received an Eduard masking kit in the mail for the Revell B-17G kit. Keep in mind this is the Pro Modeler (from Revell) kit, so I took a bit of a chance ordering the kit...however that gamble paid off. Every mask fits (so far) the windows that they're supposed to cover up. There's a typo in the masking instructions - two masks are called out as the same number..but they're not the same! So make sure the mask fits the appropriate window if you buy the masking kit! I've also put together both the ball and top turrets, and I'll be painting the former soon. I figured I'd paint the ball turret first before anything else, because once it's in the sealed fuselage it'll be rather difficult to paint!

On the topic of the fusealge, I've had a bit of trouble test-fitting the two halves together. I've narrowed the problem down to the bulkhead that seperates the cockpit from the nose compartment. I spent quite a bit of time sanding down the edges of this bulkhead with my dremel, and still the fit is not 100%. So, I've got more work to do once my dremel battery is charged up. But I'll get it to go together, somehow! 


IMG_20180228_210433_639

20180228_200218

20180228_200237

4badges

  • Member since
    May 2006
  • From: USA
Posted by Mike S. on Sunday, February 18, 2018 4:27 PM

Just wait until you run out of space for the models AND the display cabinets, which is my predicament. Crying

  • Member since
    June 2017
  • From: Winter Park, FL
Posted by fotofrank on Friday, February 16, 2018 6:24 AM

Is this B-17 kit one of those that the gun barrels attach on the outside so the exterior can be painted and detailed without breaking off and losing the barrels? I recently acquired the Revell/Monogram B-24D kit and I'm wondering about that. I haven't looked at the insturction sheet for the kit yet to know.

OK. In the stash: Way too much to build in one lifetime...

  • Member since
    August 2013
Posted by Jay Jay on Thursday, February 15, 2018 10:21 PM

your build is coming along nicely. I especially like the wood grain effects you've achieved. Looookin  Goood Man


 I'm finally retired. Now time I got, money I don't.

  • Member since
    June 2010
  • From: Rochester, New York USA
Posted by rocker286 on Thursday, February 15, 2018 9:24 PM

Thanks fotofrank and toshi ! I've been working on my B-17 a bit more this week. I've installed the waist guns, their windows, and ammo boxes/belts. Tonight I also started painting parts for the ball turret. 

2018-02-15_09-49-10

4badges

  • Member since
    March 2015
  • From: Streetsboro, Ohio
Posted by Toshi on Sunday, February 4, 2018 12:48 PM

Very nice details.  You did an excellent job assembling everything together.  Keep up the good work!

Your friend, Toshi

On The Bench: Revell 1/48 B-25 Mitchell


Married to the most caring, loving, understanding, and beautiful wife in the world.  Mrs. Toshi


  • Member since
    June 2017
  • From: Winter Park, FL
Posted by fotofrank on Sunday, February 4, 2018 11:30 AM

I really like how your build is coming along. Seeing what you've accomplished, it reminds me of being on hand when "909" and "Liberty Belle" were being built at Tom Reilly's facility when he was still in Kissimmee. Your Fortress is looking really good.

OK. In the stash: Way too much to build in one lifetime...

  • Member since
    June 2010
  • From: Rochester, New York USA
Posted by rocker286 on Sunday, February 4, 2018 10:34 AM

Thanks Keyda! 


I've managed to complete a few more steps in the building process. I've attached a few windows, completed the radio room, attached the bombsight, and glued every compartment I've completed so far into the right fuselage. I test-fit the other half of the fuselage and I'm still experiencing some gaps. Guess I'll have to break out my sanding sticks and putty when it comes time to close this thing up! I'll be working on the waist guns, ball turret and tail guns next. 

2018-02-02_10-25-40

2018-02-02_10-25-50

2018-02-04_11-17-32

4badges

  • Member since
    August 2016
Posted by Keyda81 on Thursday, January 18, 2018 8:25 PM

Some good progress going on! 

JOIN OUR COMMUNITY!

Our community is FREE to join. To participate you must either login or register for an account.

SEARCH FORUMS
FREE NEWSLETTER
By signing up you may also receive reader surveys and occasional special offers. We do not sell, rent or trade our email lists. View our Privacy Policy.