SEARCH FINESCALE.COM

Enter keywords or a search phrase below:

FM-2

4281 views
29 replies
1 rating 2 rating 3 rating 4 rating 5 rating
  • Member since
    December 2002
  • From: Northern California
FM-2
Posted by jeaton01 on Sunday, December 30, 2018 12:02 PM

This is one I started a few months ago while proceeding slowly with an early B-26 conversion, thinking it would be a quick build, but that has not been so.  No fault of the Tamiya kit that is used as the basis, but the KMC set to be used turned out to require a lot of work because it had some poor guidance.
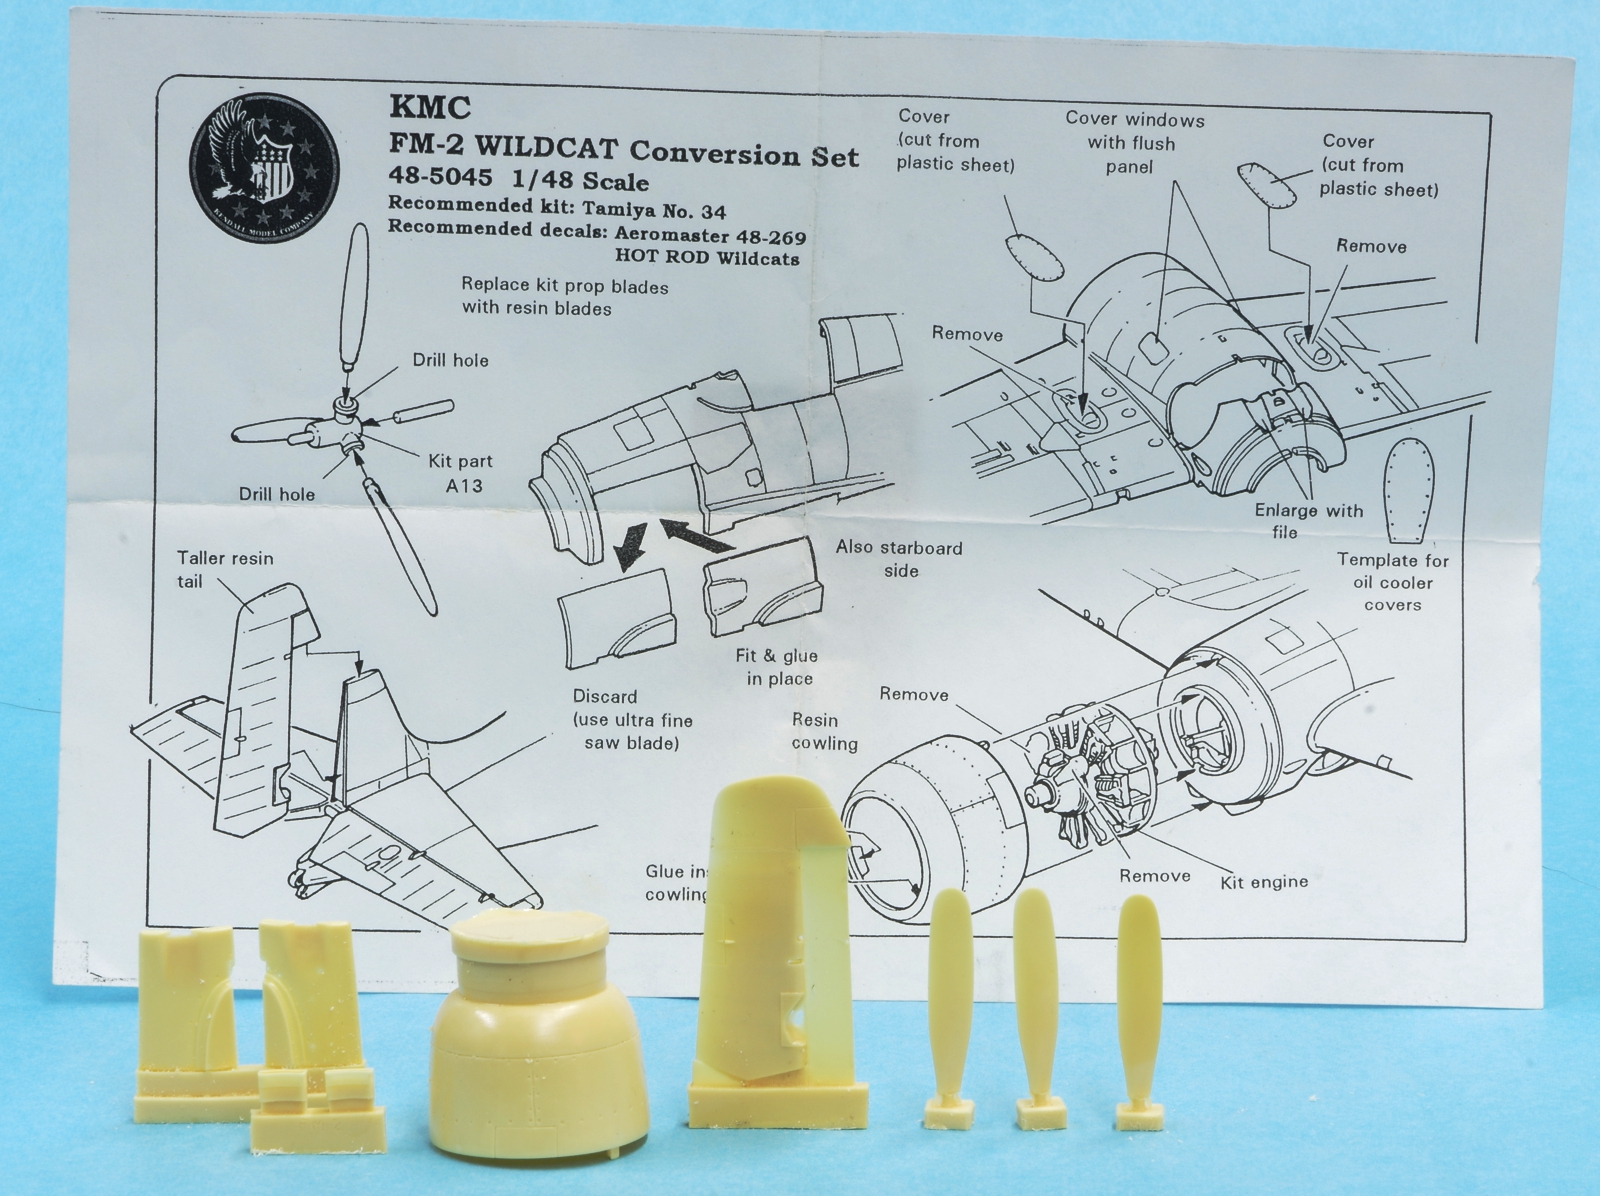
The KMC conversion parts and instructions.  The rudder needed modification as the aerodynamic counterbalance came down too far.  The lower part was cut off and attached to the fin so that it looked more like photos to me.  I didn't use the cowl except as a guide for positioning the cowl flaps, which caused trouble because they were too low  on the cowl and did not align with the exhaust depressions.  The cowl didn't fit the Tamiya kit very well.  They tell you to put inlet ducts in the bottom of the cowl which is not accurate for the FM-2.  They do tell you to remove the magnetos from the kit engine but you are still left with the wrong number of cylinders and incorrect nose section.
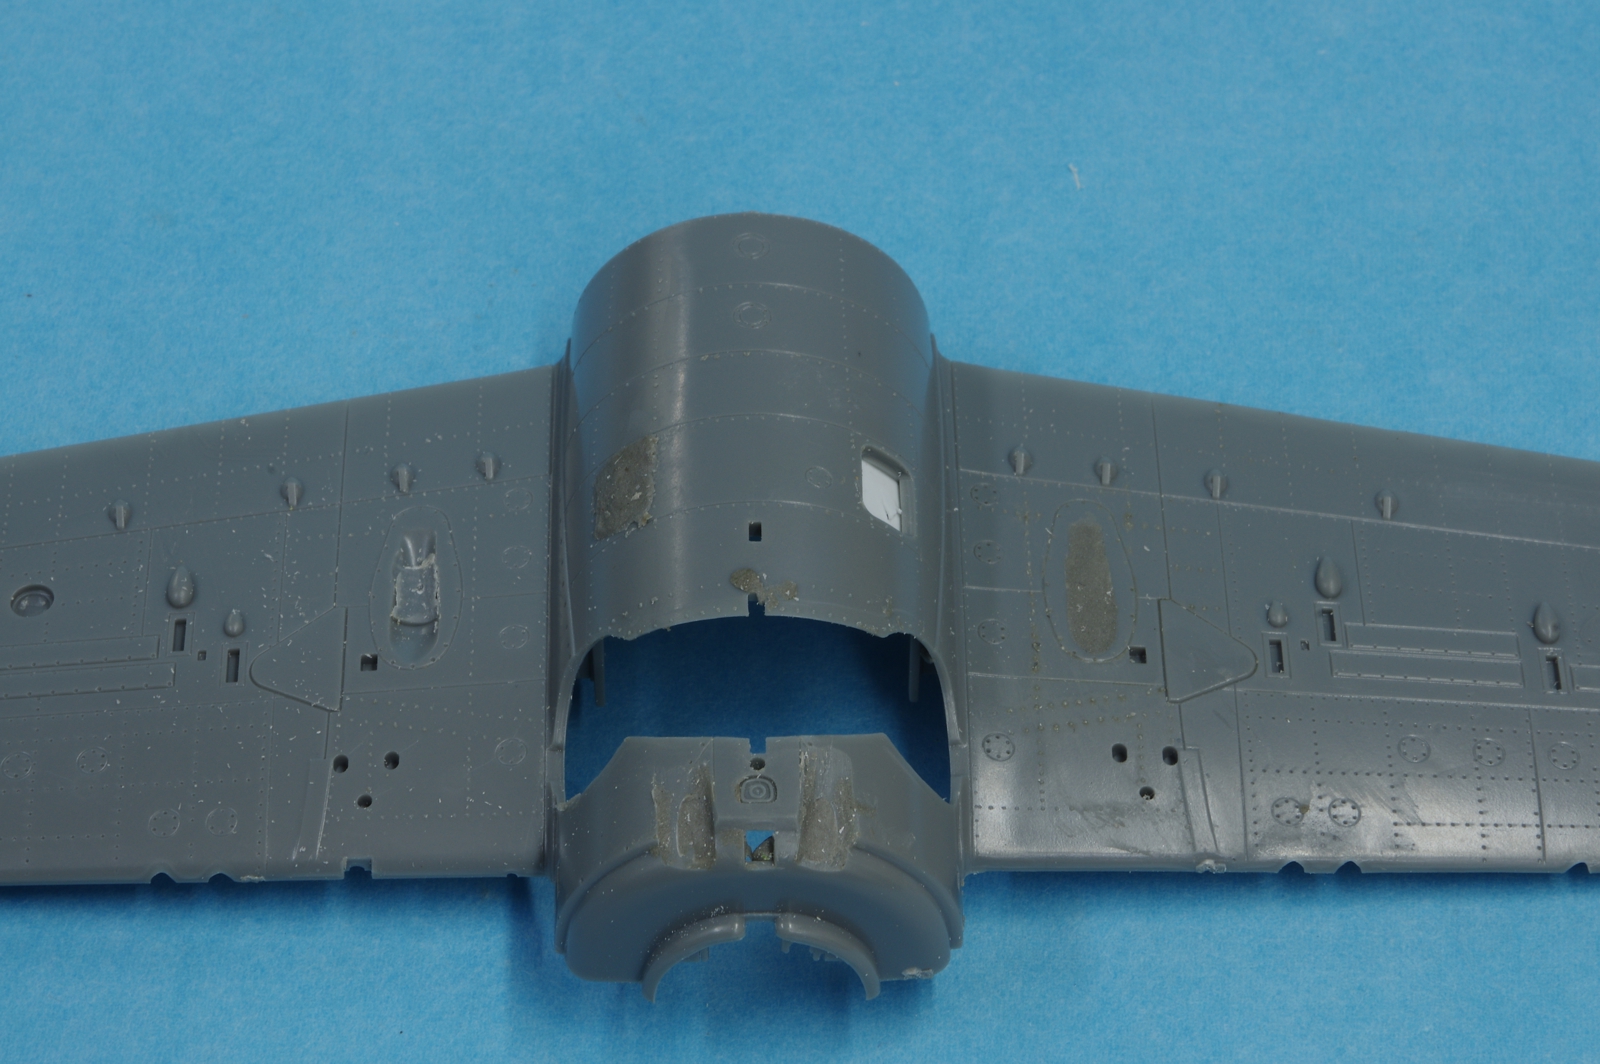
The FM-2 had metal plates where the lower fuselage window were on earlier Wildcats so they were backed with plastic card and filled with Epoxysculpt.  The oil cooler was behind the engine in the accessory compartment so the remnants of the wing oil coolers were ground away and the remaining depressions filled with Epoxysculpt as well.  The FM-2 had two exhaust stacks on the bottom like the earlier Wildcats but they were smaller and under the cowl with larger reliefs into the fuselage behind the cowl.  More grinding and filling.  Since the FM-2 had no outboard guns the accompanying shell chutes and bulges, ammunition loading doors below and gun access doors on top of the wings must be removed where the outboard guns were on the F4F-4 and FM-1.
 
The change to the KMC FM-2 rudder.
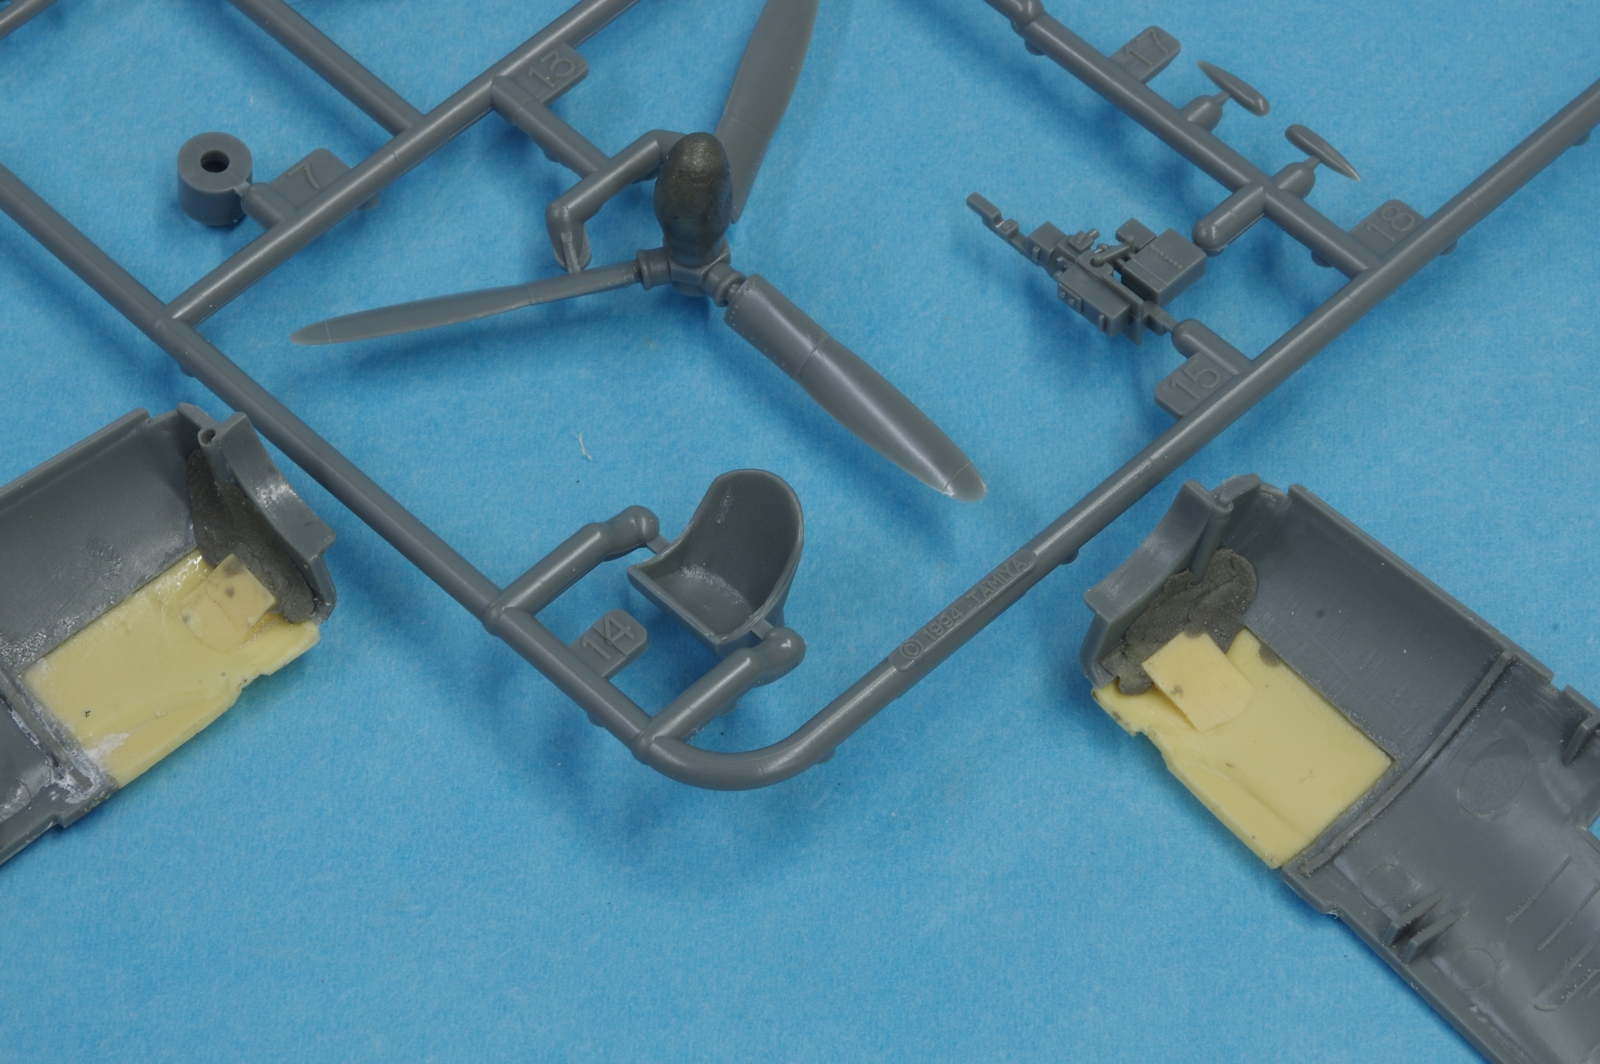


Epoxysculpt was used to fill in behind the KMC exhaust reliefs as they were too shallow to allow representation of the exhaust pipes under the cowl sides.  It was also used to modify the propeller hub, although for many FM-2's the Tamiya hub would be correct.
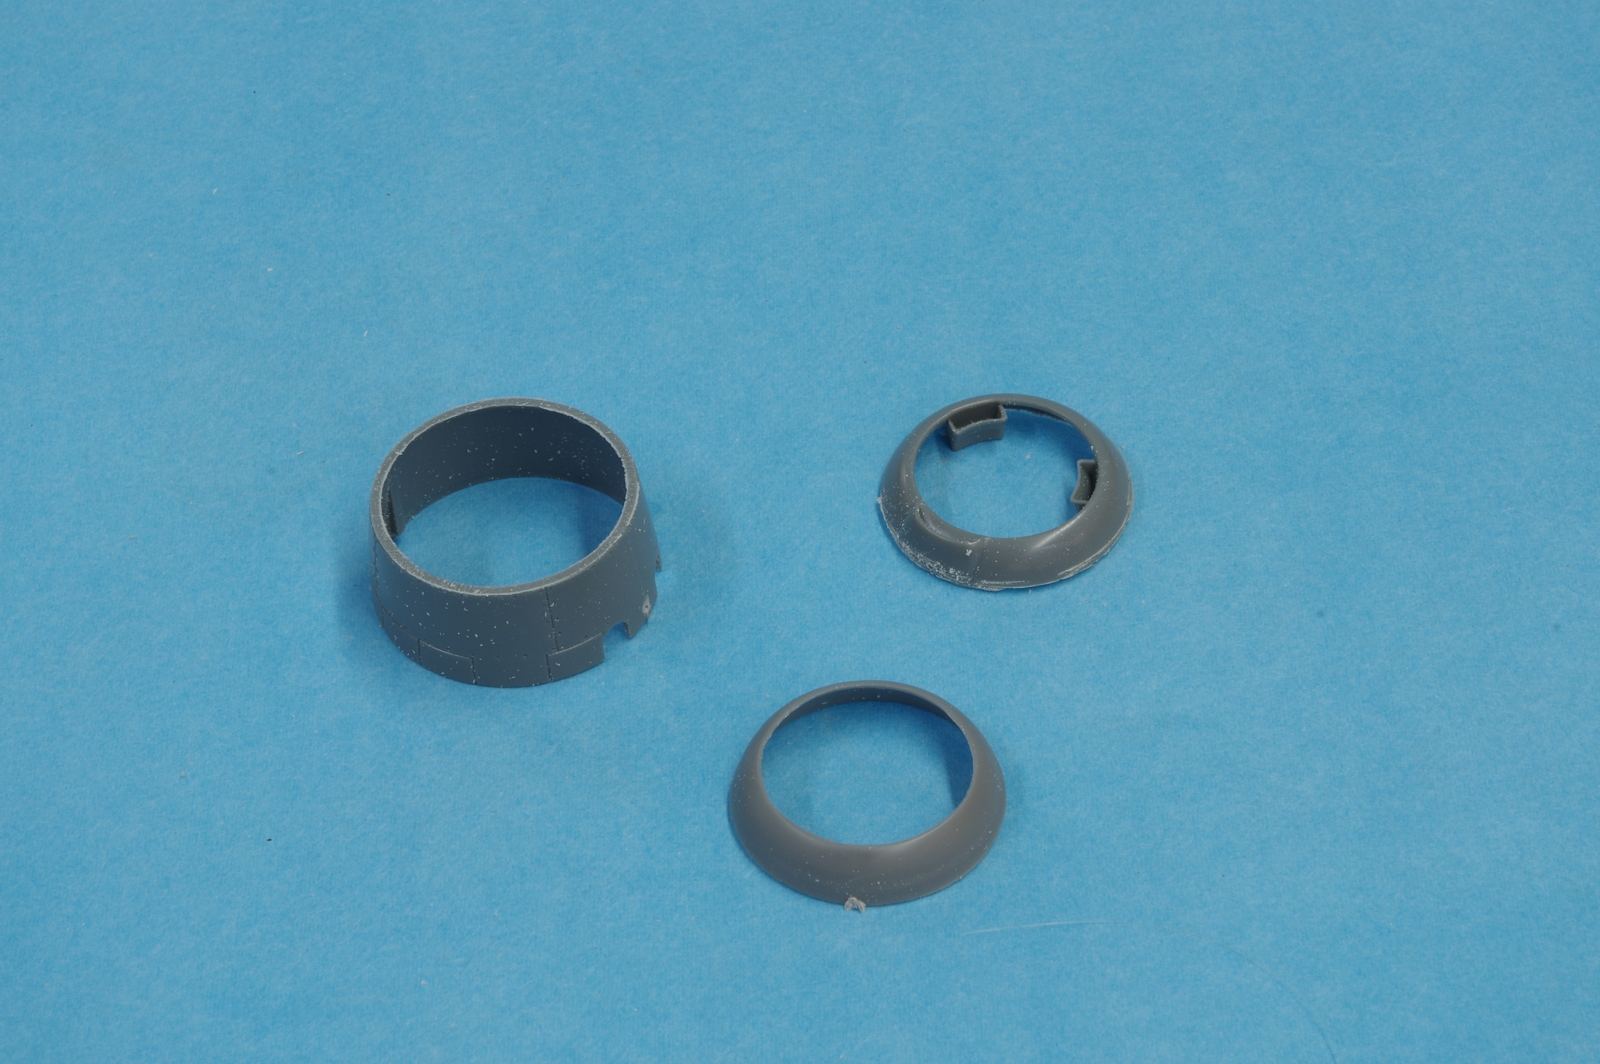


The front cowl ring from the Sword FM-2 was adapted to the Tamiya cowl.
 
All the Tamiya cowl flap detail was filled with CA and sanded smooth.  Cowl flaps were cut from the KMC resin cowl.  This is the first attempt to get them in the correct location, but it took me three tries before they looked right compared to photos.  They were located much too low on the KMC cowl.
 
The Vector engine and other parts in progress.  Eduard seat belts and pre-painted instrument panel details were added.  I have heard people say that the floor on the FM-2 was solid outside the rudder foot rails but I did not find that supported by photographs.  There was some disappointment
registered while building up the cockpit when I dropped the rudder pedals on the floor and then gracelessly stepped on them.  Tamiya was kind enough to send a replacement part rather swiftly even though I had admitted the mode of failure.
 
 
The Vector engine.  Brass pushrod housings and bell wire ignition wiring was added, and Epoxyscuplt was used to make the lamb chop baffles between the cylinders.  This is not the Vector engine that comes with the Vector conversion set for the HobbyBoss FM-2, which does have the lamb chops in resin. An .060 diameter length of music wire has been installed in a hole drilled in the crankcase for later propeller installation.


The Vector engine in the cowl.  The cowl flaps are now in their final position.  The inside of the fuselage, cowl, and landing bay are painted zinc chromate green.  Here is the source:


A photo of an FM-2 cockpit.  It is identifiable as an FM-2 by the fuel filler tube visible to the left of the rudder pedal, the larger tube below the smaller curved pipe.  This was moved forward from a position beside the seat of the F4F and FM-1.  This image is from a very good page on F4F variants, here is the link to it:

http://www.scharch.org/Ed_Scharch/usn-aircraft/05-f4f-wildcat.html


Work progresses on the underside of the wing.  Never mind the inboard guns that are protruding. MIndfade to be corrected later, only the F4F-3 had that feature.
 
 
The left side exhaust, which had two stacks.
 
The right side exhaust, which had three stacks
 
 
The fin and rudder.
 

John

To see build logs for my models:  http://goldeneramodel.com/mymodels/mymodels.html


  • Member since
    September 2012
Posted by GMorrison on Sunday, December 30, 2018 12:17 PM

That's quite a nice project. Wasn't the FM-2 the most successful fighter aircraft in WW2?

What's the markings plan?

I'm watching this one.

 Modeling is an excuse to buy books.


  • Member since
    December 2002
  • From: Northern California
Posted by jeaton01 on Sunday, December 30, 2018 12:26 PM

Hi, Bill.  Gonna do it in the Atlantic scheme.

I just happened to have read this morning that it had a kill to loss ratio of 35:1.  Quite remarkable.  Possibly because it went against poorer trained Japanese pilots late in the war, or more encounters with bombers, but still almost twice that ratio of the next best.  Maybe we should be building FM-2's instead of F-35's?Surprise

John

To see build logs for my models:  http://goldeneramodel.com/mymodels/mymodels.html


  • Member since
    July 2004
  • From: Sonora Desert
Posted by stikpusher on Sunday, December 30, 2018 12:34 PM

That’s quite a project that you have started there! 


F is for FIRE, That burns down the whole town!

U is for URANIUM... BOMBS!

N is for NO SURVIVORS...

       - Plankton

LSM


  • Member since
    September 2012
Posted by GMorrison on Sunday, December 30, 2018 12:42 PM

I'm sure you've seen this link, I've always found it to be pretty reliable.

http://www.angelfire.com/dc/jinxx1/Wildcat/F4FColors.html

 Modeling is an excuse to buy books.


  • Member since
    January 2004
  • From: Brisbane Australia
Posted by ChrisJH666 on Sunday, December 30, 2018 1:38 PM

That's coming along really nicely John

In the queue: 1/48 Beech Staggerwing (RAAF), P38 (RAAF), Vultee Vengeance (RAAF), Spitfire Vb (Malta), Spitfire VIII x2 (RAAF), P39 x2 (RAAF), Martin Baltimore (Malta?), Martin Maryland (Malta), Typhoon NF1b, Hellcat x2 (FAA)


Chris

  • Member since
    June 2013
Posted by bvallot on Monday, December 31, 2018 8:58 AM

What a fun build to watch! Very nice John. =] I always enjoy conversions and puzzle planes coming together on the forum. I've heard about the KMC conversion but never saw it in action. Glad you're giving it a go.

Glad to see you're not using the kit engine. Good for you. The Wright R-1820 was a single row engine which incidently caused the cowl to be a little shorter. Not sure how much difference that's making at 1:48 scale. Can't be more than a few millimeters. It's pretty cool to see KMC included the waffle shaped intakes between the cylinders. All of that is coming out quite nicely. I would suggest sanding down the trailing edge of the cowl flaps to bring them closer to scale if it's not too late to do so.

So happy to see this variant on the forum. Can't wait to see the rest. =]

On the bench:  

Tamiya F4U-1  Kenneth Walsh


  • Member since
    December 2002
  • From: Bury St Edmunds, Suffolk, England
Posted by Bish on Monday, December 31, 2018 9:45 AM

Thatsn some very nice work tehre John. I have never heard of the FM-2 version of the Wildcat, nice to see somthing new.

I am a Norfolk man and i glory in being so


On the bench: Airfix 1/72nd Harrier GR.3/Fujimi 1/72nd Ju 87D-3

  • Member since
    April 2003
  • From: USA
Posted by keavdog on Friday, January 4, 2019 11:25 AM

Really nice surgery there John!

Thanks,

John

  • Member since
    March 2003
  • From: Towson MD
Posted by gregbale on Friday, January 4, 2019 2:39 PM

The start of this somehow slipped by me, but I'm glad I caught it now.

Great project, John, and certainly beats a similar project I tried with the old Monogram kit (and without the nice resin) some, er...decades ago. Looking forward to seeing it in its 'Atlantic' colors! Yes

Greg

George Lewis:

"Every time you correct me on my grammar I love you a little fewer."
 
  • Member since
    December 2002
  • From: Northern California
Posted by jeaton01 on Monday, January 21, 2019 8:18 PM

A little more progress on the FM-2.  A lot of white, the bottom of the flight surfaces are flat insignia white, which at this point is still gloss because there is no flat insignia white in my stocks.  The fuselage sides are to be gloss white, but are still flat white at this point.  The clear coats will take care of that.  The topsides are dark gull grey.  For the first time I used clay rolls to mask that little dark gull grey in front of the tail.  I may yet finish this project.

I will try to thin down the cowl around the exhaust some more.  Have to do it with an Exacto knife at this point.


John

To see build logs for my models:  http://goldeneramodel.com/mymodels/mymodels.html


  • Member since
    March 2003
  • From: Towson MD
Posted by gregbale on Tuesday, January 22, 2019 5:50 AM

Looking very impressive, John.Yes

Greg

George Lewis:

"Every time you correct me on my grammar I love you a little fewer."
 
  • Member since
    August 2015
  • From: the redlands Fl
Posted by crown r n7 on Tuesday, January 22, 2019 6:30 AM

Wow that’s cool looking build 


 Nick.

  • Member since
    September 2017
  • From: western North Carolina
Posted by kensar on Tuesday, January 22, 2019 6:51 AM

Interesting conversion, John. 

Appears to have needed more work than one would first expect and you're doing very well with it.


Kensar


  • Member since
    July 2018
  • From: The Deep Woods
Posted by Tickmagnet on Tuesday, January 22, 2019 7:06 AM

That looks great


  • Member since
    December 2002
  • From: Northern California
Posted by jeaton01 on Monday, June 3, 2019 11:40 PM

Finally got the FM-2 finished.  Worked out OK, but I just had some trouble getting to the bench.  At the last I had an issue with the landing gear doors down there on the bottom.  A Tamiya part that doesn't fit?  Had to be my fault but I sure can't figure out how.   A little weathering, not too much.  Model Master paints, dark gull gray on top, insignia white under the flying surfaces, and gloss white on the fuselage.  Alclad flat coat, not too much on the gloss white portions.  I had Techmod decals, the larger ones worked fine, but the stencils rolled up on themselves, and rather than fight them I made new stencils with a color laser printer.  Better resolution than the Techmod stencils.  A few on the left side need more attention but I fixed them with Mr. Mark Softer after the pictures were taken.  To lazy to reshoot..Embarrassed

On to the pictures!


John

To see build logs for my models:  http://goldeneramodel.com/mymodels/mymodels.html


  • Member since
    April 2003
  • From: USA
Posted by keavdog on Tuesday, June 4, 2019 12:11 AM

Sure turned out nice John.  Big fan of the Atlantic scheme. 

Thanks,

John

  • Member since
    November 2003
  • From: State of Mississippi. State motto: Virtute et armis (By valor and arms)
Posted by mississippivol on Tuesday, June 4, 2019 6:25 AM
Well done, sir!
  • Member since
    May 2013
  • From: Indiana, USA
Posted by Greg on Tuesday, June 4, 2019 8:38 AM

Looks good, John. Thanks for sharing your WIP.

  • Member since
    August 2013
Posted by Jay Jay on Tuesday, June 4, 2019 8:42 AM
I admire your building skills and am amazed at your knowledge of the aircraft. I guess I have to do more research if I want to accurately depict my next build. I am puzzled at a statement you made here however. I was under the impression that the F6-F was a far superior fighter at the war's best kill ratio of 19:1 The fact that the FM had a 35:1 kill ratio is news to me. Maybe the Zero had not come along yet ?


 I'm finally retired. Now time I got, money I don't.

  • Member since
    June 2014
Posted by BrandonK on Tuesday, June 4, 2019 9:33 AM

That's beautiful. Thanks for taking us along. Very nice looking build.

BK

On the bench:

A lot !! And I mean A LOT!!

2024 Kits on deck / in process / completed   

                         14 / 5 / 2  

                              Tongue Tied

  • Member since
    August 2015
  • From: the redlands Fl
Posted by crown r n7 on Tuesday, June 4, 2019 10:10 AM

yes very well done !! you gotta like that camo.


 Nick.

  • Member since
    April 2019
  • From: Earth, Milky Way Galaxy
Posted by John 3:16 KJV on Tuesday, June 4, 2019 11:19 AM

Quick Wildcat question:

Does anyone know what specific variant the Monogram Wildcat depicts?F4F-3, F4F-4, etc......?


     “For God so loved the world, that he gave his only begotten Son, that whosoever believeth in him should not perish, but have everlasting life.

     For God sent not his Son into the world to condemn the world; but that the world through him might be saved.”  - John 3:16-17


  • Member since
    December 2002
  • From: Northern California
Posted by jeaton01 on Tuesday, June 4, 2019 1:09 PM

Thanks for all the nice comments, everyone.

Jay Jay, the FM-2 version of the Wildcat came in service after the F6F and I don't really understand why it's numbers are better than the F6F as assuredly the F6F was the more capable fighter.  It may well be that over the same time spans, say the last 6 months of the war, that the F6F results were the same or better than the FM-2.

John 3:16, the Monogram kit is an F4F-4.

John

To see build logs for my models:  http://goldeneramodel.com/mymodels/mymodels.html


  • Member since
    April 2019
  • From: Earth, Milky Way Galaxy
Posted by John 3:16 KJV on Tuesday, June 4, 2019 6:39 PM
Thank you! :)

     “For God so loved the world, that he gave his only begotten Son, that whosoever believeth in him should not perish, but have everlasting life.

     For God sent not his Son into the world to condemn the world; but that the world through him might be saved.”  - John 3:16-17


  • Member since
    February 2005
  • From: Cleveland, OH
Posted by RadMax8 on Wednesday, June 5, 2019 10:00 AM

Glad to see you finally wrangled this kit to the finish line. You did a bang-up job, especially on the subject matter of an Atlantic Theatre fighter. I feel like I haven’t seen much in the way of carrier operations stories/info from the US side in the Atlantic. 

In summary, very cool modification and excellent paint scheme. Thanks for sharing!

  • Member since
    September 2012
Posted by GMorrison on Wednesday, June 5, 2019 10:08 AM

One factor in the Pacific was the decline in quality of Japanese pilots. The US assigned successful pilots to instruction roles after a short time. Japan used it's naval aviators until they were killed.

But the F4F was a very capable aircraft, if a little funny looking. And a lot were deployed. The USN had a lot of CVE's, and the later classes could operate a couple of dozen aircraft.

 Modeling is an excuse to buy books.


  • Member since
    June 2004
  • From: 29° 58' N 95° 21' W
Posted by seasick on Wednesday, June 5, 2019 8:44 PM

Nice build!

Chasing the ultimate build.

  • Member since
    January 2015
  • From: Katy, TX
Posted by Aggieman on Thursday, June 6, 2019 12:51 PM

That is great work to convert that Tamiya F4F to an FM-2 Wildcat. The paint job is fantastic.

  • Member since
    December 2002
  • From: Northern California
Posted by jeaton01 on Saturday, June 8, 2019 11:28 PM

Thanks again.

John

To see build logs for my models:  http://goldeneramodel.com/mymodels/mymodels.html


JOIN OUR COMMUNITY!

Our community is FREE to join. To participate you must either login or register for an account.

SEARCH FORUMS
FREE NEWSLETTER
By signing up you may also receive reader surveys and occasional special offers. We do not sell, rent or trade our email lists. View our Privacy Policy.