SEARCH FINESCALE.COM

Enter keywords or a search phrase below:

1/72 C-123K Black Bat Special Ops Aircraft

9517 views
40 replies
1 rating 2 rating 3 rating 4 rating 5 rating
  • Member since
    April 2012
  • From: USA
1/72 C-123K Black Bat Special Ops Aircraft
Posted by Striker8241 on Sunday, December 15, 2019 12:50 PM

Hi, All
This project will be a 1/72 scale model of a C-123K Special Ops aircraft, tail number 55-4543, which was one of four Heavy Hook/Black Bat aircraft that I worked on at Nha Trang AB, Vietnam in 1971. The planes were from the Republic of China's legendary 34th Black Bat Squadron and were on special duty with First Flight Detatchment. We supported both the C-123K Black Bat aircraft and the MC-130E Rivet Clamp aircraft.
 
The model I'm building is Roden's C-123B, kit #056. I'll be adding the two GE J-85-17 jet engines to make it a "K" model.


Roden has done a terrific job producing this model. It's very well constructed and detailed right out of the box. However, I'll be making some corrections and additions just to see how far I can take things.
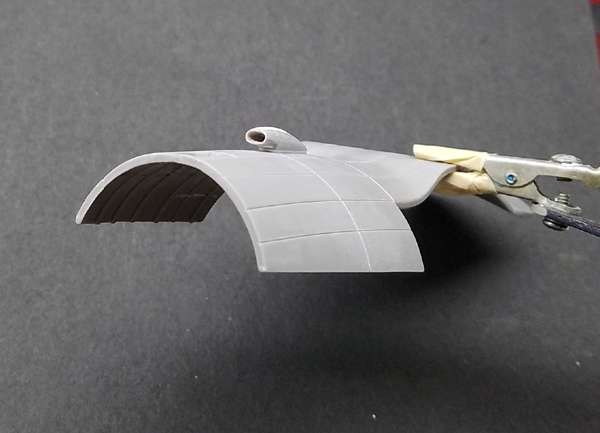
Since I  plan to detail both the cockpit and the cargo compartment, I've cut a removable section out of the top of the model, as shown below, similar to what I did with my Rivet Clamp model
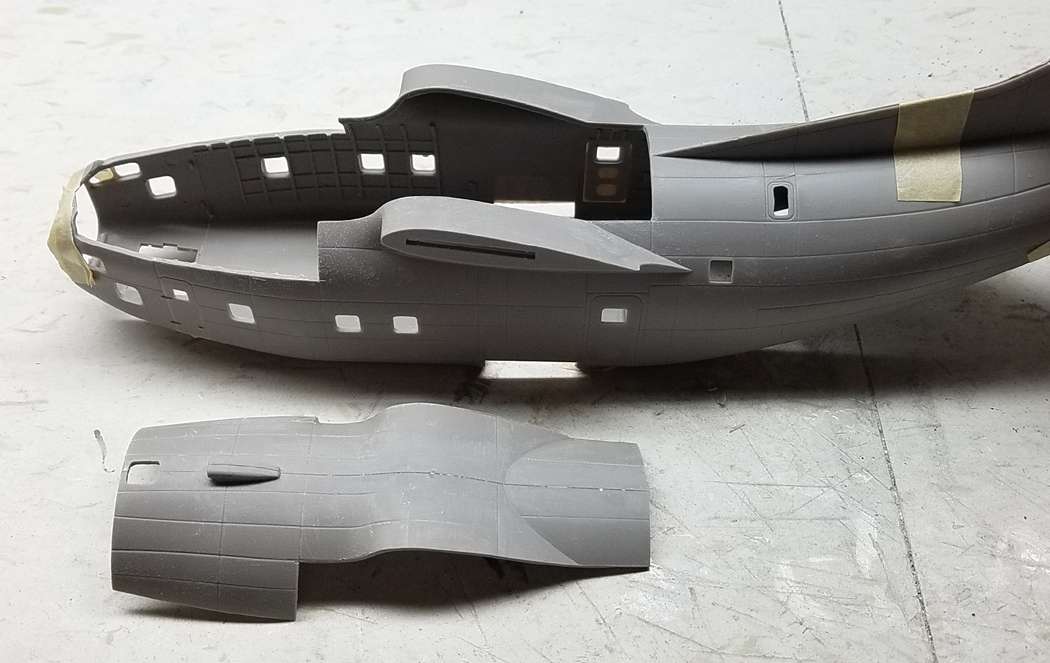
Understandably, Roden left off the loadmaster's station inside the cargo bay, which is complex and would be hard to see anyway. But since I'll be able to remove the top, I'm going to take a stab at scratch building it. Also, the Black Bat aircraft had a defensive operator's console on the right side of the forward cargo deck and I'll add that as well, although my memory of how it looked is pretty dim.
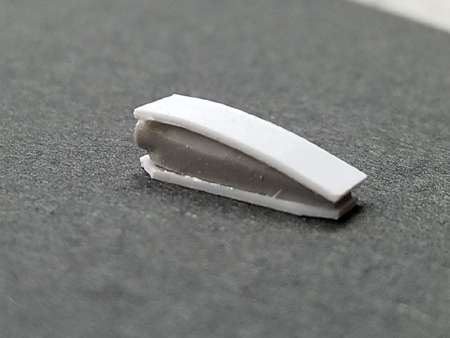
The first correction I made was to reshape the ram air scoop molded on top of the fuselage. Its shape is basically correct except that the intake is too close to the fuselage and the top of the scoop is too flat. I cut the scoop off flush with the fuselage and added a strip of 1 mm-thick plastic to the bottom and top, then trimmed and sanded it to shape. The modified scoop is shown below.

 

I'm itching to get at the cockpit next, but because of the way the model is assembled, I'll first have to construct and detail the nose wheel well and cheek compartments.

Cheers and thanks for looking!


  • Member since
    April 2015
Posted by Mopar Madness on Sunday, December 15, 2019 1:02 PM

I must admit I've never heard of a C-123. Looking forward to seeing how this comes about.

Chad

God, Family, Models...

At the plate: 1/48 Airfix Bf109 & 1/35 Tamiya Famo

On deck: Who knows!

  • Member since
    December 2002
  • From: Northern California
Posted by jeaton01 on Sunday, December 15, 2019 3:47 PM


You're going to make me look bad, Stryker.  I'm building one of these in the current Viet Nam GB.  You should join us!

John

To see build logs for my models:  http://goldeneramodel.com/mymodels/mymodels.html


  • Member since
    July 2004
  • From: Sonora Desert
Posted by stikpusher on Sunday, December 15, 2019 4:11 PM

What was the tasking of the Heavy Hook/Black Bat C-123? 


F is for FIRE, That burns down the whole town!

U is for URANIUM... BOMBS!

N is for NO SURVIVORS...

       - Plankton

LSM


  • Member since
    May 2009
  • From: Poland
Posted by Pawel on Sunday, December 15, 2019 6:20 PM

Hello Russ!

Good to see you building again!

And dang, your build list looks like the list of aircraft I would like to do some day if I had the idea where to get the references... You got all the references the hard way!

Good lck with your build and have a nice day

Paweł

All comments and critique welcomed. Thanks for your honest opinions!

www.vietnam.net.pl

  • Member since
    December 2016
Posted by Blackpowder1956 on Sunday, December 15, 2019 7:36 PM

My father Carleton Johnson LtCol USAF retired flew C-123's out of Phan Rang AFB, South Vietnam 1967-68. He mainly flew food, ammo and supplies. Occasionally flew troops as well as prisoners. He was involved in the air support of the Marines at Khe Sanh. I too have this Roden kit in my stash to build as one of the WX birds Dad flew. - Mike

  • Member since
    April 2012
  • From: USA
Posted by Striker8241 on Monday, December 16, 2019 8:33 AM

Welcome, Chad!

The C-123 was the main workhorse in Vietnam for delivering supplies and troops into small and underdeveloped airfields. It was originally designed as a glider but it was so well built that they were able to add engines to it.

Cheers,

Russ


  • Member since
    April 2012
  • From: USA
Posted by Striker8241 on Monday, December 16, 2019 8:56 AM

jeaton01


You're going to make me look bad, Stryker.  I'm building one of these in the current Viet Nam GB.  You should join us!


Hello, John, and welcome!

No, my friend, that would never be my intention, nor would it be possible. Your work is far better than mine. I'll be watching your build with interest.

I had originally planned to build the 123 in the Viet Nam build, but I soon realized it's going to take much longer than six months and I just don't have a lot of time right now. What little progress I've made was mostly done during the summer. I changed to the F-105 Combat Martin for the VN build but had to give that up too.

After the first of the year, I may have the time to build again and if so, I'll come on board.

Cheers,

Russ


  • Member since
    April 2012
  • From: USA
Posted by Striker8241 on Monday, December 16, 2019 9:07 AM

stikpusher

What was the tasking of the Heavy Hook/Black Bat C-123? 


Hello, Stikpusher, and welcome!

They were modified to fly at night, low level into North Vietnam and... elsewhere, to pickup and deliver special ops troops and to bring in supplies to remote sites. They had a string of hair-raising missions but kept mum about it. We knew very little about what they were doing.

Cheers,

Russ


  • Member since
    April 2012
  • From: USA
Posted by Striker8241 on Monday, December 16, 2019 9:25 AM

Pawel

Hello Russ!

Good to see you building again!

And dang, your build list looks like the list of aircraft I would like to do some day if I had the idea where to get the references... You got all the references the hard way!

Good lck with your build and have a nice day

Paweł


Thanks, Pawel, and welcome!

Actually, I don't have a lot of references myself. Photography was forbidden, but just like with the Rivet Clamp C-130s, there were some pictures taken. Unfortunately, they're mostly front quarter views from a distance. I don't have any pictures of the aircraft that show the sensors aft of the wings and in the tail. I'll just have to guess on those. And I doubt you'll ever find any taken inside the aircraft.

Cheers,

Russ


  • Member since
    April 2012
  • From: USA
Posted by Striker8241 on Monday, December 16, 2019 9:34 AM

Blackpowder1956

My father Carleton Johnson LtCol USAF retired flew C-123's out of Phan Rang AFB, South Vietnam 1967-68. He mainly flew food, ammo and supplies. Occasionally flew troops as well as prisoners. He was involved in the air support of the Marines at Khe Sanh. I too have this Roden kit in my stash to build as one of the WX birds Dad flew. - Mike


Welcome, Mike!

Seems like I've seen something about your father flying C-123s that was posted online. I'll try to find it again. If he flew into Khe Sanh, he was one brave dude! Did he by chance fly WX birds out of Keesler AFB?

Cheers,

Russ


  • Member since
    July 2004
  • From: Sonora Desert
Posted by stikpusher on Monday, December 16, 2019 11:18 AM

Striker8241


stikpusher

What was the tasking of the Heavy Hook/Black Bat C-123? 


Hello, Stikpusher, and welcome!

They were modified to fly at night, low level into North Vietnam and... elsewhere, to pickup and deliver special ops troops and to bring in supplies to remote sites. They had a string of hair-raising missions but kept mum about it. We knew very little about what they were doing.

Cheers,

Russ


Got ya. Keeping mum is what you’re supposed to do. Unlike certain blabber mouths today who like to write their tell all books while things are still going on....


F is for FIRE, That burns down the whole town!

U is for URANIUM... BOMBS!

N is for NO SURVIVORS...

       - Plankton

LSM


  • Member since
    June 2017
Posted by jmoran426 on Monday, December 16, 2019 11:45 AM
Hello, John! I've got the Roden 1/72 C-123 as well, and was planning on rendering it as a K model. I'm planning to do the ones that flew spotter missions over the HoChiMihn trail, looking for trucks. The stories I've heard were that there was a center-line hatch in the floor of the aircraft where an airman equipped with night-vision equipment would lie prone on the deck and look through the hatch-hole to spot movement on the trail. When they found something, night-prowling A-1 Skyraiders would come in to take them out. BTW, where will you be getting your jet pods to make it a "K". I've got an AC-119 that has the jet assist pods I was thinking of recasting copies of, but if you've got a better source, I'd love to hear about it.

jmoran426

  • Member since
    April 2012
  • From: USA
Posted by Striker8241 on Monday, December 16, 2019 5:32 PM

jmoran426
Hello, John! I've got the Roden 1/72 C-123 as well, and was planning on rendering it as a K model. I'm planning to do the ones that flew spotter missions over the HoChiMihn trail, looking for trucks. The stories I've heard were that there was a center-line hatch in the floor of the aircraft where an airman equipped with night-vision equipment would lie prone on the deck and look through the hatch-hole to spot movement on the trail. When they found something, night-prowling A-1 Skyraiders would come in to take them out. BTW, where will you be getting your jet pods to make it a "K". I've got an AC-119 that has the jet assist pods I was thinking of recasting copies of, but if you've got a better source, I'd love to hear about it.
 

Hello, jmoran426 and welcome!

That's a good question, since those little rascals are hard to come by. Mine are coming from a Roden C-123K Black Spot kit that I bought just for the engines and as a source of spare parts for this build.

Cheers,

Russ


  • Member since
    December 2016
Posted by Blackpowder1956 on Monday, December 16, 2019 6:30 PM

Striker8241


Blackpowder1956

My father Carleton Johnson LtCol USAF retired flew C-123's out of Phan Rang AFB, South Vietnam 1967-68. He mainly flew food, ammo and supplies. Occasionally flew troops as well as prisoners. He was involved in the air support of the Marines at Khe Sanh. I too have this Roden kit in my stash to build as one of the WX birds Dad flew. - Mike


Welcome, Mike!

Seems like I've seen something about your father flying C-123s that was posted online. I'll try to find it again. If he flew into Khe Sanh, he was one brave dude! Did he by chance fly WX birds out of Keesler AFB?

Cheers,

Russ

 Russ he was a hard charger! They lost an engine on approach to the drop zone and had a planeload of ammo on board. Anyways they delivered the goods and he eventually received the Bronze Star with Valor. He never was at Keesler that I know of. Dad was a C-118 pilot in Weisbaden when his best friend John "Jack" Goeglein got orders to go to Jolly Green helo school as they needed helo pilots. Dad volunteered for SE Asia as a 123 pilot (he had time in 123's I believe at Mather AFB (was training in twins T-29s and 123's. Anyways Jack got shot down and KIA over the Laotian border trying to rescue  a jet pilot. I have tons of photos of him at hole in the wall airstrips. Fast forward about 15 years, I was a LT, US Navy  Medical Officer at Naval Station Roosevelt Roads Puerto Rico. There was a Maine Air National Guard Unit flying several C-123's one of which had WX on the tail. I stopped by the flight line and talked to a Pilot. The following afternoon they took me up in the WX bird and I got to see them drop the ramp and commence parachute ops over our base. Sadly Dad died in 2002 of the same type of brain tumor that killed John Mccain. Dad had a career that spanned the latter half of the Korean War, flew fighters for the first ten years (F-86s in Korea) and then multi engine prop C-54s, C-118s, multi engine jet C-9s and C-141s. After retirement until his death at age 70 he worked as a civilian engineer at AFRL at Wright Patt.The WX bird he flew was in SE Asia.

  • Member since
    April 2012
  • From: USA
Posted by Striker8241 on Tuesday, December 17, 2019 8:29 AM

Ahh... my mistake! You were talking WX = tail code; I was thinking WX = weather. You have every reason to be proud of your father, Mike - he had an impressive career. Thanks for the background!

Cheers,

Russ


  • Member since
    April 2012
  • From: USA
Posted by Striker8241 on Sunday, December 29, 2019 3:04 PM

Hi, All. Hope everyone had a great Christmas.

I should be doing the nose gear area first, but I just had do something with the cockpit. So when no one was looking, I attacked the instrument panel (IP).

Overall, the kit cockpit detail is pretty good. However, they left off the steering wheel assembly which would sit just under the left end of the IP. I discovered that  the kit IP is about 3 mm too short overall to accommodate it, so I replaced the kit IP with a longer scratch built panel as shown below. I pieced together a scale picture of the IP from a number of different photos and edited out the two control wheels and the throttle controls. The colors look a little weird because the panel was photographed under florescent lights.


The steering wheel assembly still wouldn't fit comfortably because the rudder pedal assemblies were a bit too wide, so I trimmed them back a little and moved them inward. Now the steering box will have room to reside under the IP.

 Next, the shape of the sun shield on top of the IP was not quite right. It slopes pretty severely from the front edge toward the rear, but all the photos I've been able to find indicate that the top cover was fairly level, so I made a scratch built version, as shown below.


Ok - back to the nose gear area...... maybe....


  • Member since
    May 2009
  • From: Poland
Posted by Pawel on Sunday, December 29, 2019 3:16 PM

Hello Russ!

Cool work, as always! Looking forward to the next updates - good luck with your build and have a nice day

Paweł

All comments and critique welcomed. Thanks for your honest opinions!

www.vietnam.net.pl

  • Member since
    August 2009
  • From: Borlando Fla home of the rat
Posted by TREYZX10R on Sunday, December 29, 2019 8:42 PM

That IP looks tasty!!! Great to see You back at it Russ!

  • Member since
    April 2012
  • From: USA
Posted by Striker8241 on Monday, December 30, 2019 4:46 PM


Thanks, Pawel! Have a great day and a Happy New Year!

Cheers,

Russ


  • Member since
    April 2012
  • From: USA
Posted by Striker8241 on Monday, December 30, 2019 5:30 PM

Thanks, Trey! Very much appreciated!


  • Member since
    April 2012
  • From: USA
Posted by Striker8241 on Tuesday, January 7, 2020 7:24 PM

The kit nose wheel well detail is not quite correct or complete but that's not a big deal, especially since it's going to be hard to see any detail in there. However, I have to feed my urge to mess with things so I added some braces and supports that weren't included in the kit and I kludged together some motors and hydraulic pumps. I stopped short of adding wiring harnesses and hydraulic lines but I may add them later.

Below are front and back views of the nose wheel well.

Thanks for looking!

Cheers,

Russ


  • Member since
    December 2002
  • From: Northern California
Posted by jeaton01 on Wednesday, January 8, 2020 3:36 PM

Good work, Russ.  Beware, I'm watchingGeeked

John

To see build logs for my models:  http://goldeneramodel.com/mymodels/mymodels.html


  • Member since
    April 2012
  • From: USA
Posted by Striker8241 on Thursday, January 9, 2020 8:29 AM

Thanks, John! Glad to know you're keeping an eye on me Smile


  • Member since
    April 2012
  • From: USA
Posted by Striker8241 on Sunday, January 26, 2020 4:08 PM

Been very busy lately but I managed to do a few things, like upgrade the crew seats. The kit seats are nicely done out of the box but there are a some things that needed fixing. The headrests were too small so I scratched some new ones. And the armrests were too thick so I trimmed them down a bit and shaped them more accurately. I posed the inside armrests in the up position, as they normally were for easier access when the aircraft was on the ground.

The pictures below show the seats prior to painting, which I'll have to do later. I'll then add the seat belts and the panels behind the headrests.

Cheers and many thanks for looking!


  • Member since
    December 2002
  • From: Northern California
Posted by jeaton01 on Sunday, January 26, 2020 4:21 PM

Geeked

John

To see build logs for my models:  http://goldeneramodel.com/mymodels/mymodels.html


  • Member since
    April 2012
  • From: USA
Posted by Striker8241 on Tuesday, January 28, 2020 11:37 AM

Big Smile


  • Member since
    April 2012
  • From: USA
Posted by Striker8241 on Friday, April 17, 2020 5:06 PM

Hello, All,

Hope you are all safe and healthy!

I've had more time to build lately, so I started back working on the IP. I had to trim my new glare shield to match the curve of the front windshield using the cuss and fit method Smile Luckily it is only 0.5 mm thick, so it was a lot easier to work with. The picture below shows how it looks so far. The actual glare shield had a much more intricate shape but without accurate measurements, it would be extremely difficult to replicate.

I built a steering wheel assembly to place under the left edge of the IP. The kit control yokes were too small in diameter and also too long, so I made new ones and added some thumb switches.

 I painted the seats and added the seat belts. Then I tackled the center console. The one that comes with the kit is too high and the overall detail is pretty poor, so I cut it down and added some detail, and I replaced the throttle cluster with a scratch built one.


I scratch built the small avionics rack that was located between the copilot's seat and the right fuselage (barely seen on the left in the photos below. Then I added some insulation, the cabin braces, oxygen bottles and some miscellaneous piping and cabling.


I added some detail in the cheek compartments since it can be seen through the nose windows.


Cheers and thanks for looking!


  • Member since
    April 2012
  • From: USA
Posted by Striker8241 on Thursday, September 2, 2021 6:42 PM

I came across an interesting discrepancy between the Roden C-123 kit and the pictures I have of actual aircraft. The kit fuselage appears to be about 2-3 scale feet shorter at the top of the forward bulkhead as compared to the real aircraft. This would mean the upper curve of the kit fuselage is narrower and shorter than it should be.

Is the taller fuselage actually a modification in later versions? I haven't found any pictures that show the shorter bulkhead. In any case, it's not a problem - unless you're a fanatic about C-123s Smile


  • Member since
    April 2012
  • From: USA
Posted by Striker8241 on Tuesday, October 12, 2021 7:15 PM

Just a quick update - I completed the cargo deck flooring and began adding ribbing detail to the sides of the fuselage.

Cheers!


JOIN OUR COMMUNITY!

Our community is FREE to join. To participate you must either login or register for an account.

SEARCH FORUMS
FREE NEWSLETTER
By signing up you may also receive reader surveys and occasional special offers. We do not sell, rent or trade our email lists. View our Privacy Policy.