SEARCH FINESCALE.COM

Enter keywords or a search phrase below:

1/72 Modelcollect B-52G Build

1560 views
8 replies
1 rating 2 rating 3 rating 4 rating 5 rating
  • Member since
    April 2020
1/72 Modelcollect B-52G Build
Posted by Eaglecash867 on Sunday, May 17, 2020 2:51 PM

Hi everybody,

Starting to do test fitting on the various components of the flight deck.  I'm using a lot of Eduard photo etch on this one, along with 6 resin Wolfpack F-5 seats.  The seats that come with the kit are a mismatch of 4 ACES II seats, and 2 Webers.  I know the F-5 seats aren't 100% accurate either, but they're much closer in appearance to B-52 seats and the kit rails mated to them perfectly.

"You can have my illegal fireworks when you pry them from my cold, dead fingers...which are...over there somewhere."

  • Member since
    November 2003
  • From: State of Mississippi. State motto: Virtute et armis (By valor and arms)
Posted by mississippivol on Sunday, May 17, 2020 4:21 PM
That's going to be a big bird to display, looking forward to seeing it!
  • Member since
    January 2015
Posted by TheMongoose on Monday, May 18, 2020 7:33 AM

I like the idea of the F-5 seats. Adds some detail to what could be a bland cockpit in this scale. How's the glass look on this kit, thick or can you see your details through it?

In the pattern: Scale Shipyard's 1/48 Balao Class Sub! leaning out the list...NOT! Ha, added to it again - Viper MkVii, 1/32 THUD & F-15J plus a weekend madness build!

  • Member since
    August 2015
  • From: the redlands Fl
Posted by crown r n7 on Monday, May 18, 2020 8:44 AM

Yes, I like the BUFF, I wonder what camo? or bare metal? the flight deck looks great.


 Nick.

  • Member since
    April 2020
Posted by Eaglecash867 on Monday, May 18, 2020 11:03 AM

Thanks guys.

TheMongoose, the windscreen is fairly thick, but transparency is really good so some of the detail should be visible.  This thing has a fairly complex interior, which includes the lower deck, so a lot of the details won't be visible.  I guess I'm just doing the interior detailing more to see if I can do it...for the challenge.  I'll have photos of the interior when its completed, so I can remember what it looks like after its forever entombed inside the fuselage.

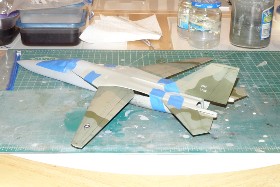
crown r n7, I'll be doing the SIOP camo scheme.  I have an FB-111A also in the works that I've done that scheme for, and I really like how that looks, so the BUFF will be in the same scheme.

Here's a pic of one of my MANY test fits on that FB-111A with some of the camo done.  I've been modifying the hell out of it with a super-detailed cockpit, seamless intakes, and an open weapons bay.  That's going really well so far, but its a pretty nerve-wracking process, so I put it on the back burner for a little while.


"You can have my illegal fireworks when you pry them from my cold, dead fingers...which are...over there somewhere."

  • Member since
    April 2012
  • From: USA
Posted by Striker8241 on Tuesday, May 19, 2020 5:58 PM

Very nice start, Eaglecash. That cockpit is going to look great! However, instead of sealing up all that detail work, you might consider cutting out part of the roof including the roof over the cockpit and one side of the fuselage,  following the panel lines, so you can display the detail. The cuttout can be put back in place when your not showing the insides.

Cheers and good luck, whatever you decide!


  • Member since
    April 2020
Posted by Eaglecash867 on Friday, June 5, 2020 6:12 PM

Thanks Striker.  I took your suggestion, so I found another forward fuselage sprue for the kit on Ebay.  I mostly bought the spare sprue just in case I screw up, but I may just end up making a separate display of just the forward fuselage with the cutaway concept.  Haven't quite figured out how I'm going to implement it yet.  My jeweler's saw will be perfect for the job as long as I can figure out a way to keep the cuts absolutely straight so the panels can go back on.  Had a little set-back with the center console in the Eduard interior kit (good thing I had a spare).  The center console part is very thin photo etch and I ended up breaking it into 3 pieces just from the metal fatigue caused by me figuring out what sequence to bend things in.  Ended up scratch-building an internal support structure for the photo-etch panels, so hopefully my spare will survive in one piece.  Just waiting for the Future to fully cure on the support structure.  I painted it the same color as the photo-etch so it won't show through at the corners.


"You can have my illegal fireworks when you pry them from my cold, dead fingers...which are...over there somewhere."

  • Member since
    October 2019
  • From: New Braunfels, Texas
Posted by Tanker-Builder on Friday, June 5, 2020 6:46 PM

EagleCash867;

        Here's a suggestion for you too, iffin ya'll don't mind, If ya'll got to do a lot of sawing then get some P.E. Modeling saws. They are not that hard to use,are stainless, and come in at leats four thicknesses. There are some thin enough  they can remove panels and stuff without obliterating the details!

  • Member since
    April 2020
Posted by Eaglecash867 on Friday, June 5, 2020 6:59 PM

Thanks Tanker-Builder.  Now that you mentioned it, I think I have a set of PE saws that I bought a while ago for something, but haven't used them yet.  I'll see if I can find them and give them a try.  Big Smile

"You can have my illegal fireworks when you pry them from my cold, dead fingers...which are...over there somewhere."

JOIN OUR COMMUNITY!

Our community is FREE to join. To participate you must either login or register for an account.

SEARCH FORUMS
FREE NEWSLETTER
By signing up you may also receive reader surveys and occasional special offers. We do not sell, rent or trade our email lists. View our Privacy Policy.