SEARCH FINESCALE.COM

Enter keywords or a search phrase below:

Hobby Boss F-111A Aardvark 1-48

3079 views
25 replies
1 rating 2 rating 3 rating 4 rating 5 rating
  • Member since
    January 2015
  • From: Katy, TX
Posted by Aggieman on Thursday, May 28, 2020 8:44 AM

Mopar Madness

That's one nice looking Aardvark, lean and all!  In 1/48, that's got to be a shelf hog. 


Thanks Chad!

It is indeed a big one.  Too big for any of my shelving, so I have mounted it to the wall alongside all the other post-Korea jets that I've built over the years (and most of those were built in the last 3 months).

  • Member since
    October 2004
  • From: Orlando, Florida
Posted by ikar01 on Wednesday, May 27, 2020 9:19 PM

I just found a shot of the tail sensor:


I give up, I can't get this particular picture to transfer over.  sorry


  • Member since
    April 2015
Posted by Mopar Madness on Wednesday, May 27, 2020 5:23 PM

That's one nice looking Aardvark, lean and all!  In 1/48, that's got to be a shelf hog. 

Chad

God, Family, Models...

At the plate: 1/48 Airfix Bf109 & 1/35 Tamiya Famo

On deck: Who knows!

  • Member since
    January 2015
  • From: Katy, TX
Posted by Aggieman on Wednesday, May 27, 2020 4:40 PM

plasticjunkie

 The SEA paint scheme looks Yes. Great job Aggie.


Thanks PlasticJunkie!

  • Member since
    November 2008
  • From: Central Florida
Posted by plasticjunkie on Wednesday, May 27, 2020 9:13 AM

 The SEA paint scheme looks Yes. Great job Aggie.

 GIFMaker.org_jy_Ayj_O


Too many models to build, not enough time in a lifetime!!

  • Member since
    January 2015
  • From: Katy, TX
Posted by Aggieman on Tuesday, May 26, 2020 5:23 PM

jeaton01

Well done Stephen.  Let the air out of the other tire!


Thank you for your kind words, John!


  • Member since
    January 2015
  • From: Katy, TX
Posted by Aggieman on Tuesday, May 26, 2020 5:22 PM

Real G

Yep, your camo colors are bang-on.  The Hobby Boss kit is really boogered up in many major details, but once built, looks exactly like an F-111, as your build proves.  And finished kits count more than stashed boxes IMO. Yes


Thank you for your kind words!

  • Member since
    January 2015
  • From: Katy, TX
Posted by Aggieman on Tuesday, May 26, 2020 5:22 PM

Chemteacher
Great job. Your SEA looks awesome. Friend of mine from college worked on ECM pods on these birds. Thanks for sharing your talents.
 

Thank you for your kind words, Chemteacher.

-Signed, son of a chemist who spent his 35 year career with Shell Oil

  • Member since
    January 2015
  • From: Katy, TX
Posted by Aggieman on Tuesday, May 26, 2020 5:20 PM

ikar01

I agree on the pylons being backwards.  Here's a few shots of the "A" models in South East Asia:


I had a shot of the tail from the rear, but at the moment I can't seem to find it.  The sensor at the tip of the tail was a deep blue glass.  If I find the shot again I'll post it for you.


Thanks for all the great photos you shared!

  • Member since
    January 2015
  • From: Katy, TX
Posted by Aggieman on Tuesday, May 26, 2020 5:19 PM

stikpusher

Very nice work on the Aardvark. That looks real sharp. But yeah I bet you are done with jets for awhile now. And yes, on the wing pylons, you have them mounted reversed. The the 30* should be the leading edge, and the 80* side should be the trailing edge. Also they should be the same color as the wing bottom. Only the initial production F-111A aircraft had the light colors on the undersides, and those were overpainted for deployment to SEA.


Thanks Stik! I had run across that detail about the underside being painted in a dark color (typically black but some earlier F-111s apparently were painted olive green on the underside as well), but I never associated that with the pylons.

Honestly, I should go ahead and fix this problem.

  • Member since
    January 2015
  • From: Katy, TX
Posted by Aggieman on Tuesday, May 26, 2020 5:17 PM

goldhammer

Nice paint work.

Looks like you are correct on the wing pylons..the angle should be facing forward.


Thanks!

I didn't actually notice the pylon issue until I was reviewing this post with the pictures. I can't believe I made that mistake; just simple carelessness on my part. And then an ambivalent attitude since I had attached the pylons with CA and did not want to spend the time it would have required to correct the pylons, along with likely re-painting.

  • Member since
    January 2015
  • From: Katy, TX
Posted by Aggieman on Tuesday, May 26, 2020 5:14 PM

JohnnyK

Very nice build and nice paint job! Yes, Hobby Boss does make nice kits. Their P-38 goes together with no problems.


Thank you for your kind words, Johnny! 

Having built several Monogram P-38s, an Academy P-38, and a Monogram Pro-Modeler P-38 (which I think was a rebox of the Hasegawa kit), and having an original issue Monogram plus the new Tamiya P-38 kits in the stash, I doubt I'll be doing the HB -38. Is that one of their "easy" releases, whatever they call those?

  • Member since
    January 2015
  • From: Katy, TX
Posted by Aggieman on Tuesday, May 26, 2020 5:12 PM

JacknewbIII

Really nice job on that Aardvark!


Thanks!

  • Member since
    January 2015
  • From: Katy, TX
Posted by Aggieman on Tuesday, May 26, 2020 5:11 PM

keavdog

Nice job.  And you have been cranking out the kits my friend!  I second your comments about hobby boss.  I'm working on my second kit and researching paint online.  Weird that they dont have a single callout for interior colors.  They are nice to build though.  The F-111 is an impressive model and you dont see them very often.  Well done..


Thank you, John!  What's odd about the interior painting is they do indicate painting for some parts, but nothing for the overall interior.  At least in the F-105 and F-111 that I've completed recently.

  • Member since
    January 2015
  • From: Katy, TX
Posted by Aggieman on Tuesday, May 26, 2020 5:10 PM

GMorrison

Very nice model. Why don't you mount it on a short clear peg as if landing. A lot of these kits make the gear struts at full extension, not compressed. Not the problem here, but I think it'd look good.


Thanks!  I agree that would look great, but I don't really have horizontal display space for this huge build.  I hung it on my "jet wall" in one of my bedrooms.

  • Member since
    December 2002
  • From: Northern California
Posted by jeaton01 on Tuesday, May 26, 2020 11:23 AM

Well done Stephen.  Let the air out of the other tire!

John

To see build logs for my models:  http://goldeneramodel.com/mymodels/mymodels.html


  • Member since
    May 2011
  • From: Honolulu, Hawaii
Posted by Real G on Monday, May 25, 2020 11:50 PM

Yep, your camo colors are bang-on.  The Hobby Boss kit is really boogered up in many major details, but once built, looks exactly like an F-111, as your build proves.  And finished kits count more than stashed boxes IMO. Yes

“Ya ya ya, unicorn papoi!”

  • Member since
    June 2017
Posted by Chemteacher on Monday, May 25, 2020 7:16 PM
Great job. Your SEA looks awesome. Friend of mine from college worked on ECM pods on these birds. Thanks for sharing your talents.

On the bench: Revell-USS Arizona; Airfix P-51D in 1/72

  • Member since
    October 2004
  • From: Orlando, Florida
Posted by ikar01 on Monday, May 25, 2020 6:21 PM

  • Member since
    July 2004
  • From: Sonora Desert
Posted by stikpusher on Monday, May 25, 2020 5:28 PM

Very nice work on the Aardvark. That looks real sharp. But yeah I bet you are done with jets for awhile now. And yes, on the wing pylons, you have them mounted reversed. The the 30* should be the leading edge, and the 80* side should be the trailing edge. Also they should be the same color as the wing bottom. Only the initial production F-111A aircraft had the light colors on the undersides, and those were overpainted for deployment to SEA.


F is for FIRE, That burns down the whole town!

U is for URANIUM... BOMBS!

N is for NO SURVIVORS...

       - Plankton

LSM


  • Member since
    August 2014
  • From: Willamette Valley, Oregon
Posted by goldhammer on Monday, May 25, 2020 5:11 PM

Nice paint work.

Looks like you are correct on the wing pylons..the angle should be facing forward.

  • Member since
    March 2015
  • From: Close to Chicago
Posted by JohnnyK on Monday, May 25, 2020 3:47 PM

Very nice build and nice paint job! Yes, Hobby Boss does make nice kits. Their P-38 goes together with no problems.

Your comments and questions are always welcome.

  • Member since
    October 2009
Posted by JacknewbIII on Monday, May 25, 2020 3:33 PM

Really nice job on that Aardvark!

  • Member since
    April 2003
  • From: USA
Posted by keavdog on Monday, May 25, 2020 12:32 PM

Nice job.  And you have been cranking out the kits my friend!  I second your comments about hobby boss.  I'm working on my second kit and researching paint online.  Weird that they dont have a single callout for interior colors.  They are nice to build though.  The F-111 is an impressive model and you dont see them very often.  Well done..

Thanks,

John

  • Member since
    September 2012
Posted by GMorrison on Monday, May 25, 2020 11:38 AM

Very nice model. Why don't you mount it on a short clear peg as if landing. A lot of these kits make the gear struts at full extension, not compressed. Not the problem here, but I think it'd look good.

 Modeling is an excuse to buy books.


  • Member since
    January 2015
  • From: Katy, TX
Hobby Boss F-111A Aardvark 1-48
Posted by Aggieman on Monday, May 25, 2020 11:28 AM

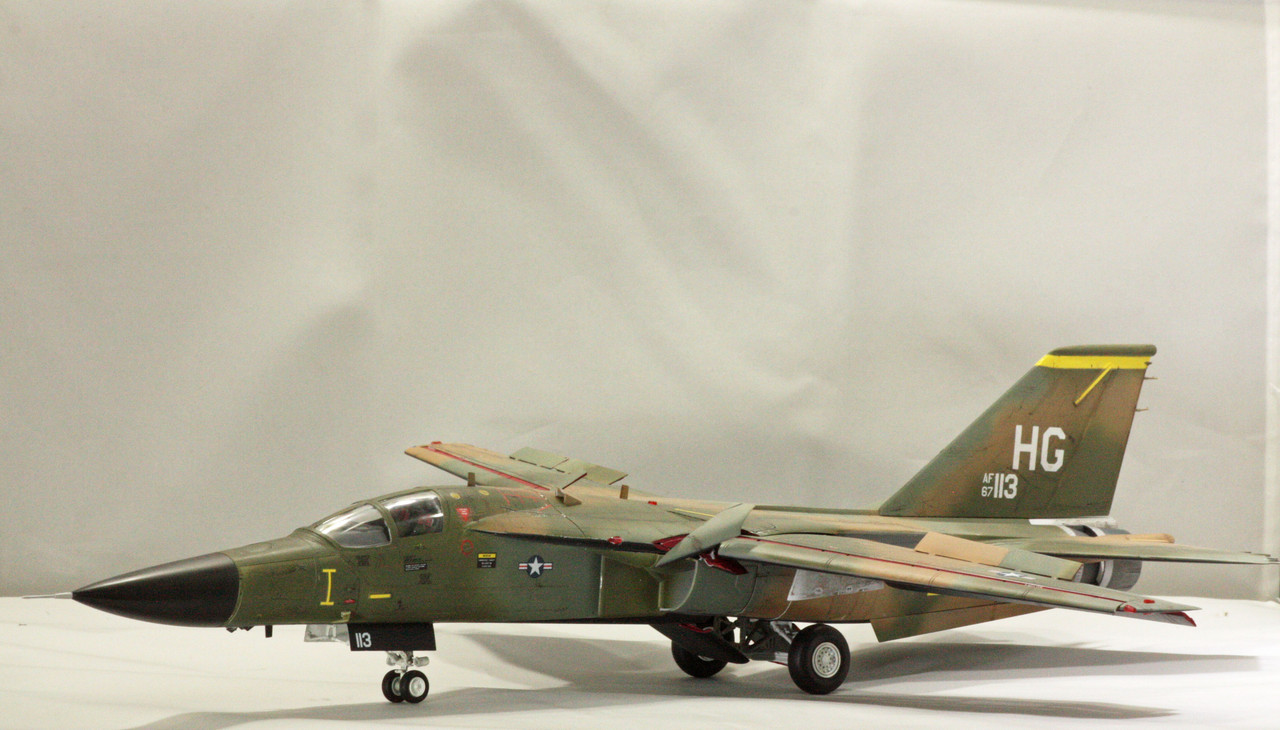
My great "jet-a-thon" for 2020 is now done.  I definitely have a case of jet fatigue on the heels of the entire Century Series and now this beast.

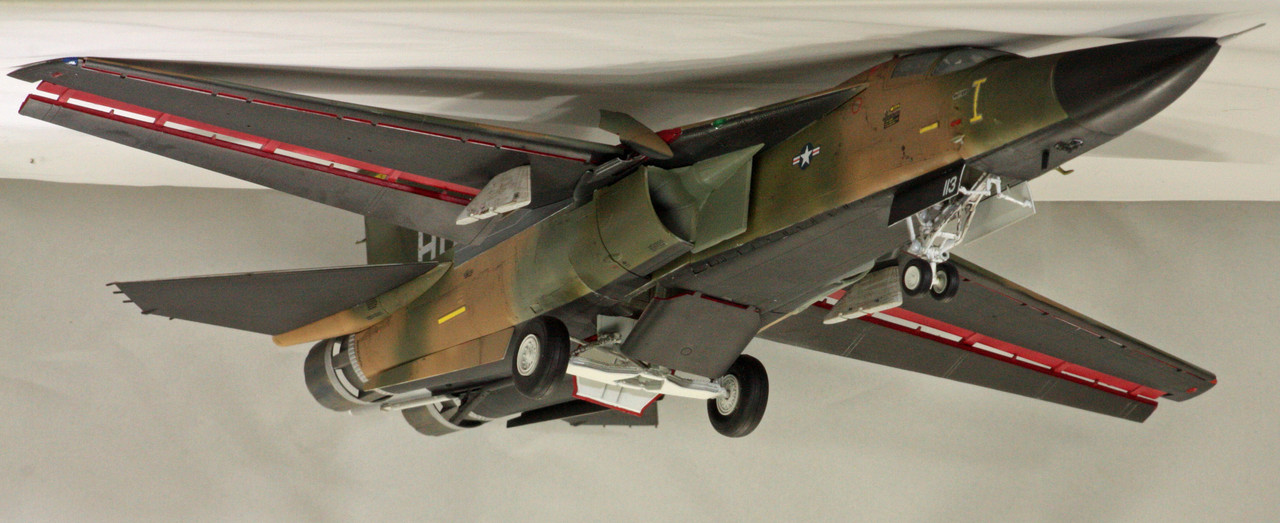
I apologize for the coming rant on Memorial Day, but Hobby Boss frustrates me to no end. Their kits are pretty good, come with good detail, and generally go together okay (although each one I've done has presented me with some challenges) - but their quality control or perhaps it's their research leaves me wanting, particularly with regard to their instructions and painting guide.  Unlike most kits that Hasegawa produces, Hobby Boss loads theirs up with ordinance, which is a good thing. But I'd sure like some information included in the kit as to what ordinance a particular aircraft actually carries. The instructions would have you load this one up with all kinds of things, but everything I found online suggested such a load-out would not be accurate.  Then the mounting of something like the ALQ-87 pod is, based on actual photos I found, completely wrong, and of course the kit does not provide correct mounting parts or any note of where that thing should go (2 of them, one forward and one rear of the main landing gear, not on the wing mounts).

In the end I opted to mount a single wing rack with Mk. 82 bombs - and then, either the instructions were notoriously lacking or I did something wrong.  I might actually lean toward the latter.  I built this thing with the flaps deployed, and when I went to install the bomb racks, there was insufficient room to allow the bombs to fit.  I then opted to just leave the bombs and their rack off (but the mounting rack is still there, although I think I may have put those on facing the wrong direction, which may account for the lack of space).

Well, I could go on with my rant, but I think I've said enough on the matter.

I liked the detail in this kit.  The cockpit looks good, the exhaust cans look good, the wheel wells have some good stuff going on in there even though you really can't see much once everything is in place.  Parts fit pretty tightly.  The primary landing gear, though, is problematic, quite wobbly.  I wonder if crews experienced issues with that gear structure, similar to the well-known problems the Bf109s had.  Or did I not get it installed correctly?  Photos below will show an airplane that is sitting askew.  There does not appear to be anything I can do about that, save for ripping the gear off and attempting to fix, a task that I am loathe to do.

The flaps are quite fragile, but I liked the look the deployed flaps give this bird.

Paints were largely the Vallejo SEA set, with some Tamiya khaki and NATO green, Model Master Metalizer jet exhaust, titanium, and aluminum, and Vallejo red and yellow.  I weathered the exhaust cans with Tamiya weathering compounds, ground gray pastels on the underside, and Flory dark dirt wash on the top side.  Sprayed with a good coat of Mission Models' flat clear.

So on to the photos:

That's it for me with jets for a while.  I still have several in my stash, but I think I'm fine if I don't see another exhaust can for a good while.  Back to WWII subjects for me (and I've already built the Me262 and Gloster Meteor, although I do have a Monogram and Hobby Boss P-80 in the stash).  Next up is a Yak-1.

JOIN OUR COMMUNITY!

Our community is FREE to join. To participate you must either login or register for an account.

SEARCH FORUMS
FREE NEWSLETTER
By signing up you may also receive reader surveys and occasional special offers. We do not sell, rent or trade our email lists. View our Privacy Policy.