SEARCH FINESCALE.COM

Enter keywords or a search phrase below:

MPM 1/48 Heinkel He 177A-5 Greif - Complete

8119 views
37 replies
1 rating 2 rating 3 rating 4 rating 5 rating
  • Member since
    January 2015
  • From: Katy, TX
MPM 1/48 Heinkel He 177A-5 Greif - Complete
Posted by Aggieman on Saturday, October 3, 2020 12:41 PM

It is glorious here in SE Texas today.  Temps have been almost unseasonably cool, with bright sunshine, college football is back, and I'm back at my bench.  Well, I seem to have spent an inordinate amount of time at the bench this year, so only the weather has really changed.

I am going to do a work-in-progress with this build, MPM's big Heinkel He 177A-5 Greif (Griffon is how that translates).  In recent years I've built a couple of other Heinkel warbirds - Special Hobby's 1/48 He 115B-1 and Revell's huge 1/32 He 111P-1, and curiously, I did WIP's on those as well.  I'm not sure what I find so fascinating about building replicas of Heinkel warbirds that I am compelled to share the building journey with everyone, but I figure I won't get any complaints.

Here is the kit box-top.

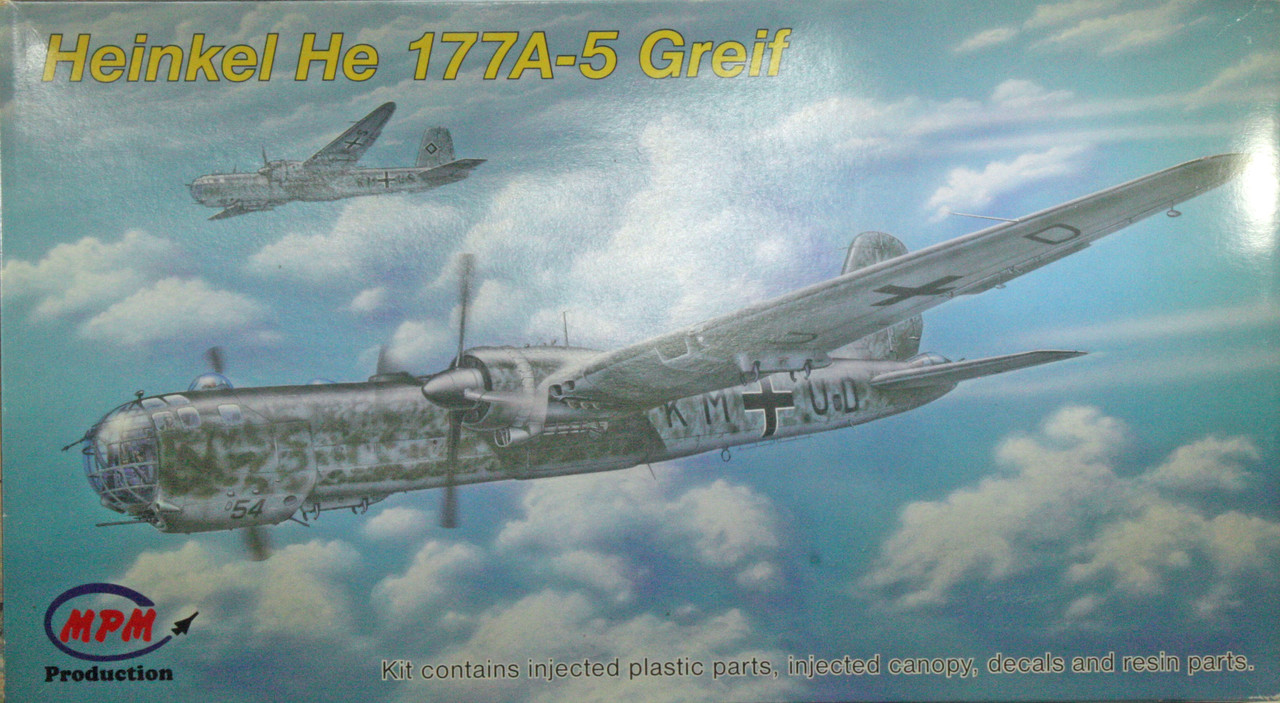
This is one of Germany's few heavy bombers.  It was probably not considered a successful aircraft, mostly due to its rather unique engineering.  It's a 4-engined heavy bomber that scales out to about the same size as an US B-17.  Notice, there are only 2 nacelles.  Each nacelle was fitted with 2 engines, which apparently was the source of many issues ground crews faced with this bomber.  I believe the Greif was used heavily on the Eastern Front, but I know it also saw some action in the West as well.  To that point, I first recall seeing the Greif depicted in the movie Enemies at the Gate, and then many years later, there was a great sequence of a Greif dive-bombing a building in the movie Allied.

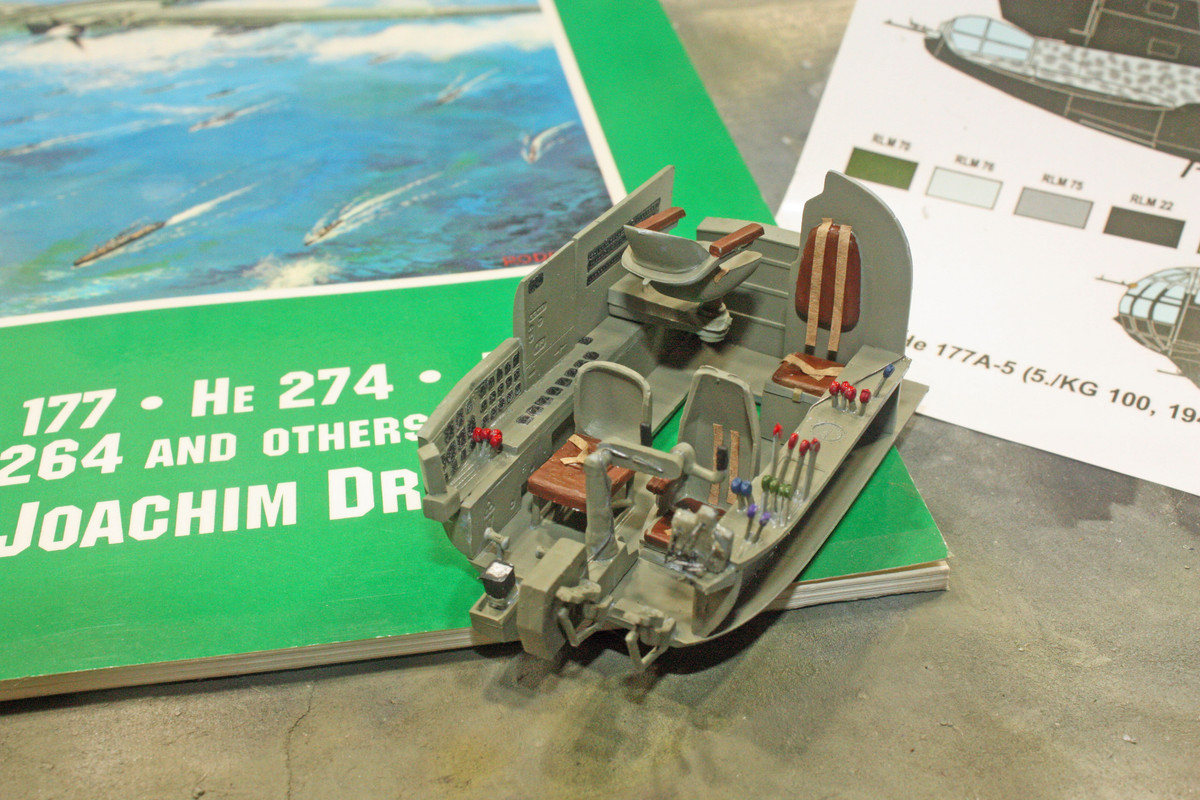
First impressions of this kit:  it's a fairly typical short-run style of kit, with nary a locator pin to be found, and rather thich sprue attachment points on many of the parts.  But unlike the typical short-run kit, there is no parts upgrades in PE, and only a small number of resin parts.  And the kit features a great amount of detail in the cockpit, mostly in the form of levers that one would typically see represented via PE (so these parts are likely a bit thick, but I like the way they look). Panel lines are thin.  The major parts seem good, with no warping that I can detect, but the wings so far have revealed some potential alignment issues when I've test fitted them.  The plastic surface feels a bit rough, but a quick pass with sanding pads will take care of that.

So construction has begun in the cockpit.  I started by putting down a coat of RLM 02 Grau on all the interior surfaces and parts.  I know that at some point the Luftwaffe switched their standards for their aircraft interiors, opting for the darker RLM 66 dunkelgrau, but I've taken a bit of artistic license here by using the RLM 02.  My reasoning is that the lighter grey paint will allow for better visibility of the cockpit parts and the various dials and levers than would the RLM 66.  As for this particular aircraft, I don't know when it would have rolled out of Heinkel's factory, but I am doing a bomber that belonged to 6/KG 100 out of Toulouse-Blagnac, 1944, so it's likely this one would have featured the darker interior.

The kit does not come with seatbelts, so I used my standard brown grocery paper bag to fashion belts for the 4 seats included in the cockpit.  I wired the rear of the tiny IP and ran the wire along the console to the rear of the cockpit, and I added a wire to the backside of the control column.

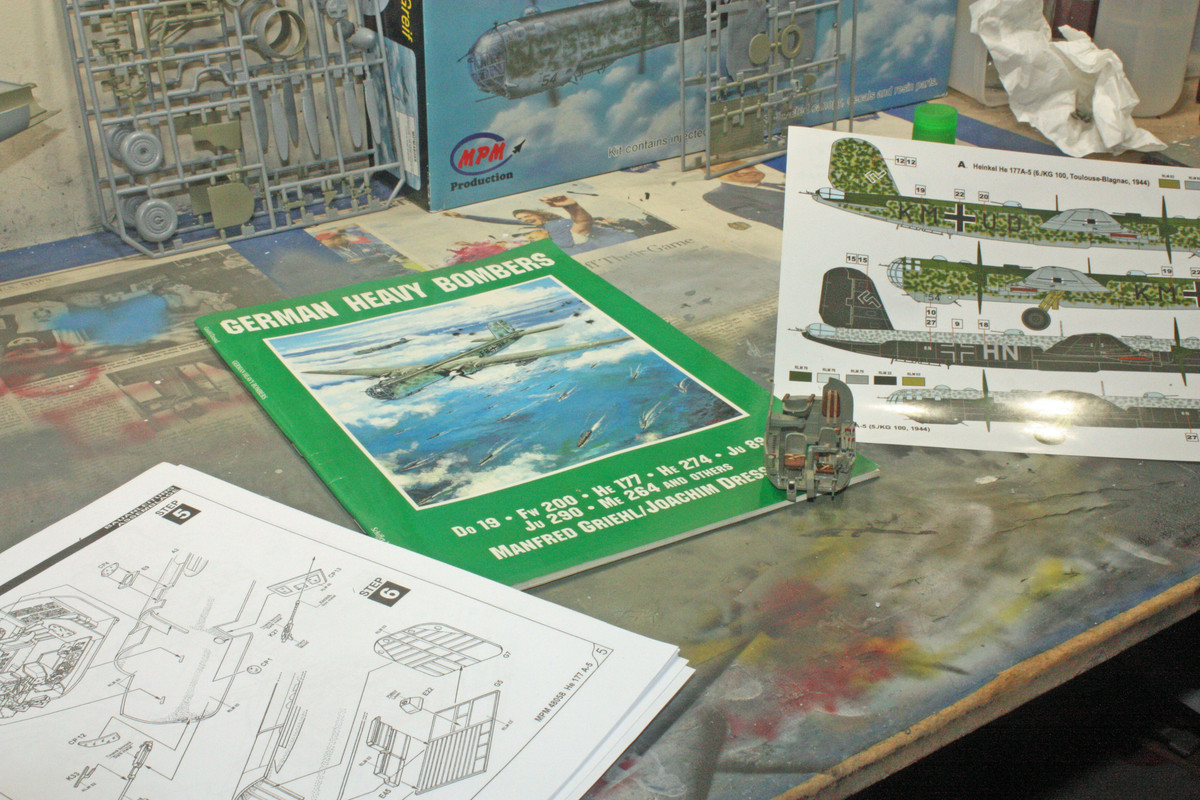
This wider shot shows my workbench with the first thing I ever purchased from Squadron, a book on German heavy bombers with the 177 featured on the cover. I actually bought the book for its inclusion of the Amerika Bomber, the Me 264 (which I built a few years ago from a 1/72 Special Hobby kit).  The book features a good write-up on the Greif, as well as a few photographs that may be of good reference when I get to the exterior painting.

That's it for today.  Have some family time for the day planned, as well as listening to the football game from Tuscaloose, Alabama - the Aggies have won there before, but honestly I'm not expecting a victory for my good guys today.

  • Member since
    April 2015
Posted by Mopar Madness on Saturday, October 3, 2020 7:47 PM

I would HIGHLY recommend the Nautilus wing spar set for this kit.  The wing butt joints are pretty weak. 

http://nautilusmodels.com/48-803.htm

Chad

God, Family, Models...

At the plate: 1/48 Airfix Bf109 & 1/35 Tamiya Famo

On deck: Who knows!

  • Member since
    January 2015
  • From: Katy, TX
Posted by Aggieman on Monday, October 5, 2020 9:20 AM

Ugh, regarding that game - I didn't expect A&M to win, but I also didn't expect them to field such a junior high school defense either.  Oh well.  I managed to spend most of Saturday listening to that abomination of a game while working on the Greif.

This kit has some lovely fit issues.  Even when one gets parts together as snug as they will go, there remains awful gaps and huge seams that will have to be dealt with.  The wings are the worst for this; they don't seem to be well-molded with the intent that they actually belong together.  The stub used to attach each wing to the fuselage is (a) garbage and (b) insufficient to the task for which they were designed.  Chad, your suggestion is definitely a good one, but given my budgetary constraints, I engineered my own wing spars out of styrene bars that I had on hand.

The other awful fit is the canopy.  I have thus far simply placed it into position, and it is as if the part was never test-fit during kit development.  I'll try to first "stretch" the part under some hot water to get it into a more passable fit, but right out of the box, this is the worst I have ever seen for any similar parts (worse that Monogram's B-29 or even Special Hobby's Me 264).

Cockpit and the canopy

Poor fitting seams

Wings and wing spar

From here I will continue to get the wings together.  That's going to be a slow process to get the best fit and alignment as the parts will allow.  And I'll start to work on the canopy.

  • Member since
    November 2003
  • From: Naples, FL
Posted by tempestjohnny on Monday, October 5, 2020 9:32 AM
You've definitely got your work cut out for you on this one.


  • Member since
    December 2002
  • From: Northern California
Posted by jeaton01 on Monday, October 5, 2020 10:01 AM

I think I'm glad I decided to stick with 1/72 for the well named Grief, uh, I mean Greif!

John

To see build logs for my models:  http://goldeneramodel.com/mymodels/mymodels.html


  • Member since
    April 2015
Posted by Mopar Madness on Monday, October 5, 2020 6:54 PM

I like your idea for the wing spar. Really unfortunate about the fit up front though. But it sounds like you've got a good plan to rectify the situation.

Chad

God, Family, Models...

At the plate: 1/48 Airfix Bf109 & 1/35 Tamiya Famo

On deck: Who knows!

  • Member since
    January 2015
  • From: Katy, TX
Posted by Aggieman on Tuesday, October 6, 2020 4:56 PM

An update: I managed to wrangle the wings together without any problems, and I was quite surprised that I ended up not having to do anything radical to get the canopy into position.  I did have to put on my patience hat, however, for all of this.  

For the canopy, I initially glued one side to the fuselage, no glue following along the rear part that follows the curvature of the fuselage.  I let that sit for a few hours, then returned and glued the opposite side, again nothing along the rear of the part, and held it until the glue set.  After that it was an easy effort to get the rear flush with the fuselage (well, almost flush).  

I followed a similar strategy with the wings.  One portion of one of the nacelles did not want to align, but by glueing short portions at a time, I was able to force it into proper position.

I have attached all the necessary clear parts, including the big curved windscreen, with all the masking in place.  And I have started on the laborious seam work for this beast.  I scraped and sanded a bunch, then have put down a coat of putty.  Since my photos I have done an initial sanding job on the dried putty, but more of that is to come.  Still more to come, also, when I get to attaching the wings and stabilizers.

I expect to do more seam work tomorrow, then get to attaching the wings and stabilizers.

  • Member since
    November 2003
  • From: Naples, FL
Posted by tempestjohnny on Wednesday, October 7, 2020 4:16 AM
Wow what a difference on the glass. The fit looks half way decent


  • Member since
    January 2015
  • From: Katy, TX
Posted by Aggieman on Wednesday, October 7, 2020 9:26 AM

tempestjohnny
Wow what a difference on the glass. The fit looks half way decent
 

Agreed.  I'm actually pretty happy with this kit, despite its short-run characteristics.  It is not fighting me like a Special Hobby kit would (in my experience, anyway).  Yeah, that canopy did not look like it had any intention of fitting half way decently to the surrounding fuselage, but it didn't resist my efforts to force it into position.

I've finished up the first round of sanding and puttying, and have attached one of the wings.  Even with that custom wing spar, it is still a questionable fit.  That attachment stub is so pathetically insufficient.  I had to whittle a bit of it away and scrape away some of the slot in the fuselage just to get it inserted, but it felt a bit unstable even after I got it properly slotted in and secured with tape and clamps.  I'm going to let it sit out there for a few hours before I inspect it, and before turning my attention to the opposite wing.  Hoping to get all of the wings and stabilizers into position tonight, fill the seams tomorrow, and get some paint going by Friday.

  • Member since
    January 2015
  • From: Katy, TX
Posted by Aggieman on Thursday, October 8, 2020 9:44 AM

Moving right along ...  Both wings and stabilizers are in place and I have filled the seams. Fit wasn't terrible in these areas as the curves of the wings lined up with the fillets pretty well.  The gaps were easily filled with Perfect Plastic Putty.

I have begun installing the engines by attaching the base to which the cowlings connect.

I added the rudder, a very tight fit, and the ailerons, one of which was a too tight fit that actually broke the surrounding plastic of the wing tip.  I sanded the aileron down a bit, repaired the crack in the wing plastic, and was able to fit the aileron in without any further problems.

I have a good bit of sanding ahead of me with the progressively finer sanding pads to try to knock down all these scratches along the fuselage seams.  Then on to a prime coat.  I am going to do something I've never done with this build, which is to do a "black base" coat.  If I understand the process, I will cover the entire airframe in splotchy black that will result in, hopefully, a paint job that will appear well worn.

  • Member since
    June 2014
Posted by BrandonK on Thursday, October 8, 2020 9:51 AM

Modeler... "I love building challenging kits."

Model company... "Hold my beer."

Looks like this is one of those "thank God it's finally done" kits. With all that work involved it will be one of those kits that you just can't get rid of due to all the effort it took to complete. Very nice work saving it thus far.

BK

On the bench:

A lot !! And I mean A LOT!!

2024 Kits on deck / in process / completed   

                         14 / 5 / 2  

                              Tongue Tied

  • Member since
    January 2015
  • From: Katy, TX
Posted by Aggieman on Friday, October 9, 2020 8:04 AM

BrandonK

Modeler... "I love building challenging kits."

Model company... "Hold my beer."

Looks like this is one of those "thank God it's finally done" kits. With all that work involved it will be one of those kits that you just can't get rid of due to all the effort it took to complete. Very nice work saving it thus far.

BK


Thanks Brandon!

This kit definitely has some of the same quirks that you'll find in typical short-run kits, but in looking back on what I have done thus far, I'm actually surprised that I have been able to wrangle this turkey into decent shape.  Yeah, there have been some bumps in the road, but I've seen far, far worse than this one.

I've seen a few examples of this kit built up superbly.  The kit is a decent canvas to go nuts with the detailing.  One guy opened up the bomb bay and scratched out the bay. There are detail sets available to open up the engine access panels to show off the unique engines the Greif carried.  So the kit can be built up to high standards.  The only thing to determine now is, can I produce a similar OOB build?

  • Member since
    January 2015
  • From: Katy, TX
Posted by Aggieman on Friday, October 9, 2020 8:14 AM

I've moved on to the painting stage.  Yesterday, I started painting by putting down a coat of Grey Stynylrez primer, and after that dried sufficiently, I did my first attempt at black basing.  I didn't look at any tutorials on this procedure, I just emulated what I've seen online from modelers who have done this.  Thus, I'm not sure that I really did it correctly, so we'll have to see how this impacts the camouflage painting to come.  I anticipate that the top side splinter scheme will largely cover the black basing, but the underside and fuselage sides should be a bit more revealing ...

This morning, my first session at the bench was to do the underside painting.  I am not doing the bomber featured on the box top, which is a light grey top side with violet mottling, and black underside surfaces. I am doing a Griffon with light blue underside and fuselage sides, with the standard dark green + black green splinter scheme on the top side.  Mottling will be done all along the fuselage sides and rudder with a green and and a grey.

My paint this morning came from the Vallejo set "Luftwaffe Colors Pre-War to 1941" - RLM 65 light blue.

Next up is to do the mottling, which will first be RLM 02 followed by one of the greens from that Vallejo set, either RLM 71 (which is what the painting diagram calls for) or RLM 62, which I think would provide a bit of distinction between the mottled green and the green of the splinter scheme.  I haven't decided which way I'm going to go just yet.

  • Member since
    January 2015
  • From: Katy, TX
Posted by Aggieman on Friday, October 9, 2020 12:53 PM

More progress - I have the mottling completed and now curing up under a coat of flat clear.  I followed the plan I laid out above, starting with RLM 02.  I didn't think it shows up too well atop the RLM 65.  

I went with RLM 62, which is a lighter green than what I will be using for the top side splintering.  I splotched the RLM 62 randomly until I felt like I had a decent coverage while still allowing the underlying RLM 65 to show through as well.  I dialed the compressor back to roughly 8 PSI for this painting.

After the clear coat is fully dry, I will start masking for a hard-edge along the spine of the fuselage.  Not sure if I'll actually get to the painting today.


  • Member since
    November 2003
  • From: Naples, FL
Posted by tempestjohnny on Saturday, October 10, 2020 5:49 AM
Coming along very nice. I like you're idea of doing the mottling before the main topside colors


  • Member since
    April 2015
Posted by Mopar Madness on Saturday, October 10, 2020 9:41 AM

You're making some good time on this one!

Chad

God, Family, Models...

At the plate: 1/48 Airfix Bf109 & 1/35 Tamiya Famo

On deck: Who knows!

  • Member since
    January 2015
  • From: Katy, TX
Posted by Aggieman on Saturday, October 10, 2020 7:45 PM

Today's progress was pretty good, once I actually got to the bench.  I spent the first 10 hours in a training class (missing entirely today's University of Florida - Texas A&M University football game).  I have the entire airframe painted, with today starting by masking for the splinter scheme then putting down the RLM 70.  No issues with any of this, although looking at the pictures makes me think I may need to go back on some of the RLM 71 on the starboard wing near the aileron.  I didn't notice anything amiss in that area while I was spraying a gloss clear coat.  I'll double check tomorrow.

  • Member since
    May 2011
  • From: Honolulu, Hawaii
Posted by Real G on Saturday, October 10, 2020 8:44 PM

Mopar Madness

You're making some good time on this one!


Agreed.  I was about to comment “Good Grief Wink you are making rapid progress on a donkey of a kit!”

“Ya ya ya, unicorn papoi!”

  • Member since
    December 2002
  • From: Bury St Edmunds, Suffolk, England
Posted by Bish on Sunday, October 11, 2020 5:35 AM

Thats a lovely looking bild. Great job fixing those issues.

I am a Norfolk man and i glory in being so


On the bench: Airfix 1/72nd Harrier GR.3/Fujimi 1/72nd Ju 87D-3

  • Member since
    November 2003
  • From: Naples, FL
Posted by tempestjohnny on Sunday, October 11, 2020 6:10 AM
Looks like quite the beast. You have definitely conquered a tough kit


  • Member since
    July 2019
Posted by Hoss WA on Sunday, October 11, 2020 8:09 AM

Looking great!  I really like the paintwork and nice job on the construction. 

  • Member since
    January 2015
  • From: Katy, TX
Posted by Aggieman on Sunday, October 11, 2020 8:38 AM

Well, that figures.  I was going to start putting the decals onto this big bird this morning, but the decal sheet does not actually include the markings for the Greif that I'm building. As in, no Balkenkreuzs, no squad markings, no serial numbers, none of that.

Seriously, is there zero quality control at MPM?

Additionally, the decal sheet does not seem to have a complete set of markings for the alternate bomber that one can build with this particular kit.

I went through my spares box of old decals and Montex Masks and was surprised to find that I have very few spare Nazi decals.  I do have just enough for this build, but they come from a Tamiya Fw190 that I built in 1997, and a Monogram Pro-Modeler Ju88 that I built in 2006.  The Balkenkreuzs for the wings will be a bit undersized for this big bomber.  The kit does have some squad markings not intended for either of these builds, EK SM; I will use these as they are initials for both myself and my paternal grandfather.  I've used many Montex Masks for Luftwaffe builds, but apparently was unable to get the masks for the Balkenkreuzs off those builds in such a way as to allow for re-usability.

So my Greif is going to be a fictional bomber.

  • Member since
    January 2015
  • From: Katy, TX
Posted by Aggieman on Sunday, October 11, 2020 8:38 AM

Hoss WA

Looking great!  I really like the paintwork and nice job on the construction. 


Thank you Hoss!

  • Member since
    January 2015
  • From: Katy, TX
Posted by Aggieman on Sunday, October 11, 2020 8:39 AM

tempestjohnny
Looks like quite the beast. You have definitely conquered a tough kit
 

Thanks Johnny!

  • Member since
    January 2015
  • From: Katy, TX
Posted by Aggieman on Sunday, October 11, 2020 8:39 AM

Bish

Thats a lovely looking bild. Great job fixing those issues.


Thank you Bish!

  • Member since
    January 2015
  • From: Katy, TX
Posted by Aggieman on Sunday, October 11, 2020 8:40 AM

Real G


Mopar Madness

You're making some good time on this one!


Agreed.  I was about to comment “Good Grief Wink you are making rapid progress on a donkey of a kit!”


Thanks Real G!

  • Member since
    January 2015
  • From: Katy, TX
Posted by Aggieman on Sunday, October 11, 2020 8:40 AM

Mopar Madness

You're making some good time on this one!


Thanks Chad!

  • Member since
    December 2018
Posted by Tosh on Sunday, October 11, 2020 7:07 PM

Wow, mottle looks awesome!

Your friend's, Toshi & Ezra

Reside in Streetsboro, Ohio


  • Member since
    April 2003
  • From: USA
Posted by keavdog on Sunday, October 11, 2020 7:11 PM

Looking sharp

Thanks,

John

  • Member since
    January 2015
  • From: Katy, TX
Posted by Aggieman on Monday, October 12, 2020 10:01 AM

Tosh

Wow, mottle looks awesome!

Your friend's, Toshi & Ezra


Thank you Toshi & Ezra!

JOIN OUR COMMUNITY!

Our community is FREE to join. To participate you must either login or register for an account.

SEARCH FORUMS
FREE NEWSLETTER
By signing up you may also receive reader surveys and occasional special offers. We do not sell, rent or trade our email lists. View our Privacy Policy.