SEARCH FINESCALE.COM

Enter keywords or a search phrase below:

Painting F-86 airbrake bay detail

1749 views
3 replies
1 rating 2 rating 3 rating 4 rating 5 rating
  • Member since
    June 2017
Posted by UnwaryPaladin on Saturday, February 6, 2021 9:33 AM

A wash will also help smooth the imperfect seperation between your green and metalic paint. An acrylic wash would work fine. Water down some black or dark gray paint, add a touch of soap (I just run a wet brush over a bar of soap), then slop it on. Immediately take a dry brush and soak up the excess paint. If needed, dry your brush off on a paper towel to soak up more of the wash. 

  • Member since
    April 2003
  • From: USA
Posted by keavdog on Friday, February 5, 2021 10:26 PM

I did the Hasegawa F-86 a bit back.  There's not too much going on depending on what reference picture you look at and which kit.  Zinc Chromate inside overall -  A bit of plumbing and widgets. I did the plumbing in aluminum.  Picked out a couple of the widgets in grey/aluminum then did a wash.  

Can't post links for some reason but if you want to see my build thread google:

finescale keavdog hasegawa f-86f


Thanks,

John

  • Member since
    April 2020
Posted by Eaglecash867 on Friday, February 5, 2021 6:03 PM

You'll need to start with some really good brushes of course.  I have the entire line of the Tamiya Pointed Brush Pro II, as well as the Micron Paint Brush Set from Micromark.  The Tamiya brushes are fantastic for the tiny details that are fairly shallow.  The Micron brushes are long and thin, so you can paint details that are deeper...even being able to wrap around the backs of things like tubes, hoses, and wire bundles.  In addition to that, you'll need paint that is made for handbrushing details.  I'm finding the Vallejo Model Color paints and the MRP Aqua and Figure lines to be excellent for getting good coverage, controlled flow so the paint flows to the edge of a detail and stops there, and minimal brush marks.

The raised details in this cockpit tub were painted with all 3 types...along with a few details that were painted with Tamiya using plenty of retarder.  It was my first time using the non-Tamiya paints for brush painting details, and I'm already a fan.  It was also my first time using the Tamiya brushes.

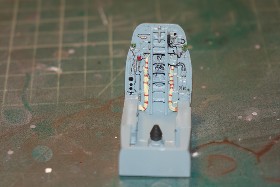
Aside from that, use lots of magnification and light.  My cockpit tub is 1/32 scale, so you're definitely going to have your work cut out for you in 1/72 scale. 


"You can have my illegal fireworks when you pry them from my cold, dead fingers...which are...over there somewhere."

  • Member since
    July 2019
  • From: Vancouver, British Columbia
Painting F-86 airbrake bay detail
Posted by Bobstamp on Friday, February 5, 2021 5:01 PM

I’m about ready to start painting my 1/72 Academy model of the F-86F Sabre, but I need some advice on painting the raised details inside the bay where the airbrake flaps are stored, as shown in this model (not mine, unfortunately!):

I want to display the model with the airbrakes “deployed,” but I need some advice about painting. I’ve only ever used a dry-brush technique on such details, with notably poor result. Any suggestions would be appreciated.

Bob

On the bench: A diorama to illustrate the crash of a Beech T-34B Mentor which I survived in 1962 (I'm using Minicraft's 1/48 model of the Mentor), and a Pegasus model of the submarine Nautilus of 20,000 Leagues Under the Seas fame. 

JOIN OUR COMMUNITY!

Our community is FREE to join. To participate you must either login or register for an account.

SEARCH FORUMS
FREE NEWSLETTER
By signing up you may also receive reader surveys and occasional special offers. We do not sell, rent or trade our email lists. View our Privacy Policy.