SEARCH FINESCALE.COM

Enter keywords or a search phrase below:

A Corsair Affair Pt. 1, Tamiya 1/48 F4U-1a

1046 views
2 replies
1 rating 2 rating 3 rating 4 rating 5 rating
  • Member since
    December 2020
  • From: Kansas
A Corsair Affair Pt. 1, Tamiya 1/48 F4U-1a
Posted by DM1975 on Thursday, March 25, 2021 9:05 PM

So after following bvallon’s wonderful F4U-1 birdcage Corsair build I got a lot of jelly goin on. I absolutely love the Corsair and have for as long as I can remember. I’ve always wanted to be able to build a nice looking Corsair and his build thread has really motivated me to try. Now I don’t expect to have as great an outcome but I’m sure gonna do my best and then do it even better on the next one. While I have the birdcage version in my build pile I’ve decided to go with the -1a model for this.


I decided instead of using any P.E. details that I’d scratch build it all myself. At first I was just going to do a straight forward build but as stated before I got motivated. I figured that I have some good reference material so I mine as well make use of it. Along with the printed reference material I’ve also collected a few hundred images from the internet as well. 


First thing I did was make trim tab controls and a new throttle control. I also decided to make the cockpit lights. For the coiled cable I have a roll of thin wire that I wrapped around a sewing pin. I then took a piece of stretched sprue and drilled, with a fresh blade in my knife two holes. One hole I drilled in the side and one in the end. The hole in the side I glued a thinner stretched sprue piece into for the bracket that holds it to the cockpit wall. The hole in the end is where I glued the coiled “power cable”. I also carved the molded elevator trim wheel into something resembling the real trim wheel and scratched the cooling flap controls. 


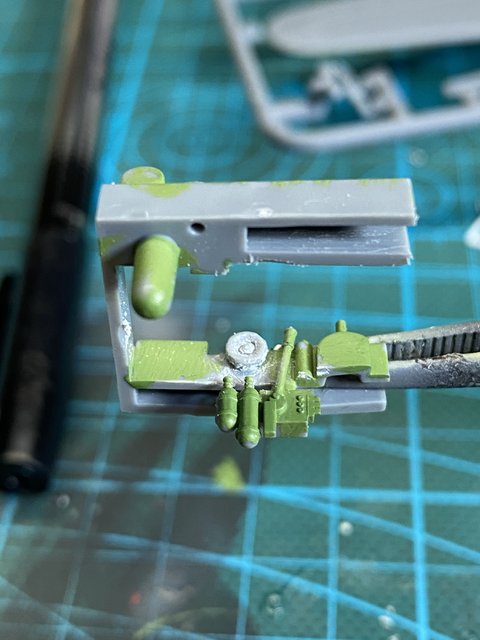
The seat was next. I sculpted it down and added a couple details out of some very thin polystyrene. The frame I cut out of a sheet of polystyrene and then sculpted it to look round. I sized it to fit between the seat and armor plate while the seat was mounted on the models actual seat frame. I cut this off afterwards and glued the ones I made into place. It’s not perfect and I may change it now that I have some thin polystyrene rods. The interior pieces have been painted with Model Masters green zinc chromate. 


Now for the instrument panel I’m going to break my “no PE” decision. I have decided to buy one that’s detailed. I don’t like the Tamiya instrument panel decal and the IP itself has no real paintable features other than the instrument bezels. I have ordered a Yahu IP for it but it may be a month before it arrives. 

Tags: Corsair , f4u-1a , Tamiya
  • Member since
    December 2020
  • From: Kansas
Posted by DM1975 on Thursday, March 25, 2021 10:00 PM

Waiting on the IP I’ve moved onto the engine. While Tamiya did a great job on it and it can very much stand on its own there is still room for improvement. 


I sculpted some existing parts to my liking such as the distributor caps and the ignition cable assembly, adding the little spots the spark plug wires come out of with thinly sliced stretched sprue. I decided to leave the magneto mostly alone other than rounding out the back of it. Other items such as the oil lines that come out of the bottom of the crank case and that block that should be at the very bottom I scratched out of polystyrene. 


Where it got “fun” was gluing plug wires. Sooooo many spark plug wires!!!!! For this I used a thin metal wire that I’ve had laying around forever. It’s the same wire I used for the cockpit light. I couldn’t tell you what it is or how thick it is. I pretty much just eyeballed cutting and bending them. Then I just glued them on with some thick super glue. After the first ten or so you become a pro. 


For paint I used Army acrylic paint. I used Wolf Grey for the engine case, gunmetal for the first dry brush I did over the cooling fins, then used shining silver for the heads. I painted the push rod tubes flat black and the plug wires leather brown. For the ignition cable assembly I mixed some army green, leather brown, and shining silver. I mixed these up in different proportions until I kinda got a dirty metal look I wanted. It’s not exactly what I wanted but it should do.  Finally I painted the engine badge and data plate on it.


  • Member since
    December 2002
  • From: Northern California
Posted by jeaton01 on Thursday, March 25, 2021 11:57 PM

You're making somne nice improvements to a great kit.

John

To see build logs for my models:  http://goldeneramodel.com/mymodels/mymodels.html


JOIN OUR COMMUNITY!

Our community is FREE to join. To participate you must either login or register for an account.

SEARCH FORUMS
FREE NEWSLETTER
By signing up you may also receive reader surveys and occasional special offers. We do not sell, rent or trade our email lists. View our Privacy Policy.