SEARCH FINESCALE.COM

Enter keywords or a search phrase below:

Airfix 1/72nd Victor K.2 Op Black Buck Complete Page 2

5275 views
33 replies
1 rating 2 rating 3 rating 4 rating 5 rating
  • Member since
    December 2002
  • From: Bury St Edmunds, Suffolk, England
Airfix 1/72nd Victor K.2 Op Black Buck Complete Page 2
Posted by Bish on Sunday, September 26, 2021 3:32 PM

Been looking forward to building this, as soon as it came out i knew what i was going to be doing with it. I've never done any of the V Bombers before, and i was recently pleased to see Airfix are re-releaseing the Valiant and am hoping for a Black Buck version of the Vulcan. But firstly, the Victor, there is a lot of kit in this box, and even without the bomber parts, its not going to be a quicky build. I am adding Eduard PE plus resin wheels and a few other AM parts. I am still awaiting the re-release of a couple of pieces of ground equipment from AIM, but if need be i wil add those later if they are not released before this is done.

Starting out with the interior, from what i could find online i made a few changes to what Airfix recomends. Also, i noticed bthat the eduard interior set does not simply replace some of the consoles but it completly changes some. From what i could find the PE looked correct and so i checked the instructions for the previous bomber release which i found on scalemates. Airfix have not changed anything on the inside from their bomber boxing, and it does make sense that the 2 would be different. Once i worked all that out, i got going, the 2 front seats were painted, weathered and then the PE was added. The instructions said to paint the cushions yellow but this didn't seem right, the photo's seem to show grey, so thats what i went with.

And the rear seats along with the rudder pedals.

The cabin floor with some PE already added. One of the seat bases was removed as it seems the tanker has 3 in the back rather than 4.

And the rear console with the desk painted for wood, coloured PE will go on the console face later.

The instructions said the walls were all black. But the photo's i found of the Victor at RAF Cosford showed a light grey in the rear section and these seemed to match the Light Aircraft Grey that i had used on my Typhoon wheel wells, so i went with that.

I've also done some work on the main whell wells. There is PE for the roof of the wel, but i left that out as the kit looked more accurate than the PE.

And got the main undercarrage together.

Got a bit of detail painting and weathering to do before i can flat coat the interior parts and get the fuselage together.


I am a Norfolk man and i glory in being so


On the bench: Airfix 1/72nd Harrier GR.3/Fujimi 1/72nd Ju 87D-3

  • Member since
    July 2021
Posted by Flight Line Media on Sunday, September 26, 2021 5:46 PM
Great start, Bish! I look forward to seeing your build completed.

Andrew

www.flightlinemedia.co

Follow us on Instagram: from.the.ariel.view

  • Member since
    May 2011
  • From: Honolulu, Hawaii
Posted by Real G on Sunday, September 26, 2021 6:10 PM

Bish,

I will definitely be watching this one!

“Ya ya ya, unicorn papoi!”

  • Member since
    April 2015
Posted by Mopar Madness on Sunday, September 26, 2021 7:38 PM

I'm in.  I've always thought the nose made this bird look so unique to others in its class.  This is my favorite of the V bombers!

Chad

God, Family, Models...

At the plate: 1/48 Airfix Bf109 & 1/35 Tamiya Famo

On deck: Who knows!

  • Member since
    September 2012
Posted by GMorrison on Monday, September 27, 2021 12:52 AM

Didn't you and your mates do the town at Ascencion?

Well to be frank, this is a rebox, not repop; of the oolllddd Matchie kit.

She's an ugly ***, much like the Nimrod.

Sit's at the bar wondering why the guys pass by to buy TSR2 a drink.

The big issue with all V bombers, Nimrod and other embedded engine types- horizontal split in the intake vanes.

FOD covers solve that, or be prepared for a bunch of work.


Bill


 Modeling is an excuse to buy books.


  • Member since
    December 2002
  • From: Bury St Edmunds, Suffolk, England
Posted by Bish on Monday, September 27, 2021 2:43 AM

Thanks for looking in guys.

Chad, i agree, it does have a different look to it due to the nose, i like the Victor as well.

Bill, the intake vaines on this are one piece, it i can get the sides without a big seam i think it will be ok. I've seen a few builds of this kit and not seen anyone have any major issues. But once i get it together, i'll see if i think it needs FOD covers.

We usually only stayed at Ascencion for a couple of hours but we did have one over night stay when the falklands was fogged in. We just got bussed straight up tio the base and never got in to town.


Edit: Sorry Bll, i wasn't sure if you were reffering to this kit or had posted a pic of the old matchbox one you had built, i can see a lot of pics from work. As G said, the Airfix kit is a new tool, starting with the bomber version in 2016 and now this one from 2018.

From looking at the instructions, the way the intakes go together, it look as though it will be easier to sort the seams, but we will see. Will get pics of that when i get to them.

I am a Norfolk man and i glory in being so


On the bench: Airfix 1/72nd Harrier GR.3/Fujimi 1/72nd Ju 87D-3

  • Member since
    May 2011
  • From: Honolulu, Hawaii
Posted by Real G on Monday, September 27, 2021 11:28 AM

GM,

This kit is new, not the old Matchbox monster.  Nevertheless, the intakes do look challenging to seam fill.  Same with the new-tool Vulcan.

I have a Nimrod lurking in the closet...

“Ya ya ya, unicorn papoi!”

  • Member since
    February 2011
Posted by knox on Tuesday, September 28, 2021 10:58 AM

I really enjoy watching your builds.  Carry on, good Sir.  

fox
  • Member since
    January 2007
  • From: Narvon, Pa.
Posted by fox on Tuesday, September 28, 2021 1:58 PM

Looking good Bish! Gonna be one good looking bird.

Jim Captain

Stay Safe.

 Main WIP: 

   On the Bench: Artesania Latina  (aka) Artists in the Latrine 1/75 Bluenose II

I keep hitting "escape", but I'm still here.

  • Member since
    December 2002
  • From: Northern California
Posted by jeaton01 on Tuesday, September 28, 2021 10:55 PM

Be sure to give all the details, Martin, as I want to learn all the hard spots beforehand with mine!

John

To see build logs for my models:  http://goldeneramodel.com/mymodels/mymodels.html


  • Member since
    December 2002
  • From: Bury St Edmunds, Suffolk, England
Posted by Bish on Wednesday, September 29, 2021 6:31 AM

Thanks guys.

John, nothing hard so far. I have the intakes together and it looks as though someone actually gave some thought to how the seams would be cleaned up and the inside painted. I could have made it slightly easier by not following the instructions and attaching the top part to the wing first, but even so it doesn't seem to be near as bad as the Matchbox kit sounds. Will post some pics at the weekend.

I am a Norfolk man and i glory in being so


On the bench: Airfix 1/72nd Harrier GR.3/Fujimi 1/72nd Ju 87D-3

  • Member since
    December 2002
  • From: Bury St Edmunds, Suffolk, England
Posted by Bish on Monday, October 11, 2021 4:23 AM

Made qute a bit of progress on the Victor over the last couple of weks. Got the interior all together and ready to fit.

And got that into the fuselage alogn with the forward landing gear.

And then the fuselage closed up without to many issues.

As you can see, i have added the cover over the bomb bay. This is sooner than the instructions indicate and may have been an error


Posted by Bish on Sunday, October 10, 2021 11:18 AM

Made qute a bit of progress on the Victor over the last couple of weks. Got the interior all together and ready to fit.
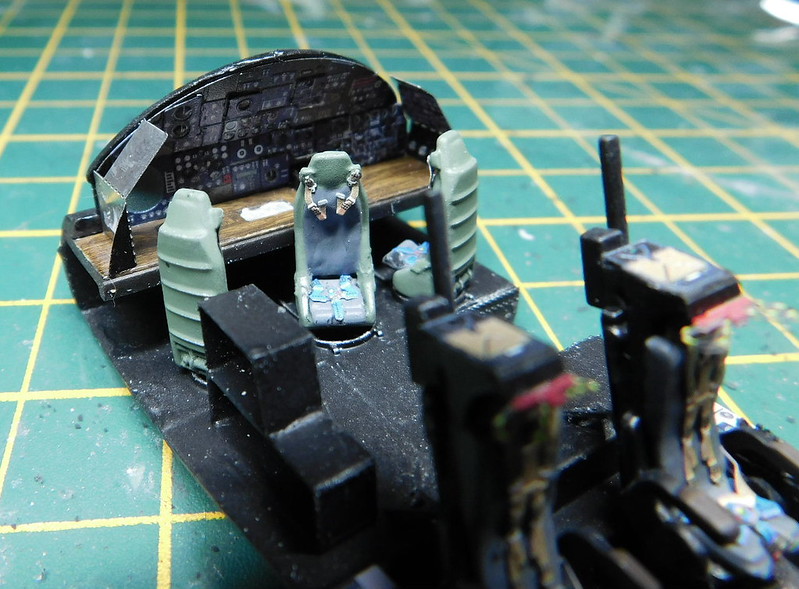
And got that into the fuselage alogn with the forward landing gear.
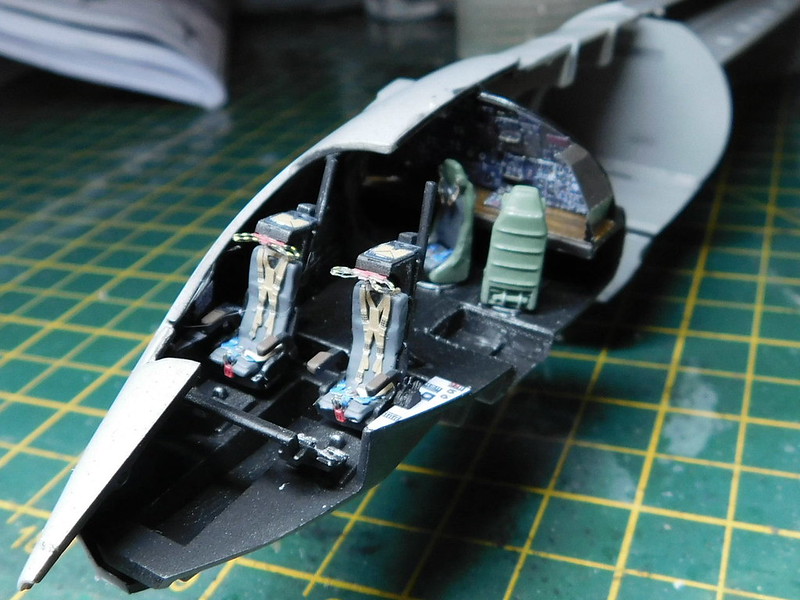
And then the fuselage closed up without to many issues.

As you can see, i have added the cover over the bomb bay. This is sooner than the instructions indicate and may have been an error.

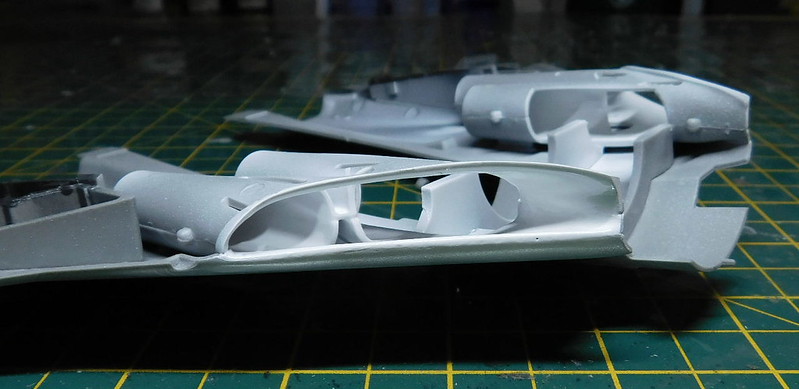
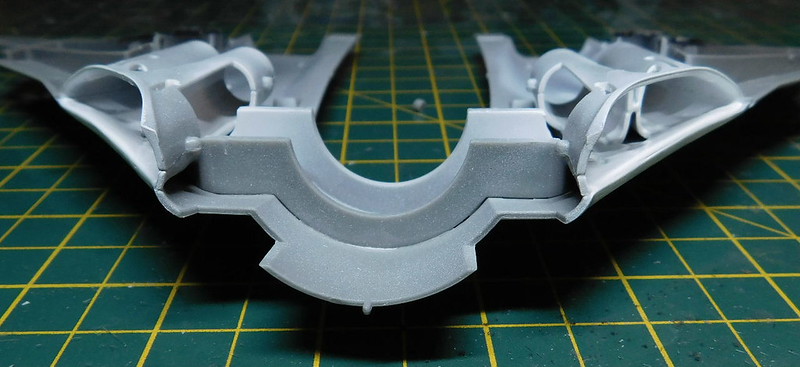
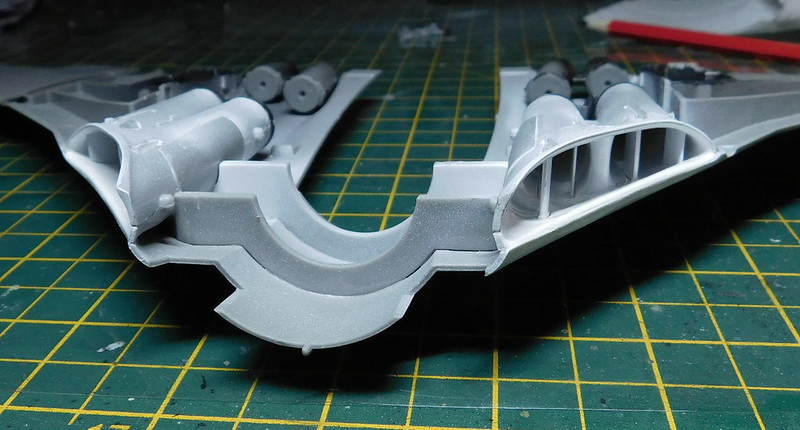
I started on the intakes and it looks as though thise has been designed in a way to ease cleaning upseams and painting. The opening in the sides has a panel that goes over it late, and i did that after painting.

I painted the veins before fitting, once everything was dry, they were fitted and the side panels added.
With that done i got to getting the wings together and fitted. There is a point in the Airfix instructions which confused me a bit. If you want the flaps raised, and as Victors always seem to have them raised on the ground that what i am doing, you are told to cut off the outser fairing (the one on the left in this photo).

But that did not make sense to me, i was looking in the instructions for a point where that part was re-attached. Fortunatly this was cleared up on Brit Modeller. This seems to have been an error on the original bomber kit that Airfix have not correct. The correct procedure is to sand down the ridge on the outer fairing and remove part of the inner one thats attached to the bottom wing secion, so you are left with this.

I think think others have found this out the hard way, so i am grateful for it being passed on.

With the wings on all all the panels and flaps fitted i also got the tail on, this beast is really coming together.

You can see that quite a bit of filler wasneeeded along the wing/fuselage join. I believe this was caused by me adding the doors to the bomb bay to early. I had not noticed at the time, but the door overlaps the bay along the middle, and this is where the gap is. Without the doors, the fuselage could have been pressed out to meet the wing and once in place the doors would have fitted better. By the time i realised it was to late. That wil teach me for thinking i know better and jumping through the instructions.

Thats all for now. Still a bit more to do before she hits the spray booth (assuming she fits). But at least now i can meassure up the board and start getting that together.

I am a Norfolk man and i glory in being so


On the bench: Airfix 1/72nd Harrier GR.3/Fujimi 1/72nd Ju 87D-3

  • Member since
    April 2015
Posted by Mopar Madness on Monday, October 11, 2021 9:54 AM

You're putting a lot of care into this lovely lady. I'll remember your write up when I'm making my own.

Chad

God, Family, Models...

At the plate: 1/48 Airfix Bf109 & 1/35 Tamiya Famo

On deck: Who knows!

  • Member since
    December 2002
  • From: Bury St Edmunds, Suffolk, England
Posted by Bish on Wednesday, October 13, 2021 3:34 AM

Thanks Chad. Its a nice kit though its now a handful with everything on.

I am a Norfolk man and i glory in being so


On the bench: Airfix 1/72nd Harrier GR.3/Fujimi 1/72nd Ju 87D-3

  • Member since
    October 2021
  • From: New York
Posted by JonahGrutze on Friday, October 15, 2021 4:20 PM

Nice Hard Work . Good job!

  • Member since
    January 2015
Posted by TheMongoose on Saturday, October 16, 2021 5:59 PM

I've had my eye on these V bombers for years but just haven't pulled the trigger. Going to super enjoy watching you put this together and taking a few notes for a future build or two or three

In the pattern: Scale Shipyard's 1/48 Balao Class Sub! leaning out the list...NOT! Ha, added to it again - Viper MkVii, 1/32 THUD & F-15J plus a weekend madness build!

  • Member since
    December 2002
  • From: Bury St Edmunds, Suffolk, England
Posted by Bish on Sunday, October 17, 2021 2:36 AM

Thanks Mongoose, i hope to have all 3 by next year, but they are big beasts.

I am a Norfolk man and i glory in being so


On the bench: Airfix 1/72nd Harrier GR.3/Fujimi 1/72nd Ju 87D-3

  • Member since
    December 2002
  • From: Bury St Edmunds, Suffolk, England
Posted by Bish on Sunday, October 24, 2021 6:31 AM

I had hoped to have a bigger update this weekend as i thought the painting would be done. But i had some issues getting the white underside done. I used Humbrol Gloss white but it can out with a yellow tint and i had some runs on the fuselage. I ended up stripping off the white from the fuselage undersid and goin over the whole underneath with Tamiya white. I got the second coat on this morning, so its going to be a while yet before the top side is done what with all the masking and leaving paint to dry. So this is how it loked last weekend ready for primer.


I am a Norfolk man and i glory in being so


On the bench: Airfix 1/72nd Harrier GR.3/Fujimi 1/72nd Ju 87D-3

  • Member since
    September 2012
Posted by GMorrison on Sunday, October 24, 2021 11:27 AM

From the looks of things, she isn't going to be a tail-sitter, but this is your last chance to check.


Bill

 Modeling is an excuse to buy books.


  • Member since
    December 2002
  • From: Bury St Edmunds, Suffolk, England
Posted by Bish on Sunday, October 24, 2021 12:37 PM

Doesn't seem to be at the moment, but i secure all my aircraft to a base anyway, those with a nosewheel from there, so i never add weight.

I am a Norfolk man and i glory in being so


On the bench: Airfix 1/72nd Harrier GR.3/Fujimi 1/72nd Ju 87D-3

  • Member since
    December 2002
  • From: Bury St Edmunds, Suffolk, England
Posted by Bish on Sunday, November 14, 2021 4:32 AM

Not much of an update, but after 3 weeks i finally have the painting done so thought i better post somthing. After getting the white sorted, i got onto the top side. This took a lot of masking, it took 3 evenings to mask up the grey before adding the green. I then had to do some touching up but now i can finaly get the decals on.

I've spent the last few nights adding decals to the Typhoon, so now thats done i can get onto this.

I am a Norfolk man and i glory in being so


On the bench: Airfix 1/72nd Harrier GR.3/Fujimi 1/72nd Ju 87D-3

  • Member since
    January 2015
Posted by TheMongoose on Sunday, November 14, 2021 6:19 PM

That's some serious shelf space right there for sure! Looks great in camo

In the pattern: Scale Shipyard's 1/48 Balao Class Sub! leaning out the list...NOT! Ha, added to it again - Viper MkVii, 1/32 THUD & F-15J plus a weekend madness build!

  • Member since
    February 2011
Posted by knox on Sunday, November 14, 2021 6:25 PM

What a good looking airplane.  You’ve done such a wonderful job on your build. It would be fun to see in person.  

  • Member since
    July 2003
  • From: On my kitchen counter top somewhere in central North Carolina.
Posted by disastermaster on Sunday, November 14, 2021 7:34 PM

Man-oh-man.

What an office.

 https://i.imgur.com/LjRRaV1.png


  • Member since
    December 2002
  • From: Bury St Edmunds, Suffolk, England
Posted by Bish on Monday, November 15, 2021 6:26 AM

Thanks guys, i am pleased its finally coming together. Now i have the board cut, i have realised the shelf i made for these larger kits is not big enough. The board will sit on it but there is a large over hang, and as its at floor level, that could be an issue. I may have to try and re-jog my shelving.

I am well chuffed with the cockpit, just a pity it would be seen.

I am a Norfolk man and i glory in being so


On the bench: Airfix 1/72nd Harrier GR.3/Fujimi 1/72nd Ju 87D-3

  • Member since
    April 2015
Posted by Mopar Madness on Monday, November 15, 2021 11:04 AM

That is some time consuming masking! But the result is well worth the effort.

Chad

God, Family, Models...

At the plate: 1/48 Airfix Bf109 & 1/35 Tamiya Famo

On deck: Who knows!

  • Member since
    December 2002
  • From: Northern California
Posted by jeaton01 on Monday, November 15, 2021 8:23 PM

Valiant, Victor, Vulcan...yeah, I see a whole new shelf in Martin's future!

John

To see build logs for my models:  http://goldeneramodel.com/mymodels/mymodels.html


  • Member since
    December 2002
  • From: Bury St Edmunds, Suffolk, England
Posted by Bish on Tuesday, November 16, 2021 2:10 AM

Thanks guys.

John, your not worng. I am now looking at where i can put an extra shelf. I had put an extra wide shelf (40cm deep 140 long) in for my larger models. But the board for this one is just over 50cm deep and over 40 wide. What with the 3 V Bombers, a Nimrod and now the C-130, which i had not realised was so big (the wingspand is even bigger than the Victor, i'm looking at adding a 50cm shelf in a corner where it would get kicked as i walk past. I think i need a bigger room.

I am a Norfolk man and i glory in being so


On the bench: Airfix 1/72nd Harrier GR.3/Fujimi 1/72nd Ju 87D-3

  • Member since
    December 2002
  • From: Bury St Edmunds, Suffolk, England
Posted by Bish on Sunday, December 12, 2021 1:30 PM

Finally able to post something on the Victor. It took over a week to get the decals on. There didn't seem to be that many of them compared to some other Airfix kits, but there were a lt of small stencils and some tricky decals.

The decals for the underwing pods were a bit tricky. A few of them stuck in one spot, after the first one broke up and had to be pieced together, i was more careful with the rest and managed to tease them off.

I gave the whole things 2 coats of flory aqua gloss before some flory wash. It left some stains in a few places, especially underneath around some of the stencils. So i had to do quite a bit of touching up. But i was finally able to add the flat coat and fit the undercarrage, pods and some other parts.

Still got a few bits to finsh and add before i can attach to the base and finish off some ground equipment.

I am a Norfolk man and i glory in being so


On the bench: Airfix 1/72nd Harrier GR.3/Fujimi 1/72nd Ju 87D-3

  • Member since
    May 2011
  • From: Honolulu, Hawaii
Posted by Real G on Monday, December 13, 2021 11:46 AM

The Victor is looking great Bish!  I am surprised how much of the cockpit is visible in the overhead shot.

“Ya ya ya, unicorn papoi!”

JOIN OUR COMMUNITY!

Our community is FREE to join. To participate you must either login or register for an account.

SEARCH FORUMS
FREE NEWSLETTER
By signing up you may also receive reader surveys and occasional special offers. We do not sell, rent or trade our email lists. View our Privacy Policy.