SEARCH FINESCALE.COM

Enter keywords or a search phrase below:

Hasegawa P-3C Orion 1/72

16288 views
22 replies
1 rating 2 rating 3 rating 4 rating 5 rating
  • Member since
    December 2022
Posted by Googly on Tuesday, December 27, 2022 8:11 PM

P3C had 48 externally loaded tubes + 3 pressurized tubes (loaded from inside the aircraft) + 1 unpressurized free fall chute = 54 "holes" in the fuselage.  Fun fact: the unpressurized free fall chute functioned as a vacuum cleaner--hook up a vacuum hose and you could vacuum out the cabin.  Fun fact #2 -- the same vacuum function was helpful for "burial at sea" ceremonies for those who chose cremation, ashes were sucked out and spread over the ocean.

My background:  Naval Flight Officer with time in P3C Update II.5; P3B Mod and Canadian CP-140 Aurora


I am thinking about building this model. 

  • Member since
    June 2003
  • From: Philadelphia, PA
Posted by garys on Tuesday, April 27, 2021 10:29 AM

Turned out great!

  • Member since
    July 2004
  • From: Canberra, Australia
Posted by Aussie747 on Tuesday, April 27, 2021 5:39 AM

Great job on your P-3 Aggieman, nice to see it finished!

These kits go together with little fuss. Later boxings have more flash theses days (but not very much compared to others I have built).

I have built a few now, in this shot are an NP-3D, P-3A, 3 P-3Bs and an AP-3C. I have also built another AP-3C (not shown) which is at my son's place (he works on them).

We also have a ring in P-3 replacement as well :-)


Ray

  • Member since
    November 2009
  • From: Twin Cities of Minnesota
Posted by Don Stauffer on Wednesday, April 21, 2021 7:10 AM

What a neat livery.  Looks great!

Don Stauffer in Minnesota

  • Member since
    January 2015
  • From: Katy, TX
Posted by Aggieman on Tuesday, April 20, 2021 5:37 PM

keavdog

Turned out great!  How was the kit?  I've read mixed reviews on the Orion.

route - really like the fire bomber.  I have a budding fire plane collection going.


I recall the kit being fuss-free in getting together.  Not a whole lot of internal details, but as route says, you can't see much anyway.  Route, that's a fine looking fire bomber.

  • Member since
    April 2003
  • From: USA
Posted by keavdog on Tuesday, April 20, 2021 1:08 PM

Turned out great!  How was the kit?  I've read mixed reviews on the Orion.

route - really like the fire bomber.  I have a budding fire plane collection going.

Thanks,

John

  • Member since
    December 2013
  • From: Orlando Florida
Posted by route62 on Tuesday, April 20, 2021 12:52 PM

I built an older boxing of this same kit a couple years ago.  I converted mine to a fire bomber.  I used the Lone Star resin belly tank and wheels.  I also got metal landing gear as this kit needs a good bit of weight to keep it off its tail.  I did not think the plastic landing gear would be able to handle the weight.  

I added the Black Dog dropped flaps as well.  For an older kit, the fit was good and no major issues to report.  I removed and rescribed the panel lines.  Dont bother doing much detail on the cockpit.  All you can see are the seats.  I added some seat belts made from tamiya tape.  It is an impressive model in the display case.

  • Member since
    August 2015
  • From: the redlands Fl
Posted by crown r n7 on Tuesday, April 20, 2021 7:10 AM

That is one sharp looking P-3 and a interesting story.. I always wanted to buy that kit.


 Nick.

  • Member since
    January 2015
  • From: Katy, TX
Posted by Aggieman on Tuesday, April 20, 2021 6:58 AM

Well talk about a blast from the past.  When I first posted this topic, my 9th-grade daughter was < 4 weeks old and I was about to start what would be the best job I have had in my career to this point.

I did get the Orion built up pretty well, and on one Saturday under the guise of bringing our newborn to see her grandmother and step-dad, I delivered it to him.  He was beyond surprised.  If I had to guess, I'd say that was one of his top 5 moments - well, maybe not top 5 but certainly up there.  He gushed about that model for years afterward.

My mom died about 5 years after this, and in the years since, I've only seen my step-dad on occasion, usually at Christmas gatherings where that side of my family still welcomes him (they were married for 20+ years, so he is considered a part of the family).

Here are the bad photos I took prior to delivering the Orion to my step-dad (but I didn't think to take any pictures of him receiving it, dang it).
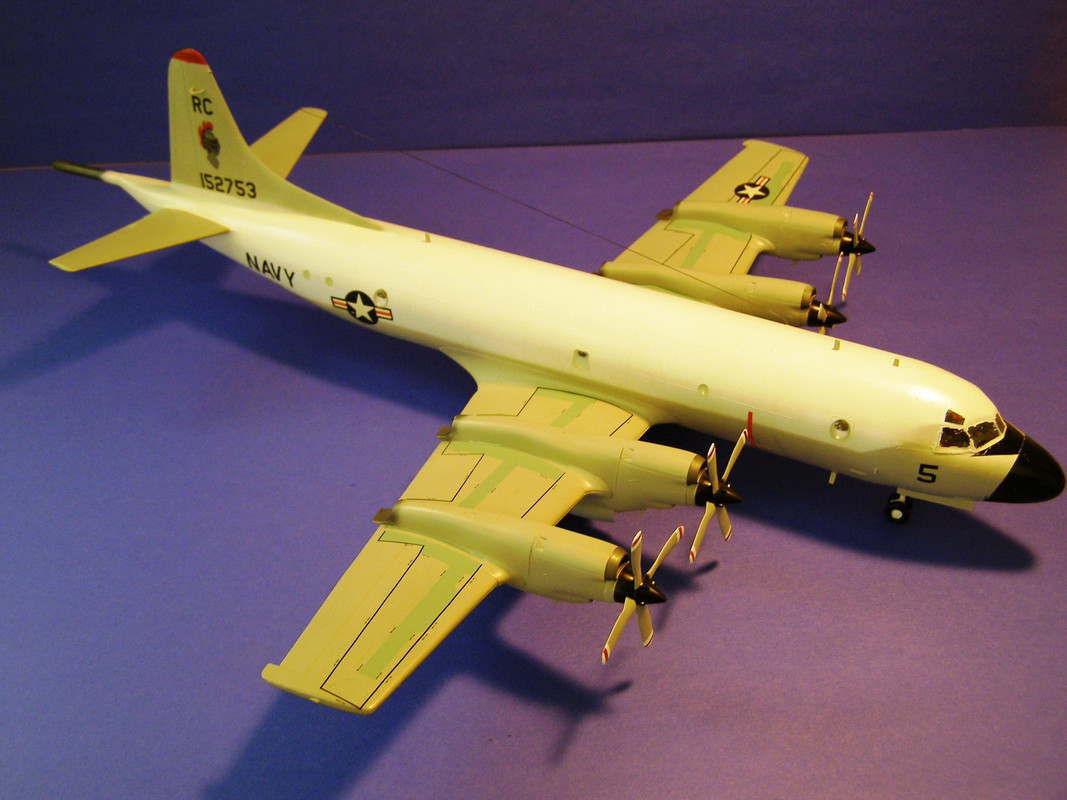
I ended up making the squadron decals with the inkjet printer I had at the time based on a scan of the insignia that my mom found in one of his books.  Turned out pretty good, I thought.  And not too long after, my step-dad asked me to build a P2V-7 Neptune for him, as his squadron was still flying that bird when he joined; they were to transition to the Orion shortly after that.  So he also has a Neptune displayed in his computer room.

  • Member since
    April 2021
Posted by Twool71 on Saturday, April 17, 2021 9:58 AM

My dad was stationed with VP-4 The Skinny Dragons in NAS Barbers Point from 1976-1981.  When I was about 7 my dad had a carved wooden model of his plane that he flew and I was playing around and broke it.  It was grey and white with all the markings, us Navy VP Brats will know, so for his upcoming 75th birthday I found one just like the one I broke except for the decals.  I have searched like crazy for the VP-4  VP-46 decals.  Anyway nice to chat with a fellow gecko hunter from the islands.  We lived at 4968 B Kela Place Ewa Beach

Tags: P3 , VP-4 , VP-46
  • Member since
    December 2002
  • From: Lyons Colorado, USA
Posted by Ray Marotta on Thursday, May 4, 2006 7:19 AM

The P-3 in the photo is a  "Heavy B".  The giveaways are the searchlight pod under the right wing, the lack of a windowbehind the right forward observer window for sensor station 3 (Radar/Mad), lack of 2 small portholes behind the right rear observers window, and the small window that can be seen under the right horizontal stab, and the DIFAR antennas visible under the right horizontal stab.

The kit piece with 52 holes is for the sonobouy cassettes.  On the B models, the sono package shows as a 3'x3' door on the belly in the same place.  The sonobouys are loaded into the dispensor from inside the AC.

For Yardbird::  I flew Heavy B's with VP-10 Combat Aircrew 3 from '72-'74.

Ray

 ]


  • Member since
    July 2004
  • From: Canberra, Australia
Posted by Aussie747 on Wednesday, May 3, 2006 1:23 AM

The dead give away that the pictured P-3 is B model is the search light pod under the starboard wing. You can see the rear part of it in the picture.  Also as GL mentioned the P-3B did not have have the sonobuoy tubes so they will have to be filled on the kit if you do a B. I think there is also differences with cabin window layouts up near the cockpit.

Cheers

Ray

  • Member since
    August 2005
  • From: Sydney, Australia
Posted by Phil_H on Thursday, April 20, 2006 10:52 AM
 Aggieman wrote:

GL, there is a piece in the kit that has 52 molded-in "holes" that fits on to the underside just behind the wings.  Is this the sonobuoy launcher?  Makes sense but I'm not familiar with this aircraft.  Thanks for pointing out this information.

Yep that would be the sonobuoy dispenser.

http://www.hsgalleries.com/gallery04/p3cas_1.htm

The area outlined in red on the underside behind the wings.

  • Member since
    January 2015
  • From: Katy, TX
Posted by Aggieman on Thursday, April 20, 2006 8:42 AM

Thumbs Up [tup] Phil, thanks for the site.  Looks like a good research tool!

GL, there is a piece in the kit that has 52 molded-in "holes" that fits on to the underside just behind the wings.  Is this the sonobuoy launcher?  Makes sense but I'm not familiar with this aircraft.  Thanks for pointing out this information.

  • Member since
    September 2003
  • From: USA
Posted by glweeks on Thursday, April 20, 2006 1:56 AM
Hi,  I flew on that P3-B as an IFT (In Flight Electronics Tech) during a 1976 deployment to Okinawa.  I also have the P3 kit but not the 70's  VP-46 decals.  The kit is a P3C.  I also worked on those when VP-46 transistioned to the "C" model in 1977.  Made an Adak, Alaska deployment in C's.  Besides a totaly different electronics package inside one of the big external differences was the sonobouy launching chutes.  The "B" model was manualy loaded from inside during flight and launched through a single tube. The "C" model has the bouy's  externaly stored in that multi holed area under the tail (near the enterance hatch).  I'll probaly have to get the (old style) VP-46 decals made somewhere. It's on the "ta do" list.                  G.L.
Seimper Fi "65"
  • Member since
    August 2005
  • From: Sydney, Australia
Posted by Phil_H on Wednesday, April 19, 2006 7:51 PM
 Aggieman wrote:

Not sure if this is a P-3B or a P-3C.  I'll have to do some more research to determine that and then determine what the differences are, at least externally.

Going by the tail number, it appears to be a P-3B.

This site: http://users.rcn.com/jeremy.k/serialSearch.html,  identifies it as a "Lockheed P-3B-75-LO Orion"

  • Member since
    June 2003
  • From: Philadelphia, PA
Posted by garys on Wednesday, April 19, 2006 12:29 PM
Great pic. Here's some more links that might help you.
BTW that's VP-46.
This is a OOP Suprescale decal, while not VP-46 you can probably get a lot of markings from this sheet.
http://m2reviews.cnsi.net/scotts/decals/super/ss72236.htm
This sheet has stencils and stars:
http://m2reviews.cnsi.net/scotts/decals/super/ss72432.htm
The pic above is of a P-3B. This link might show you some diffs, plus a cool site anyway.
http://home.planet.nl/~p3orion/index.html

gary

  • Member since
    January 2015
  • From: Katy, TX
Posted by Aggieman on Wednesday, April 19, 2006 11:54 AM

Gary,  Thanks again for the information.  I found my step-dad's actual squadron and photos of some of the aircraft that were in that squad.

Not sure if this is a P-3B or a P-3C.  I'll have to do some more research to determine that and then determine what the differences are, at least externally.

This is the picture my mom was able to get me, and I found this same photo on line on the site Gary gave me.  I can't wait to get started on this bird!

  • Member since
    January 2003
  • From: 40 klicks east of the Gateway
Posted by yardbird78 on Wednesday, April 19, 2006 9:58 AM

I built one of these kits about 15 years ago for a friend who was former P-3B crewmember with VP-10 out of NAS New Brunswick.  It does build into a pretty decent model with no major problems.  The B model could carry three Bullpup missiles under each wingtip while the C model could carry two Harpoons.  My friend took one look at the model and said it is a C instead of B.  I don't know what the differences are, but he sure did.

Darwin

 ,,

The B-52 and me, we have grown old, gray and overweight together.

  • Member since
    February 2004
  • From: Green Lantern Corps HQ on Oa
Posted by LemonJello on Wednesday, April 19, 2006 12:52 AM

That's pretty cool.  My dad was with VP-22 (if I remember correctly) out of Barber's Point NAS in the early seventies, I spent the first three years of my life chasing the geckos around base housing. 

While I was stationed in Okinawa, I found a Haseegawa P-3 kit, but it was the newer version with the added sensor bumps and spine for a P-3 snooper as extra (resin??) parts.  I gave that to dad as a gift.  I had wanted to build it up in his unit's markings, instead he's building it right now.  Talked to him on Easter and he found a P-3A on Ebay to add to his stash, I think those were the mods he worked on, so he was pretty happy with that find. 

If you get a chance, post some photos of your P-3, I'd love to see how it all comes together.

A day in the Corps is like a day on the farm; every meal is a banquet, every paycheck a fortune, every formation a parade... The Marine Corps is a department of the Navy? Yeah...The Men's Department.
  • Member since
    January 2015
  • From: Katy, TX
Posted by Aggieman on Tuesday, April 18, 2006 6:55 PM

Gary,

Thanks so much for the information!  I spent Easter with my mom and step-dad and managed to turn our conversation toward WWII aircraft, which finally led to Vietnam.  In quite subtle fashion, I got him to show me photos he had of the actual aircraft he worked on.  Of course I then had to get my mom to send me copies of those photos, so now I will be attempting to duplicate the markings as best I can either by hand-painting the squadron logo or creating it via computer and printing on my own decal sheet.

  • Member since
    June 2003
  • From: Philadelphia, PA
Posted by garys on Tuesday, April 18, 2006 5:03 PM
Yo Aggieman,
What you've got there is simply the best 1/72 kit of the P-3 ever made (because it's the only one, LOL).
Though I've never built it, it does build into a pretty dramatic model. Don't worry about the finer details, your step father will be so excited to recieve your gift he won't miss them. Here is a great site with all you need to know about VP squadrons. http://www.vpnavy.com/index.html
He probably saw them fly out of Cam Rahn Bay, RVN
As to aftermarket, Superscale (nee Microscale) made more than a few sheets for these birds back in the day. They show up at swap meets and E-bay a lot. You may also want to try http://www.djhobby.com they have many OOP decals. Good luck.
Gary
  • Member since
    January 2015
  • From: Katy, TX
Hasegawa P-3C Orion 1/72
Posted by Aggieman on Friday, April 14, 2006 9:25 AM

Any one ever built this kit?

My step-father was involved in some capacity with these birds at a Navy air station somewhere in SE Asia during Vietnam.  He's always gone on and on about his love for this aircraft.  I've decided to build this one and give it to him for Father's Day this year.

Any one know of any aftermarker products for this kit?  I've searched the usual sources (CE, Meteor, various on-line hobby shops, etc) but found nothing.  Not even decals that I could find.

As for the kit itself, I just received it last night and looked over it briefly.  Looks to be an older mold, with raised panel lines, more flash than I would expect from a Hasegawa kit, and very little detail.  That's disappointing.  Actually, I'd like to build up the interior and remove a side of the fuselage for displaying that interior.  That would take me into a new arena of the hobby - scratch-building.  I'm up for the challenge per se, but I wonder if I have the time to get it done given everything else I have going on.....

JOIN OUR COMMUNITY!

Our community is FREE to join. To participate you must either login or register for an account.

SEARCH FORUMS
FREE NEWSLETTER
By signing up you may also receive reader surveys and occasional special offers. We do not sell, rent or trade our email lists. View our Privacy Policy.