SEARCH FINESCALE.COM

Enter keywords or a search phrase below:

1944 Group Build

131971 views
1959 replies
1 rating 2 rating 3 rating 4 rating 5 rating
  • Member since
    August 2009
  • From: MOAB, UTAH
Posted by JOE RIX on Tuesday, September 16, 2014 11:09 PM

lost,, Your Wildcat is excellent. It's unfortunate that your pre shading didn't turn out as hoped. Nonetheless, your paint work is superb. The sausages do indeed work well. I use Silly Putty rather than blue tac but, the results are great regardless.

"Not only do I not know what's going on, I wouldn't know what to do about it if I did". George Carlin

  • Member since
    April 2013
Posted by SchattenSpartan on Wednesday, September 17, 2014 2:37 PM

Lost, she's looking great! I really like that 2-tone gray scheme! You could try going over the panel lines with a heavily diluted layer of the base color mixed with a bit of black to darken them. Another option would be to lighten the base color and fill in the panel centers. Just a couple of ideas...

  • Member since
    September 2003
  • From: AandF in the Badger State
Posted by checkmateking02 on Friday, September 19, 2014 8:00 PM

"It's been a long road, gettin' from there to here. . ."

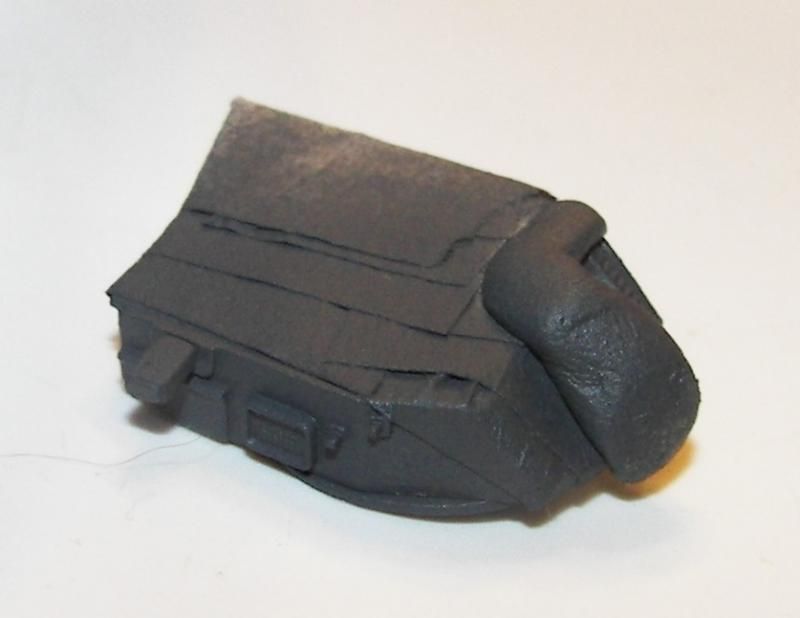
Been working on the main gun turrets, which were molded with a lot of cast-in detail, including a life raft;; not much of a flat surface.  But the camouflage is pretty straight.

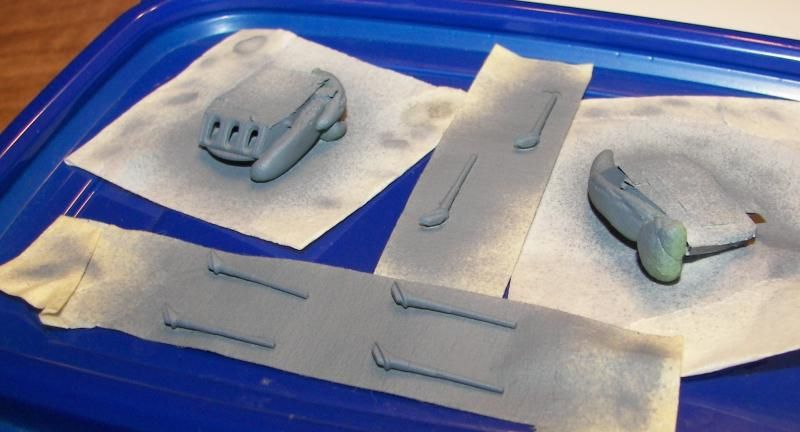
So I thought I'd try poster tack.  Here are the port sides, after applying the darker gray over the lighter gray.

Well, it didn't work.  Too much overspray.  No wonder poster tack is useful for soft demarcation lines. Maybe it was the way I put it on.

So, as Pooh said:  "Think, think, think."

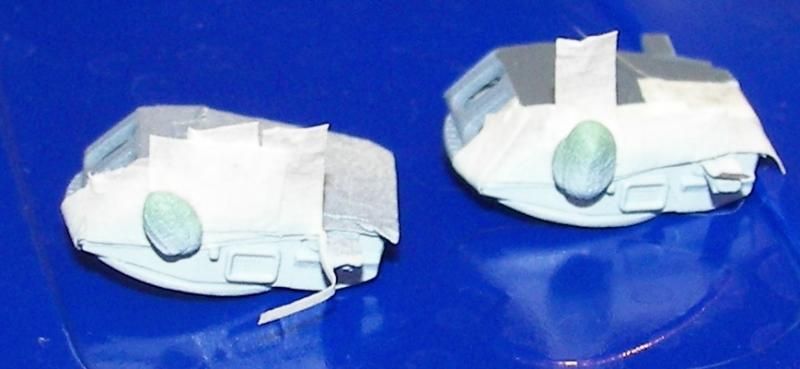
I resprayed the turrets with 5-O (the darker gray color), then cut narrow strips and masked between the molded details, then used bigger pieces to fill in.  Used poster tack to cover the intrusive protrusions.


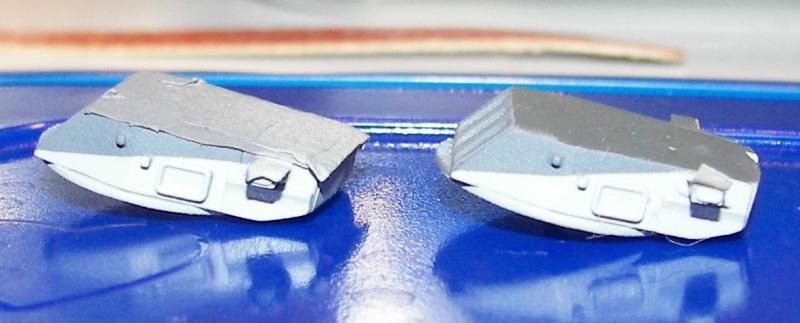
Then painted the 5-L (the lighter gray), and pulled off the masks.  It turned out OK--as good as I'm going to get it.

The complications of the schemes on each side of the turrets coerced me into doing each side as a separate project, so next up will be the starboard side of the turrets.

Those were the numbers 1 and 2 turrets; here's the number 3 (aft) turret, with 5-L masked and black applied.


  • Member since
    December 2002
  • From: Bury St Edmunds, Suffolk, England
Posted by Bish on Monday, September 22, 2014 1:01 PM

Looking good check.

I am a Norfolk man and i glory in being so


On the bench: Airfix 1/72nd Harrier GR.3/Fujimi 1/72nd Ju 87D-3

  • Member since
    January 2014
  • From: Toronto
Posted by Rob S. on Monday, September 22, 2014 5:12 PM

Looking great Check...question..is the poster tac a one time use or do you clean the paint off it, and, if so, how? Thanks!

______________________________________________________________________________


On the Bench: Nothing on the go ATM

  • Member since
    September 2003
  • From: AandF in the Badger State
Posted by checkmateking02 on Monday, September 22, 2014 6:09 PM

Thanks, Bish and Rob.  Still working on the turrets and guns.  Basic painting is done--but touch ups remain.

Rob, I do re-use the poster tack.  It doesn't seem to transfer paint from one project to the next, although I do keep the "used" stuff separate for a few days or weeks.  Doesn't seem to have any negative consequences  to re-using it.


  • Member since
    December 2002
  • From: Bury St Edmunds, Suffolk, England
Posted by Bish on Tuesday, September 23, 2014 1:08 PM

I re use it as well, not had any issues. I don't use it on every build so its usually a good couple of months before I ne to re use it.

I am a Norfolk man and i glory in being so


On the bench: Airfix 1/72nd Harrier GR.3/Fujimi 1/72nd Ju 87D-3

  • Member since
    January 2014
  • From: Toronto
Posted by Rob S. on Tuesday, September 23, 2014 2:45 PM

thanks guys...

______________________________________________________________________________


On the Bench: Nothing on the go ATM

G-J
  • Member since
    July 2012
Posted by G-J on Tuesday, September 23, 2014 7:07 PM

I've finally started working on the Mosquito.  Here are the nacelles, of which only the interiors are painted.  On to the wings.

On the bench:  Tamyia Mosquito Mk. VI for the '44 group build.  Yes, still.

On deck: 

  • Member since
    August 2009
  • From: MOAB, UTAH
Posted by JOE RIX on Tuesday, September 23, 2014 8:09 PM

CMK, You are still pulling off some remarkable paint work there. Nice work. If you encounter masking issues such as that again I suggest you try Silly Putty. It is much softer and more pliable, and you are able to push down tight as such to create sharp demarcation lines. Just push it up with a razor blade or other straight edge to create straight lines. I absolutely love the stuff and use it for a majority of my masking, especially camo patterns. And yes, you can just knead it after use and reuse it a number of times.

"Not only do I not know what's going on, I wouldn't know what to do about it if I did". George Carlin

  • Member since
    August 2009
  • From: MOAB, UTAH
Posted by JOE RIX on Tuesday, September 23, 2014 8:12 PM

It's great to see you getting started G-J. Looking forward to your usual outstanding work.

"Not only do I not know what's going on, I wouldn't know what to do about it if I did". George Carlin

  • Member since
    September 2003
  • From: AandF in the Badger State
Posted by checkmateking02 on Tuesday, September 23, 2014 10:34 PM

Thanks for the tip, Joe.  I have some of it; just never used it.  It'll probably come in handy yet with the North Carolina.


  • Member since
    February 2010
  • From: Berkeley CA/St. Paul MN
Posted by EBergerud on Wednesday, September 24, 2014 1:04 AM

OK, we need a little more salt water.

I'm building the 1/350 Cyber-Hobby (Dragon) USS Buchanan 1945 Tokyo Bay. I intended this kit to be part of a D-Day Group Build on Finescale. It was a good idea really. We think of destroyers as being part of the Pacific War, but rarely was USN (and RN) naval gun power more appreciated than during the Normandy campaign prior to the breakout. (The same was true at both Salerno and Anzio.) In particular, US DDs were shelling German beach and close defenses at Omaha and Utah. I believe all of the USN DDs at Normandy were Gleaves Class with mostly late war fittings. But a Gleaves isn't necessarily a Gleaves, and Rick Davies at Model Warship kindly shared some of his data on the subject and concluded the Buchanan kit would match well with USS Hobson, Cory or Fitch, all of which served at Normandy. I think I'll use Hobson simply because I've got good photos. Regardless, this did mean that the kit would carry Measure 22 - which is fine by me because I find it the most pleasing to the eye. (Other USN measures were either too blue or too "busy" to suit my taste. Hats off to the gents doing the Measure 30's. It was no picnic giving Scharnhorst a Norwegian Fjord scheme, but at least the deck was wood color, and the lines were softer.)

Here's the kit and the intended destination:

This is my first Dragon ship model, but I'm well acquainted with their armor. The family resemblance shows. The detail is exceptional for a styrene kit. In most cases the fit is also excellent. But, as is the case with their AFVs, caution is in order because a Dragon screw-up can be major, and they lurk because you don't expect them. (I'm much more cautious when building anything from Eastern Europe because I assume that you'll get bitten in the face at any time. The Tamiya portion of DML's gene pool can lull you until you get wacked by something that would do Zvezda or Smer proud.) There was also driver error involved. I started the kit in Minnesota and had to put aside for several weeks - that's a very bad way to approach a build at least for me.

More to the point, DML isn't happy if it isn't sitting at the point where many modelers would find their kits over engineered. Their designers are skilled and are able to create very detailed very small parts. Nobody will knock detail, but there are many times when one wonders if something made of three or four tiny parts couldn't have been done better with two - or one. DML's approach raises the part count and greatly increases build time. Probably the common complaint leveled at a Dragon kit are the poor instructions. Certainly true here. Parts are mislabeled, and placement is often very vague. Here is where you wish you had a Tamiya kit. Tamiya has very clear diagrams and/or photos showing what a component of the kit is supposed to look like after the parts are assembled. DML does that sometimes, and sometimes it doesn't. This leads to a lot of trial and error. I daresay that if I did another DML DD now, the build time would go down greatly. (I was dealing with two sets of instructions - one for the 1942 rendition, another shorter set detailed the changes required for the 1945 ship. It wasn't always clear where one ended and the other began.)

I should point out that I've built Buchanan while having a DML 1/350 Laffey at the ready. Most of the parts are interchangeable. I've only had to use some of the PE to replace items lost, but it's been a great comfort to know that I could take a mulligan in case of emergency. If I hit the lottery I'll make sure to have two copies of every model I build.

Anyway, as the kit stands now, most of the components are near completion. Here are several, although there is a lot of touching up to do:

I've done some dry assembly of the components, and the fit bodes well for the final stretch - or so I hope.

I did luck out with the PE. The standard Buchanan 42 comes with a basic set. I bought the 1945 kit second hand and it came with additional Cyber Hobby PE made for the 42 - including full railings ladders etc that look very nice. I like DML PE. It's less refined than Tom's or WEM but much sturdier. It also comes with a couple of jigs to help with some tricky bends. DML has plastic or PE choices for a number of parts, but not all. As luck would have it, the piece of PE that went AWOL was one with no plastic equivalent. With the two sets of PE included, there was no reason to track down a full set of aftermarket PE designed specifically for the kit. (I'm sure a more discerning modeler would have done so for the extra refinement.) The one place where DML let me down was the mast and the SC radar. The foremast was extremely fine and, in my few, unnecessarily segmented. I put it together and it looked very flimsy and really pretty lame. (The small mast on the aft deckhouse was pretty good and took some PE very well so I kept it. The fire control radar was done in PE and looks pretty good, although something more delicate would have been better.) The plastic SC radar was awful - something I saw right away. So I picked up a set of WEM WWII USN radars for the SC2. Nothing crude about WEM. I was a little worried about the rear frame, but actually was an easy bend and went on very quickly. I would prefer not to discuss how long it took to install the 16 dipoles in the front. (I saw another brand of radar PE - Empire I think - that dispensed with the dipoles.) Anyway, I scratched the mast in brass. Judging from the photos of the Gleaves DDs I've seen, the mast is actually pretty stout and I don't think this will be badly out of scale. The SC2 is in order - still have to work on some details.

I would like to show what I'm up to with the paint job. I do a lot of armor and am very interested in the unusual but effective weathering techniques pioneered by a gent named Mike Rinaldi. (He has three volumes of his work called "Tank Art" that sell very well.) Rinaldi likes to do as much weathering as possible with shading and pigments. He argues, correctly I believe, that rust and chipping can be seriously overdone especially on allied vehicles which carried pretty solid paint jobs and tended to be only a few months old. But there's still wear so Rinaldi came up with something he calls "reverse dry brushing." What you do is lay down a base coat of a color that is close to but darker than what you want for the model. He recommends Tamiya acrylics for this stage. I used XF 17 Sea Blue after Vallejo primer for the lower hull and the pieces of the deck that I knew were going to end up blue. I sealed it with Future. The base I applied was LifeColor Deck Blue (624), LC Navy Blue both lightened with a bith of Vallejo Model Color Light Sea Gray. (I've found that LC mix perfectly well with Vallejo Model Color as both are water based acrylics with very similar painting characteristics.) Vallejo MC 905 (Blue Gray Pale) cut with MC 906 (pale blue) stood in for haze gray. Once the base colors were dry, I took a brush and dampened it in Vallejo Airbrush Thinner and slowly made some streaks. This would remove some of the light base and reveal some of the darker Tamiya. This creates a series of dark smudges. After staring at a few hundred photos of Atlantic Theater US DDs, this is what I was looking for. Hobson's history is pretty typical. After some proper fun and games with arctic convoys it returned to Boston in December 43 where I'd assume it was given a refit. It joined the Bogue "hunter killer" group and made another stop at Boston on April 2. Whatever was done was done quickly because it was dispatched to the UK where it worked with convoys near Ireland and prepared for Normandy. After service at the beaches it moved down to support ops against Cherbourg - a pretty busy ship. So overall I'd guess the Normandy DDs were in pretty good condition, but far from pristine. So this is where we're going to start - washes, filters and some streaking still to come. What I'm really going to be after is an uneven color scheme that will evoke a measure of wear (the sort of thing I see every few days when I drive by the Richmond refinery and check out the latest tanker to arrive) without a rustbucket effect. I think if you look closely at the pic of Hobson above, you'll see what I'm talking about.

The illustrator for Dave McComb's nice Osprey book on prewar class US DDs must have been thinking along the same lines. Here's a linedrawing for Landsdowne which best shows the effect. (I daresay Landsdowne was more worn than Hobson,

That's it for now. Will check in as things start going together. Lot of work left, but I'm going down the hill finally - that's helpful for a modeler like myself that is prone to project fatigue.

Comments from wiser heads always appreciated.

Eric


A model boat is much cheaper than a real one and won't sink with you in it.

  • Member since
    September 2003
  • From: AandF in the Badger State
Posted by checkmateking02 on Wednesday, September 24, 2014 10:50 AM

I've got the kit in 1/700, so I'm looking forward to how your build goes, Eric.  Nice work so far!


  • Member since
    December 2002
  • From: Bury St Edmunds, Suffolk, England
Posted by Bish on Wednesday, September 24, 2014 11:21 AM

Ships ever where, we are assembling an armada. Nice start Eric.

I am a Norfolk man and i glory in being so


On the bench: Airfix 1/72nd Harrier GR.3/Fujimi 1/72nd Ju 87D-3

  • Member since
    August 2009
  • From: MOAB, UTAH
Posted by JOE RIX on Wednesday, September 24, 2014 11:55 AM

Eric, That destroyer is awesome. You've done some really terrific work on it so far. I'm really intrigued by your weathering method that you're trying. Thanks also, for the detailed history and analysis. That really adds to your build and reasoning. All these great ships being built is becoming quite a distraction from my efforts to work on my Hellcat. But, I'm lovin' it.

"Not only do I not know what's going on, I wouldn't know what to do about it if I did". George Carlin

  • Member since
    February 2010
  • From: Berkeley CA/St. Paul MN
Posted by EBergerud on Wednesday, September 24, 2014 3:38 PM

I've got the 1/700 Livermore/Monssen also. Obviously they're small, but the detail is exceptional for the scale. You'll probably have a smoother build too. It's just not possible to try the delicate moldings in 1/700 they did in 1/350 and therefore the part count is down a lot. As I recall there's just enough PE with the 1/700 that you could get a good kit just using WEM's generic 1/700 railings/ladders.


A model boat is much cheaper than a real one and won't sink with you in it.

  • Member since
    April 2014
  • From: Australia
Posted by lostagain on Thursday, September 25, 2014 2:54 AM

Schatten Spartan,

Thanks for the advice - unfortunately my patience had run out and I had already sanded back the paint to give a smooth base to rework off. This did however yield up an interesting look on the Wildcat, an effect which probably will come in handy on a bit of armour...

So I masked up again to redo the grey. Did black preshading this time and tried to keep the paint light. Lightened the original paint with sky blue to touch up the panel centres. The ailerons were masked after the initial paint job. 

CMK, the amount of softness on the edge of the 'sausage' mask is related to the thickness of the sausage and the spraying angle. I was using sausages about 3mm in diameter, and spraying over the edge of the sausage to break it up a little but not too much.

The paint job has improved, and so onto the clear coat.

The propellor in the Academy kit was inaccurate around the cuff and boss, so I am trying to improve the appearance a bit by extending cuff leading and trailing edges and removing a large collar from each of the blade roots.. Haven't snapped a blade off yet, just a matter of time...

  • Member since
    September 2003
  • From: AandF in the Badger State
Posted by checkmateking02 on Thursday, September 25, 2014 8:13 AM

The extra work paid off, lostagain.  That's a very good looking paint job on the Wildcat.  


  • Member since
    January 2014
  • From: Toronto
Posted by Rob S. on Thursday, September 25, 2014 1:52 PM

Yes, very nice paintjob on the Wildcat, the preshading shows nicely!!

______________________________________________________________________________


On the Bench: Nothing on the go ATM

  • Member since
    September 2003
  • From: AandF in the Badger State
Posted by checkmateking02 on Thursday, September 25, 2014 11:00 PM

Moved on to the second level deck, painted and test-fitting.

Starboard

Port


  • Member since
    August 2009
  • From: MOAB, UTAH
Posted by JOE RIX on Thursday, September 25, 2014 11:31 PM

Lostagain, It is indeed regrettable that your initial paint did not work out but, your recovery paint job turned out fantastic. As the saying goes,it's not in the mishap, it's all in the recovery. Great job.

"Not only do I not know what's going on, I wouldn't know what to do about it if I did". George Carlin

  • Member since
    August 2009
  • From: MOAB, UTAH
Posted by JOE RIX on Saturday, September 27, 2014 10:47 PM

I've managed some progress here as of late. I've completed the engine for the Hellcat. Eduard certainly did an excellent job in molding this nicely detailed R2800. The cylinders were painted with Alclad dull aluminum and the case with MM neutral gray. The push rods were painted with Gunze flat black. This was the first time I'd tried a PE ignition wire set and at first it was a bit frustrating bending and gluing them but, once I got it down things went rather smoothly. The PE emblem and placard were also a very nice touch of detail. The engine was given an overall coat of Mr. Surfacer gloss and then treated with an oil pin wash. The engine was then given a coat of Testors semi gloss.

A note here concerning the color of the ignition wires. I have dozens of reference photos of the R2800 and I had not seen anywhere where it mentioned the color of the wires. In photos they will appear as black, silver and more often a dirty gray or green. Well the other day while reading the captions under pictures of the Smithsonian R2800 it clearly stated that the wires were in copper sheathing. This was quite clear in the photos of the engine. This would, for me, explain the dull grayish green you see in many shots as the copper would have oxidized. I opted to paint mine in the bare copper color as a bit of artistic license in order to create the contrast in colors and draw the casual observers attention to the detail.

Thanks for having look.

"Not only do I not know what's going on, I wouldn't know what to do about it if I did". George Carlin

  • Member since
    December 2002
  • From: Bury St Edmunds, Suffolk, England
Posted by Bish on Sunday, September 28, 2014 3:01 AM

Looking good there guys.

I am a Norfolk man and i glory in being so


On the bench: Airfix 1/72nd Harrier GR.3/Fujimi 1/72nd Ju 87D-3

  • Member since
    February 2010
  • From: Berkeley CA/St. Paul MN
Posted by EBergerud on Sunday, September 28, 2014 5:19 AM

Very nice looking engine Joe. (Some day try to track down a bottle of Iwata Medea Com.Art acrylics - hopeless for painting for great for weathering - some gray smoke or dirty oil delivers a part with a grimy color and a grimy feel. I've been using it for a couple of years - it's hard to explain.) Cameras have really changed modelling methinks. So much lovely detail work ends up getting obscured or buried by rest of the airplane and maybe a friend or a judge would see it. Now several fellow nuts can say, that's a sweet engine. (I should take myself more seriously: I just can't get myself excited over super detailing a cockpit that I know nobody will ever see - except poor souls on the board.

Hobson's components are coming together. The deck is not glued on, but it looks like things will fit. I might even build a base even though I'm sick of looking at the thing and really want to do a tank. (The new Tamiya MKIV methinks - it comes with a motor - can hardly wait.)

Eric


A model boat is much cheaper than a real one and won't sink with you in it.

  • Member since
    August 2009
  • From: MOAB, UTAH
Posted by JOE RIX on Sunday, September 28, 2014 8:51 AM

Thanks Eric. I'll have a look into the Iwata medea of which you speak. The Hobson sure is looking fantastic. Sorry to hear you are seemingly burning out on it but, rest assured, I'm enjoying the heck out of your destroyer.

"Not only do I not know what's going on, I wouldn't know what to do about it if I did". George Carlin

  • Member since
    September 2003
  • From: AandF in the Badger State
Posted by checkmateking02 on Sunday, September 28, 2014 2:11 PM

Engine is still looking great, Joe!

And the destroyer is excellent, Eric.  It's easy to get "sea sick," since ships tend to take so long to finish.  Nevertheless, it's very pleasing to the eye.


  • Member since
    January 2014
  • From: Toronto
Posted by Rob S. on Sunday, September 28, 2014 7:18 PM

Great looking work guys...that engine, Joe, looks like it's gonna start up and power that plane!!

______________________________________________________________________________


On the Bench: Nothing on the go ATM

  • Member since
    August 2009
  • From: MOAB, UTAH
Posted by JOE RIX on Sunday, September 28, 2014 8:17 PM

Rob, Thank You. That's quite a compliment.

and CMK, Thanks...again.Lol.

"Not only do I not know what's going on, I wouldn't know what to do about it if I did". George Carlin

  • Member since
    May 2014
Posted by Nomad53 on Tuesday, September 30, 2014 6:31 AM

Hey all,

I'm still here. Been sick for the last week or so. It's been a long time since I have been that sick with a cold.

From the looks of all the builds going on there is some great work being done. Outstanding paint jobs. I have taken a break form the USS Missouri as the masking job on the decks have been kinda hard for me to get going the right way.

I have been working on the Kennedy PT-109 just to break up the builds a little bit. I am not entering it into any GB's as I am not going for the historical look at the time that JFK was the skipper. I am building it for my son-in-law who really likes it.

Almost done eith it but I am having trouble with my airbrush at the time. I guess it's time that I take it apart and do a real good cleaning and hope it works.

Keep up the great builds and I will get back on the Missouri soon.

Doug

Nomad53


JOIN OUR COMMUNITY!

Our community is FREE to join. To participate you must either login or register for an account.

SEARCH FORUMS
FREE NEWSLETTER
By signing up you may also receive reader surveys and occasional special offers. We do not sell, rent or trade our email lists. View our Privacy Policy.