SEARCH FINESCALE.COM

Enter keywords or a search phrase below:

1/35 M1009 CUCV, WIP, 02/17/13, Completed

27480 views
101 replies
1 rating 2 rating 3 rating 4 rating 5 rating
  • Member since
    July 2006
  • From: New Jersey
1/35 M1009 CUCV, WIP, 02/17/13, Completed
Posted by redleg12 on Thursday, December 27, 2012 9:04 PM

Fire Mission

M1009 ¾ Ton Commercial Utility Combat Vehicle

Introduction

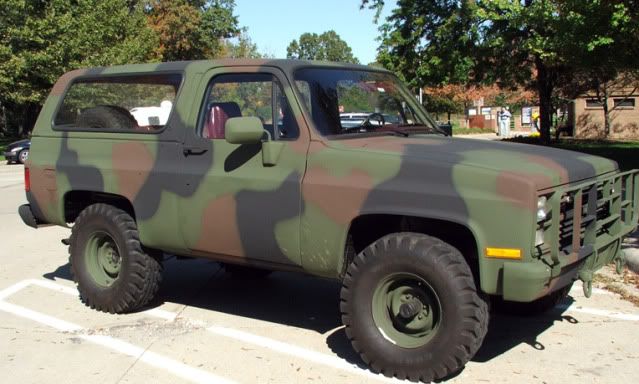
The Chevy Utility vehicles were introduced in the 1980s as an interim replacement of the M880 series vehicles which had replaced the old WC series. The CUCV were eventually replaced in combat units by the HMMWV but served many roles through the early 2000s


Background

While serving as a battalion Assistant S-3 I had a M1009 in place of a HUMMV. Though not suited perfectly for combat use, HQ34 served me well through many training exercises.

Build

I will be using a Miniman M1009 resin kit for this build

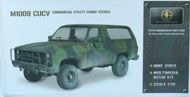
The kit is well made with numerous details and is excellent casting with almost no fisheyes or voids. The instructions are picture based and similar to styrene kit instructions. The parts themselves require very little cleaning with the exception of removal of casting blocks. The kit is mostly resin but also includes soft metal parts, clear lenses and windows, photo etch parts, decals and a pressed paper front brush guard.

Step 1 is to install the white metal leaf springs and the resin transfer case. I installed the transfer case after removing the casting blocks from the floor panel and the case. The floor board has pin holes to spot the white metal leaf springs. The holes needed to be cleaned with a drill bit to comfortable fit the springs, which were then installed

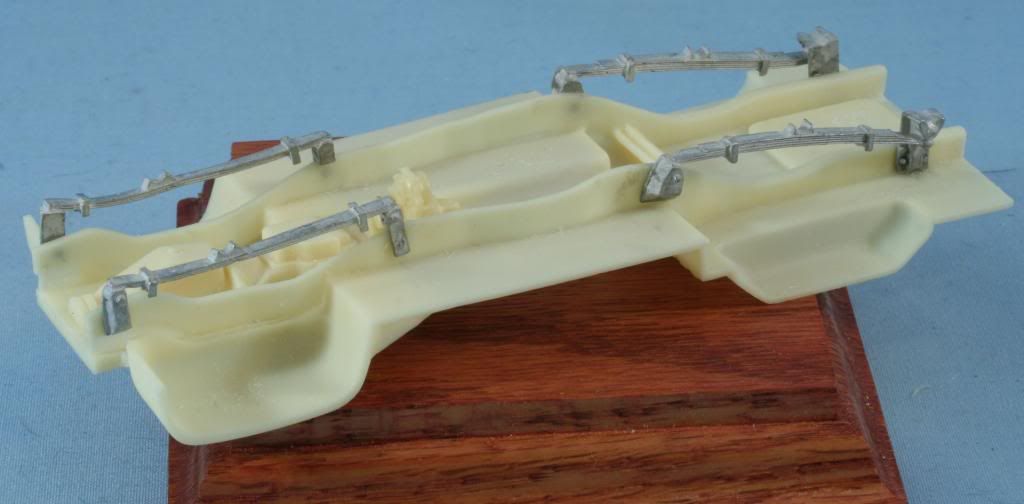
Next step is to install the universal drive shafts. The axels are white metal while the drive shafts are resin. Care needs to be taken to center the axels for proper tire alignment and proper rotation to install the universal. The front assembly fit perfectly but the rear universal needed some slight trimming, which I did on the transfer case end, in order to get proper fit.


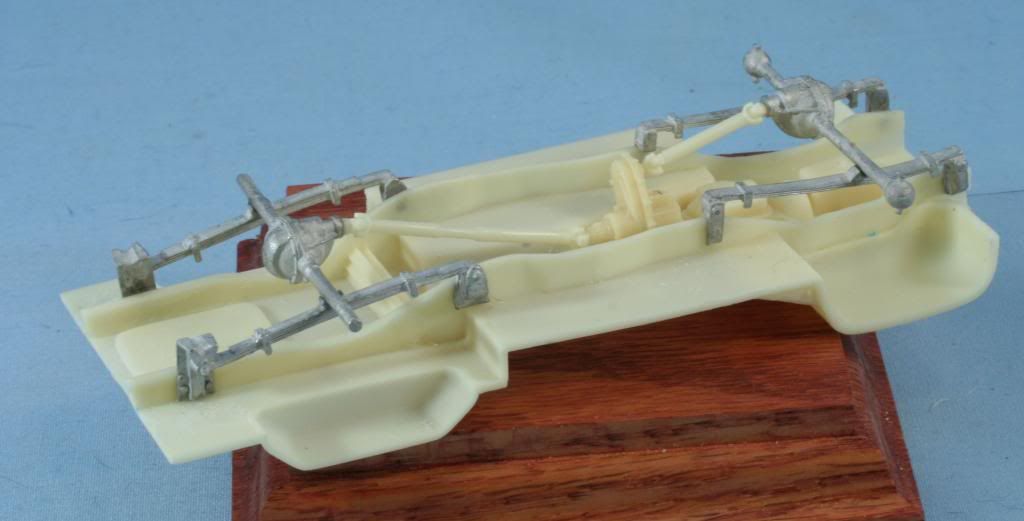
Step 3 installs the shocks and the dual exhaust system. Removal of the exhaust systems from their pour blocks needs to be do done carefully to avoid breaking the exhaust pipes, which are long and thin. First I installed the shocks, which fit in a pin- hole on the floor-board and a pin on the axel. The shocks were slightly shorter in length than the line up pins. In order to install, I lined up the pin on the axel and shortened up on the line up on the floor-board which required a new pin hole to be drilled. The exhaust has to be threaded under the rear axel and the front end lines up with a pin-hole in the floor board while the tailpipe rests on the rear block of the rear leaf spring. Once threaded these parts lined up perfectly and fit well.

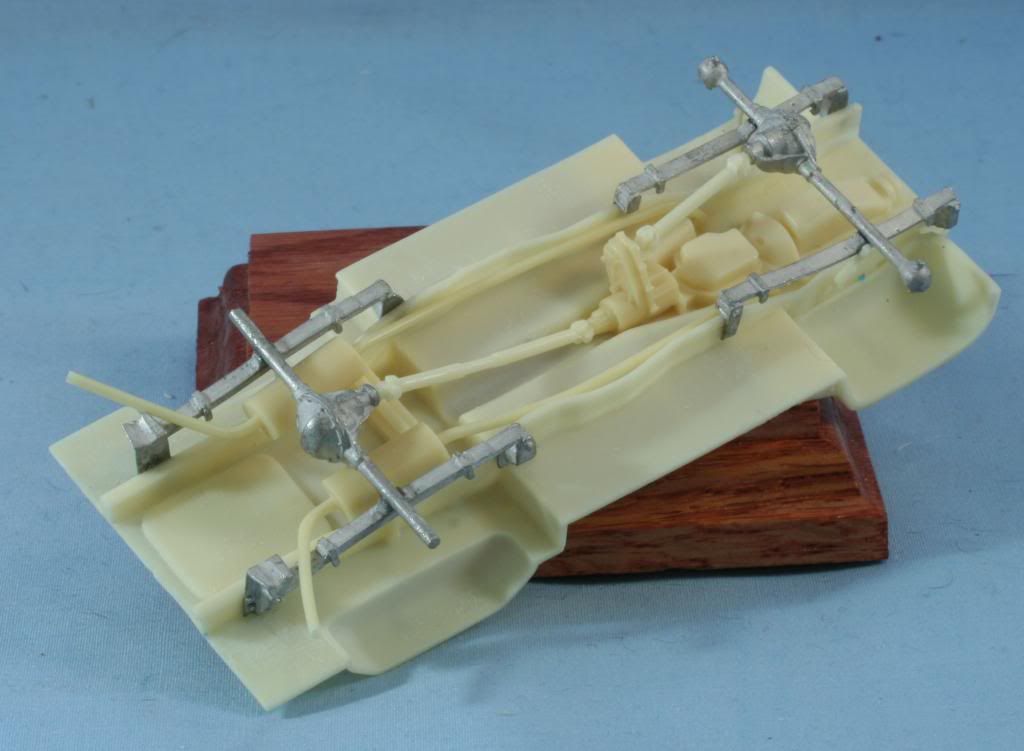
The first three steps complete the undercarriage. Step 4 requires the tires to be assembled, which I will skip until final assembly. At this point, the undercarriage assembly will head to the paint booth, as the bottom will be basically black with steel for the exhausts. The top is the inside of the vehicle and the floor inside was a NATO green.

As always feel free to leave a comment either positive or negative

Rounds Complete!!


"The Moral High Ground....A Great Place to Emplace Artillery."

  • Member since
    January 2006
  • From: California
Posted by SprueOne on Thursday, December 27, 2012 9:12 PM

Watching and following this WIP build. 

Tags: CUCV

Anyone with a good car don't need to be justified - Hazel Motes


Iron Rails 2015 by Wayne Cassell Weekend Madness sprueone

  • Member since
    July 2006
  • From: New Jersey
Posted by redleg12 on Friday, December 28, 2012 6:30 AM

Sprue - Thanks for tagging along

Rounds Complete!!

"The Moral High Ground....A Great Place to Emplace Artillery."

  • Member since
    May 2005
  • From: Dublin Rep Of Ireland
Posted by terry35 on Friday, December 28, 2012 9:16 AM
Hi, Mike I've seen this kit, very interesting, are those trucks like a Ford Bronco? I've never seen any of these vehicles in the flesh as we just don't see American Pickup trucks over here.

Terry.

  • Member since
    July 2006
  • From: New Jersey
Posted by redleg12 on Friday, December 28, 2012 10:07 AM

Terry - Yep they are like a Bronco. The old WC series trucks were replaced in the mid 70s by the M880 series. These were built by Dodge and essentially pickup trucks, commercial pickups which were militarized. This was done to help bail out Chrysler at the time and fill a vehicle void. The M880 series ran on gasoline and were not done well...in general they $ucked.

The army quickly looked to replace and since the HMMWV was still in development, they turned to Chevy. The M1009 and 1008. The 1009 was the Blazer vehicle and the 1008 was a Chevy pickup. They were far better than the M880 series but still not a off road combat vehicle.

Once the HMMWV was issued in the mid 80s the M1009 & 1008 were moved from front line units to combat support units. Essentially they slowly were "used up" and the last few went with support of the initial OIF invasion.

Thanks for the peek and the question.  

Rounds Complete!!

"The Moral High Ground....A Great Place to Emplace Artillery."

  • Member since
    May 2009
  • From: Poland
Posted by Pawel on Friday, December 28, 2012 11:02 AM

Hello Mike!

Another interesting build - I'll be watching! The company's decision to put in metal undercarriage looks very reasonable to me, considering how funny resin can behave under load AND temperature. Good luck with your build and have a nice day

Paweł

All comments and critique welcomed. Thanks for your honest opinions!

www.vietnam.net.pl

  • Member since
    July 2006
  • From: New Jersey
Posted by redleg12 on Friday, December 28, 2012 12:58 PM

Pawel - Thanks, the soft metal for the suspension parts is perfect. Much stronger than resin and considering it holds up the model, it is a very smart move. Thanks for stopping in.

Rounds Complete!!

"The Moral High Ground....A Great Place to Emplace Artillery."

  • Member since
    May 2005
  • From: Dublin Rep Of Ireland
Posted by terry35 on Friday, December 28, 2012 2:53 PM
Thanks Mike, the Irish Army used Land Rovers for Decades, built across the water, easily repaired and parts abundant, plus they are great off road. It was in the late 1980's that they started to purchase Nissan Patrols. As far as I know the only large American Pickup type trucks are large Ford F1500 (I think that's the type) used by our special forces.
Petrol/gasoline is almost €2 a liter here so the American love affair with large capacity engines would not last long here.
Thanks for your time and I look forward to seeing this progress.

Terry.

  • Member since
    December 2002
  • From: Valrico, FL
Posted by HeavyArty on Friday, December 28, 2012 7:26 PM

Great start Mike.  It is coming along well.

Gino P. Quintiliani - Field Artillery - The KING of BATTLE!!!

Check out my Gallery: https://app.photobucket.com/u/HeavyArty

"People sleep peaceably in their beds at night only because rough men stand ready to do violence on their behalf." -- George Orwell

  • Member since
    July 2006
  • From: New Jersey
Posted by redleg12 on Friday, December 28, 2012 9:26 PM

Terry - The M880 was a gas vehicle. The M1009/1008 were diesel engines....much better

Gino - Happy New Year and thanks for the peek...details coming soon.

Rounds Complete!!

"The Moral High Ground....A Great Place to Emplace Artillery."

  • Member since
    September 2005
  • From: beacon falls , Ct.
Posted by treadwell on Friday, December 28, 2012 9:32 PM

Hi Mike Smile

I saw this truck on ' Redleg-2-Scale ' and it said up next and I guess it is !  This going to be pulling the trailer in the dio ?  I will bet the exhaust was a very fragile PITA !  looking great so far Yes 

Mike, Have a Great New Year my friend !

treadCool


  • Member since
    July 2011
  • From: Pittsfield, IL USA
Posted by novembergray on Saturday, December 29, 2012 10:04 AM

I was just curious if the photo was of your vehicle and if so, where it was taken. I was an FO on a COLT team for HHB 1/10 FA stationed on Kelley Hill, FT Benning back in the late 90s. I didn't see much but Benning and Kuwait and of course Ft Sill for basic and AIT. I'm sure with your time in you saw a lot of posts.

Joe

It's not about how fast you get there or even where you're going. It's whether you enjoy the ride.

  • Member since
    July 2006
  • From: New Jersey
Posted by redleg12 on Saturday, December 29, 2012 11:03 AM

Tread - thanks for the peek. No this will not be pulling the trailer. Actually the M1009 had a trailer hitch but its attachment point was not that great and early on the Army banned trailer pulling with the M1009. as for the web site, need to play catch up this weekend....busy, busy busy! Happy New Year my friend.

Joe - I don't have a still picture of my HQ34.I do have a video with it. As for the picture here, it is just a good shot of a 1009 from the internet. As for my time, it was the generation before you. It could be signal mountain at Sill, jump school at Benning, Bragg, ect, ect. I saw a lot of dirt and plent of muzzle blast! it may be faster today with all the electronics but it is still about automatic steel! Nice to hear from a brother Redleg!

Rounds Complete!!

"The Moral High Ground....A Great Place to Emplace Artillery."

  • Member since
    July 2004
  • From: Texas
Posted by wbill76 on Saturday, December 29, 2012 12:58 PM

Nice to see this one get its turn on the bench Mike! Look forward to seeing it come alive. Beer

  • Member since
    September 2006
  • From: Dripping Springs, TX, USA
Posted by RBaer on Saturday, December 29, 2012 2:44 PM

I'm going to follow this one as well, both for the build and for the amusement value of seeing a model of something I spent a large part of my life working on (among other things). Should be neat.

Apprentice rivet counter.

  • Member since
    September 2005
  • From: North Pole, Alaska
Posted by richs26 on Saturday, December 29, 2012 2:55 PM

I have driven both the Dodge and the Chevy's and they both sucked, especially with the Chevy's 6.2L diesel which was also used in the original Humvee.  Had 3 GM's at Gitmo in 95 with my AF CE group that were totally thrashed by the time we deployed there.  They probably ended up in the dump.  Had a Dodge and several GM's at the AF's largest used car lot, "Al's Garage", Al Kharj, Saudi. The GM's are highly prized for offroading vehicles with the heavier frames and axles.

WIP:  Monogram 1/72 B-26 (Snaptite) as 73rd BS B-26, 40-1408, torpedo bomber attempt on Ryujo

Monogram 1/72 B-26 (Snaptite) as 22nd BG B-26, 7-Mile Drome, New Guinea

Minicraft 1/72 B-24D as LB-30, AL-613, "Tough Boy", 28th Composite Group

  • Member since
    July 2006
  • From: New Jersey
Posted by redleg12 on Saturday, December 29, 2012 4:51 PM

Bill - I am raising it up through the roof hoping for a thunderstorm!!

RBaer - Glad you are along...I always enjoy modeling something from my past. I get those "scale" memories!!

Rich - I hear you...The Dodge was a total DOG...the Chevy was transportation...much better than the Dodge 880 series but not close to a HMMVE. Many guys have had an experience with the 1009. Glad to see you come along through memory lane

Rounds Complete!!

"The Moral High Ground....A Great Place to Emplace Artillery."

  • Member since
    July 2006
  • From: New Jersey
Posted by redleg12 on Sunday, December 30, 2012 4:00 PM

Having some time with the holiday allows me to keep moving on this build. First the undercarriage assembly was primed and then the bottom painted flat black.

Once dry, the flip side which is the interior was painted NATO Green

Next were the interior components including the seats door panels and the dashboard. The vinyl in the M1009 was a reddish brown to close to NATO Brown. The dash had vinyl in NATO Brown, plastic in Black and the metal underside in NATO Green. After painting the respective parts, I then used MM Acryl Semi Gloss Clear on the vinyl and plastic areas to give the proper sheen to the components.

With all the paint dry on the undercarriage, I did some basic underside weathering using AK Filter for NATO. Dabbing in spots to create the dirty stained effect.

Next I assembled the interior installing the front and rear seats and the floor transfer case shifter.

With that complete the interior was weathered with a light coat of AK Filter for NATO followed by AK Dust Effects.

With the kit interior parts now assembled it is time to add a bunch of details. First I completed the dashboard. I used Archer transfer gauges and the put a drop of future over each gauge. When the future dries it simulates the gauge glass. The data plate is from Archer Data Plate set. I attached the PE dash bracket and then attached a Verlinden speaker. The speaker is painted with Tamiya Olive Green and the speaker wire, which goes from the speaker under the dash, is 26 gauge SS wire painted Flat Black. I then assembled the steering column and steering wheel to finish the dashboard assembly

Lastly I worked on the radio assembly. I started with a Verlinden RT-524 and R-442 radios with their mounts and painted them with Tamiya Olive Green. The details on the radio include the white area for grease pencils to write frequency, the black area for the frequency, the orange for the incoming call light, and dry brush on some of the knobs with white for indicator. I also dry bushed using Alclad Aluminum for the jacks and the paint wear on the edges of the radio.

Next I made the brackets to hold the radio assembly using .060 C channels styrene. After assembly, the channels were painted with Alclad Steel. Once everything was dried I assembled everything for installation into the M1009.

That is it for now. Lots more interior details coming.

As always feel free to leave a comment either positive or negative

Happy New Year!

Rounds Complete!!

"The Moral High Ground....A Great Place to Emplace Artillery."

  • Member since
    April 2011
Posted by jezones on Sunday, December 30, 2012 4:59 PM
The build looks great so far. I always learn so much from watching your builds. I'm looking forward to the next update.

Mark
  • Member since
    July 2004
  • From: Texas
Posted by wbill76 on Sunday, December 30, 2012 6:49 PM

Nice work as always on the details Mike! I bet those leather bucket seats bring back some memories. Smile

  • Member since
    July 2006
  • From: New Jersey
Posted by redleg12 on Sunday, December 30, 2012 7:25 PM

Mark - Glad you are enjoying and learning. Part of doing a blog is teaching. Enjoy and always feel free to ask questions

Bill - Thanks, I will admit it was the most comfortable vehicle in the field. With all the gear on you did not fit real well in a "bucket" seat. It was an oddity.

Rounds Complete!!

"The Moral High Ground....A Great Place to Emplace Artillery."

  • Member since
    April 2011
Posted by jezones on Sunday, December 30, 2012 7:53 PM
No that I think about it I think our Chief had one of those bucket seats in our M998. Don't ask me how or where he got it from. It always did look funny compared to the other seats

Mark
  • Member since
    July 2006
  • From: New Jersey
Posted by redleg12 on Tuesday, January 1, 2013 3:12 PM

Ok, I was able to get some details done over the holiday. First, you cannot go anywhere with a military vehicle without your vehicle logbook. The logbook is on the floor next to the driver seat. The logbook is .020 styrene covered with Sungumini BDU camouflage decal.

Next is the chain welded to the floor to lock the steering wheel. I used chain from Michaels painted with Alclad Steel.

On the passenger seat is the “pork chop” or radio microphone. This is from the Pro Art radio set. The microphone wire is 26 gauge SS wire, coiled and painted flat black. Now as the Assistant S-3 of an artillery battalion, I was the Fire Direction Officer, responsible for coordination all of the battalion firing. The manual that covers all artillery fire direction is FM-6-40. A copy of the early 1980s version is on the front seat.  Photo of the real manual shrunk down to 1/35, printed and glued to .020 styrene. Next to the manual is a Graphical Firing Table, which is like a slide ruler to calculate firing data. Produced the same way as the manual except I used .010 styrene (yes….I do have the real items to photo). Lastly, the sign of the times, the empty pack of Marlboro on the floor….long day.

I had a buddy make me a copy of the rear tire, as the kit does not come with a spare, (thanks S.R.) which on the M1009 has a spare stored in the rear. The tire is painted with tire mix of 50/50 Flat and NATO black, the rim is NATO Green. The mount is made from .030 styrene angle painted flat black.

The back seat has the radio mounted. The mount is supported by .030 angle painted with Alclad Steel. The radio connecting jacks are .020 styrene rod painted with Alclad Aluminum. The speaker and microphone wires are 26 gauge SS painted flat black. Then on the seat, there is my army cot (hopefully at some point I got to use it if only for an hour). The cot frame is Alclad Aluminum and the canvas is Tamiya Drab Green.  

In the back are two water cans from Real Models painted flat black. Also two cases of MREs made from Verlinden set. The box is a resin box, which would be a FDC plotting kit. The box is painted with Tamiya Olive Green and edges worn with a #2 pencil. Lastly is my pack painted NATO Green and faded with AK dust effects.

Well that is it for the interior, now it is time to start working on the body.

As always feel free to leave a comment either positive or negative

Rounds Complete!!

"The Moral High Ground....A Great Place to Emplace Artillery."

  • Member since
    December 2002
  • From: Fort Knox
Posted by Rob Gronovius on Tuesday, January 1, 2013 3:27 PM

You're catching that purplish-brown color of the vinyl interior very well.

CUCVs still scream REMF wagon to me. Real men drove in 1/4 tons pulling doghouses.

  • Member since
    July 2006
  • From: New Jersey
Posted by redleg12 on Tuesday, January 1, 2013 4:13 PM

Rob - Thanks for the comments. My time with the CUCV was that interim time between the 1/4 ton and the HMMWV. That time when we turned in all the 1/4 ton & doghouses and then waited for particular models of the HMMWV to be delivered...Even after delivery the CUCV hung around as a go for vehicle until the supply system caught up.

Happy New Year to you Rob!

Rounds Complete!!

"The Moral High Ground....A Great Place to Emplace Artillery."

  • Member since
    September 2005
  • From: beacon falls , Ct.
Posted by treadwell on Tuesday, January 1, 2013 5:39 PM

Happy New Year Mike Smile

The interior is really shaping up nicely. A chain to lock the steering wheel ?  Doesn't the Army trust the Chrysler locking wheel column ?  You don't have to answer that one LOL Wink 

tread Cool


  • Member since
    July 2006
  • From: New Jersey
Posted by redleg12 on Tuesday, January 1, 2013 5:49 PM

Tread - Happy New Year to you and your wife. Now to answer the question....when the Army ordered the CUCV series, they ordered them ALL keyed alike. Anyone who had access to a CUCV key could make a copy and start any CUCV in the inventory. Soooooo....thus the chains to lock the steering column.

Rounds Complete!!

"The Moral High Ground....A Great Place to Emplace Artillery."

  • Member since
    December 2002
  • From: Fort Knox
Posted by Rob Gronovius on Tuesday, January 1, 2013 5:52 PM

treadwell

Happy New Year Mike Smile

The interior is really shaping up nicely. A chain to lock the steering wheel ?  Doesn't the Army trust the Chrysler locking wheel column ?  You don't have to answer that one LOL Wink 

tread Cool

Chevrolet, not Chrysler, provided door locks & steering wheels all keyed exactly alike. Therefore, the only way to ensure unauthorized use of the 1008/1009 series was to have a lock & chain on the steering wheel.

Every CUCV key would open every door and every ignition key would start every truck.

That way, a lost vehicle key did not require re-keying of the vehicle. A lost padlock normally had a second key in the motor pool, or if in the field, a pair of bolt cutters and another padlock and you were on your way.

  • Member since
    September 2005
  • From: beacon falls , Ct.
Posted by treadwell on Tuesday, January 1, 2013 7:01 PM

Hi Rob Smile

Happy New Year to you !

Sorry about the Chevy /Chrysler confusion.. I'm easily confused during the holidays LOL .

Very interesting about all the keys and ignitions being the same Surprise .  I can easily understand the need of the chain, padlock and responsibility of the padlock key bearer now !  

Have a great New Year !

tread Cool   


  • Member since
    September 2005
  • From: beacon falls , Ct.
Posted by treadwell on Tuesday, January 1, 2013 7:09 PM

Mike, thanks also for the explanation...still trying to figure out how I got Chrysler/ Chevrolet  mixed up..

You and Rob posted about 3 minutes apart and originally I missed yours .... dam....I need some sleep...made it all the way to midnight just like the big kids last night ! ...LOL

you are off to a great start for 2013 Yes

tread Cool


JOIN OUR COMMUNITY!

Our community is FREE to join. To participate you must either login or register for an account.

SEARCH FORUMS
FREE NEWSLETTER
By signing up you may also receive reader surveys and occasional special offers. We do not sell, rent or trade our email lists. View our Privacy Policy.