SEARCH FINESCALE.COM

Enter keywords or a search phrase below:

1/35 SAM-6 completed - suggested changes made, pics on pg. 2

14922 views
19 replies
1 rating 2 rating 3 rating 4 rating 5 rating
  • Member since
    January 2007
Posted by Gigatron on Monday, October 4, 2010 7:45 AM

Thanks, guys Cool

-Fred


  • Member since
    July 2004
  • From: Texas
Posted by wbill76 on Sunday, October 3, 2010 11:59 AM

Corrections/adjustments look good! Yes

  • Member since
    August 2003
  • From: Connecticut, USA
Posted by Nachtflieger on Saturday, October 2, 2010 10:48 PM

Really nice work.Yes

Nate


  • Member since
    January 2007
Posted by Gigatron on Saturday, October 2, 2010 8:08 PM

Hey guys,

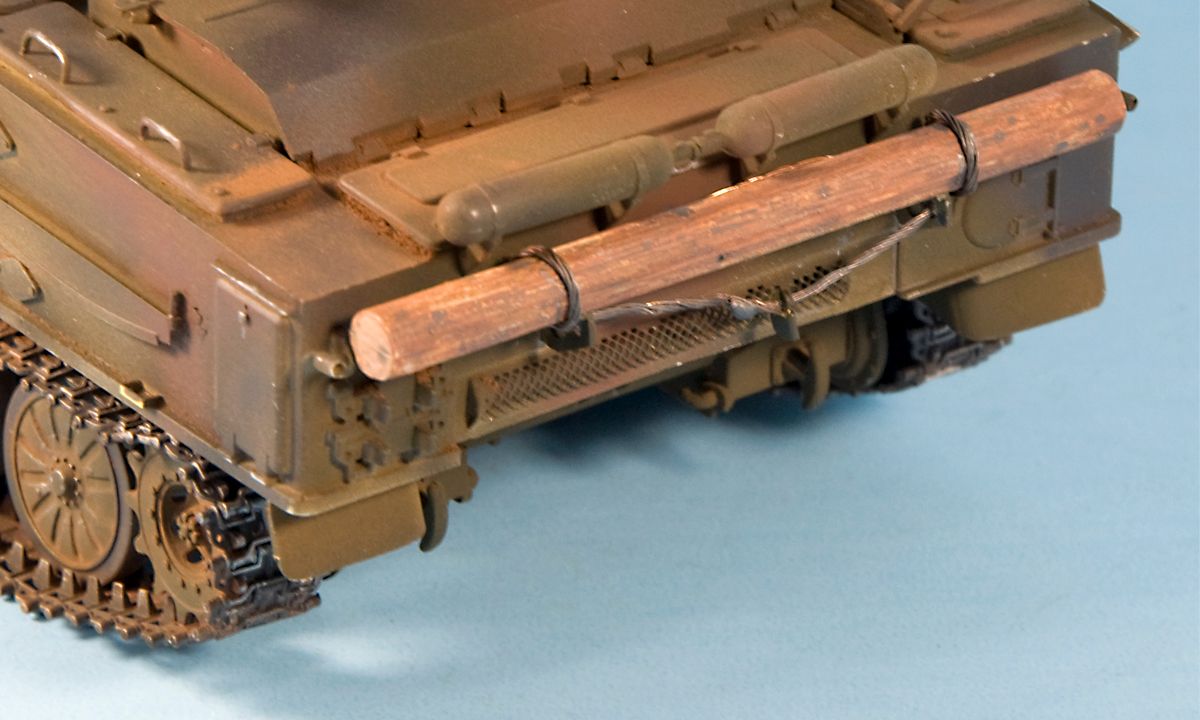
So, I made some of the suggested changes (except for the floating road wheel - not much I can do about that).  The log tie-down is twisted copper cable, which was then painted with MM metalizer Titanium.

And if you look real close, you can see a home-made padlock I made from PE sprue


Marc, it's good to be back on the wrong side of the tracks (pun intended Cool).  It's fun to build something without fiddly landing gear and antennae.

Camo Junkie, I look forward to seeing yours, when it's finished.

Constructor, that's an interesting tip and one definitely worth keeping mind of, for future builds.  I look forward to the pictures.

Mikael, I though about using a real stick, but I decided I needed to keep up my practice with painting wood grain.

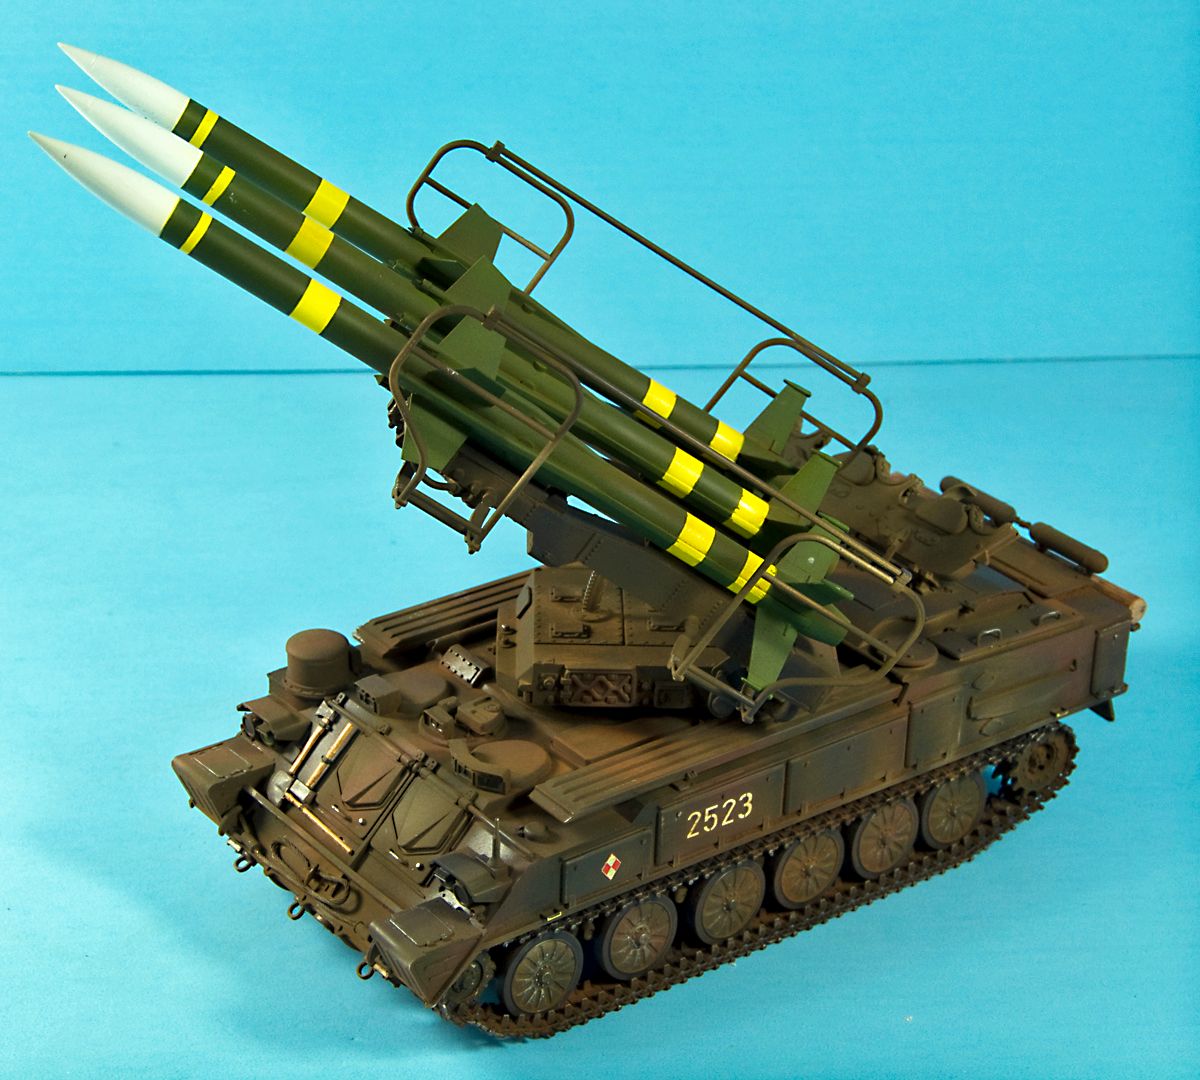
Thanks Hughes.  I'm normally an aircraft builder, but I have dabbled in the armor, on occassion.  Next up will be an Israeli Shilka.

Thanks again, guys Cool

-Fred


  • Member since
    May 2005
  • From: Eugene, Oregon
Posted by hughes2682 on Saturday, October 2, 2010 1:30 PM

That is a well done build that you have posted here.  I won't add any constructive criticism since it has already been done. Wink  It looks like just some small detail stuff to be done to bring it up to the next level.  Again, that is a solid build.  Thank you for posting it.  Looking forward to seeing more of your works.

Cheers

Dave

http://img.photobucket.com/albums/v317/Aaronw/Groupbuilds/ClassicAviationGB2010bomb.jpg

With enough thrust, pigs fly just fine.

  • Member since
    December 2007
  • From: Bridgeview, Illinois
Posted by mg.mikael on Friday, October 1, 2010 9:52 PM

Nice to see some modern Russian armor (that's in Polish markings). Your construction is top notch, though as was mentioned I'd suggest tarnishing up the tools to show use. Other then that your SAM is lookin' fine!Yes

As for the un-ditching log in the back, I would have suggested scratching your own to give it more realism. And by scratching I mean going outside and finding a dead branch on a tree or stick on the ground, that's all I did for the one I scratched you see below and it gave it ten times more detail. For the tie-downs, just take some tow-cable string either stain it with some washes to give it a natural color or paint it in a metal shade to give the appearance of a metal cable. Then just loop it around the log and connecting point....see below.

"A good plan executed now is better than a perfect plan next week." - George S. Patton

  Photobucket 

  • Member since
    July 2006
  • From: Philippines
Posted by constructor on Friday, October 1, 2010 7:15 PM

When building Russian armor with these fording logs, I replace them with the middle portion of wooden chopsticks that get from japanese restaurants. I cut them to size and stain them brown and cut thin peices of metal (brass leftover from PE sheets) and use them as mounting straps I will post a picture soon.

  • Member since
    January 2009
  • From: clinton twp, michigan
Posted by camo junkie on Friday, October 1, 2010 3:14 PM

im working on this one as we speak! nice job!

"An idea is only as good as the person who thought of it...and only as brilliant as the person who makes it!!"
  • Member since
    April 2005
  • From: Piscataway, NJ!
Posted by wing_nut on Friday, October 1, 2010 2:36 PM

Hey Fred, been a long time.  I see you are stepping out a bit into the land of heavy machinery.  Looks good.  The others have you covered on some things.  As stated... looks bada$$

Marc  

  • Member since
    May 2009
  • From: Poland
Posted by Pawel on Friday, October 1, 2010 2:32 PM

Howdy!

I found a foto of a T-72 for you, where the details of mounting of the log to the back to the tank are well visible. Hope it helps.

Foto from PrimePortal

By the way, did you know the log is one of the historically oldest tank accessories, already seen on the original british "tanks" from WWI?

Have a nice day

Paweł

All comments and critique welcomed. Thanks for your honest opinions!

www.vietnam.net.pl

  • Member since
    March 2006
Posted by TD4438 on Friday, October 1, 2010 9:08 AM

My initial reaction upon seeing the first pic........."Oh,bada$$!"

I really dig this one.

Nice job!

  • Member since
    January 2007
Posted by Gigatron on Friday, October 1, 2010 7:42 AM

Thanks for all the compliments and the tips, guys Cool

With the tools, I just followed the painting instructions - stainless steel.  I'll try to darken them with a wash of titanium, or another MM metalizer.

Does anyone have any pics of how the log was secured?  Did the they use rope or chain?  Where are the tie down points?

The one road wheel is indeed floating.  The mount kept snapping off (3 or 4 times), until I pinned it.  But by then, the only way it would stay on, was at the slightly off angle.

And with the warhead, it's not so much as yellow overspray, as it is not enough white coverage.  I sprayed the yellow first, masked it off and then sprayed the white and green.  Just a matter of going back and masking and respraying some white.

Thanks again,

Fred


  • Member since
    September 2006
  • From: Central Texas
Posted by NucMedTech on Friday, October 1, 2010 7:40 AM

Nice job! After seeing so many tanks and WWII subjects this one kind of jumps out at you. I like it.

-StephenCowboy

Most barriers to your successes are man made. And most often you are the man who made them. -Frank Tyger

  • Member since
    August 2003
  • From: Connecticut, USA
Posted by Nachtflieger on Friday, October 1, 2010 6:32 AM

Wow! I like this one! Looks like you have a bit of yellow over spray on one of the missile warheads. Really looks good overall!Smile

Nate


  • Member since
    October 2009
  • From: South Carolina
Posted by jetmodeler on Friday, October 1, 2010 6:29 AM

Nice job.Yes First time I have ever seen one of these.


  • Member since
    September 2007
  • From: Truro Nova Scotia, Canada
Posted by SuppressionFire on Friday, October 1, 2010 5:41 AM

Looks good, a real eye catching color scheme.

Agreed with the others regarding the tools, log and road wheel. Quick fixes to take the SAM to a higher level.

I would dare to 'dust' the entire model from above to get a 'in the field look'. Everything is looking parade day shiny, which is perfect if that is your intent. Perhaps a few soldiers marching with a officer saluting?

http://i6.photobucket.com/albums/y211/razordws/GB%20Badges/WMIIIGBsmall.jpg


  • Member since
    August 2005
  • From: Sydney, Australia
Posted by Phil_H on Friday, October 1, 2010 5:19 AM

Hey Fred,

She came up nicely. Smile I'm tempted to have a crack at the one I have in the stash.

Just an observation (not a criticism), it looks like the no.4 roadwheel on the right side is "floating" a bit, and as a result, the track above it also..

You may also wish to secure the log on the rear with some strapping as it seems to be unrestrained at the moment.

But overall, very nice. Cool

  • Member since
    May 2009
  • From: Poland
Posted by Pawel on Friday, October 1, 2010 4:49 AM

Oh, it's a very nice one! I like it the more it's in Polish markings! As for the tools, the metal portion of them would most likely be painted some shade of olive green. Maybe worn down to the metal at the edges. There's also a little to little contrast on the camo colours in comparison to what I saw 1:1. That would be the only two things I had, otherwise, like I said, I like it a lot. Keep 'em comin', have a nice day

Paweł

All comments and critique welcomed. Thanks for your honest opinions!

www.vietnam.net.pl

  • Member since
    July 2004
  • From: Texas
Posted by wbill76 on Thursday, September 30, 2010 8:25 PM

Fred,

Always nice to see more modern/post-WW2 stuff get built, looks like you did this one justice. Beer Only recommendation I have would be to tone down the metal portions on the tools on the glacis, they have an almost chromed/stainless steel look to them. You could repaint or rub some pencil graphite into the metal surfaces to give them a less shiny appearance perhaps?

  • Member since
    January 2007
1/35 SAM-6 completed - suggested changes made, pics on pg. 2
Posted by Gigatron on Thursday, September 30, 2010 8:21 PM

Hey guys,

Here's my Trumpeter Russian SAM-6 in Polish markings

It's my first time with Trumpeter's indvidual track links (not a fun experience) and my first tri-color camo scheme. 

I went with very light weathering on this build as I really wasn't sure which route I wanted to go.  I've only seen pictures of these things on display, so I wasn't sure what real-word weahterin would look like.

As always, constructive criticism is welcome.

-Fred


JOIN OUR COMMUNITY!

Our community is FREE to join. To participate you must either login or register for an account.

SEARCH FORUMS
FREE NEWSLETTER
By signing up you may also receive reader surveys and occasional special offers. We do not sell, rent or trade our email lists. View our Privacy Policy.