SEARCH FINESCALE.COM

Enter keywords or a search phrase below:

1/35 Italeri M108 105mm SP Howitzer, WIP, 05/30/11 Finished

50762 views
154 replies
1 rating 2 rating 3 rating 4 rating 5 rating
  • Member since
    August 2008
  • From: S.W. Missouri
Posted by Pvt Mutt on Sunday, January 16, 2011 11:36 AM

Thunder Turtle to the rescueBig Smile

I'll be watching Mike

Tony LeeSmile

Shoot Low Boys They're Ridin Ponys

  • Member since
    June 2005
  • From: Massachusetts
Posted by minimortar on Sunday, January 16, 2011 11:40 AM

'ave at it Mike! I'm sure that the 1/40 guys will be thrilled to have one of your builds! Despite the kit's flaws (in general), they do build up nicely. I know that you've done one previously as well as have I and they turn out a-ok. Besides, the M108/M109 is the puritiest AFV chassis (IMHO) ever made... well... a close second to the trusty old M113. Both are FMC products anyway.

Now, if we could ony get you to add a Verlinden or Hobby Fan VN figure (or more) to round out this project...

Yeah

Thanks,
Kevin Keefe

Mortars in Miniature
A Scale Model (Plus!) Collection of the Infantryman's Artillery

  • Member since
    July 2004
  • From: Texas
Posted by wbill76 on Sunday, January 16, 2011 11:45 AM

Woohoo, Mike's building an SPG! Looking forward to the usual arty magic work on this one Mike. Beer

  • Member since
    December 2002
  • From: Valrico, FL
Posted by HeavyArty on Sunday, January 16, 2011 12:30 PM

It looks like it is off to a great start.  I'll be watching you do your usual magic.

Gino P. Quintiliani - Field Artillery - The KING of BATTLE!!!

Check out my Gallery: https://app.photobucket.com/u/HeavyArty

"People sleep peaceably in their beds at night only because rough men stand ready to do violence on their behalf." -- George Orwell

  • Member since
    May 2003
  • From: Ft. Sill, OK
Posted by beav on Sunday, January 16, 2011 1:12 PM

Saw this on the other site, was wondering when I would see it here!  Looking good

"First to Fire!"

Steven

  • Member since
    July 2006
  • From: New Jersey
Posted by redleg12 on Sunday, January 16, 2011 1:40 PM

Tony – Tighten your chin strap and come along for the ride!! Thanks

Kevin – I totally agree. The M108/109 carriage and the M113 carriage set the tone for the 60s thru today. The kit is enjoyable….just needs some TLC….otherwise known as modeling!! Thanks again……Figures…..that would be after I figure all the other “stuff”!!

Bill – I’m back in position and ready to fire!! Thanks

Gino – Thanks…..it’s an oldie but goodie….one that everyone forgets!!

Beav – Thanks, I am like SNL…..I do a Weekend Update!!

Thanks again guys for peeking in and taking the time to comment

Rounds Complete!!

"The Moral High Ground....A Great Place to Emplace Artillery."

  • Member since
    May 2009
  • From: Poland
Posted by Pawel on Thursday, January 20, 2011 2:20 AM

Mike,

I'm thrilled to see you building this one! I want to build a Vietnam M109 for some time now but I have problems with getting at the Italeri kit. I'm sure your build will be a great reference, at least in the areas where M108 and M109 are similar. Good luck building and have a nice day

Paweł

All comments and critique welcomed. Thanks for your honest opinions!

www.vietnam.net.pl

  • Member since
    July 2006
  • From: New Jersey
Posted by redleg12 on Thursday, January 20, 2011 10:23 PM

Pawel - Thanks. If you are looking for reference, you can pick up Steve Zaloga's book on the M109 which the beginning details the weapon both M108 and M109 use in VN. It is a great reference.

Glad to have you looking on and look forward to your comments.

Rounds Complete!!

"The Moral High Ground....A Great Place to Emplace Artillery."

  • Member since
    April 2005
  • From: Piscataway, NJ!
Posted by wing_nut on Friday, January 21, 2011 6:57 AM

Nice Mike.  Knowing what you will do with that those guys are in for a treat.  Are you going to it in the revetment form the fist pics?  That would look so cool.

Marc  

  • Member since
    July 2006
  • From: New Jersey
Posted by redleg12 on Friday, January 21, 2011 4:12 PM

Marc - Thanks.....on the revetment, yes, still working out the details and going thru some of my old manuals.

Thanks again

Rounds Complete!!

"The Moral High Ground....A Great Place to Emplace Artillery."

  • Member since
    November 2008
  • From: Jefferson City, MO
Posted by iraqiwildman on Friday, January 21, 2011 4:55 PM

I look forward to following this build.

The M108 looks funny to me after spending 11 years in a M109 unit. It looks like someone broke half the tube off. Such a tiny tube on such a big chassis.

I have to agree with the durability of the M109 and M113/m577/m548 chassis. They have been in active service for almost 50 years. And it looks like the M109 Paladins will be around for 20 more years since the Crusader project was cancelled. I don't think there is a replacement for the M577 in the works either.

Tim Wilding

  • Member since
    July 2003
  • From: On my kitchen counter top somewhere in North Carolina.
Posted by disastermaster on Friday, January 21, 2011 8:47 PM

This is gonna look great.

http://th7.photobucket.com/albums/y298/treded_scarz/Icons/th_supersquirrel.jpg   You all know what this nut is capable of..........

http://i20.photobucket.com/albums/b232/gluetank/Decorated%20images/th_T1-4-copy.jpg

Sherman-Jumbo-1945

"I was so much older then, I'm younger than that now"


  • Member since
    July 2006
  • From: New Jersey
Posted by redleg12 on Friday, January 21, 2011 9:58 PM

Iraqwildman - Thanks, Yep, alot of steel around a small gun!

Steve - Thanks for the vote of confidence.....as for the picture....watchout for the nuts.....they are like kryptonite! Big Smile

Thanks!!

Rounds Complete!!

"The Moral High Ground....A Great Place to Emplace Artillery."

  • Member since
    June 2008
  • From: Iowa
Posted by Hans von Hammer on Saturday, January 22, 2011 8:09 AM

iraqiwildman

I look forward to following this build.

The M108 looks funny to me after spending 11 years in a M109 unit. It looks like someone broke half the tube off. Such a tiny tube on such a big chassis.

Ditto... I crewed and chiefed  M109A3s and always giggle a bit when I see the '108...  It's like someone lost a bet...

 However...  I could have dealt with the 108's "looks" after the years I did on towed 105s and standing around in the open...   Having a roof and a heater, ya know... Beats hell outta a poncho and bunny-boots...

So, you gonna be using that resin interior set you sniped from me on Ebay a couple years ago, Redleg? Wink

  • Member since
    July 2006
  • From: New Jersey
Posted by redleg12 on Saturday, January 22, 2011 8:31 AM

Hans - You should know....towed artillery truly brings out the artilleryman (who after being outdoor wants to run inside) Hey.....at least on a M109 you did not have to climb to get to the weapon. Try an M110/107, especially in the winter with a little snow and ice. Sad

There is nothing like a towed weapon with the spade in a mud puddle and every time you fire everybody is splashed with mud!! Surprise

As for the interior, That set is for an M109. The interior of an M108 is a bit different, Much smaller breech, trays a different.....lots more room.  No this won't have an interior....but I will do a fire base emplacement for the exterior....just working those detail out.

Rounds Complete!! 

"The Moral High Ground....A Great Place to Emplace Artillery."

  • Member since
    June 2008
  • From: Iowa
Posted by Hans von Hammer on Saturday, January 22, 2011 10:58 AM

Yeah, nothin' like driving spikes through a couple dead men into frozen ground to hold the M101 spades in the middle of a Ft Carson Winter, lol...

(Betcha that last'll  freak out some non-arty types)...Whistling

  • Member since
    July 2006
  • From: New Jersey
Posted by redleg12 on Sunday, January 23, 2011 9:39 PM

This week I moved on to the turret.  In step 7 the gun and mantlet are assembled. The mantlet requires a fair amount of filling as it has a seam down the middle and is very uneven due to sinking. The barrel itself has a seam which requires work. After putty, and Mr. Surfacer I mounted the elbow telescope and here is the view.

Next was the turret itself. The turret on the kit was made to mount the M109 and M108. The mounting for the 105mm gun does not fit correctly and requires a shim at the top side. A small strip of .020 styrene does the trick.

Some minor touch up on the sprue removal points and with the howitzer mounted this is the completed step 7

Steps 8 adds the lifting hooks and bustle racks. The storage bins and a number of tools were left off for ease of painting. Step 9 adds the hatches and I will come back later after painting with a better Ma Duce.

At this point here is the turret

Next up is some detailing, fixing the back door to a split door, replacing some kit blobs for handles and fixing the hollow storage boxes. Time to start warming up the spray booth!!

As always thanks for stopping by. Your comments good or bad are always appreciated.

Rounds Complete!!

"The Moral High Ground....A Great Place to Emplace Artillery."

  • Member since
    May 2003
  • From: Ft. Sill, OK
Posted by beav on Sunday, January 23, 2011 10:26 PM

Wouldn't be able to tell the difference between that one and the one thats on display here!

"First to Fire!"

Steven

  • Member since
    May 2009
  • From: Poland
Posted by Pawel on Monday, January 24, 2011 7:06 AM

Hello!

That gun is lookin' good! Is that "ladder thingy" on top of the turret, on the left side, supposed to represent the cleaning rod?

Good luck with your build, have a nice day

Paweł

All comments and critique welcomed. Thanks for your honest opinions!

www.vietnam.net.pl

  • Member since
    March 2007
  • From: New york
Posted by JEFFB on Monday, January 24, 2011 11:56 AM

Lookin good so far redleg!!!   I can't believe the spg is large, with such a tiny barrel tube.  you've done a great job reviving an older kit

  • Member since
    July 2004
  • From: Texas
Posted by wbill76 on Monday, January 24, 2011 1:07 PM

Lots of putty/elbow grease being put in on this latest round Mike but will look great I'm sure once you get it painted. Yes

Moderator
  • Member since
    April 2006
  • From: my keyboard dreaming of being at the workbench
Posted by Aaron Skinner on Monday, January 24, 2011 1:16 PM

Nice work as always!

Aaron Skinner

Editor

FineScale Modeler

  • Member since
    July 2006
  • From: New Jersey
Posted by redleg12 on Monday, January 24, 2011 7:05 PM

Beav – Thanks, the one “down there” (Fort Sill artillery museum) is an early test version of the M108. Some minor differences like the headlights mounted on the turret and the barrel has no brake…..but generally the same. Thanks again

Pawel – Thanks, as I write this I am having a brain cramp Confused and forget what that item is on the front of the turret. The ramming staffs are on the top of the turret…..when the light comes back on I will get you an answer…..for now thanks

Jeff – Thanks, yep small tube……big butt…..ok, I won’t go there. That was exactly the reason the discontinued the M108 and the 105mm only became a towed weapon used by light divisions. The 155mm M109 gave them more punch and range for almost the same $$$$. Thanks again

Bill – Yep…as I said in the beginning this will be a putty dream. With what I am working on now, I will really be going for the putty…..removing the molded M109 tool boxes on the turret roof which the M108 did not have Bang Head. I will be using the holy trinity of modeling….the Dremel, Putty and Sandpaper……amen Angel.   Thanks again

Aaron – Speaking of heavenly bodies, it is always great to hear from Mt Olympus Bow Down. I deeply appreciate you stopping in. Thank you

Rounds Complete!!

"The Moral High Ground....A Great Place to Emplace Artillery."

  • Member since
    May 2003
  • From: Ft. Sill, OK
Posted by beav on Monday, January 24, 2011 7:20 PM

Redleg, see i wasn't able to tell the difference.

couldn't those rod things be the red white pole things you guys haul everywhere?

"First to Fire!"

Steven

  • Member since
    July 2006
  • From: New Jersey
Posted by redleg12 on Monday, January 24, 2011 7:36 PM

The red and white poles are aiming posts....the items on top are tools and maintenance items.....the aiming posts you need to take out and use at every position. The are usaull in a case and would be stored down below.

Page 26 lists much of the stuff we carry...  http://redleg2scale.com/RBMI%20Info/Artillery%20Modeling.pdf

The picture shows a "candy cane" set

Rounds Complete!!

"The Moral High Ground....A Great Place to Emplace Artillery."

  • Member since
    March 2010
  • From: Buffalo, NY
Posted by macattack80 on Monday, January 24, 2011 7:42 PM

Redleg12, great job so far.  Keep up the good work sir.  Yes

Kevin

[


  • Member since
    July 2006
  • From: New Jersey
Posted by redleg12 on Tuesday, January 25, 2011 5:48 AM

Kevin - Thanks for stopping in and for leaving a comment!!

Rounds Complete!!

"The Moral High Ground....A Great Place to Emplace Artillery."

  • Member since
    May 2009
  • From: Poland
Posted by Pawel on Tuesday, January 25, 2011 6:46 AM

I meant the detail from this picture:

The five rods in front of the hatch, on top of the turret. Wouldn't it be good to replace it, if it's a cleaning rod? Good luck with your build, have a nice day

Paweł

All comments and critique welcomed. Thanks for your honest opinions!

www.vietnam.net.pl

  • Member since
    July 2006
  • From: New Jersey
Posted by redleg12 on Tuesday, January 25, 2011 7:09 PM

This week the surgeon goes to work on the molded on blobs.......I am working on it!!

Rounds Complete!!!

"The Moral High Ground....A Great Place to Emplace Artillery."

  • Member since
    August 2003
  • From: Connecticut, USA
Posted by Nachtflieger on Wednesday, January 26, 2011 2:19 AM

Lookin good Mike. I'll be watching this one.

Nate


  • Member since
    July 2006
  • From: New Jersey
Posted by redleg12 on Wednesday, January 26, 2011 6:40 PM

Nate - Nice to have you drop in....stay warm and keep dry!!......Don't hurt your knee in the snow!!

Rounds Complete!!

"The Moral High Ground....A Great Place to Emplace Artillery."

  • Member since
    July 2006
  • From: New Jersey
Posted by redleg12 on Sunday, January 30, 2011 8:00 PM

Not a lot of time this week but enough to get some detail work done. First I started on the chassis. I removed all the plastic blobs that were supposed to be handles, tie downs and latches.  The hatch handle I made with 26 gauge stainless steel wire. The latch handles are 20 gauge wire for the post and flattened solder then bent to shape and glued on top of the wire. The tie downs are PE leftovers.

The exhaust is a big blob of plastic. With increasing drill bits, I drilled out the end for exhaust.

The kit rear door is a one piece door. The M108 had a double door setup. First I used a panel scribe tool to etch in the seam for the two doors. Then using .020 styrene, I created a set of hinges for the left side.

Next, I cleaned up the seam where the side panels meet the decking and install Archer .025 weld bead raised detail.

Now it was on to the turret. The turret has 3 boxes molded onto the roof which are for the M109 and did not exist with the M108. It was time for surgery with the Dremel. Here is the rough cut to remover the boxes

After cleaning up the cut and squaring it off, I used some .040 styrene sheet to fill the hole. After gluing and installing some pop stick cross braces inside the turret, the first coat of putty was installed in the seams

That’s it for now. Next up, some more putty and Mr. Surfacer to dress up the turret roof, then a bunch of tie downs for tools.  Getting close to paint!!

As always thanks for stopping by. Your comments good or bad are always appreciated.

Rounds Complete!!

"The Moral High Ground....A Great Place to Emplace Artillery."

  • Member since
    July 2004
  • From: Texas
Posted by wbill76 on Sunday, January 30, 2011 10:28 PM

Nice work on the details and looks like the patient will survice the surgery efforts Mike! Got to love power tools! Wink

  • Member since
    March 2010
  • From: Buffalo, NY
Posted by macattack80 on Sunday, January 30, 2011 10:46 PM

Great work on all those fixes.  Bow Down   I am looking forward to seeing this one a painted up.

Kevin

[


  • Member since
    July 2003
  • From: On my kitchen counter top somewhere in North Carolina.
Posted by disastermaster on Sunday, January 30, 2011 11:27 PM

Here's a good example of how fixes can produce a beautiful build.

http://i20.photobucket.com/albums/b232/gluetank/Decorated%20images/th_Smileyavatar-bettereye.jpg?t=1294093447

Sherman-Jumbo-1945

"I was so much older then, I'm younger than that now"


  • Member since
    July 2006
  • From: New Jersey
Posted by redleg12 on Monday, January 31, 2011 5:24 AM

Bill - Thanks....you can never have enough tools....especially power tools or in this case...attachmentsWink

Kevin - Thanks, I can't wait myself.....the model really comes alive when you start to paint

Steve - Thanks, you are too kind. Just doing some old fashioned modeling....I know you understand!! At our age we understand patience Wink

Rounds Complete!! 

"The Moral High Ground....A Great Place to Emplace Artillery."

  • Member since
    April 2005
  • From: Piscataway, NJ!
Posted by wing_nut on Monday, January 31, 2011 6:41 AM

Mike if you ever get tired of the legit life you have a future in a chop shop.

Marc  

  • Member since
    October 2010
  • From: Staten Island
Posted by BigDaddyBluesman on Monday, January 31, 2011 8:59 AM

Looking great......it's nice to see someone doing something other then a Panther or Tiger or Sherman.

I am trying to find one of these kits. They had a few on Ebay but I was outbid. Now nothing.......They were going for over $50. As are the M110 and M107 kits. The M109 kits are a bit cheaper and more available, or was they aren't around anymore either. The M108 are rare, so is the Tamiya M125, even the M106 is OOP now but cost is low. I'm still trying to find the M125 and M108.

I have found a company that makes 1/35 M55 and M53 SPH/G.......$200 each plus shipping from Germany...ouch. And I did get the Azimut XM706 Airforce open top version from France. As well as the full M728 CEV conversion from a place in Germany.

It seems like the post WWII to pre Iraq war US armor is a forgotten thing. 1950-1990 US Armor is mostly OOP. Except a few exceptions which are releases of older molds like the M113, M48A3 and some M60s. But Artillery and support vehicles are few and the ones out there are expensive.

I am wondering what era are you making the M108? Is it going to be pre-Vietnam or Nam? I think the Army only had a few and took them out of service in favor of the M109 during the war.

The Turret is coming out great as is the chassis. I noticed that the Mantle area has what looks like bigger bolts then the model, it's hard to see. I am wondering if you are going to replace them with Hexagonal sprue. The model looks like little dimples, it's hard to tell exaclty until you paint it though. Are they bolts? The outer plate has the bolts recessed a bit and the inner part are not, as far as I can tell in the pictures. There's a bit of rust and over paint on the one in the pictures. http://www.primeportal.net/artillery/david_lueck/m108_105mm_sph/index.php?Page=1

What references are you using? You have a great eye for those little details.


  • Member since
    July 2006
  • From: New Jersey
Posted by redleg12 on Monday, January 31, 2011 12:30 PM

Marc – LOL…..I look at it more from a scientific process of the conservation of matter. I just help change the form…..sometimes it is simple….sometimes you have to split atoms!!

Big Daddy – A lot said in your return.  First if you are looking for information on artillery kits, you can check this for SP artillery…  http://www.redleg2scale.com/RBMI%20Info/SP%20kits.html

The M55 was made and is now being reissued by Revell….it is not the best and needs some help but it is a lot cheaper than $200.

As someone who builds artillery, I feel your pain. It has taken a bunch of years to acquire the towed and self propelled kits that are OOP. My only advice is patience.

As for the M108, as I stated at the beginning of this thread, this was commissioned by the members of the 1 BN 40 FA who served in Viet Nam from Oct 1967 thru early 1969. Only 300+ M108s were manufactured. Only two battalions were deployed to Viet Nam for a total of 36 weapons deployed.

I have a bunch of personal photos supplied by members of the 1/40. I will try to get permission to post one or two here. You can see some pictures at the start of this thread but the actual

As for the M108 at prime portal, there are two on their site. One is in camouflage and is in service with the Brazilian army. The other you pointed out is part of the Fort Sill museum. BE CAREFUL using this for information. This is an early development version. Note the headlights on the turret. The howitzer tube is missing the muzzle brake. It is good in general but not for details. As for the bump on the kit….yep the bums are the hex bolts you see in the picture. They are actually not bad on the model. I am trying to fix things that a flat out wrong or REALLY bad.  So….no, I am not going to replace all the bolts.

Hope that answers the questions….feel free to ask away….either here or by PM

Rounds Complete!!

"The Moral High Ground....A Great Place to Emplace Artillery."

  • Member since
    October 2010
  • From: Staten Island
Posted by BigDaddyBluesman on Monday, January 31, 2011 1:08 PM

When I get into my Vietnam arty phase I will be a callin' ya for sure.

I removed those posts for reasons some people cannot understand. It was a personal issue with myself and my feeling that fighting people with a keyboard is futile unless you can whack them over the head with it. I don't do nasty and I talk to people on the internet the same way I do in person, as a gentleman with respect. If I have to be any other way I disengage before it escalates. I just erase everything I wrote, the end, nothing to fight about, simple. It seems to work very well for me. I can take constructive criticism and welcome it but I will not ever take rudeness, blatant attempts to be drawn into immature internet fights and condescending comments. I am the same person whether in person or with a keyboard. I have found the majority of people online are nice people.

But there is a minority who seem to have a dark side that comes out on their keyboard that would never even think of it to your face. If they did they would have spent their lives getting the crap beat out of them, maybe they did and still haven't figured it out. They take kindness for weakness and that is a mistake. I was told when I was a younger man if you punch-out every A Hole you meet you will be doing it every 15 minutes for the rest of your life and not make a dent in the amount of them in the world.

  • Member since
    August 2008
  • From: S.W. Missouri
Posted by Pvt Mutt on Friday, February 4, 2011 5:57 PM

Hey Mike you better get busy man,your thread is nearing the edge of the known world.Alien

Tony LeeSmile

Shoot Low Boys They're Ridin Ponys

  • Member since
    July 2006
  • From: New Jersey
Posted by redleg12 on Saturday, February 5, 2011 7:37 AM

Coming soon!!.....Thanks my friend

Rounds Complete!!

"The Moral High Ground....A Great Place to Emplace Artillery."

  • Member since
    July 2006
  • From: New Jersey
Posted by redleg12 on Sunday, February 6, 2011 10:09 PM

This was a week of cleaning up the turret and moving into the mundane tasks of armor building.

After multiple coats of putty and Mr. Surfacer, the turret roof was back in service. I then added details from a number of photos. These details included a number of tie downs using leftover PE, TC hatch handle from the parts bin, some .020 styrene to make some stops and mounts for tools and the M2 tripod, some mount parts for the tow cable from the parts bin and a latch assemble on the forward part of the turret also made with parts from the bin.


The storage boxes for the bustle racks have a hollow back which needed to be covered. This was done with some .010 styrene.

At this point the hull and turret are ready for paint. While all the putty drying was happening, the road wheels were painted with a tire black (50/50 Flat and NATO black) then the rims were painted with XF74 JSDF OD.

Now I was onto the tracks. I am using AFV club T126 individual track set. First order of business is to remove them from the trees and clean up all the nubs.

I have to clean up some of the pin marks on the track links. I will be working on those as I let paint dry. Not a lot visually but a lot of hours on the bench.

As always thanks for stopping by. Your comments good or bad are always appreciated.

Rounds Complete!!

"The Moral High Ground....A Great Place to Emplace Artillery."

  • Member since
    August 2008
  • From: S.W. Missouri
Posted by Pvt Mutt on Sunday, February 6, 2011 10:41 PM

Mike looks like you've been a busy man buddy.Coffee

Nice work you've done.Toast

Thanks for the progress report.

Tony leeSmile

Shoot Low Boys They're Ridin Ponys

  • Member since
    May 2003
  • From: Ft. Sill, OK
Posted by beav on Sunday, February 6, 2011 11:08 PM

Those tank treads look intense!

"First to Fire!"

Steven

  • Member since
    January 2007
Posted by the doog on Monday, February 7, 2011 1:01 AM

WOW, Mike-- I completely missed this build! I have to remember to get out of the garage when I'm engrossed i my latest project! lol!

This was one of the very first models I'd ever built, so it's nice to see it happening with the proper details and standards to it that you are applying. Kinda brings a tear to my eye! Embarrassed

YesYes

  • Member since
    July 2003
  • From: On my kitchen counter top somewhere in North Carolina.
Posted by disastermaster on Monday, February 7, 2011 1:07 AM

Looks So fine............... he doin' the VVD

301lgrrjpg9.gif image by JWselamat
Vecchio Victory Dance   (kind'a looks like 'im don't it.....leakage an' all ? )

Look at that.................
Snoopy Animationflawless..................

http://i177.photobucket.com/albums/w226/redleg12/M10820.jpg

It's first rate work here folks...................

http://i20.photobucket.com/albums/b232/gluetank/Animated/th_1-Animated-Disastermaster.gif?t=1296616998


Sherman-Jumbo-1945

"I was so much older then, I'm younger than that now"


  • Member since
    July 2006
  • From: New Jersey
Posted by redleg12 on Monday, February 7, 2011 6:03 AM

Tony - I'm trying!! Thanks for the peek

Karl - No problem....I know how it is, your eyes are on the computer but your head is still working on the last project. Thanks for stopping in and for the comments.

Beav - Yep...indy tracks are "fun".....76 links per side and 152 connectors.....lots of little parts. Thanks for the peek

Steve - Thank you sir.....I am honored that snoopy has turned out....Nothing like detals!! Always a pleasure and a LMAO bonus!

Thanks guys

Rounds Complete!!

"The Moral High Ground....A Great Place to Emplace Artillery."

  • Member since
    October 2010
  • From: Staten Island
Posted by BigDaddyBluesman on Monday, February 7, 2011 6:27 AM

These builds are very inspirational, it makes you want to take the kit you have and fix it. Any kit, just make it right. So many things on these models are wrong or out of scale. Some you can fix and some require you to completely scratch build. But it seems most modern kits are a good base.

It's amazing when you see someone make a vehicle the way it was when really being used. Out of the box is OK, but when it's being done to spec as much as possible it seems to add something. Although unfortunately when the model is done some of those little things that were fixed will be lost when the paint and other stuff go on. But a lot won't and will show up, even knowing it's there and correct means a lot.

Some of the models I see done here and other places on the internet amaze. The realism is fantastic. It looks like this one is going into that category. I still like looking at the Ontos you did, I compare it to real photos and it's right on in so many ways, a real joy and inspiration to look at.

As I work on my stuff I strive to make every detail correct. It does add time and some frustration but it's worth it. Once it's done you can see the difference.

  • Member since
    May 2003
  • From: Ft. Sill, OK
Posted by beav on Monday, February 7, 2011 7:18 AM

That is the best praise possible for a builder.

"First to Fire!"

Steven

  • Member since
    December 2002
  • From: Valrico, FL
Posted by HeavyArty on Monday, February 7, 2011 8:36 AM

Its looking great Mike.  The roof correction came out perfect.  Great job as usual.

Gino P. Quintiliani - Field Artillery - The KING of BATTLE!!!

Check out my Gallery: https://app.photobucket.com/u/HeavyArty

"People sleep peaceably in their beds at night only because rough men stand ready to do violence on their behalf." -- George Orwell

  • Member since
    June 2005
  • From: Massachusetts
Posted by minimortar on Monday, February 7, 2011 8:48 AM

HeavyArty

Its looking great Mike.  The roof correction came out perfect.  Great job as usual.

I have to ditto Gino's comment Mike. I could've never got that cut to come out as smoooooth as you have!

Thanks,
Kevin Keefe

Mortars in Miniature
A Scale Model (Plus!) Collection of the Infantryman's Artillery

  • Member since
    March 2010
  • From: Buffalo, NY
Posted by macattack80 on Monday, February 7, 2011 4:05 PM

HeavyArty

Its looking great Mike.  The roof correction came out perfect.  Great job as usual.

Ditto  I figured you would have sworn off AFV Club tracks from you experience with them in your M40 build. 

Kevin

[


  • Member since
    December 2002
  • From: Valrico, FL
Posted by HeavyArty on Monday, February 7, 2011 6:04 PM

macattack80
  I figured you would have sworn off AFV Club tracks from you experience with them in your M40 build.

Actually, other thean the T80 and T84 tracks, AFV Club's indi-link tracks are great.  I use them often.  The M108/109 tracks are really nice and go together well.

Gino P. Quintiliani - Field Artillery - The KING of BATTLE!!!

Check out my Gallery: https://app.photobucket.com/u/HeavyArty

"People sleep peaceably in their beds at night only because rough men stand ready to do violence on their behalf." -- George Orwell

  • Member since
    July 2004
  • From: Texas
Posted by wbill76 on Monday, February 7, 2011 7:59 PM

Very nice work on this one Mike, up to your usual standards and looking good! Beer

  • Member since
    July 2006
  • From: New Jersey
Posted by redleg12 on Monday, February 7, 2011 11:26 PM

Noah – I am touched by your comments. I will admit you can see some amazing builds here and on some other sites.

Details are what I enjoy. Yes, it takes time but it is enjoyable and valuable. Thank you for your thoughtful comments.

Steven – Thanks for stopping by and for the comments

Gino – Thanks….it was a female dog but it was worth it.

Also thanks for the supporting fire with Macattack

Kevin – As I have said the holy trinity….Dremel, putty and sand paper….putty and sandpaper…..putty and sandpaper….check!!!!  Sad.....putty and sandpaper……hope Bang Head…..putty and sandpaper……luck Cool….YEAH Whistling

Just time….some sanding and putty every night for a week

Kevin – As my brother Gino states, I have sworn off indy link styrene tracks with a center pin….T80 & 84. As for the AFV T126, they are not bad. Some slight ejector pin marks on the back side….a little work cleans them up. They fit well and look a 1000 times better than the kit supplied track. Also, no one else makes an AM T126 track

Thanks for stopping by and for the comments

Bill – Always a pleasure to have you drop in. Thanks Wink

Rounds Complete!!

"The Moral High Ground....A Great Place to Emplace Artillery."

  • Member since
    October 2010
  • From: Staten Island
Posted by BigDaddyBluesman on Tuesday, February 8, 2011 12:09 AM

I say it the way I see it. Some times that might not sit right with people but I am always honest.

Your work is really outstanding.

The art of modeling is to do what you are doing, making it real. There is a certain amount of artistic license with any art form but very little leeway when modeling actual weapons and vehicles used in specific war down to the unit and time frame. Something I am trying very hard to accomplish myself. I am really happy I found the unit of that dual 50 cal Sheridan......I can't wait to do that one.

Bring to life a piece of plastic, that is the art. That's what I am studying now, how to bring to life a piece of plastic, brass and whatnot stuff you have laying around and making it life like. When you have achieved that you are then a true artist to me. My uncle after WWII moved to France to paint even though he lost an eye in the war, many others from my fathers side were/are artistic. So I have a good family DNA strain for art.

It does mean taking chances some times and not playing it safe. Am I adding to much of this or not enough of that. I have noticed that many of the so called professional modelers leave me cold some times because they tend to play it safe, I GUESS they have to. Museum quality probably has very high standards. And some not so professional modelers tend to over do it or are afraid to go to the next level. The way you build seems to have found that happy medium, like the Goldilocks of modeling for lack of a better analogy.

One issue I do have with many professionals is their models lack figures. I am ignorant to the actual guidelines as to what constitutes a professional museum quality model. I just know what I like as a person who loves art and has always been an artist in some way, I was a professional musician.

To me a tank without it's TC is just a vehicle in the motorpool...LOL. I think if many modelers realized just how much of an art form what they are doing is they might consider taking it to another level of perfection. Look at the great painters of history, Da Vinci (who loved drawing tanks..LOL), Rembrandt, Rubens, Van Gogh, Picasso, Cezanne they all took it to another level that distinguished their work. All different styles from the most lifelike to the least lifelike, apply that to your modeling and make a work of art. That is my philosophical approach to this who some would consider even childish. No art is childish, not even finger painting.

I'll add that Doog also inspired me greatly too. The kid did a great job on that M48A3. Having never served nor ever been on the vehicle it was an amazing piece of work. A tribute to knowing good technique, doing research and not being egotistical as to not listen to constructive criticism. Also having the guts to take a dremel to the hull and turret...Smile

I am doing only Vietnam era US vehicles and weapons. There's enough of them to keep me busy for a long time. I am going to do a report very soon on some Models from that era and conversion kits I was able to find. I hope that helps those interested in that era.

  • Member since
    July 2006
  • From: New Jersey
Posted by redleg12 on Tuesday, February 8, 2011 5:28 PM

Noah - First thank you for the complements...I am Embarrassed and overwhelmed.

There are many good "artists" on this site and on other sites. Karl (Doog) is one of them. Most of us are all different and build in different ways. Some like Karl are complete diorama builders while someone like WBill sticks with the equipment only. I fall somewhere in between though I am not a big figure person.

Like the many styles of art, we all have our style and appreciate each other's art.

Again I thank you for the comments and appreciate your support.

Rounds Complete!!

"The Moral High Ground....A Great Place to Emplace Artillery."

  • Member since
    October 2010
  • From: Staten Island
Posted by BigDaddyBluesman on Tuesday, February 8, 2011 5:50 PM

Yes it's a personal choice, I dig the whole statement thing. Like this is a so and so and this is how it was used. Or even during a combat scene as though it was a still cut from a video which is my favorite.

I love finding pictures of oddball stuff, like an M113 pulling an 105MM howitzer in Nam, with it's crew on top. Or the dual 50 Sheridan. Or the M151A1 with a 50cal ring mount in the back. Just different stuff and how it was used.

  • Member since
    July 2006
  • From: New Jersey
Posted by redleg12 on Sunday, February 20, 2011 9:34 PM

Just a quick update for this week. It was time to add some paint so the overall finish is Tamiya XF-74 JSDF OD. Then for some tone the high areas are sprayed with a XF-51 Khaki Drab wash. This is sprayed a number of times to build up the tone color

Now it was time for markings. First the stars were applied on the turret and small stars on the front. This is done using a stencil to make a mask with blue painters tape and then with the mask applied a light spray of Tamiya Flat White. The bumper numbers are made up from a stencil set, applied directly to the model and the also sprayed with Flat White. Setting up the stencils can be a female dog and take a bit of time.

The hull and turret will receive a coat of future and then some decals for the bridge weight marker and the “barrel name” Bounty Hunter.

Meanwhile I have been busy cleaning tracks and beginning track assembly with about 1/3 of one track assembled.

As always thanks for stopping by. Your comments good or bad are always appreciated.

Rounds Complete!!

"The Moral High Ground....A Great Place to Emplace Artillery."

  • Member since
    July 2004
  • From: Texas
Posted by wbill76 on Monday, February 21, 2011 1:27 PM

Nice to see this one with paint on Mike and the stencil work is top notch as well. Beer

  • Member since
    March 2010
  • From: Buffalo, NY
Posted by macattack80 on Monday, February 21, 2011 4:43 PM

wbill76

Nice to see this one with paint on Mike and the stencil work is top notch as well. Beer

Ditto  All your fixes turned out perfect!  No flaws in the putty jobs.  Bow Down  Keep up the good work sir!

Kevin

[


  • Member since
    July 2006
  • From: New Jersey
Posted by redleg12 on Monday, February 21, 2011 8:17 PM

Bill - Thanks, at times the stencils can be Bang Head.....but they give the look Wink

Mac - Thanks, at least I packed my putty away for this build Big Smile

Rounds Complete!!

"The Moral High Ground....A Great Place to Emplace Artillery."

  • Member since
    March 2003
  • From: Western North Carolina
Posted by Tojo72 on Tuesday, February 22, 2011 7:52 AM

looking good Mike

  • Member since
    July 2006
  • From: New Jersey
Posted by redleg12 on Tuesday, February 22, 2011 3:38 PM

Thanks for the peek and the comments

Rounds Complete!!

"The Moral High Ground....A Great Place to Emplace Artillery."

  • Member since
    March 2010
Posted by shoot&scoot on Tuesday, February 22, 2011 8:42 PM

Wow, really moving along on this build!  Neat idea about the sprayed on highlights and the stencils are first rate.

                                                                                   Pat.

  • Member since
    June 2007
Posted by Labour In Vain on Wednesday, February 23, 2011 1:59 PM

You are taking this kit on a promotion ride Cool
Great finnish!

As always
Boarder

Avatar © David Byrden 2005 http://Tiger1.info/
  • Member since
    October 2010
  • From: Staten Island
Posted by BigDaddyBluesman on Wednesday, February 23, 2011 2:14 PM

It's loooooking great!!!!!!

Can't wait to see it completed.

To my joy I saw one on EBay.......the first day and it's up to $70......I hope it gets over $100. Maybe then some will come out of the woodworks. Looks like I should have went for the $50 when they had a few a while back.

How do you do all those little details without getting your fingers stuck together.....Huh?

  • Member since
    July 2006
  • From: New Jersey
Posted by redleg12 on Wednesday, February 23, 2011 7:45 PM

Pat – Thanks, the stencils work out well, especially for the stars. As for the “highlight” it is a way to help break up the mono color look. After some oils with dot filters it will take on a nice effect.

Labour in Vain – Always enjoy my building and sharing. Thanks for the comments

Noah – Thanks for the comments….as far as the details….dental tools and jewelers loops on my eyeglasses Bang HeadSurprise

Thanks guys

Rounds Complete!!

"The Moral High Ground....A Great Place to Emplace Artillery."

  • Member since
    October 2010
  • From: Staten Island
Posted by BigDaddyBluesman on Wednesday, February 23, 2011 7:56 PM

Got those tools, I guess it would help if I didn't have 10 thumbs....Sad

  • Member since
    December 2002
  • From: Valrico, FL
Posted by HeavyArty on Wednesday, February 23, 2011 9:12 PM

She is looking great Mike.  The finish is perfect.  Can't wait to see it down on the firing point.

Gino P. Quintiliani - Field Artillery - The KING of BATTLE!!!

Check out my Gallery: https://app.photobucket.com/u/HeavyArty

"People sleep peaceably in their beds at night only because rough men stand ready to do violence on their behalf." -- George Orwell

  • Member since
    March 2007
  • From: Michigan
Posted by tonka on Wednesday, February 23, 2011 9:30 PM

Mike,

Glad I got back on the forum and ran across your build. as always it looks great!

Nice work!

Kevin

]

  • Member since
    July 2003
  • From: On my kitchen counter top somewhere in North Carolina.
Posted by disastermaster on Wednesday, February 23, 2011 10:39 PM

 This is lookin' "SO" http://th145.photobucket.com/albums/r211/goatrancher/Smileys/th_Nice.gif


http://i20.photobucket.com/albums/b232/gluetank/Animated/th_1-Animated-Disastermaster.gif?t=1296616998

Sherman-Jumbo-1945

"I was so much older then, I'm younger than that now"


  • Member since
    July 2006
  • From: New Jersey
Posted by redleg12 on Thursday, February 24, 2011 4:37 AM

Gino – Thanks, she should be ready to emplace soon….I hope

Kevin – Nice to have you back, always welcome and thanks

Steve – It is always a pleasure to have you stop by

Rounds Complete!!

"The Moral High Ground....A Great Place to Emplace Artillery."

  • Member since
    July 2006
  • From: New Jersey
Posted by redleg12 on Sunday, March 13, 2011 8:29 PM

OK…It’s been a couple of weeks. RL has been keeping my weekends busy. Hopefully I can finish this guy up soon though I will have a break when I go to AMPS International.  Nonetheless here is the latest progress

Besides continuing to assemble track (one just about complete) I have been working on the chassis. I applied Archer Transfer Bridge Crossing marker on the front. Next I pin washed the engine grill and air intake grills along with bolts and hatches. Letting that dry for a day, I did some dot filters using White, Sap Green and Flesh Oil paint. Here is a look after the filters

I completed filters on the side and top surfaces. In the track area I used a Ceramic Stucco tinted with Burnt Umber acrylic. This gives a good “chunky” base for a dirty track area. I applied the stucco using random splotching with buildup in areas which would normally hold dirt.


After the stucco dries overnight I will work the areas with Vietnam Earth pigment....next week 

As always thanks for stopping by. Your comments good or bad are always appreciated.

Rounds Complete!!

"The Moral High Ground....A Great Place to Emplace Artillery."

  • Member since
    March 2007
  • From: Michigan
Posted by tonka on Sunday, March 13, 2011 8:58 PM

Looking great Mike! The stucco looks like it will blend well. Always learn something from your builds!

Look fwd to next pics!

Kevin

]

  • Member since
    July 2003
  • From: On my kitchen counter top somewhere in North Carolina.
Posted by disastermaster on Sunday, March 13, 2011 11:26 PM


The Thinker............ I've been wondering where this had gotten to.


http://i20.photobucket.com/albums/b232/gluetank/Animated/th_1-Animated-Disastermaster.gif?t=1296616998

Sherman-Jumbo-1945

"I was so much older then, I'm younger than that now"


  • Member since
    July 2006
  • From: New Jersey
Posted by redleg12 on Monday, March 14, 2011 5:36 AM

Kevin - Thanks for stopping in. Glad you got something out of my build log.

Steve - Thanks for the concern.....just way too many things happening jeeping me away fro the bench at times.....hopefully it will get better after early April

Rounds Complete!!

"The Moral High Ground....A Great Place to Emplace Artillery."

  • Member since
    December 2002
  • From: Valrico, FL
Posted by HeavyArty on Monday, March 14, 2011 6:29 AM

Great job as usual.  Good idea with the stucco too.  Hope to see this one in person in a few weeks.

Gino P. Quintiliani - Field Artillery - The KING of BATTLE!!!

Check out my Gallery: https://app.photobucket.com/u/HeavyArty

"People sleep peaceably in their beds at night only because rough men stand ready to do violence on their behalf." -- George Orwell

  • Member since
    July 2004
  • From: Texas
Posted by wbill76 on Monday, March 14, 2011 8:47 PM

Ditto on the use of the stucco. Nice to see this one getting some time Mike, I can definitely relate to the RL interference problem. Big Smile

  • Member since
    July 2006
  • From: New Jersey
Posted by redleg12 on Monday, March 14, 2011 8:58 PM

Gino - Thanks, the stucco is a good 1/35 "chunk" builder. Especially for VN build where the track area always needs a chunk Wink . Now as far as seeing it ina few weeks.....Surprise....RL is real busy.....I don't think it will make it

Bill - Thanks for stopping in....another stucco fan Wink .I am hoping for a RL break soon....I need a nice full bench day Crying

Rounds Complete!!

"The Moral High Ground....A Great Place to Emplace Artillery."

  • Member since
    July 2006
  • From: New Jersey
Posted by redleg12 on Sunday, March 20, 2011 7:35 PM

I had some time this weekend to push this one along. I concentrated on completing the chassis with the exception of the tracks.

For the headlights, I drilled out the kit supplied molded headlights and replaced them with #116 clear and 118 black MV lenses. Also I mounted the kit supplied barrel travel lock.

Then I worked on finishing the track area by weathering with MIG Vietnam Earth pigment. I also worked the side panel bolts and the chassis front with the same pigment mixture. After everything dried here is how things looked

Here is the other side looking from the rear.

Here is an underside view so you can see all that is weathered.

Next were the road wheels. The back of the wheels are easier to weather while off the vehicle.

Once the wheels dried, I assemble the pairs and mounted the main road wheels. The idler and drive will go on with the tracks.

That is it for the chassis except for tracks and final weathering. Next update, on to the turret.

As always thanks for stopping by. Your comments good or bad are always appreciated.

Rounds Complete!!

"The Moral High Ground....A Great Place to Emplace Artillery."

  • Member since
    March 2010
  • From: Buffalo, NY
Posted by macattack80 on Sunday, March 20, 2011 7:50 PM

Coming along nicely sir!  I like the stucco weathering technique.  I would have never thought to use that.  Nice idea! Yes

The MV lenses are a nice touch too.  Keep up the good work!

Kevin

[


  • Member since
    July 2006
  • From: New Jersey
Posted by redleg12 on Sunday, March 20, 2011 8:37 PM

Mac - Thanks for stopping in. The stucco weathering is a trick from Steve Zaloga. I like the way it looks and it is easy to work with.  As for the MV lenses.....I love the way they look, they have depth. Thanks again

Rounds Complete!!

"The Moral High Ground....A Great Place to Emplace Artillery."

  • Member since
    April 2009
  • From: Carmel, IN
Posted by deafpanzer on Sunday, March 20, 2011 9:21 PM

Mike, looking great! Yes You are very close to the finish line. Never thought about using stucco...

Andy

  • Member since
    January 2007
Posted by the doog on Monday, March 21, 2011 2:11 AM

Mike, that loooks awesome!

This brings back fond memories for me. This model was literally one of the first ones I ever built back when I got back into modeling seriously. It's cool to see it coming back to life! You're doing a great job and tribute to this vehicle!

I've filed the "stucco" in my memory for future use!

  • Member since
    June 2005
  • From: Massachusetts
Posted by minimortar on Monday, March 21, 2011 9:26 AM

It's comin' to life now Mike! Lookin' forward to MORE! I too will keep the 'stucco' in mind for the future.

Thanks,
Kevin Keefe

Mortars in Miniature
A Scale Model (Plus!) Collection of the Infantryman's Artillery

  • Member since
    July 2003
  • From: On my kitchen counter top somewhere in North Carolina.
Posted by disastermaster on Monday, March 21, 2011 10:27 AM

Some very nice "mudifications" here Mike.

 http://th50.photobucket.com/albums/f319/Scott_Andy/My%20Space%20Crap/th_59.gif Keep on chuggin'.....

             http://i20.photobucket.com/albums/b232/gluetank/Animated/th_1-Animated-Disastermaster.gif?t=1296616998

Sherman-Jumbo-1945

"I was so much older then, I'm younger than that now"


  • Member since
    October 2010
  • From: Staten Island
Posted by BigDaddyBluesman on Monday, March 21, 2011 2:29 PM

Man that looks great.

The MIG pigment works extremely well, it really is the only thing that looks correct. I noticed there are different shades of Vietnam dirt depending on how wet it is. Like on the side of the road it is very dry and you get that light color. As it gets more moist it turns redder. When very wet like after a rain it becomes a deep dark clay like texture and red color. This could all be done with the MIG pigment. I have tested it......the more you use the redder it gets. So if you want to get that lighter dust shade just use a bit mixed with a light color paint, if you want that dark red use more.

Most of the vehicles I have seen in pictures have the red color were you have it, fresh from the field. Then it gets the dusty color as it dries, that is usually around the sides of the vehicle or inside the wheels. I guess the heat from the wheels dries it out. But if it's parked in the mud it will stay red. Of course unless it's a real sunny day and it dries it out. I did a lot of research and it also depends on if it's the rainy season or after January when the weather changes.

  • Member since
    August 2003
  • From: Connecticut, USA
Posted by Nachtflieger on Monday, March 21, 2011 3:09 PM

Looking real good Mike. Looking forward to seeing it finished.

Nate


  • Member since
    July 2006
  • From: New Jersey
Posted by redleg12 on Monday, March 21, 2011 6:22 PM

Since so many like the stucco, here is the product information

http://www.liquitex.com/Products/texgelmedceramstuc.cfm

I added some burnt umber acrylic paste to give it the reddish orange color. That makes the MIG pigment cover much better. I like the acrylic paste to keep the stucco thick but you could also use the cheap acrylic paint.

Andy – Thanks.  The stucco is clean easy and gives a nice effect. Try it you will like it

Karl – Thanks….glad to bring back good memories.  File the link above for info!

Kevin – Thanks for stopping in.

Steve – Glad you like my mudifications!!

Noah – Thanks for stopping in. Yep, the MIG VN Earth pigment is perfect. The time I am looking for is around Tet. Moving into position with mud but now dried. The stucco give a nice chunky effect and the pigment, laid on heavy gives the dry deep clay red color. I still have to dust the main deck and turret. That will be part of my final weathering along with more chunky in the tracks.

Thanks again

Nate – Tanks for stopping by!


Thanks again everyone

Rounds Complete!!

"The Moral High Ground....A Great Place to Emplace Artillery."

  • Member since
    October 2010
  • From: Staten Island
Posted by BigDaddyBluesman on Monday, March 21, 2011 7:03 PM

Tet was during the end of the rainy season. So if it's in January you'll see a lot more rain. It stops abruptly in February as far as I have read.

I'm still doing the Hue Dio so I am trying to dial on on a certain phase of the battle during a certain time period that seems to be in the middle/end of February when the rain is stopping. You'll notice when you look at pictures from the battle of Hue some seem like it's a lot of the red and in some pictures it's the sandy color, that later part would be when the rain stopped and the ground dried up.

I would think about lightening the color of the mud on the sides of the vehicle and inside the road wheels a bit. That's what I see in a lot of pictures, unless you are going to do the early part of Tet, then keeping the color more homogeneous would be the way to go IMO.

If anybody is interested in the battle of Hue a book to read is "Phase line green", it was inspiring and disturbing at the same time. It was heart wrenching reading about the Marines begging their commanders to give them fire support which they would not do as they were ordered to make infantry attacks against dug in NVA / VC positions manned with heavy weapons over and over again. A similar thing happened at Monte Cassino in WWII.

  • Member since
    July 2004
  • From: Texas
Posted by wbill76 on Monday, March 21, 2011 8:45 PM

Making good progress on this one Mike, just have to keep "slogging" away! Wink

  • Member since
    July 2006
  • From: New Jersey
Posted by redleg12 on Tuesday, March 22, 2011 5:19 AM

Bill - Thanks....slogging...now there is a good term with the mud on this one!!   

From one slog to another..thanks Wink

Rounds Complete!!

"The Moral High Ground....A Great Place to Emplace Artillery."

  • Member since
    April 2005
  • From: Piscataway, NJ!
Posted by wing_nut on Tuesday, March 22, 2011 6:22 AM

Stucco on a tank?  You can get the Guys at Garden State Brick Face to carve in some mortar linesWhistling

Seriously, looks great.  Will it be ready for AMPS? Are you really not coming to MCon?  Won't be the same without you.

Marc  

  • Member since
    July 2006
  • From: New Jersey
Posted by redleg12 on Tuesday, March 22, 2011 3:10 PM

Marc - Thanks......brick armor!!!!

No it will not be rady for AMPS.....slowed by RL and you cannot rush art!!  As far as MCon....yep, leaving on Tues to head to AMPS. After spending almost a week at AMPS, it is tough to hit MCon the week before.....sorry, I will miss it too.

Thanks Again

Rounds Complete!! 

"The Moral High Ground....A Great Place to Emplace Artillery."

  • Member since
    June 2005
  • From: Massachusetts
Posted by minimortar on Wednesday, March 23, 2011 10:16 PM

Do the locals know that you're heading their way Mike? Toast Drinks Beer Coffee Camera

Have a blast and 'good hunting'!

Thanks,
Kevin Keefe

Mortars in Miniature
A Scale Model (Plus!) Collection of the Infantryman's Artillery

  • Member since
    July 2006
  • From: New Jersey
Posted by redleg12 on Thursday, March 24, 2011 5:19 AM

Kevin - I am sure they know....the National Guard has been alerted....extra stocks of burbon have been brought in.....large quantities of Italian food have been emplaced Wink

Thanks old friend....really looking forward to the two trips, first to the National Marine Museum and their restoration area, then the next day to a large private armor collection. Plenty of pics for the website!!

Ahhh the smell of starch and diesel.

Rounds Complete!! 

"The Moral High Ground....A Great Place to Emplace Artillery."

  • Member since
    July 2006
  • From: New Jersey
Posted by redleg12 on Sunday, April 24, 2011 8:18 PM

Well it has been a while between my trip to AMPS and spring chores, this has been the first good weekend on the bench in almost a month.

As a diversion to start, I began working on the base. I was able to pick up an old OOP Verlinden Firebase. After some body work with putty, I applied a prime coat of using a generic grey primer. The dirt areas were given a base coat of Poly Scale US Earth 505366. The sandbags were coated in Poly Scale US Mid Green 505390 and the drums were painted Tamiya flat black, Here is the basic base.


After drying, the stack seams between the sandbags was treated with a solution of MIG Viet Nam Earth pigment in mineral sprits. After drying I use a soft makeup brush to clear the excess and dust some areas of the flat areas of the bags.

Next was the drum area where the same pigment solution was used for the area between the drums. Again some of the excess was used to dust the drums. The chimes on the drums along with any side bungs were highlighted using a #2 pencil. This was also done to the two drums off to the side which are half buried. Here is the current status of the base.

In between working on the base, I completed the assembly of the individual track links. Two sets of tracks are prepared with 78 links per side. The tracks were first primed with Tamiya flat black. Then they were painted with Alclad Steel. After drying, they were coated with future for wash protection. Next the pads were painted with a 50/50 mix of Tamiya Flat and NATO black.

After this the tracks were treated with the same MIG solution used above to begin the track weathering.

That’s it for now. Looking at the home stretch here, hopefully the next week or two will finish up

As always thanks for stopping by. Your comments good or bad are always appreciated.

Rounds Complete!!

"The Moral High Ground....A Great Place to Emplace Artillery."

  • Member since
    June 2005
  • From: Massachusetts
Posted by minimortar on Sunday, April 24, 2011 8:34 PM

Looks great Mike! Man, finding that old and long OOP Verlinden Fire Base... WOW!... good haul! Lovin' what you've done to it too!

The Home Stretch... bring it on!!! Stick out tongue

Thanks,
Kevin Keefe

Mortars in Miniature
A Scale Model (Plus!) Collection of the Infantryman's Artillery

  • Member since
    March 2007
  • From: Michigan
Posted by tonka on Sunday, April 24, 2011 10:07 PM

Nice job on the base Mike!  Very realistic looking. Wish I had your patience on those individual track pieces...My Marine M26 has been on hold due to the tracks,,can't get into the tracks....

So is your next piece a Marine vehicle after visiting the Marine Museum?? Whistling

Kevin

]

  • Member since
    July 2006
  • From: New Jersey
Posted by redleg12 on Monday, April 25, 2011 5:34 AM

Kevin – Thanks….yep, the old OOP Verlinden base saved a LOT of sandbag time for this old bag Wink

Kevin – Thanks….indy tracks can be a big time PITA. I usually use TV time to cut and clean the parts. Then I keep them ready until the mood is right….if I am in the right mood I can bang them out….if parts are a struggle, it’s best to wait for another day.

The Marine museum was fantastic and would recommend it to everyone…..now to think it might influence my building…..well they do have artillery Surprise

Rounds Complete!!

"The Moral High Ground....A Great Place to Emplace Artillery."

  • Member since
    July 2004
  • From: Texas
Posted by wbill76 on Monday, April 25, 2011 10:25 AM

Nice to see some progress on this one Mike, the FB looks like it's ready for some action. Beer

  • Member since
    April 2009
  • From: Carmel, IN
Posted by deafpanzer on Monday, April 25, 2011 11:00 AM

Looking great! Yes  I haven't thought about using one of those Verlinden diomara bases for my previous builds.  Gonna look into it and see if anything will work. 

Bet you had fun at AMPS, now it is coming back to Aubrun, IN and I will be there! Big Smile


Andy

  • Member since
    January 2007
Posted by the doog on Monday, April 25, 2011 1:29 PM

Mike that looks really perfect.

The whole scene should be just a peach!

  • Member since
    October 2010
  • From: Staten Island
Posted by BigDaddyBluesman on Monday, April 25, 2011 1:57 PM

Mike's stuff always looks perfect.

So neat and clean.

Hi Doog, I am working on a similar M48 to yours, I don't think it will look as good but I used a lot of your tricks, thanks.

I'm curious to see if Mike is going to make his diorama neat and clean......

OR

What I see in all the pictures of Vietnam, chaotic, dirty, messy and many of the equipment looks jerry rigged in some way or another. Which works out great for me because I am a little sloppy still with my work.

  • Member since
    July 2006
  • From: New Jersey
Posted by redleg12 on Monday, April 25, 2011 7:25 PM

Bill – Thanks…looking forward to position occupation shortly Wink

Andy – Thanks for stopping in. As for the Verlinden base, be patient and search. I had been looking on ebay and they were going for quite a sum. I did an internet search and found a “gamer” who was selling it on a game forum for a very reasonable price. Embarrassed

Karl – Thanks….look at the actual pictures on the first page…then go to the Verlinden base….I thought of this base from the moment I started this build!! Always a pleasure to have you peek.

Noah – Thanks for stopping in. Neat….hummm that’s a new one….organized maybe!! Yep there will be more….I am just getting the basic colors in place. I will be spending time with the actual pictures from the firebase to find the right “junk”. And there will be dirt everywhere!

Thanks guys

Rounds Complete!!

"The Moral High Ground....A Great Place to Emplace Artillery."

  • Member since
    October 2010
  • From: Staten Island
Posted by BigDaddyBluesman on Monday, April 25, 2011 8:03 PM

You have to be organized to be neat......Yeah your work is neat and organized looking.

Yeah like I look at pictures constantly trying to figure out what half of the things are. They just grabbed anything they could and used it. Like in Hue the Marines went into the battle with most of their equipment left back at their base. So they stuffed their pockets with grenades, you won't see them hanging John Wayne style. And used any bag they could like empty Claymore bags and demolition bags.

The fire bases I have looked at were crazy unorganized looking. Again they grabbed whatever they could to make shelters, any type of those wood ammo boxes pilled up and 55 gallon drums filled with sand. I have a diagram somewhere on how a mortar or howitzer pit should be built. They did try to follow the basic idea but just wow, especially after a fire mission, what a mess....LOL. I guess the SPH pit would be different, much different. But if they were there for a while I did see them set up those RPG barriers made of mesh screen.

By the way if anybody is reading this please let me know if y'all have pictures of a M48 Dozer tank.

  • Member since
    July 2006
  • From: New Jersey
Posted by redleg12 on Sunday, May 8, 2011 8:33 PM

From one mother to all you others….Happy Mothers Day!! In a nice way!!!!!

The tracks were washed with a burnt sienna wash and then dusted with MIG Viet Nam earth pigments. The road wheels received a coat of my stucco mix, mostly around the outside part of the rim where it would normally accumulate. After drying, they were dusted with MIG Viet Nam Earth pigments. The drive wheel tips were dry brushed with Alclad Steel.

After gluing the drive wheel in place, the tracks were then put on and the ideler wheel glued. Finally a light dusting with some more MIG VN Earth to make all the parts flow together.

Some details on the back. You can see the tail lights done with Clear Red and Smoke. The communications wire spool was done with some painters tape to make under bulk. Then it was wrapped with 32 gauge SS wire to cover the painters tape. Then the wire bundle was painted Flat Black

I finished the turret similar to the chassis. The vertical sides was given a dot filter using White, Flesh and Green oil paint dots and stroked to create the stain effect. The top surface was given a coat of MIG Grey for Dark Green filter. Then a solution of MIG VN Earth pigment and Mineral Sprits was used for pin washing. Nest a #2 pencil was used in some high spots to create ware. Lastly some dry dusting of MIG VN Earth was used to create highlights.

I have mounted a few tools, the tripod for the M2 and the M2 itself. The last few little items to complete are some ammo cans and ammo for the M2 and adding some straps on some of the storage, otherwise it is essentially complete.

On to finishing the base for my final and next update

As always thanks for stopping by. Your comments good or bad are always appreciated.

Rounds Complete!!

"The Moral High Ground....A Great Place to Emplace Artillery."

  • Member since
    July 2003
  • From: On my kitchen counter top somewhere in North Carolina.
Posted by disastermaster on Sunday, May 8, 2011 11:04 PM

Seriously cool Mike.                 http://i792.photobucket.com/albums/yy205/bloody_bagheera/Smileys/blush2.gif

Of course you gotta know I luv the mud and the traces around the drivers area.

The evidence of any mods on the top of the turret are very well done.

                                      http://i20.photobucket.com/albums/b232/gluetank/Animated/th_1-Animated-Disastermaster.gif?t=1296616998

Sherman-Jumbo-1945

"I was so much older then, I'm younger than that now"


  • Member since
    July 2006
  • From: New Jersey
Posted by redleg12 on Monday, May 9, 2011 5:39 AM

Steve - Thanks....like you, it's the little things that make a build Wink

Rounds Complete!!

"The Moral High Ground....A Great Place to Emplace Artillery."

  • Member since
    July 2004
  • From: Texas
Posted by wbill76 on Monday, May 9, 2011 10:03 AM

Nice to see someone else got some time at the bench for Mother's Day. Looking good Mike, now on to the base! Yes

  • Member since
    April 2009
  • From: Carmel, IN
Posted by deafpanzer on Monday, May 9, 2011 11:34 AM

I like it!  I like it!  I like it! Big Smile  You did an outstanding job weathering and applying pigments to your build.  The soil reminded me of my days living in NC...


Andy

  • Member since
    October 2010
  • From: Staten Island
Posted by BigDaddyBluesman on Monday, May 9, 2011 11:41 AM

It looks great!!!!!!!

I just almost finished my tracks on the M48A3, I was going to do the same thing with the silver, that's were they wear and get shinny. Right in there.....A lot of the weathering was lost when I sprayed the cover coat of clear. I was like were did all that cool stuff go???????????? So I'll add some on now. I didn't want to over do it but maybe I should have if I would have known that most of it disappears with a coat of clear dull coat.

I bid on a M108 on ebay but lost it. I bid $95 and it went for $96. I just was not going to go to $100. I'll keep trying for this and a M125.

  • Member since
    July 2006
  • From: New Jersey
Posted by redleg12 on Monday, May 9, 2011 7:42 PM

Bill - Yep....it takes a mother to get on the bench on mother day......(actually the day before Whistling )

Thanks for stopping by

Andy - Thanks for the love.....good old red clay! Surprise   Thanks again

Noah - I am sure you did that because you just enjoy weathering details sooo much you wanted to do them again Whistling....lol. Hey, we all have done worse things....but I am sure you won't do that again.

Thanks for stopping by

Rounds Complete!!

"The Moral High Ground....A Great Place to Emplace Artillery."

  • Member since
    February 2011
  • From: Ontario, Canada
Posted by gunner_chris on Monday, May 9, 2011 8:04 PM

Just caught up to your build, and it looks great!

Looking forward to seeing it continue before I brave an M109.

  • Member since
    July 2006
  • From: New Jersey
Posted by redleg12 on Tuesday, May 10, 2011 5:58 AM

Chris - Thanks, enjoy the M109, the entire series all are great kits.

Rounds Complete!!

"The Moral High Ground....A Great Place to Emplace Artillery."

  • Member since
    November 2006
  • From: Coastal Maine
Posted by dupes on Tuesday, May 10, 2011 10:47 AM

Oooooh, nice! Looking forward to seeing this in September at AMPS! Big Smile

Side query - have some questions about the M110A2...might you be the guy to ask?

  • Member since
    July 2006
  • From: New Jersey
Posted by redleg12 on Tuesday, May 10, 2011 12:58 PM

OK.....first thanks for the comments. Now, you will not see it at AMPS as this is a commission job and will be off to the client before then!!

As far as the M110A2, yep, by all means send me your questions. Hit me up on my email or PM!!

Great to see you come up online...have not seen you in awhile!!

Rounds Complete!!

"The Moral High Ground....A Great Place to Emplace Artillery."

  • Member since
    October 2010
  • From: Staten Island
Posted by BigDaddyBluesman on Tuesday, May 10, 2011 1:22 PM

You mean you have to give that one up? I guess it's like having your child married and leaving your home....LOL. I hope you got a good price for it, with the diorama that's a lot of money tied up in plastic, resin and paint, then add the hours of work.........wow.  I started counting the money I spent on my dio and stopped before I started feeling a little foolish. One I hit a grand I was like OMG!!!!!

But Man have I learned a lot in a short period of time. I am now working on making better faces. I am using a pin, I cannot do eyes with a brush. Although I just saw a set of mini brushes in the micro-mark catalog.

If I am feeling up to it I think I am going to put up some pix tonight so everybody can rip it apart...Big Smile

I don't know how it will come out in pictures but it looks pretty good to me. I did so many things backward because I did not know what I was doing.

Anyway that looks so good I want to eat it, yeah man it kind of looks like a cake. I think if an armored or artillery officer were getting retired hiring someone to make a cake like that would be cool.

I can tell by the way you do your work a certain amount of pride is in there. I felt something as I studied and researched the battle of Hue I found myself being more drawn into it. Not just making a diorama of models anymore but a piece of history. Those little plastic and resin guys were real, I used real pictures and video but embellished a bit. My dio is a tribute now not just some model kits thrown together to look cool.

  • Member since
    November 2006
  • From: Coastal Maine
Posted by dupes on Tuesday, May 10, 2011 5:46 PM

redleg12

OK.....first thanks for the comments. Now, you will not see it at AMPS as this is a commission job and will be off to the client before then!!

As far as the M110A2, yep, by all means send me your questions. Hit me up on my email or PM!!

Great to see you come up online...have not seen you in awhile!!

Rounds Complete!!

There's the money aspect (obviously!) but I think I would have an AWFULLY hard time giving up an awesome build like that, commission or no commission.

Re: the forum, can finally get online semi-broadband tethering to my phone - limited bandwidth, though, so I have to stay away from pic-heavy threads if I can. Better than dialup, anyway!

As far as the M110A2 - will most definitely contact you (and if you happen to have a line on the Eduard PE set or the Barrel Depot barrel for the Italeri kit, keep that in mind)!

  • Member since
    July 2006
  • From: New Jersey
Posted by redleg12 on Tuesday, May 10, 2011 7:46 PM

Noah  - I am not normally a "commission" builder. I found it very hard to turn down my "brothers" from 1/40 FA. I have recieved copies of personal pictures, articles about the unit and the history and many emails. It is not about $$$ but brotherhood. The price paid will cover my costs. I have earned a treasure of shared memories. It is not about the destination...it is about the journey. I try to give back in many small ways.

Duty, honor, country...and all my brothers

Marc - The frequency is always open for you....whatever I can help (and yes there is an Eduard PE and a barrel made....I will turn the radar on for availability)

Rounds Complete!!

"The Moral High Ground....A Great Place to Emplace Artillery."

  • Member since
    October 2010
  • From: Staten Island
Posted by BigDaddyBluesman on Tuesday, May 10, 2011 8:31 PM

That's a horse of a different color, yeah if it's for your old unit or any military unit.

Did you checkout my M48? I need a new camera for sure or maybe it's the program. The camera does not show any small details no matter how good the lighting is. Any suggestions?

  • Member since
    July 2006
  • From: New Jersey
Posted by redleg12 on Tuesday, May 10, 2011 8:49 PM

Noah - The 1/40 is not one of my old units but as far as brothers especially artillerymen are all my brothers. As my "brother" Gino....Heavy Artillery here at FSM would say..." my brother from another mother".

They reached out to me, for a favor.

As far as the M48 and the camera, I have sent you a note on your private push.

Rounds Complete!!

"The Moral High Ground....A Great Place to Emplace Artillery."

  • Member since
    June 2005
  • From: Massachusetts
Posted by minimortar on Wednesday, May 11, 2011 7:38 AM

Came out awesome overall Mike...  Its got that good "heavy" look to it but I gotta tell ya that I just love those tracks! I'd be willing to bet that the 1/40 boys are going to be real proud to have this!

Looking forward to seeing it in the pit.

Thanks,
Kevin Keefe

Mortars in Miniature
A Scale Model (Plus!) Collection of the Infantryman's Artillery

  • Member since
    July 2006
  • From: New Jersey
Posted by redleg12 on Wednesday, May 11, 2011 7:13 PM

Kevin - Where did you get my picture.....as you can see I am quite handsome!! Stick out tongue

Thanks for the fly by.....always appreciate your comments and expecially your humor!!

Rounds Complete!!

"The Moral High Ground....A Great Place to Emplace Artillery."

  • Member since
    August 2010
Posted by Jose_Luis_Lopez on Thursday, May 12, 2011 4:39 AM

A really rare subject, not often seen in modelling contest or magazines .... but I do not know why!!!! ... it´s really nice!! ... you did a good work, it´s not easy to deal with that earth color ...


  • Member since
    July 2006
  • From: New Jersey
Posted by redleg12 on Thursday, May 12, 2011 7:27 PM

Jose - Thanks. A color like VN earth is difficult due to the sharp contrast to the OD Green. I love a challange!!

Thanks again

Rounds Complete!!

"The Moral High Ground....A Great Place to Emplace Artillery."

  • Member since
    October 2010
  • From: Staten Island
Posted by BigDaddyBluesman on Friday, May 13, 2011 12:37 PM

Yes the mud of Nam, a subject I have made a personal study of since Nam is the only modeling subject I wish to do, for some odd reason.

I have found now 4 different colors of VN earth. It was 3 but now it's four.

It depends were you are, what time of the year it is and what time of the day it is. The afternoon sun will dry it really fast and then it's a tan color. It could start off red and in a few hours it's a chalky tan. But if it's raining it will have a few different colors in there.

I'm trying to get a 3 tone mud on my M48, the normal reddish color and the fully dry color and the color it gets as it dries. It seems to turn into a fine powder that probably got into everything. In certain parts of the country the earth is not muddy but almost clay, it looks like it must have a lot of ferrous oxide in it. That is a vibrant reddish brown color that is actually very beautiful except on your roadwheels....Big Smile....unless it's a model and not for real.

I have cleaned armored vehicles, it's not fun.

Oh I forgot there is also the beach sand so that makes 5.

  • Member since
    May 2005
  • From: Dublin Rep Of Ireland
Posted by terry35 on Saturday, May 14, 2011 6:58 PM

Really brilliant model there Mike, as I always say, I have a lot of admiration for people who will take on and tackle these older kits. Excellent work.

Terry.

  • Member since
    July 2006
  • From: New Jersey
Posted by redleg12 on Sunday, May 15, 2011 6:12 AM

Terry - Thanks, because of what I like to build, many are the older kits. I don't look at it as older or new, just plastic!! Wink  Once you pass 50, old is an unspoken word Surprise

thanks again

Rounds Complete!!

"The Moral High Ground....A Great Place to Emplace Artillery."

  • Member since
    July 2006
  • From: New Jersey
Posted by redleg12 on Monday, May 30, 2011 6:08 PM

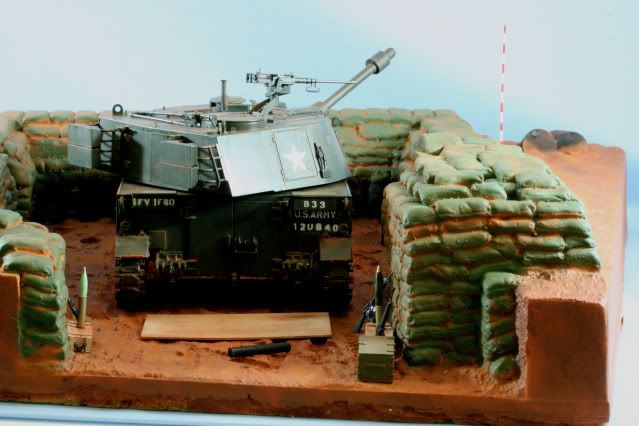
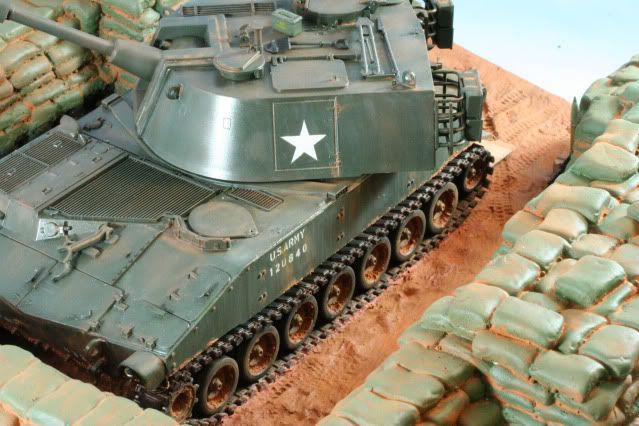
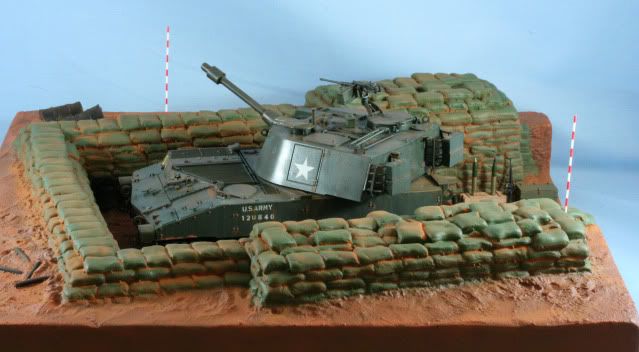
It is fitting that I finish this model for the 1/40 FA on Memorial Day weekend.  To all my FA brothers at from the 1/40, Happy Holiday

Well I was down to details. First I drilled a hole in the chassis and thru the base. Using a furniture screw and nut I secured the M108 in position. To make the tracks look proper on the ground, I coated the underside of the tracks with cell-u-clay tinted with Raw Sienna acrylic. I used the same mix tor “glue” all the details sitting on the ground.

As for the details

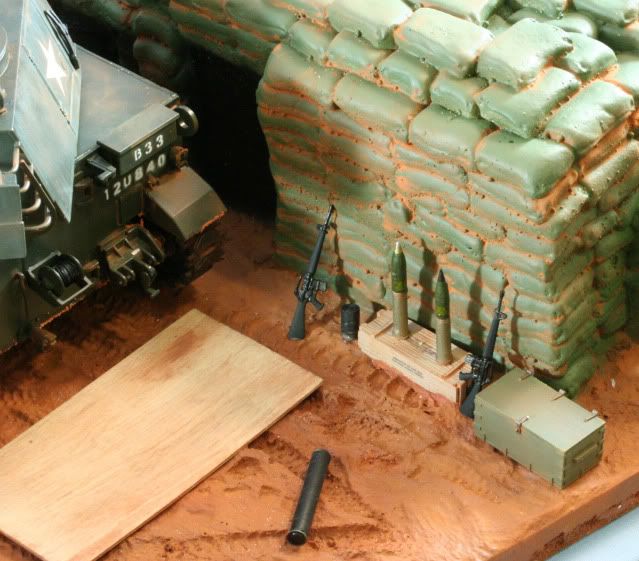
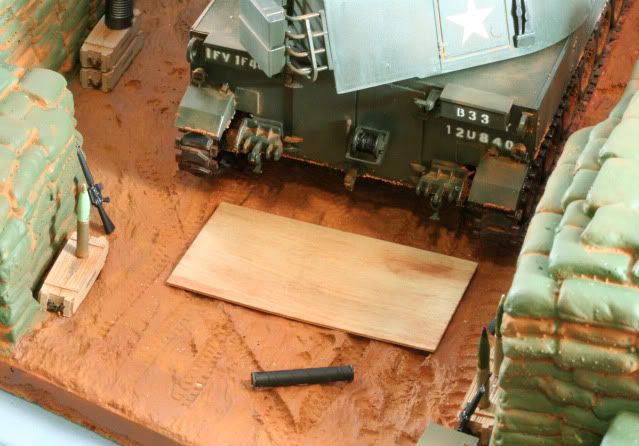
·         M16s- Dragon M16 kit, painted Tamiya Flat Black on the plastic areas and Alclad Burnt Exhaust for the metal areas.

·         105mm Ammo Crates – Custom cast resin, custom decals, Poly Scale US Earth Base and coated with Tamiya Buff. After flat coat, dusted with MIG VN Earth pigment.

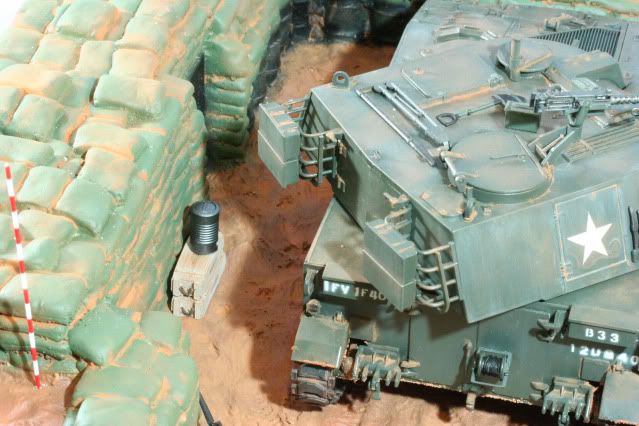
·         Section Chest – Resin cast, Poly Scale Tac Dk Green, Alclad Steel on hinges and latch, dusted with MIG VN Earth pigment.

·         105mm High Explosive – Resin cast, Alclad Pale Gold casing, Tamiya Dk Copper rotating band, projectile Tamiya OD, PD fuse Alclad Pale Gold, MTSQ Time fuse Tamiya Flat Black, custom decals.

·         105mm WP – Resin cast, same as HE except projectile is a mix of Tamiya Olive and Cockpit Green.

·         Plywood – 1/64” plywood, cut to scale for 4 x 8 sheet, grain enhanced using a Winston Oil Dark Sienna wash, dusted with MIG VN Earth pigment.

·         Bug Juice container – Tamiya, Alclad Steel

·         Gas Cans – Resin Cast, Poly Scale Tac Dk Green, Floquil Bright Oil for spilled diesel stains.

·         105mm Fibers – AFV, Tamiya Flat Black, gloss on the end caps

·         Aiming Posts - .040 styrene rod, Tamiya Flat Red and White

·         50 cal Ammo Cans – AFV, Poly Scale US Med Green, MIG Dark Wash.

·         50 cal Ammo Belt – Academy, Alclad Pale Gold and Tamiya Flat Black

·         M2  50cal – Parkerized finish with a 70/25/5 mix of Tamiya NATO Black, Metallic Grey and JA Green. Handles are Tamiya Flat Black   

So without further waiting, here is the finished M108 of the 1 BN 40 FA form Vietnam

As always thanks for stopping by. Your comments good or bad are always appreciated.

Next up may be the M1200 conversion of the M1117

Remember a vet! Happy Memorial Day

Rounds Complete!!

EOM!!

"The Moral High Ground....A Great Place to Emplace Artillery."

  • Member since
    April 2009
  • From: Carmel, IN
Posted by deafpanzer on Monday, May 30, 2011 6:35 PM

Yes L-O-V-I-N-G it!!! Yes I have been checking eBay for last few days looking for a good Verlinden base.  There's plenty so I hope to score one soon.  Thanks again for doing another great WIP.  It was fun watching this one...


Andy

  • Member since
    December 2002
  • From: Valrico, FL
Posted by HeavyArty on Monday, May 30, 2011 8:14 PM

OUTSTANDING!!! The 1-40 FA guys should be duly impressed.  Great job.

Gino P. Quintiliani - Field Artillery - The KING of BATTLE!!!

Check out my Gallery: https://app.photobucket.com/u/HeavyArty

"People sleep peaceably in their beds at night only because rough men stand ready to do violence on their behalf." -- George Orwell

  • Member since
    July 2003
  • From: On my kitchen counter top somewhere in North Carolina.
Posted by disastermaster on Monday, May 30, 2011 8:55 PM

We're all "drōōly" impressed here Mike.

http://th155.photobucket.com/albums/s318/NightFall_photo/Smileys%20and%20Stuff/th_slobberingdogs.gif

All around wonderful results and suitably finished on the appropriate day too.

http://i20.photobucket.com/albums/b232/gluetank/Animated/th_1-Animated-Disastermaster.gif?t=1296616998

Sherman-Jumbo-1945

"I was so much older then, I'm younger than that now"


  • Member since
    July 2006
  • From: New Jersey
Posted by redleg12 on Monday, May 30, 2011 9:54 PM

Andy - Thanks for all the love!!  As far as a base, be patient when using ebay and good luck

Gino - Thanks, I hoping it help in bringing back good memories.

Steve - I thought today would be a fitting day to finish this one. Thanks for howling out the comments ....excuse me, I have to go walk now

Thanks guys

Rounds Complete!! 

"The Moral High Ground....A Great Place to Emplace Artillery."

  • Member since
    February 2011
  • From: Ontario, Canada
Posted by gunner_chris on Monday, May 30, 2011 10:42 PM

Looks great - I'm sure the guys will be honoured with the end result.

UBIQUE

  • Member since
    July 2006
  • From: New Jersey
Posted by redleg12 on Tuesday, May 31, 2011 4:50 AM

Gunner - Thanks for stopping by and for the comments. I'm hoping they enjoy it!

Rounds Complete!!

"The Moral High Ground....A Great Place to Emplace Artillery."

  • Member since
    January 2007
Posted by the doog on Tuesday, May 31, 2011 6:32 AM

Like Gino said, Mike--"outstanding!". It really came out fantastically! It's just a beautiful composition and a superb model.

I don't know how you guys can give these away. I wouldn't be able to part with it!

  • Member since
    December 2006
  • From: t.r.f. mn.
Posted by detailfreak on Tuesday, May 31, 2011 8:44 AM

                                      Another masterpiece of artillery. Kinda gives you the feeling that one could be there. Always looking forward to the next arty installement,any clues or hints?

                                                                 Greg"Detailfreak"RowleyYes

[View:http://s172.photobucket.com/albums/w1/g-earl828/]  http://i158.photobucket.com/albums/t104/cycledupes/1000Roadwheels4BuildBadge.jpg

  • Member since
    July 2006
  • From: New Jersey
Posted by redleg12 on Tuesday, May 31, 2011 11:30 AM

Karl - Thanks, I understand what you are saying but for me it is for a good cause. This I hope will bring back good memories for my brothers at the 1/40 FA reunion. That thought helps with the separation pains.

It is like letting a child go, after nurturing them and getting them ready it is time for them to make their mark on the world....in my case, albeit in miniature!

Greg - Thanks, glad you enjoyed it.

As for my next item, I am going to go back modern, to the M1200 Armored Knight. This is a specialized version of the M1117 armored car. It is used by artillery forward obsevers to get target observation and send target information. I will be using the Trumpeter kit and a resin conversion for the M1200 from Formations model.

Always something different!

Rounds Complete!!

"The Moral High Ground....A Great Place to Emplace Artillery."

  • Member since
    July 2004
  • From: Texas
Posted by wbill76 on Tuesday, May 31, 2011 11:32 AM

Mike,

A fitting way to spend the holiday and up to your usual standards on the various details and composition. Bravo! Beer

  • Member since
    October 2010
  • From: Staten Island
Posted by BigDaddyBluesman on Tuesday, May 31, 2011 6:07 PM

Just as I thought your M-16s have NO slings......Oops.....Ha Ha......Devil

It looks excellent, I'm sure they will be amazed and proud of it. A lot of work and I'm sure a little hard to part with. Very neat, very precise and great attention to detail, except for those weapons....LOL.

Get those weapon's slings soldier.......Whistling

  • Member since
    June 2005
  • From: Massachusetts
Posted by minimortar on Tuesday, May 31, 2011 7:29 PM

Another fine subject and another fine piece of art! A real beauty there Mike!

So... Two thumbs up, a pat on the back, two high fives, a noogie to the noggin and a slap in the *** out to you for schtickin' with this. You did your brothers (and well, the rest of us too!) good by providing some real good step-by-step goodness (as you always do!) with this old bugger!!

(The term "Old Bugger" referres to the kit and is in no way being directed towards or anywheres near you. Big Smile)

BigDaddyBluesman

Just as I thought your M-16s have NO slings......Oops.....Ha Ha......Devil

Get those weapon's slings soldier.......Whistling

Na... leave them home... they only got/get 'in the way'.

Thanks,
Kevin Keefe

Mortars in Miniature
A Scale Model (Plus!) Collection of the Infantryman's Artillery

  • Member since
    July 2006
  • From: New Jersey
Posted by redleg12 on Tuesday, May 31, 2011 7:44 PM

Bill – Thanks, I thought it would be a fitting completion to this build on Memorial Day!

Noah – Thanks for stopping by.

Slings….artillerymen don’t use slings Surprise  …..they only get in the way or get caught on the equipment!! Wink Thanks again.

Kevin – Thank you my friend for the many kind words.

Old….. is a state of mind, I don’t consider myself old, just “certified pre used” Whistling    . Like a good pair of boots I’m already broken in  Cool

Rounds Complete!!

"The Moral High Ground....A Great Place to Emplace Artillery."

  • Member since
    September 2005
  • From: beacon falls , Ct.
Posted by treadwell on Tuesday, May 31, 2011 9:15 PM

Heya Mike :  )

they say 'to be a great writer, write what you know about'.....I think you know where I am going with this analogy .... I follow your stuff.. I just don't write you enough.

metaphorically speaking,

tread :  )


  • Member since
    July 2006
  • From: New Jersey
Posted by redleg12 on Wednesday, June 1, 2011 5:11 AM

Bill - Thank you so very much.  I may have knowledge but if I had half of your talent I would be twice as good.  Wink

It was great to have you stop in. Hopefully the Treadhead is feeling well these days. All my best.

Thanks again

Rounds Complete!!

"The Moral High Ground....A Great Place to Emplace Artillery."

  • Member since
    October 2010
  • From: Staten Island
Posted by BigDaddyBluesman on Wednesday, June 1, 2011 10:17 PM

What do you mean artillerymen don't use slings, I bet the first artillery was a sling, just ask David and Goliath....Smile

It really does look good, ya kind of don't want to take your eyes off of it, like a pretty woman.

I found another M108 on ebay but it's already built....errrrrr.....eventually I will find one for less than $100.

  • Member since
    July 2006
  • From: New Jersey
Posted by redleg12 on Thursday, June 2, 2011 5:12 AM

Noah - LOL..... as far as the M108, you just have to keep your eyes open. There was a kit last week that went for about $55.

Sometimes you need patience like a vulture!!

Rounds Complete!!

"The Moral High Ground....A Great Place to Emplace Artillery."

  • Member since
    November 2004
  • From: Essex England
Posted by spacepacker on Thursday, June 2, 2011 8:58 AM

Been following this all the way.....I'm "Gobsmacked"Yes...cheers....Kenny

  • Member since
    March 2010
  • From: Democratic Peoples Republic of Illinois
Posted by Hercmech on Thursday, June 2, 2011 9:21 AM

Came out great I love kits set in dio's even if I never put them in one. Again great job!


13151015

  • Member since
    March 2003
  • From: Western North Carolina
Posted by Tojo72 on Thursday, June 2, 2011 11:33 AM

Great work Mike,nice detailing on the base also.

I still remember argueing with a friend about one of these, that just because it has treads and a turret that it is not a tank !! 

again,nice project.

  • Member since
    October 2010
  • From: Staten Island
Posted by BigDaddyBluesman on Thursday, June 2, 2011 12:06 PM

Calling that a tank is blasphemy!!!!!!!!

I would call it armor but not a tank, that's funny.

I think any vehicle with a mounted gun/weapon system would be defined as armor. The difference would be soft skinned or true armor and certain countries define their weapon systems differently. Even the SPH had a thin armor as did the M113 and kind of fall between what I would call soft and hard armor. It's not only the thickness of the armor but the mission it's designed for that defines what it is. Like I would definitely call Vietnam Gun Trucks armor.

To me a Tank is a vehicle designed to fight against other tanks, kind of like a heavy weight boxer fighting another one, not a middle weight. Which is different then a tank killer or anti tank vehicle, them being more like a middle weight or even lighter in the case of a Mutt with a M40 106mm RR or later with TOW.

IMO put a GPMG on a Jeep and it's armor, it now becomes a combat vehicle. So in essence a combat vehicle is armor whether it's a Humvee or M-88. Maybe I think that way because I was Cav when I was in the Army.

Mike you saw a M108 on ebay for $55 and didn't email me!!!!!!!........Crying I think that one started off at $55 and ended up at $100.

  • Member since
    July 2006
  • From: New Jersey
Posted by redleg12 on Thursday, June 2, 2011 8:11 PM

Kenny – Thank you…..Gobsmacked…all I can think of


Hercmech – Thanks, I love to do a little vignette with each model. This one was a bit larger to set the scene.

Anthony – Thanks……Tank…call Artillery a Tank….give me his coordinates, its time for a fire mission!Wink

Noah – Thanks for the support on the Tank vs. Artillery. As far as the M108…I did not know you were looking.

I will keep my eyes trained and give you a ring on your secure push next time I spot a target

Thanks again guys

Rounds Complete!!

"The Moral High Ground....A Great Place to Emplace Artillery."

JOIN OUR COMMUNITY!

Our community is FREE to join. To participate you must either login or register for an account.

SEARCH FORUMS
FREE NEWSLETTER
By signing up you may also receive reader surveys and occasional special offers. We do not sell, rent or trade our email lists. View our Privacy Policy.