SEARCH FINESCALE.COM

Enter keywords or a search phrase below:

1/35 Italeri M108 105mm SP Howitzer, WIP, 05/30/11 Finished

50759 views
154 replies
1 rating 2 rating 3 rating 4 rating 5 rating
  • Member since
    July 2003
  • From: On my kitchen counter top somewhere in North Carolina.
Posted by disastermaster on Sunday, January 30, 2011 11:27 PM

Here's a good example of how fixes can produce a beautiful build.

http://i20.photobucket.com/albums/b232/gluetank/Decorated%20images/th_Smileyavatar-bettereye.jpg?t=1294093447

Sherman-Jumbo-1945

"I was so much older then, I'm younger than that now"


  • Member since
    March 2010
  • From: Buffalo, NY
Posted by macattack80 on Sunday, January 30, 2011 10:46 PM

Great work on all those fixes.  Bow Down   I am looking forward to seeing this one a painted up.

Kevin

[


  • Member since
    July 2004
  • From: Texas
Posted by wbill76 on Sunday, January 30, 2011 10:28 PM

Nice work on the details and looks like the patient will survice the surgery efforts Mike! Got to love power tools! Wink

  • Member since
    July 2006
  • From: New Jersey
Posted by redleg12 on Sunday, January 30, 2011 8:00 PM

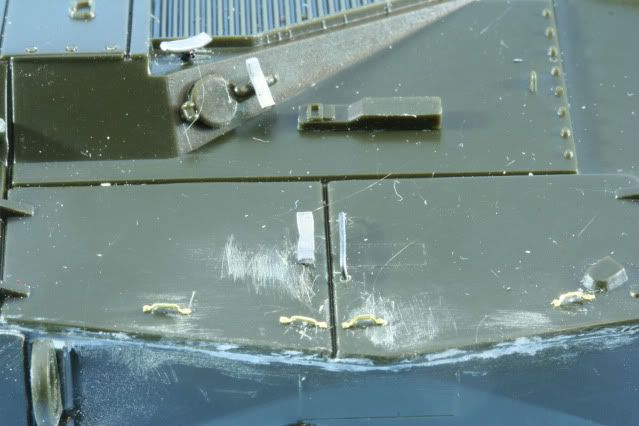
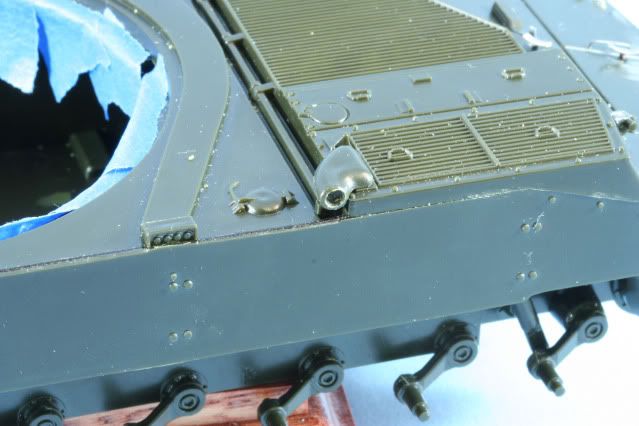
Not a lot of time this week but enough to get some detail work done. First I started on the chassis. I removed all the plastic blobs that were supposed to be handles, tie downs and latches.  The hatch handle I made with 26 gauge stainless steel wire. The latch handles are 20 gauge wire for the post and flattened solder then bent to shape and glued on top of the wire. The tie downs are PE leftovers.

The exhaust is a big blob of plastic. With increasing drill bits, I drilled out the end for exhaust.

The kit rear door is a one piece door. The M108 had a double door setup. First I used a panel scribe tool to etch in the seam for the two doors. Then using .020 styrene, I created a set of hinges for the left side.

Next, I cleaned up the seam where the side panels meet the decking and install Archer .025 weld bead raised detail.

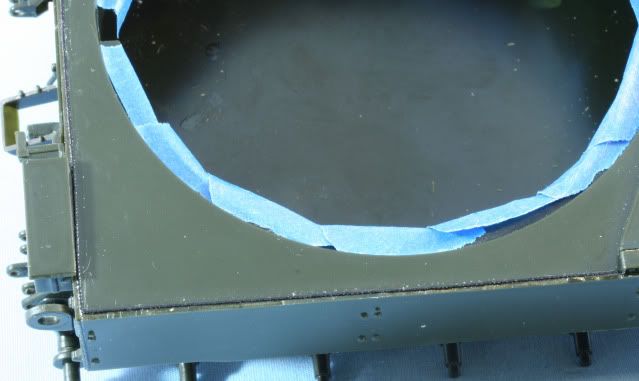
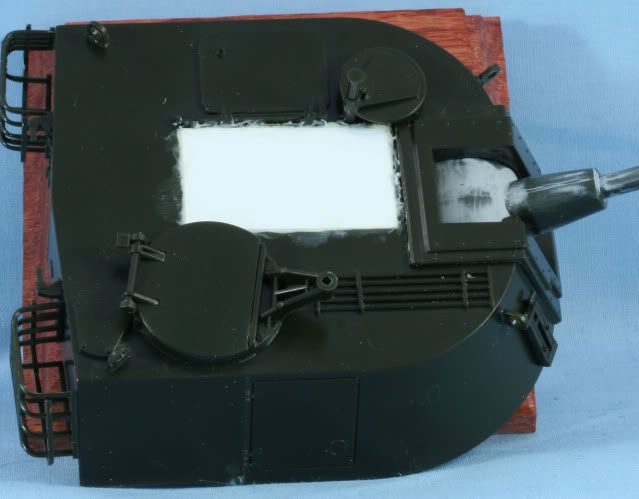
Now it was on to the turret. The turret has 3 boxes molded onto the roof which are for the M109 and did not exist with the M108. It was time for surgery with the Dremel. Here is the rough cut to remover the boxes

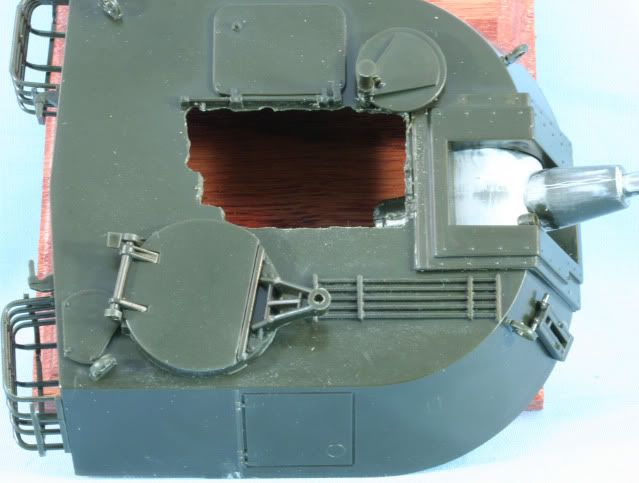
After cleaning up the cut and squaring it off, I used some .040 styrene sheet to fill the hole. After gluing and installing some pop stick cross braces inside the turret, the first coat of putty was installed in the seams

That’s it for now. Next up, some more putty and Mr. Surfacer to dress up the turret roof, then a bunch of tie downs for tools.  Getting close to paint!!

As always thanks for stopping by. Your comments good or bad are always appreciated.

Rounds Complete!!

"The Moral High Ground....A Great Place to Emplace Artillery."

  • Member since
    July 2006
  • From: New Jersey
Posted by redleg12 on Wednesday, January 26, 2011 6:40 PM

Nate - Nice to have you drop in....stay warm and keep dry!!......Don't hurt your knee in the snow!!

Rounds Complete!!

"The Moral High Ground....A Great Place to Emplace Artillery."

  • Member since
    August 2003
  • From: Connecticut, USA
Posted by Nachtflieger on Wednesday, January 26, 2011 2:19 AM

Lookin good Mike. I'll be watching this one.

Nate


  • Member since
    July 2006
  • From: New Jersey
Posted by redleg12 on Tuesday, January 25, 2011 7:09 PM

This week the surgeon goes to work on the molded on blobs.......I am working on it!!

Rounds Complete!!!

"The Moral High Ground....A Great Place to Emplace Artillery."

  • Member since
    May 2009
  • From: Poland
Posted by Pawel on Tuesday, January 25, 2011 6:46 AM

I meant the detail from this picture:

The five rods in front of the hatch, on top of the turret. Wouldn't it be good to replace it, if it's a cleaning rod? Good luck with your build, have a nice day

Paweł

All comments and critique welcomed. Thanks for your honest opinions!

www.vietnam.net.pl

  • Member since
    July 2006
  • From: New Jersey
Posted by redleg12 on Tuesday, January 25, 2011 5:48 AM

Kevin - Thanks for stopping in and for leaving a comment!!

Rounds Complete!!

"The Moral High Ground....A Great Place to Emplace Artillery."

  • Member since
    March 2010
  • From: Buffalo, NY
Posted by macattack80 on Monday, January 24, 2011 7:42 PM

Redleg12, great job so far.  Keep up the good work sir.  Yes

Kevin

[


  • Member since
    July 2006
  • From: New Jersey
Posted by redleg12 on Monday, January 24, 2011 7:36 PM

The red and white poles are aiming posts....the items on top are tools and maintenance items.....the aiming posts you need to take out and use at every position. The are usaull in a case and would be stored down below.

Page 26 lists much of the stuff we carry...  http://redleg2scale.com/RBMI%20Info/Artillery%20Modeling.pdf

The picture shows a "candy cane" set

Rounds Complete!!

"The Moral High Ground....A Great Place to Emplace Artillery."

  • Member since
    May 2003
  • From: Ft. Sill, OK
Posted by beav on Monday, January 24, 2011 7:20 PM

Redleg, see i wasn't able to tell the difference.

couldn't those rod things be the red white pole things you guys haul everywhere?

"First to Fire!"

Steven

  • Member since
    July 2006
  • From: New Jersey
Posted by redleg12 on Monday, January 24, 2011 7:05 PM

Beav – Thanks, the one “down there” (Fort Sill artillery museum) is an early test version of the M108. Some minor differences like the headlights mounted on the turret and the barrel has no brake…..but generally the same. Thanks again

Pawel – Thanks, as I write this I am having a brain cramp Confused and forget what that item is on the front of the turret. The ramming staffs are on the top of the turret…..when the light comes back on I will get you an answer…..for now thanks

Jeff – Thanks, yep small tube……big butt…..ok, I won’t go there. That was exactly the reason the discontinued the M108 and the 105mm only became a towed weapon used by light divisions. The 155mm M109 gave them more punch and range for almost the same $$$$. Thanks again

Bill – Yep…as I said in the beginning this will be a putty dream. With what I am working on now, I will really be going for the putty…..removing the molded M109 tool boxes on the turret roof which the M108 did not have Bang Head. I will be using the holy trinity of modeling….the Dremel, Putty and Sandpaper……amen Angel.   Thanks again

Aaron – Speaking of heavenly bodies, it is always great to hear from Mt Olympus Bow Down. I deeply appreciate you stopping in. Thank you

Rounds Complete!!

"The Moral High Ground....A Great Place to Emplace Artillery."

Moderator
  • Member since
    April 2006
  • From: my keyboard dreaming of being at the workbench
Posted by Aaron Skinner on Monday, January 24, 2011 1:16 PM

Nice work as always!

Aaron Skinner

Editor

FineScale Modeler

  • Member since
    July 2004
  • From: Texas
Posted by wbill76 on Monday, January 24, 2011 1:07 PM

Lots of putty/elbow grease being put in on this latest round Mike but will look great I'm sure once you get it painted. Yes

  • Member since
    March 2007
  • From: New york
Posted by JEFFB on Monday, January 24, 2011 11:56 AM

Lookin good so far redleg!!!   I can't believe the spg is large, with such a tiny barrel tube.  you've done a great job reviving an older kit

  • Member since
    May 2009
  • From: Poland
Posted by Pawel on Monday, January 24, 2011 7:06 AM

Hello!

That gun is lookin' good! Is that "ladder thingy" on top of the turret, on the left side, supposed to represent the cleaning rod?

Good luck with your build, have a nice day

Paweł

All comments and critique welcomed. Thanks for your honest opinions!

www.vietnam.net.pl

  • Member since
    May 2003
  • From: Ft. Sill, OK
Posted by beav on Sunday, January 23, 2011 10:26 PM

Wouldn't be able to tell the difference between that one and the one thats on display here!

"First to Fire!"

Steven

  • Member since
    July 2006
  • From: New Jersey
Posted by redleg12 on Sunday, January 23, 2011 9:39 PM

This week I moved on to the turret.  In step 7 the gun and mantlet are assembled. The mantlet requires a fair amount of filling as it has a seam down the middle and is very uneven due to sinking. The barrel itself has a seam which requires work. After putty, and Mr. Surfacer I mounted the elbow telescope and here is the view.

Next was the turret itself. The turret on the kit was made to mount the M109 and M108. The mounting for the 105mm gun does not fit correctly and requires a shim at the top side. A small strip of .020 styrene does the trick.

Some minor touch up on the sprue removal points and with the howitzer mounted this is the completed step 7

Steps 8 adds the lifting hooks and bustle racks. The storage bins and a number of tools were left off for ease of painting. Step 9 adds the hatches and I will come back later after painting with a better Ma Duce.

At this point here is the turret

Next up is some detailing, fixing the back door to a split door, replacing some kit blobs for handles and fixing the hollow storage boxes. Time to start warming up the spray booth!!

As always thanks for stopping by. Your comments good or bad are always appreciated.

Rounds Complete!!

"The Moral High Ground....A Great Place to Emplace Artillery."

  • Member since
    June 2008
  • From: Iowa
Posted by Hans von Hammer on Saturday, January 22, 2011 10:58 AM

Yeah, nothin' like driving spikes through a couple dead men into frozen ground to hold the M101 spades in the middle of a Ft Carson Winter, lol...

(Betcha that last'll  freak out some non-arty types)...Whistling

  • Member since
    July 2006
  • From: New Jersey
Posted by redleg12 on Saturday, January 22, 2011 8:31 AM

Hans - You should know....towed artillery truly brings out the artilleryman (who after being outdoor wants to run inside) Hey.....at least on a M109 you did not have to climb to get to the weapon. Try an M110/107, especially in the winter with a little snow and ice. Sad

There is nothing like a towed weapon with the spade in a mud puddle and every time you fire everybody is splashed with mud!! Surprise

As for the interior, That set is for an M109. The interior of an M108 is a bit different, Much smaller breech, trays a different.....lots more room.  No this won't have an interior....but I will do a fire base emplacement for the exterior....just working those detail out.

Rounds Complete!! 

"The Moral High Ground....A Great Place to Emplace Artillery."

  • Member since
    June 2008
  • From: Iowa
Posted by Hans von Hammer on Saturday, January 22, 2011 8:09 AM

iraqiwildman

I look forward to following this build.

The M108 looks funny to me after spending 11 years in a M109 unit. It looks like someone broke half the tube off. Such a tiny tube on such a big chassis.

Ditto... I crewed and chiefed  M109A3s and always giggle a bit when I see the '108...  It's like someone lost a bet...

 However...  I could have dealt with the 108's "looks" after the years I did on towed 105s and standing around in the open...   Having a roof and a heater, ya know... Beats hell outta a poncho and bunny-boots...

So, you gonna be using that resin interior set you sniped from me on Ebay a couple years ago, Redleg? Wink

  • Member since
    July 2006
  • From: New Jersey
Posted by redleg12 on Friday, January 21, 2011 9:58 PM

Iraqwildman - Thanks, Yep, alot of steel around a small gun!

Steve - Thanks for the vote of confidence.....as for the picture....watchout for the nuts.....they are like kryptonite! Big Smile

Thanks!!

Rounds Complete!!

"The Moral High Ground....A Great Place to Emplace Artillery."

  • Member since
    July 2003
  • From: On my kitchen counter top somewhere in North Carolina.
Posted by disastermaster on Friday, January 21, 2011 8:47 PM

This is gonna look great.

http://th7.photobucket.com/albums/y298/treded_scarz/Icons/th_supersquirrel.jpg   You all know what this nut is capable of..........

http://i20.photobucket.com/albums/b232/gluetank/Decorated%20images/th_T1-4-copy.jpg

Sherman-Jumbo-1945

"I was so much older then, I'm younger than that now"


  • Member since
    November 2008
  • From: Jefferson City, MO
Posted by iraqiwildman on Friday, January 21, 2011 4:55 PM

I look forward to following this build.

The M108 looks funny to me after spending 11 years in a M109 unit. It looks like someone broke half the tube off. Such a tiny tube on such a big chassis.

I have to agree with the durability of the M109 and M113/m577/m548 chassis. They have been in active service for almost 50 years. And it looks like the M109 Paladins will be around for 20 more years since the Crusader project was cancelled. I don't think there is a replacement for the M577 in the works either.

Tim Wilding

  • Member since
    July 2006
  • From: New Jersey
Posted by redleg12 on Friday, January 21, 2011 4:12 PM

Marc - Thanks.....on the revetment, yes, still working out the details and going thru some of my old manuals.

Thanks again

Rounds Complete!!

"The Moral High Ground....A Great Place to Emplace Artillery."

  • Member since
    April 2005
  • From: Piscataway, NJ!
Posted by wing_nut on Friday, January 21, 2011 6:57 AM

Nice Mike.  Knowing what you will do with that those guys are in for a treat.  Are you going to it in the revetment form the fist pics?  That would look so cool.

Marc  

  • Member since
    July 2006
  • From: New Jersey
Posted by redleg12 on Thursday, January 20, 2011 10:23 PM

Pawel - Thanks. If you are looking for reference, you can pick up Steve Zaloga's book on the M109 which the beginning details the weapon both M108 and M109 use in VN. It is a great reference.

Glad to have you looking on and look forward to your comments.

Rounds Complete!!

"The Moral High Ground....A Great Place to Emplace Artillery."

  • Member since
    May 2009
  • From: Poland
Posted by Pawel on Thursday, January 20, 2011 2:20 AM

Mike,

I'm thrilled to see you building this one! I want to build a Vietnam M109 for some time now but I have problems with getting at the Italeri kit. I'm sure your build will be a great reference, at least in the areas where M108 and M109 are similar. Good luck building and have a nice day

Paweł

All comments and critique welcomed. Thanks for your honest opinions!

www.vietnam.net.pl

  • Member since
    July 2006
  • From: New Jersey
Posted by redleg12 on Sunday, January 16, 2011 1:40 PM

Tony – Tighten your chin strap and come along for the ride!! Thanks

Kevin – I totally agree. The M108/109 carriage and the M113 carriage set the tone for the 60s thru today. The kit is enjoyable….just needs some TLC….otherwise known as modeling!! Thanks again……Figures…..that would be after I figure all the other “stuff”!!

Bill – I’m back in position and ready to fire!! Thanks

Gino – Thanks…..it’s an oldie but goodie….one that everyone forgets!!

Beav – Thanks, I am like SNL…..I do a Weekend Update!!

Thanks again guys for peeking in and taking the time to comment

Rounds Complete!!

"The Moral High Ground....A Great Place to Emplace Artillery."

JOIN OUR COMMUNITY!

Our community is FREE to join. To participate you must either login or register for an account.

SEARCH FORUMS
FREE NEWSLETTER
By signing up you may also receive reader surveys and occasional special offers. We do not sell, rent or trade our email lists. View our Privacy Policy.