SEARCH FINESCALE.COM

Enter keywords or a search phrase below:

Indy Track SNAFU

1875 views
7 replies
1 rating 2 rating 3 rating 4 rating 5 rating
  • Member since
    September 2008
  • From: Minneapolis MN
Indy Track SNAFU
Posted by BigSmitty on Wednesday, February 16, 2011 5:05 PM

OK, on my StuG IIIB (Tamiya) I decided the kit vinyls weren't going to cut it, so I decided to swap them out for some 40cm Dragon Magic Tracks, of which I had two extra sets.

Good news:  They fit great, no modification of the idler or drive sprockets.

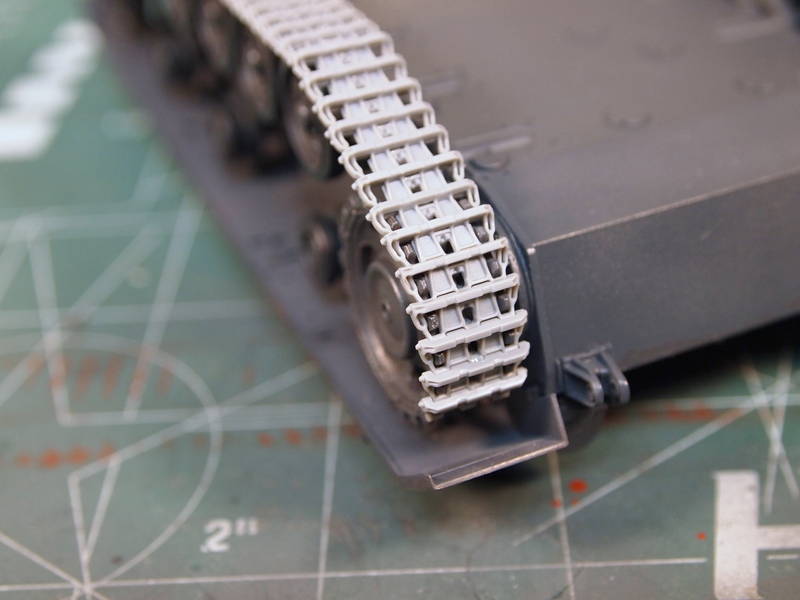
Bad news:  Since I was planning on using the kit tracks, the road wheels and return rollers are glued in place and I need a way to separate the indy tracks when dry to paint/wash/etc.  Here is how I'm sitting right now:

I think this would be the best place to separate them, as the road wheels and return rollers are glued in place, and I can mate up the tracks on the idler easily enough, and the drive sprocket is a tight fit, which means if I don't have a way to glue it down, friction should be enough to hold it in place, then I can hit it with a little CA if necessary.


Any recommendations would be helpful.  Oh, and the other side just has the bottom run completed, as seen in the foreground of the second photo.


Matt - IPMS #46275

"Build what ya love and love what ya build..."

Build Logs, Rants and Humor


  • Member since
    March 2003
  • From: Rain USA, Vancouver WA
Posted by tigerman on Wednesday, February 16, 2011 8:14 PM

Oh that sucks. I've never done them before, but I hear a great trick is to glue them into one long run, wait an hour, then wrap them around the wheels and such. Yeah, next time leave the idler and sprocket unglued.

Did you do a top run as well? 

I'm glad to hear that the Dragon tracks worked well enough on the Tamiya kit. I have an extra set myself.

   http://i7.photobucket.com/albums/y269/wing_nut_5o/PANZERJAGERGB.jpg

 Eric 

  • Member since
    September 2008
  • From: Minneapolis MN
Posted by BigSmitty on Wednesday, February 16, 2011 8:19 PM

Eric,

See that's the thing.  The idler and sprocket ARE unglued.  I can still pull them off, and was wondering if splitting them like I have would make any difference.  Screw it.  I may just bust off the wheels, clean them up and blue tac them in place.  Not like this is going to a show or anything.  And yeah, the tracks work like a champ.


Matt - IPMS #46275

"Build what ya love and love what ya build..."

Build Logs, Rants and Humor


  • Member since
    January 2006
  • From: California
Posted by SprueOne on Wednesday, February 16, 2011 8:52 PM

you're good. Just continue with that straight run, at the bottom of the picture, on your bench top using liquid cement until you have enough links to connect the track loop.

while still pliable, form this around the remaining and liquid glue the ends to the other part already set onto the wheels. Let this cure. 

Once it's cured, remove the drive wheel with track loop for painting. It is very fragile but if it becomes disassembled at a link then just re glue 


Anyone with a good car don't need to be justified - Hazel Motes


Iron Rails 2015 by Wayne Cassell Weekend Madness sprueone

  • Member since
    April 2005
  • From: Piscataway, NJ!
Posted by wing_nut on Thursday, February 17, 2011 6:42 AM

I am guessing you have not done the other side yet so lets start with that one.  You have picked the best spots to join then since you have something underneath to for support.  Make the two runs so they meet at those spots and while still pliable installed and clip the end together somehow.  Little alligator clicks, a hemostat or something like that.  use tissue tog et whatever sag you want.  When they have cured they should be easy to take off without being able to take off any of the running gear.

For the side in the pic, by the time you read these suggestions that run in the pic will have set so getting some sage may be a problem.  Once you have the lengths correct maybe a little more liquid glue just on the links where you want some sag to soften them just a little.

Marc  

  • Member since
    September 2008
  • From: Minneapolis MN
Posted by BigSmitty on Thursday, February 17, 2011 12:45 PM

The small track run in the foreground is actually the bottom run for the other side.  I will still be able to get the sag in the upper run on the side that's 50% finished.  I will just run the empty side with the same break points as the one I'm working on now.

Bleargh.  At least my M1 Abrams has the Bronco workable set, and I didn't install any of the wheels yet.  Live and learn I guess.

Matt - IPMS #46275

"Build what ya love and love what ya build..."

Build Logs, Rants and Humor


  • Member since
    September 2008
  • From: Minneapolis MN
Posted by BigSmitty on Thursday, February 17, 2011 1:23 PM

Update:

Got the top run on the left side.  Added some Q Tip stems for the sag, not much sag on the top side.  Using the kit box and my 1/48 StuG IIIB (link and length) tracks to eyeball the sag on the top.  I was 1/2 of a link too short, so I added one, which makes the run a little bit long, so I'm trying to take up that extra with more sag up top, to pull everything together.

First time using indy track links.  A little bit of a learning curve.  Next time, leave all the running gear blue tac'd.  The track is glued at the idler end, and I should be able to 'gently' get the track off after it cures, since the drive sprocket and idler are still just mounted using the friction between the parts.


Matt - IPMS #46275

"Build what ya love and love what ya build..."

Build Logs, Rants and Humor


  • Member since
    July 2003
  • From: Toronto, Ontario, Canada
Posted by zokissima on Thursday, February 17, 2011 2:57 PM

Good job! Honestly, I always glue the sprocket and idler in place, and build the track in two separate sections. Never had any problems yet.

JOIN OUR COMMUNITY!

Our community is FREE to join. To participate you must either login or register for an account.

SEARCH FORUMS
FREE NEWSLETTER
By signing up you may also receive reader surveys and occasional special offers. We do not sell, rent or trade our email lists. View our Privacy Policy.