SEARCH FINESCALE.COM

Enter keywords or a search phrase below:

RB Model PE: Browning M2... COMPLETED!

5769 views
24 replies
1 rating 2 rating 3 rating 4 rating 5 rating
  • Member since
    April 2009
  • From: Carmel, IN
RB Model PE: Browning M2... COMPLETED!
Posted by deafpanzer on Friday, March 18, 2011 5:47 PM

Guys, I have signed up for Korea War GB with my M24 Chaffee.  My first AMERICAN armor since my return to the hobby.  Wbill, sorry about that!  Yup, that OLD Italeri kit but it will be loaded with upgrades.  One of those is the 50 cal machine gun of course to replace that ugly kit piece...

At first I was planning to use one that came in Chaffee upgrade set from Verlinden but they were all in resin and barrels were crooked and not impressive.  So I ordered aluminum barrels from RB model to go with some of resin parts. 

When I received the RB model set, I was surprised how many pieces it came and there was no instructions. Confused It came in a little zip lock bag.  I am trying to figure out how to assemble it correctly.  I googled... no luck... but found some good pictures to give me some leads like this one.
http://bkhoffmann.de/reviews/review_rb_barrels/mg.JPG

I am hoping you can tell me what those parts are for...

  1. 1. MG barrel
  2. 2. MG vent near end of barrel
  3. 3.  Back plate handles
  4. 4.  UNKNOWN... maybe base for mounting???
  5. 5.  Ring nut for barrel
  6. 6.  PE from clockwise starting at right; back plate, rear sight, barrel carrier, UNKNOWN, part of rear sight, part of bolt. 

I just realized that it is missing a bolt grip!!!  I guess I will have to use Verlinden resin part or grab one from Academy MG set.  Maybe you can tell me what those two mysterious parts are.  An instructions would be great too!

Andy

  • Member since
    February 2011
  • From: San Antonio
Posted by MAJ Mike on Friday, March 18, 2011 6:25 PM

I bought 2 of these from a Sprue Brothers Super Special.  I've been afraid to start because I've little experience with PE parts.  I thought there was a cocking handle in the kit.  I'll have to check. 

Wish I could help more, but I want to look over your shoulder to figure out the best way of assembling this.


 "I'd "I'd rather be historically accurate than politically correct."

"Sic gorgiamus allos subjectatos nunc!"

  • Member since
    February 2011
  • From: San Antonio
Posted by MAJ Mike on Friday, March 18, 2011 6:33 PM

Yikes.  My mistake.  What i got was not Verlinden.  I purchased 2 kits by Pontos Model.  Very nice PE parts to be added to a box cal.50 M2.  I just need to summon up the courage to use them.


 "I'd "I'd rather be historically accurate than politically correct."

"Sic gorgiamus allos subjectatos nunc!"

  • Member since
    March 2007
  • From: New york
Posted by JEFFB on Friday, March 18, 2011 6:47 PM

hopefully I can shed some light on your barrel. I have a couple waiting for a home, and was bothered by the lack of instructions..but found this review that deals w/ this set...

http://www.perthmilitarymodelling.com/reviews/vehicles/rb_model/rb35b13.html

from the pics ..it looks lke part number 4 is the front barrel grommet. mine look different though? I'm still working on the PE fret though....I'll keep looking!

Jeff


  • Member since
    August 2005
  • From: Sydney, Australia
Posted by Phil_H on Friday, March 18, 2011 6:53 PM

Looking at other pics of the RB set and comparing to what you have above, it looks like your mystery part 4 is actually two parts - there should be a flanged collar, which looks to have slipped over the end of one of the three handles (two firing grips, one charging handle) making it appear to be one part.

Unknown part #6 may be the front sight(?) tube at the top/front of the receiver.

http://www.rbmodel.com/data/foto/small/35B13.jpg


  • Member since
    March 2007
  • From: New york
Posted by JEFFB on Friday, March 18, 2011 6:56 PM

ok...I solved it!!!!  Check part number 4 again......I'll give ya a minute.....The 3rd charging handle is stuck inside the grommet!!!!  Mine is exactly like it! 

The PE fret...right to left...firing handles, sight BASE, barrel handle,  sight POST is the little guy on the far left side, and the part right below RB..is the sight that would move for ranging.  The perth link shows it ..

Hope I made sense....

jeff

  • Member since
    April 2009
  • From: Carmel, IN
Posted by deafpanzer on Friday, March 18, 2011 8:15 PM

WOW!  You guys are so good.  Yes, the mysterious missing piece case has been solved!  Knew I could count on you!

Jeff was correct.  It was two parts tangled into one piece.  I had to use two tweezers to take them apart.  I owe you a Beer, Jeff!  How embarrassing for me... LOL Embarrassed  Now we can see three pieces of wood handles and fully assembled barrel below...

Phil, looks like you were right about #6 PE part used as front sight.  I visited RB model website and looked at the pictures you suggested.   Oh boy, how in the world can I bend it into a perfect shaped circle... I better invite Tony 'Pvt Mutt' over to help me. 

Here's sneak preview of my M24 Chaffee... 75% completed. 


Thank you guys again! Beer

Andy

  • Member since
    August 2008
  • From: S.W. Missouri
Posted by Pvt Mutt on Friday, March 18, 2011 8:30 PM

Andy, take one of your drill bits a size or two smaller than what you need and roll the PE using the drill bit like a rolling pin on something soft like your cutting mat or something a little softer.Geeked

Now get to it

Tony leeSmile

Shoot Low Boys They're Ridin Ponys

  • Member since
    April 2009
  • From: Carmel, IN
RB Model PE: Browning M2... COMPLETED!
Posted by deafpanzer on Friday, March 18, 2011 8:52 PM

Tony, so you are declining my invitation to come over here?  You are only 6-7 hours drive away.  Actually I just wanted to say thanks for the tip.  I will try that tonight as soon as the boys and the queen hit the hay. 

Andy

  • Member since
    April 2009
  • From: Carmel, IN
Posted by deafpanzer on Saturday, March 19, 2011 1:27 AM

I really enjoyed this even tho it took me nearly an hour and half.  I ain't Pvt Mutt but one day I will be as good as him... Big Smile

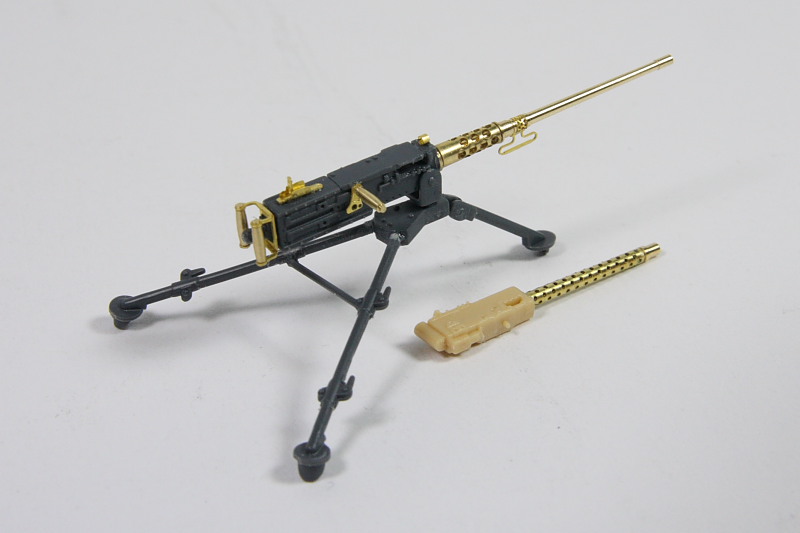
Here's pictures of completed 50 Cal... Verlinden resin parts were used to go with RB Model aluminum and brass PE set.

Tony, your tip using a drill bit and press & roll against the cutting mat worked like a charm.  Thank you buddy!

Andy

  • Member since
    August 2003
  • From: Connecticut, USA
Posted by Nachtflieger on Saturday, March 19, 2011 6:20 AM

Nice looking .50 Andy. That would look great under a coat of MM gunmetal.Big Smile

Nate


  • Member since
    April 2005
  • From: Piscataway, NJ!
Posted by wing_nut on Saturday, March 19, 2011 6:24 AM

Jeez Andy, between you and Tony there is some serious PE work in here lately.  Nice work.

Marc  

  • Member since
    March 2007
  • From: New york
Posted by JEFFB on Saturday, March 19, 2011 9:47 AM

Looks great Andy!!!  I'll have to find a decent kit to add mine to now.....maybe another Stryker?

Phil - you must ve been typing at the same time about the missing  handle!!!  I complete;y missed the front site!!!!  Thanks

Jeff

  • Member since
    August 2008
  • From: S.W. Missouri
Posted by Pvt Mutt on Saturday, March 19, 2011 10:05 AM

Bravo Andy BravoYes

Tony leeSmile

Shoot Low Boys They're Ridin Ponys

  • Member since
    April 2009
  • From: Carmel, IN
Posted by deafpanzer on Saturday, March 19, 2011 10:11 AM

Jeff & Phil, I am still laughing about this... two pieces tangled into one nice piece! Stick out tongue  If I had to do it all over again, I wouldn't have used Verlinden resin parts.  The MG has been molded into one whole piece that I had to cut & sand parts off except for one at the bottom.   I should have used my MG set from Academy... there is always next time. Yes

Marc- Trust me I ain't Tony... it probably takes him five minutes to do what took me an hour and half to come up with this. Stick out tongue  I think it will be easier and quicker if I can bring all of my PE stuff to his place.  I am confident that I can make a deal with Tony... let him use my paint booth in the winters in exchange for his PE service.  You think it will work out?

Nate- Thanks for looking!  Can't wait to have it painted either. Good luck on your Marder!

Andy

  • Member since
    April 2009
  • From: Carmel, IN
Posted by deafpanzer on Saturday, March 19, 2011 10:17 AM

Tony, THANK YOU! I still owe you a Beer...

Andy

  • Member since
    December 2006
  • From: t.r.f. mn.
Posted by detailfreak on Saturday, March 19, 2011 3:00 PM

                                 Hey Andy,beautiful pe work on that .50,the two,verlinden and RB sets go well together. I like the fact that you took the lack luster verlinden piece and made it look so good!!By the way the Chaffee is looking pretty sweet to!

                                                        Greg "Detailfreak"RowleyYes

[View:http://s172.photobucket.com/albums/w1/g-earl828/]  http://i158.photobucket.com/albums/t104/cycledupes/1000Roadwheels4BuildBadge.jpg

  • Member since
    March 2003
  • From: Rain USA, Vancouver WA
Posted by tigerman on Saturday, March 19, 2011 3:40 PM

Bow Down man those MG's are just plain sweet! Your really improving this old dog.

   http://i7.photobucket.com/albums/y269/wing_nut_5o/PANZERJAGERGB.jpg

 Eric 

  • Member since
    July 2004
  • From: Texas
Posted by wbill76 on Saturday, March 19, 2011 3:43 PM

Glad to hear you got it all sorted out Andy, and nice work on the Ma Deuce as well. Beer

  • Member since
    February 2011
  • From: San Antonio
Posted by MAJ Mike on Sunday, March 20, 2011 8:47 AM

Beautiful!  I'll use this thread to guide my efforts on the Ma Duece on the Sherman M4A3 that I'm building.  Great job!


 "I'd "I'd rather be historically accurate than politically correct."

"Sic gorgiamus allos subjectatos nunc!"

  • Member since
    April 2009
  • From: Carmel, IN
Posted by deafpanzer on Sunday, March 20, 2011 8:54 AM

Thank you guys!  Stikpusher who is leading Korea War GB mentioned it was missing a headspace and timing part so I will see what I can do but first I need to know what they looks like. Stick out tongue  I am always learning here in the forum.  And I just realize RB model set doesn't come with a 'butterfly' shaped trigger so I will work on it tonight...

Mike, thanks and good luck on your Sherman! Yes

Andy

  • Member since
    December 2006
  • From: t.r.f. mn.
Posted by detailfreak on Sunday, March 20, 2011 12:49 PM

               Deafpanzer,on the Ma Duece as the fifty calibre was nicknamed, The setting of headspace and timing was a critical step in setting up the weapon for firing. This procedure was done everytime the weapon was cleaned or the barrel changed,basically went like this.First step is to clear the weapon,open the feed tray cover,remove any linked ammo.,pull the cocking handle to the rear to eject any cartridge that may be in the chamber,visually check the chamber to make certain it is clear. With the bolt in the open position the barrel can now be removed by turning it counter-clockwise until it comes free. Now a fresh barrel can be installed ,screwing it in a clockwise direction until it seats.As you are turning the barrel in you will hear it start to click,once seated the barrel is turned back roughly three clicks.This should put you roughly at the  correct headspace and timing setting.The headspace and timing tool is a flat bar marked "GO" on one end ,and "NO-GO" on the other. With-out the headspace and timing properly set the Ma Duece would not function properly or not at all. The above procedure was from memory and I think I covered it pretty well. If you want more info. just google  headspace and timing the fifty calibre Mg. Hope I shed a little light on the subject without causing to much head scratchingConfused

                           My apologies as I somewhat explained the setting of headspace but not the timing.I noticed after I typed this that Stikpusher has also explained in the Korean war G.B. blog so rather than going into this anymore I will just leave it where it is at.Andy do'nt concern yourself with the headspace and timing ,also there are actually two triggers on the fifty cal.Between the butterfly there is a smaller trigger witch is used to fire the weapon as a single shot.A rotating collar with a hook typeof latch was used to hold the center trigger down for automatic fire,and up for single shot! As Stikpusher stated,amazing what one remembers after twenty + years out of service.

                                                                   Greg"Detailfreak"RowleyYes

[View:http://s172.photobucket.com/albums/w1/g-earl828/]  http://i158.photobucket.com/albums/t104/cycledupes/1000Roadwheels4BuildBadge.jpg

  • Member since
    April 2009
  • From: Carmel, IN
Posted by deafpanzer on Sunday, March 20, 2011 6:24 PM

I have to shoot Ma Duece one day.  Knob Shooting Range in Kentucky is about 3.5-4 hours drive from here and they have annual shooting event where you can shoot just anything available for rent. 

After reading Stikpusher and Detailfreak comments I had to check it out and found this great clip I thought you'd enjoy.   Down the memory lane for some of you guys... Big Smile  Tried to add video clip from Youtube but it didn't work so I pasted the link below.

http://www.youtube.com/watch?v=Gsb2PST-rLo

I worked on my M2 a bit today and I will post another picture tonight.

Andy

  • Member since
    April 2009
  • From: Carmel, IN
Posted by deafpanzer on Sunday, March 20, 2011 10:04 PM

For sure I am calling this done...

Good thing I had this set... U.S. Machine Gun set from Academy.  Somebody here recommended this set... I used its 'butterfly' trigger and mount parts to make it complete. 

It has been a great learning experience for me... I don't think I will ever use MG sets from Verlinden again.  Academy set with RB model barrel will just do the job.   Have a great week!

Andy

  • Member since
    February 2011
  • From: San Antonio
Posted by MAJ Mike on Sunday, March 20, 2011 10:17 PM

Looks great!  I've got the barrel assembly and the front sight assembly on the Tamiya Cal.50 from their M4A3 kit.  This is great training in patience.  I'm using a PONTOS set I got via a Super Special at Sprue Brothers. 

I really need to get an Optivisor.


 "I'd "I'd rather be historically accurate than politically correct."

"Sic gorgiamus allos subjectatos nunc!"

JOIN OUR COMMUNITY!

Our community is FREE to join. To participate you must either login or register for an account.

SEARCH FORUMS
FREE NEWSLETTER
By signing up you may also receive reader surveys and occasional special offers. We do not sell, rent or trade our email lists. View our Privacy Policy.