SEARCH FINESCALE.COM

Enter keywords or a search phrase below:

An unusal M4A1 - Updated 05-09-12

6530 views
31 replies
1 rating 2 rating 3 rating 4 rating 5 rating
  • Member since
    September 2005
  • From: Uppsala, Sweden
An unusal M4A1 - Updated 05-09-12
Posted by bultenibo on Saturday, April 21, 2012 7:33 AM

I'm no big fan of Shermans. I think I only built one in my whole life, but when I saw this photo of a M4A1 which was found during a dreadging of the Manila harbour in the Philippines I got this urge to built it.

I think it would make an excellent diorama, quite aesthetic in all it's simplicity. Just look at the colors - white, grey and orange!

Luckily I've got a Italeri M4A1 just lying arond that could be used for this kind of experiment. Big Smile I'm going to try to make it simple. Since I'm no "Shermanoholic" and not that interested in technicalities I'm not going to recontruct the interior in any detail. After all, pretty much everything seems to be covered by mud!

BTW Here's an article aboth the tank:

http://www.armytimes.com/news/2009/09/ap_sherman_found_philippines_092309/

/Tony aka Bultenibo


  • Member since
    November 2005
Posted by T26E4 on Saturday, April 21, 2012 9:02 AM

You said you're not a Shermanaholic but there is a very big issue here.  The hull is a cast hull M4A1 small hatch hull for a 75mm gun tank.  The Italeri kit is an M4A1 big hatch 76mm tank.  None of those were sent to the Pacific theater.  If that inconsistency doesn't bother you,then go for it!

Roy Chow 

Join AMPS!

http://www.amps-armor.org


  • Member since
    September 2005
  • From: Uppsala, Sweden
Posted by bultenibo on Saturday, April 21, 2012 10:23 AM

T26E4

You said you're not a Shermanaholic but there is a very big issue here.  The hull is a cast hull M4A1 small hatch hull for a 75mm gun tank.  The Italeri kit is an M4A1 big hatch 76mm tank.  None of those were sent to the Pacific theater.  If that inconsistency doesn't bother you,then go for it!


Hi Roy!

LOL! See, I knew that there would be something wrong with the Italeri kit, but I wouldn't be able to tell the difference between a small hatch and a big hatch Sherman even if my life depended upon it. Big Smile I'll disregard the historical inaccuracies this time, and just go for it!  Thanks for the input anyway!


/Tony

  • Member since
    July 2004
  • From: Texas
Posted by wbill76 on Saturday, April 21, 2012 1:45 PM

Sounds like an interesting challenge Tony! Reminds me of the dio some years back that a builder did of replicating a black-and-white photo in 3-D complete with all the shades of gray. Look forward to seeing you tackle it. Yes

  • Member since
    September 2005
  • From: Uppsala, Sweden
Posted by bultenibo on Saturday, April 21, 2012 3:00 PM

Bill:

What a great idea! Do you have a link to the diorama or some pics? The only thing I've seen that points in that direction is the Russian modeller Vladimir Demchenkos "Shadows of Stalingrad" - a really spooky dio in which he portrayed the remenbrance of fallen soldiers by painting them grey, while all the other parts were in color. Check it out!

http://en.diorama.ru/gallery/dioramas/1832/

/Tony


  • Member since
    November 2005
Posted by T26E4 on Saturday, April 21, 2012 3:26 PM

It was a b/w diorama by Barry Gaszo

http://web.archive.org/web/20090207224350/http://www.archertransfers.com/Bracketed.html

It is also featured in Lynn Kessler's book "How to Build Armor Dioramas" by Kalmbach.

Roy Chow 

Join AMPS!

http://www.amps-armor.org


  • Member since
    September 2005
  • From: Uppsala, Sweden
Posted by bultenibo on Saturday, April 21, 2012 3:42 PM

Tanks for the link Roy!

It's a really cool concept, and quite effective, since we are more or less programmed to visualize ww2 in black and white.

/Tony

  • Member since
    April 2005
  • From: Piscataway, NJ!
Posted by wing_nut on Sunday, April 22, 2012 7:24 AM

bultenibo

Tanks for the link Roy!

It's a really cool concept, and quite effective, since we are more or less programmed to visualize ww2 in black and white.

/Tony

I agree.  That is an impressive piece of work to have been able to get his brain to transfer the "color" in to a grey scale.  And to do it so beautifully.  Reminds me of my photography classes in college when the profs would say, "You can't take a good color photo until you can take a great B&W photo."

Marc  

  • Member since
    November 2009
  • From: SW Virginia
Posted by Gamera on Sunday, April 22, 2012 10:57 PM

Tony, I love the idea. Something really cool and unusual.

I assume they'd already cleaned the hulk off since I'd expect more marine life growing on the hull.

"I dream in fire but work in clay." -Arthur Machen


  • Member since
    September 2005
  • From: Uppsala, Sweden
Posted by bultenibo on Monday, April 23, 2012 4:37 AM

Gamera

Tony, I love the idea. Something really cool and unusual.

I assume they'd already cleaned the hulk off since I'd expect more marine life growing on the hull.

I think that it has come straight out of the water in the pic. I would guess that the lack of marine life is due to the fact that it didn't reside on the bottom of the ocean, but rather was buried in silt and mud. That's atleast what I think. I've just found some pics of tank after the coastguard had it washed, and I'm going to post them later today.

/Tont

  • Member since
    November 2009
  • From: SW Virginia
Posted by Gamera on Monday, April 23, 2012 9:05 AM

bultenibo

 Gamera:

Tony, I love the idea. Something really cool and unusual.

I assume they'd already cleaned the hulk off since I'd expect more marine life growing on the hull.


I think that it has come straight out of the water in the pic. I would guess that the lack of marine life is due to the fact that it didn't reside on the bottom of the ocean, but rather was buried in silt and mud. That's atleast what I think. I've just found some pics of tank after the coastguard had it washed, and I'm going to post them later today.

/Tont

Ahhhh, that would explain it. Looking forward to the photos!

"I dream in fire but work in clay." -Arthur Machen


  • Member since
    September 2005
  • From: Uppsala, Sweden
Posted by bultenibo on Monday, April 23, 2012 2:58 PM

I manage to find some more pics of the Manila Sherman, taken just after it was salvaged. Even though they are quite smaller than the first one, they allow me to get a basic 360 degree view of the wreck.

A also found another series of photos, taken from a guy that persuaded the coast guard to let him inside the dock area. These pics shows details of parts of the wreck after it was cleaned up. BTW The black thing that can be seen inside the interior of the tank is a car bumper that some idiot trew there! I think it's sacrilege to use an old Sherman as a dumpster! Angry

Unfortunatly, there are no good pics of the engine compartment. It would have been very helpful to see what was left of the enginge when I built that part. Now I just had to guess.


/Tony

  • Member since
    December 2010
  • From: T-34 Hunting
Posted by TheWildChild on Monday, April 23, 2012 3:11 PM

i seen a pretty neat dio of a German Brummbar that was done "half and half". half in B&W (in the field, with a woung crewman looking at it, damaged)  and half in color (in a museum, with the same figure head used, and aged several decades, fading from color to B&W, as if falling back in time) anybody else seen it?

1/35 XM77  "Sledgehammer", 1964 Chevy Impala Derby Car

Whats next? Aircraft for Ground Attack Group Build

"I dont just tackle to make a play, I tackle to break your will." -Ray Lewis

"In the end, we're all just chalk lines on the concrete, drawn only to be washed away"- 5 Finger Death Punch

"Ahh, my old enemy.......STAIRS"- Po, Kung Fu Panda

  • Member since
    November 2009
  • From: SW Virginia
Posted by Gamera on Tuesday, April 24, 2012 7:51 AM

Tony: Thanks for the photos. Very interesting pattern of rust there.

WC: Sounds like a great idea- wish I'd thought of it!

"I dream in fire but work in clay." -Arthur Machen


  • Member since
    December 2010
  • From: T-34 Hunting
Posted by TheWildChild on Tuesday, April 24, 2012 12:23 PM

Gamera: I will see if i can find it. actually, i think it was a "stumr tiger" not  a brummbar....at any rate, it was cool!

1/35 XM77  "Sledgehammer", 1964 Chevy Impala Derby Car

Whats next? Aircraft for Ground Attack Group Build

"I dont just tackle to make a play, I tackle to break your will." -Ray Lewis

"In the end, we're all just chalk lines on the concrete, drawn only to be washed away"- 5 Finger Death Punch

"Ahh, my old enemy.......STAIRS"- Po, Kung Fu Panda

  • Member since
    April 2012
  • From: Thousand Oaks CA
Posted by PaperPanzer on Tuesday, April 24, 2012 2:32 PM

Hi bultenibo! Looks like a good idea, Are you going to pose figures with it? Looks like that Sherman was pretty thrashed... I'm not crying over it, I ain't a "Shermanoholic" eighther ( I like the term...)

Too bad someone felt that it was a garbage bin... shame on them! Super Angry

Auctung! Panzer!

- "And now for something completely different..."- Monty Python's Flying Circus


  • Member since
    September 2005
  • From: Uppsala, Sweden
Posted by bultenibo on Tuesday, April 24, 2012 2:59 PM

Paperpanzer:

I checked my stash to see what kind of figures I had available and found this kis from ICM:

I think that the Russian tanker in his uniform would work nicely, if I only replaced the arms and the head. I also found a civilian resin head from some unknown Chinese manufacturer. It looked quite asiatic and had an ordinary haircut. Together I think that they will look somethinh like the Philippino worker in the orange uniform! Ill soon find out, since I'm almost done with the building part of the tank. Smile


/Tony

  • Member since
    September 2005
  • From: Uppsala, Sweden
Posted by bultenibo on Tuesday, April 24, 2012 6:07 PM

Puh!

At last, I'm finished with the building phase! I don't think I have EVER drilled, sanded, cut and stabbed as much as this in a single vehicle.

The first part of the build was actually just subtraction - getting rid of all details from the original kit. The second part was a bit  tougher -  to scratch build the engine compartment and trying to put together someting that would resemble the Sherman Continental radial engine. Luckily, it wasn't neccesary to achive an exact match, and the level of details could be kept quite low, since most of it will be drenched in mud anyway. Since I discovered that I must have thrown away my collection of Plasticard by mistake, I used whatever material I could lay my hands to build the engine. For example, an Italeri wooden watchtower kit was used for building the engine compartment! Smile

Well, here's the result. Enjoy!

The upper hull:

Engine compartment:

Engine:

Overview:

Fighting compartment, frontal view:


Next up is to" texturize" the whole thing and paint it its basic rust brown color. That will be fun!


/Tony

  • Member since
    July 2004
  • From: Texas
Posted by wbill76 on Wednesday, April 25, 2012 12:09 PM

Looking good Tony, off to a great start with this one in the details department...the engine gear looks the part. Yes

  • Member since
    April 2012
  • From: Thousand Oaks CA
Posted by PaperPanzer on Wednesday, April 25, 2012 2:23 PM

Quote Manstein's revenge- "needs more rust..."Big Smile

Auctung! Panzer!

- "And now for something completely different..."- Monty Python's Flying Circus


  • Member since
    September 2005
  • From: Uppsala, Sweden
Posted by bultenibo on Wednesday, April 25, 2012 2:58 PM

PaperPanzer

Quote Manstein's revenge- "needs more rust..."Big Smile


It's gonna get it! Big Smile


/Tony

  • Member since
    September 2005
  • From: Uppsala, Sweden
Posted by bultenibo on Wednesday, April 25, 2012 3:19 PM

So, now I'm finnished texturizing the whole thing, since I want both the few visiable rusty parts and the dried mud/silt to actually be seen and felt. I used ordinary white carpenter putty which was applied with a dry brush. The protruding parts were sanded down so that the texture of the rusty surface wouldn't be exaggerated. 

My idea is to paint the thing in three layers. First the whole build will be painted and weathered in the basic brown rusty color. 

After that I will add the dried silt, which probably will cover some 95% of the first layer. For this I will again use ordinary white putty, upon which I'll add some general oil washes to get some color variation.

The third layer will be representing the gray still wet mud/silt. I've found some mud powder from an unknown manufacturer in my stash that I'll experiment with to see if it's suitable for the purpose.

Here's some pics of the build after the putty was applied and after I painted the whole thing black.

I hope it will work. Big Smile


/Tony


  • Member since
    April 2012
  • From: Thousand Oaks CA
Posted by PaperPanzer on Wednesday, April 25, 2012 5:30 PM

bultenibo

So, now I'm finnished texturizing the whole thing, since I want both the few visiable rusty parts and the dried mud/silt to actually be seen and felt. I used ordinary white carpenter putty which was applied with a dry brush. The protruding parts were sanded down so that the texture of the rusty surface wouldn't be exaggerated. 

My idea is to paint the thing in three layers. First the whole build will be painted and weathered in the basic brown rusty color. 

After that I will add the dried silt, which probably will cover some 95% of the first layer. For this I will again use ordinary white putty, upon which I'll add some general oil washes to get some color variation.

The third layer will be representing the gray still wet mud/silt. I've found some mud powder from an unknown manufacturer in my stash that I'll experiment with to see if it's suitable for the purpose.

Here's some pics of the build after the putty was applied and after I painted the whole thing black.

I hope it will work. Big Smile


/Tony

http://i12.photobucket.com/albums/a240/bultenibo/22-2.jpg

http://i12.photobucket.com/albums/a240/bultenibo/23-2.jpg

http://i12.photobucket.com/albums/a240/bultenibo/24-1.jpg

http://i12.photobucket.com/albums/a240/bultenibo/25-1.jpg

http://i12.photobucket.com/albums/a240/bultenibo/26-1.jpg


Big Smile First three look as if they have been snowed on! Nice job so far...

Auctung! Panzer!

- "And now for something completely different..."- Monty Python's Flying Circus


  • Member since
    September 2005
  • From: Uppsala, Sweden
Posted by bultenibo on Thursday, April 26, 2012 4:31 PM

Just finnished with the base color - dark rusty brown. I've highlighted the few areas that will be visible with a orange-brown color. (I'm not that motivated to put in a whole lot of work into to the areas that won't be visible at all, whick pretty much is 95 % of the build.)

Did some color variation on the engine, since some parts of it will not be covered by the silt, and I also painted the rubber wheels.

Next thing to do is to apply some light colored oil washes over the designated areas and then seal the whole thing with varnish.


/Tony


  • Member since
    July 2004
  • From: Texas
Posted by wbill76 on Friday, April 27, 2012 1:27 PM

Nice work with the texturing Tony, it's got that "submerged in salt water for decades" look just right IMHO. Beer

  • Member since
    November 2009
  • From: SW Virginia
Posted by Gamera on Friday, April 27, 2012 1:46 PM

wbill76

Nice work with the texturing Tony, it's got that "submerged in salt water for decades" look just right IMHO. Beer

Ditto

Watching and hoping to learn something from you! Geeked

"I dream in fire but work in clay." -Arthur Machen


  • Member since
    October 2009
Posted by PANZERWAFFE on Sunday, April 29, 2012 4:16 PM

Great scratch work on the interior and really like the texture / base color on the hull Yes Hull is looking real good with the trans cover holes drilled and what is little there of the fender.  As the others have said, the color is perfect for a water logged Sherman.

Rob

  • Member since
    April 2009
  • From: Carmel, IN
Posted by deafpanzer on Sunday, April 29, 2012 5:14 PM

Ditto  Agree with everybody's comments.  No more lurking at my end and I will be following with interest.  Keep it coming... thanks!


Andy

  • Member since
    September 2005
  • From: Uppsala, Sweden
Posted by bultenibo on Wednesday, May 9, 2012 4:27 PM

Everybody : Thanks for the kind comments! Nice to hear that the rust seems to work. Big Smile

Unfortunatly some 98 % of it will be covered by silt and mud, and therefor not visble.

This is what I've done since the last update.

First I did some color variation on the areas that will not be covered. I used some crude dot filtering, using oils in light colors: yellow, white, red and ochra. This way I get the option of darkening the areas later, using umber and van dyck brown oils.
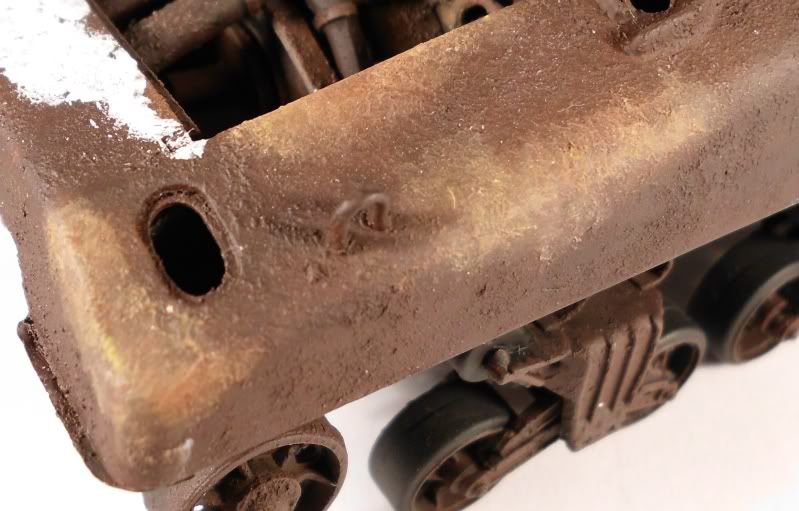
After that it was time to apply the dried silt, using ordinary carpenter putty. It feels kind of strange to cover the whole thing with putty once again since it tends to erase all details. I mean, ordinarely one would like to keep  the details as sharp as possible.

Here's where I am right now, having covered the left side of the tank:

Since I got bored with that work quickly, I soon found myself working on the figure instead. Sad

I thought that the figure would be an easy build, since the original pose seemed to be quite satisfactory for my Phillipino dock worker, but it turned into a nightmare.Angry

I honestly have not put more work into the conversion of a single figure than on this one: turning the torso, applying new hands, an arm and a head, fixing the boots and the bottom of the trousers, applying shoulder straps and reflex stipes on the jacket...

Well this is the result:

And here is the general layout of the diorama. I didn't want the back of the figure to be turned against the viewer (like in the original picture), so I placed him walking alongside the tank feeling the side of it with his right hand.

Next step is probably to finnish the work on the silt, but it's pretty tedious, so I have to pull my self togehter first... Tongue Tied

/Tony aka Bultenibo


  • Member since
    July 2004
  • From: Texas
Posted by wbill76 on Wednesday, May 9, 2012 6:35 PM

Making good progress with this one Tony...and yes, I can feel your pain about some of the counter-intuitive things you have to do to recreate it...hang in there with it! Wink

JOIN OUR COMMUNITY!

Our community is FREE to join. To participate you must either login or register for an account.

SEARCH FORUMS
FREE NEWSLETTER
By signing up you may also receive reader surveys and occasional special offers. We do not sell, rent or trade our email lists. View our Privacy Policy.