SEARCH FINESCALE.COM

Enter keywords or a search phrase below:

White Washed SU-122 Completed 95%

2000 views
11 replies
1 rating 2 rating 3 rating 4 rating 5 rating
  • Member since
    April 2007
  • From: Schroon Lake, NY
Posted by SMJmodeler on Tuesday, May 8, 2012 11:42 AM

These photos show the angled lower hulls MUCH better and I retract my comment.  Nice work! 

You may want to fix the track ends where they glue together...they appear to be coming apart and you can see the liitle "posts"...

  • Member since
    October 2003
  • From: Cape Town, South Africa
Posted by osjohnm on Saturday, May 5, 2012 6:29 AM

Following JohanT's suggestion I tried to fade out the stars and unit number subtly.

Sun is shining again but makes it look very white and not sure if the mud on the inner wheels are very visible?


SMJ, are you meaning I should add some mud streaks above the red line in the photos and also tone down/remove/randomise below the red line? Ie. reveal more white in random spots or add straight streaks of various shades?

Rear was pigments+water (so easy to fiddle with) and the front was pigments+white spirits so gave me sturdier but thicker finish.

John
  • Member since
    April 2007
  • From: Schroon Lake, NY
Posted by SMJmodeler on Thursday, May 3, 2012 4:28 PM


"The main aim of this build was to attempt a white wash, try out the hairspray technique, fiddle around with mig pigments and how to weather something white."

osjohnm:  Success!!!  This is a very convincing white wash job and the worn areas are well thought out and well placed. Yes

I like the variation on the mud on the road wheels...but definately slop-up those inner wheels.  The mud on the sloped undersides of the front and back of the hull are not quite as convincing. They seem to end too abruptly...too smeared versus rubbed...does that make sense?  You may want to consider some throw up mud splotches around the fenders too.


  • Member since
    April 2005
  • From: Gothenburg
Posted by JohanT on Tuesday, May 1, 2012 1:14 PM

Hi osjohnm,
Excellent results on your experiment!
I think the whitewash was very successful and the pigment application looks great!
All good stuff Big Smile

My only question mark is the red star and the turret number.
You might want to show them either under a coat of whitewash or maybe even in an area omitted in the white wash.
Then again I have seen T-34 factory fresh in a whitewash where the turret number is fresh on top of the white.

Thank you for sharing!

Very Best Regards
Johan 

  • Member since
    October 2003
  • From: Cape Town, South Africa
Posted by osjohnm on Tuesday, May 1, 2012 1:46 AM

Thanks for all the feedback guys, appreciate it.

Tojo72
Looks real good,you need to get some mud between the double road wheels,it's noticeable in your pics that the inside road wheel is clean.But a nice job overall


Thanks Tojo72, will add some mud in there today. I didn't even pick that up, fresh eyes always make a huge difference.

John
  • Member since
    July 2006
  • From: San Francisco Bay Area
Posted by bufflehead on Tuesday, May 1, 2012 12:03 AM

Other than what Tojo72 mentioned, I think its pretty darn nice!  One of these days I'll do a winter whitewash on some armor!  Hats off to you for a great job!

Ernest

Last Armor Build - 1/35 Dragon M-26A1, 1/35 Emhar Mk.IV Female


Last Aircraft Builds - Hobby Boss 1/72 F4F Wildcat & FW-190A8


  • Member since
    July 2004
  • From: Texas
Posted by wbill76 on Monday, April 30, 2012 7:12 PM

White wash looks good from here! Yes

  • Member since
    March 2003
  • From: Western North Carolina
Posted by Tojo72 on Monday, April 30, 2012 6:47 PM

Looks real good,you need to get some mud between the double road wheels,it's noticeable in your pics that the inside road wheel is clean.But a nice job overall

  • Member since
    March 2011
Posted by ED1CavScout on Monday, April 30, 2012 5:47 PM

Very cool man!  As a tamiya russian armor fan myself that is pretty sweet looking!

  • Member since
    July 2004
  • From: Sonora Desert
Posted by stikpusher on Monday, April 30, 2012 4:45 PM

Beautiful work!Yes The Tamiya mix for 4B0 Green is a nice tidbit to file away for me too! I do like those Tamiya weathering items. You really made a nice muddy beast here.


F is for FIRE, That burns down the whole town!

U is for URANIUM... BOMBS!

N is for NO SURVIVORS...

       - Plankton

LSM


  • Member since
    March 2003
  • From: Rain USA, Vancouver WA
Posted by tigerman on Monday, April 30, 2012 4:30 PM

That turned out really great John. I like the dirty, muddy look you gave it. 

   http://i7.photobucket.com/albums/y269/wing_nut_5o/PANZERJAGERGB.jpg

 Eric 

  • Member since
    October 2003
  • From: Cape Town, South Africa
White Washed SU-122 Completed 95%
Posted by osjohnm on Monday, April 30, 2012 4:20 PM

Hi all

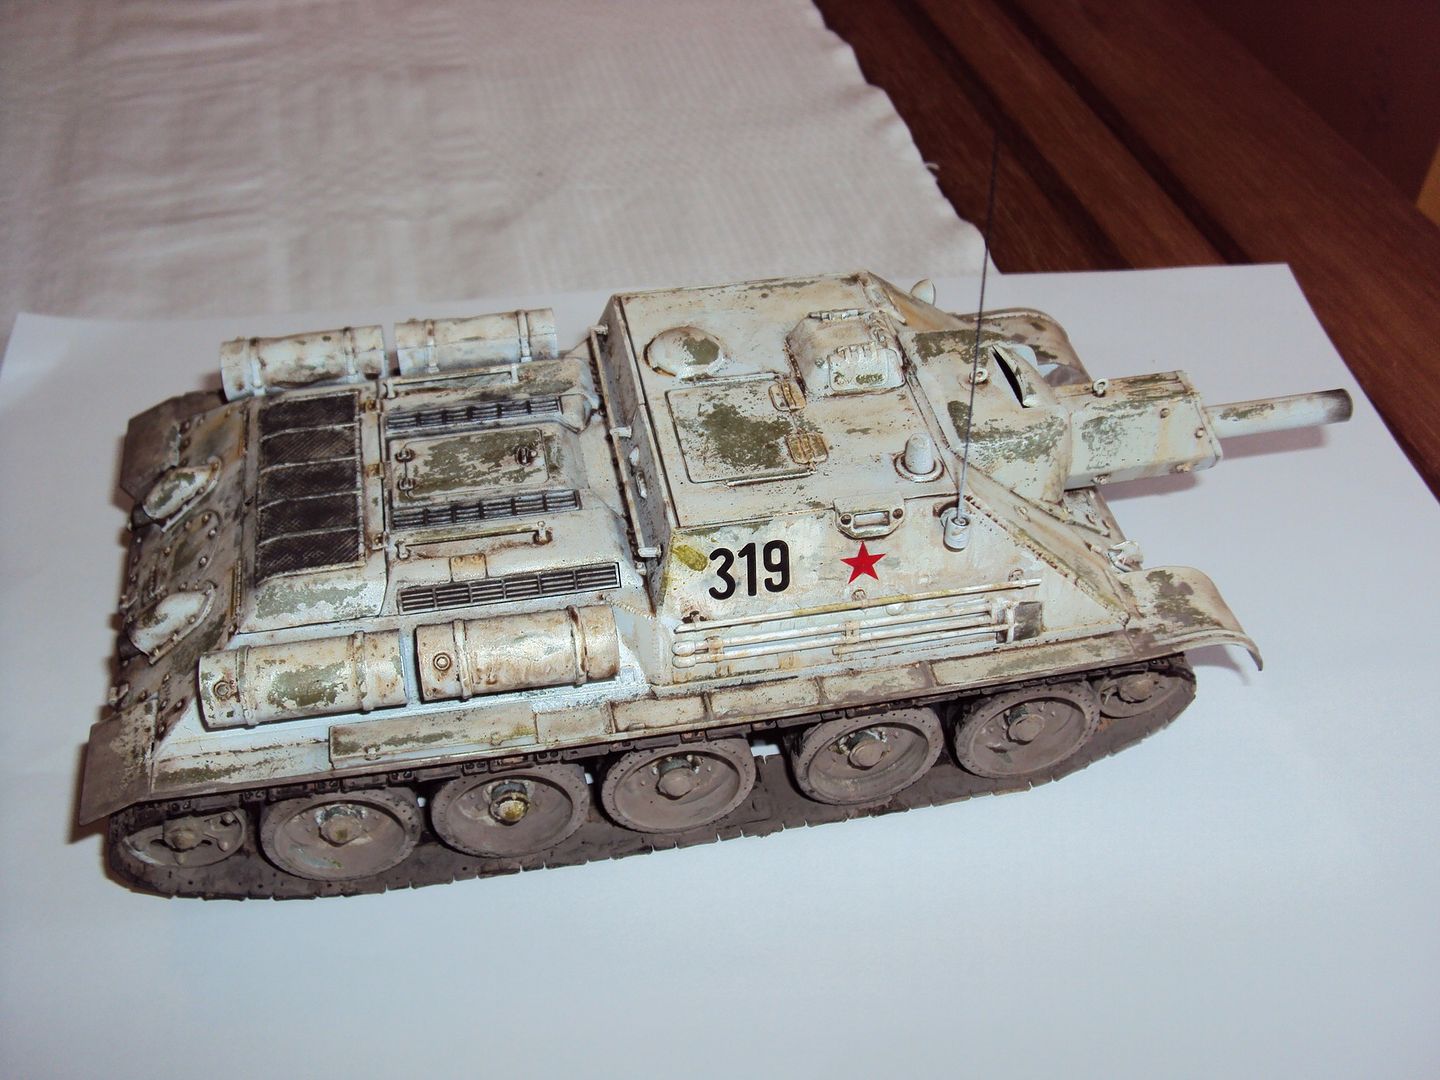
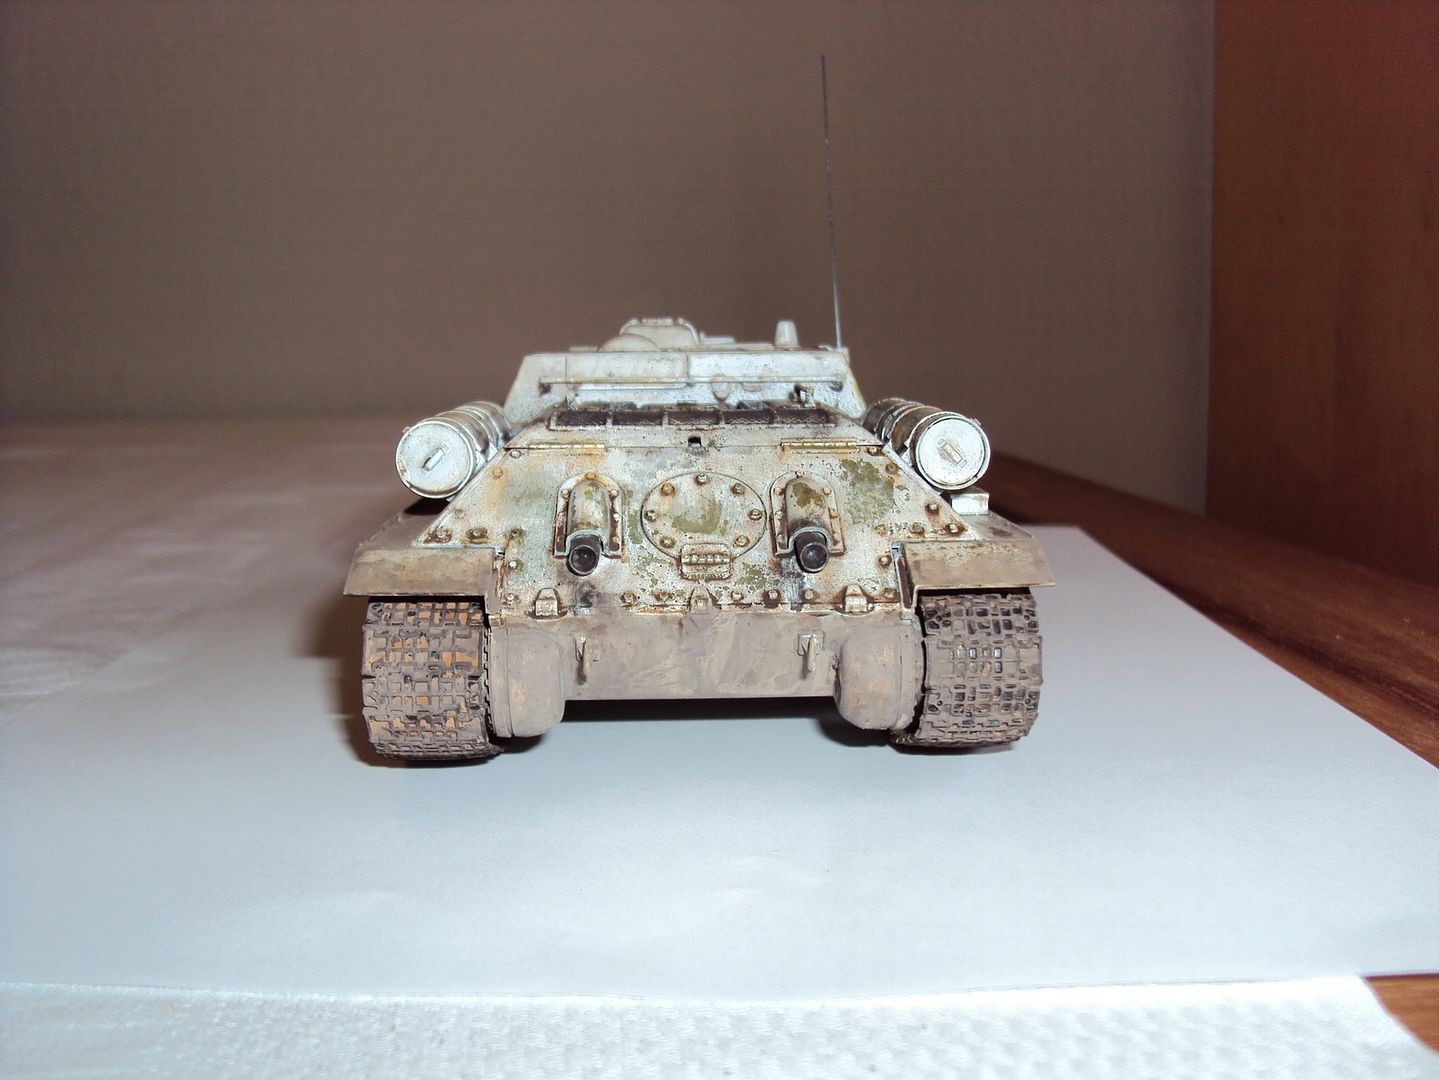
Thought I would post my current project to get feedback on my first white wash attempt.

It is the Tamiya SU-122 kit recently re-released with the "russian" weathering masters set included (main reason I got the kit). I've had pretty good results with the weathering sets but I know other builders don't really like them.

The main aim of this build was to attempt a white wash, try out the hairspray technique, fiddle around with mig pigments and how to weather something white.

Accuracy wasn't a concern and I even skipped the steps of removing the barrel seam and the seams on the fuel tanks.

Here are the steps I followed:

Primed the kit with Tamiya TS-6 Flat Black because their lacquers stand-up to pretty much anything.
Sprayed the 4BO with a 50:50 mix of XF-4 Yellow Green and XF-58 Olive Green (the mix is in Tamiya's BT-7 instructions) it came out lighter and brighter than I expected but actually worked well with all the weathering in the end.
Then I missed a crucial step, I didn't flat coat the 4BO coat before I applied the hairspray.I sprayed on flat white and I should have been more random in my spraying, think I covered the model too well.When I applied the water and started chipping away it went straight down to the black primer in places.

Touched that up and then clear coat, decals, clear coat again. Used oils for pin washes and overall washes with Raw Umber and Raw Sienna. Then flat coated the kit.

Used Tamiya's weathering sets on top of the hull and used a mix of Dry Mud/Russian Earth (mig) on the wheels, tracks and lower hull. I tried using white spirits as the fix but eventually used water instead since I can still remove the pigments if needs be, might still remove some pigments off the wheels(last 5% of build)

Sorry for long explanation but thought my approach would help you guys spot a step I missed or could have done better etc. Please let me know from a weathering perspective where I can improve this project and my next white wash attempt.

I apologise for the "flashed" photos, been raining cats and dogs all day so no outside photography possible.



Thanks for looking 

John
JOIN OUR COMMUNITY!

Our community is FREE to join. To participate you must either login or register for an account.

SEARCH FORUMS
FREE NEWSLETTER
By signing up you may also receive reader surveys and occasional special offers. We do not sell, rent or trade our email lists. View our Privacy Policy.