SEARCH FINESCALE.COM

Enter keywords or a search phrase below:

old zvezda t-34/85

11367 views
27 replies
1 rating 2 rating 3 rating 4 rating 5 rating
  • Member since
    April 2006
  • From: Denver, Colorado
Posted by waynec on Friday, July 20, 2012 7:34 PM

hi wing_nut

just starting my desert stuff. will dirty up track a bit more on T-34 and make a better generic sand base for tanks. am working on the old tamiya T-62 and will be in syrian colors; dark green lower hull. panzer desert yellow with dark green overspray.  it will be facing an afv club IDF SHO'T KAL.

Никто не Забыт    (No one is Forgotten)
Ничто не Забыто  (Nothing is Forgotten)


  • Member since
    April 2005
  • From: Piscataway, NJ!
Posted by wing_nut on Friday, July 20, 2012 6:42 PM

A bunch of desert builds just wrapping up here lately.  A nice change of pace.  And yours look terrific.

Marc  

  • Member since
    July 2004
  • From: Texas
Posted by wbill76 on Wednesday, July 18, 2012 4:37 PM

Nice work on the desert T34! My only suggestion would be some dirt/dust on the track faces to show it had traveled some to get to its current spot but otherwise looks right at home. Yes

  • Member since
    April 2006
  • From: Denver, Colorado
Posted by waynec on Wednesday, July 18, 2012 4:25 PM

hi rbaer

similar on M60 series. there was an arm with a grease fitting IIRC and you pumped grease into it to "push" the idler a bit more towards the front. jose said the rubber band tracks were tight unless the idler wheel was almost touch no. 1 road wheel. i think the T-62s tended to have tight tracks that "missed" nos. 1 and 5 road wheels too.

i can get the turret around to 1000 or 0200 but not over the front which is fine, this angle is more unusual but so am i. there is a cool pic of 3 T-34/76s booged down during BARBOROSSA with the guns over the back deck

this is a generic base mostly for my war wheels (of which i have at least 10 in the stash not counting SCUDs and tank transporters). i may build a 2'x2' generic base with a rutted track so i can get some cool eye level shots and the ruts will hide the fact the tracks may not match the ground. of course a custom build base for a diorama will address that problem.

i may try one or 2 more things on the track like double stick tape or even epoxy to stick it to the road wheels. thanks for the offer. i don't want to throw a lot of AM stuff into it; i have newer models (M-51 SUPER SHERMAN, SHO'T '67, SHO'T KAL '73) that may get some extra stuff thrown at them, especially the SHO'T KAL since it's with the barak bde and they didn't attach the side skirts.

Никто не Забыт    (No one is Forgotten)
Ничто не Забыто  (Nothing is Forgotten)


  • Member since
    September 2006
  • From: Dripping Springs, TX, USA
Posted by RBaer on Wednesday, July 18, 2012 3:24 PM

Looks like the Egyprians ran away and left it.....

One point: the discussion about the position of the idler needs to take into consideration this little tidbit: the idler swung on a swing arm/eccentric, to adjust track tension. Its "position" varied, depending on whether the crew bothered with trying to maintain their vehicles track, which appears to be not too frequently, judging from pics of T34s in service.

Also, Wayne, I have a couple of sets of Maquette indy links, PM me if you'd be interested in them.

Apprentice rivet counter.

  • Member since
    April 2006
  • From: Denver, Colorado
Posted by waynec on Tuesday, July 17, 2012 10:50 PM
it's finished though i need to make a couple more generic bases. this base is for modern 8x8 LAVs, CENTAUROs etc. will probably fix the antenna as it kinda got bent. this may go into a diorama. once again it looked like crap until the end. i added straps to the spare track blocks and "welded" a strip on the left side for them. i added angle iron mounts to the bow track blocks and hooks for the right side tow cable. i cut the ends off the plastic tow cables and glued them to picture hanging wire. the 2 blocks on the turret are from a picture i saw of a soviet tank. the pins for track sag are ok. they really do work good but it's best to do it before attaching the upper hull so i am already looking at what i will need for the old tamiya T-62 (syria '73). i may try to suprglue nos. 1 and 5 road wheels. tracks are not rusted because they don't when active. the rust gets abraided off rather quickly. all the flat top surfaces were washed with dirty white, a bit heavier on the ecternal fuel tanks for contrast. the smoke generators are darker and smudgier. overall dusting with dark brown powder as the llighter powder wasn't showing up. no decals though i thought of throwing some arab "sytian" ones from my ZSU-23/4 exceot it will be syrian too. the turret over the back deck is just a different look. actually i can't rotate it between 1000 and 0200 without knocking off the upper deck rails.

Никто не Забыт    (No one is Forgotten)
Ничто не Забыто  (Nothing is Forgotten)


  • Member since
    April 2006
  • From: Denver, Colorado
Posted by waynec on Monday, July 16, 2012 1:02 PM
fortunarely i had not melted the tracks pins together so i could pop them off. drilled a hole over nos. 1, 3, 5 road wheels and inserted brass rods with cya. had i realized this from the beginning i would have added additional support fir the rods inside the hull with styrene. looks ok. not as good as i would like but i am just plain stubborn on this one and don't want to buy new tracks. will be adding the spare tracks and tools today and play with making newer tow cables. i also have to get wings together, filled and sanded for 1/72 ME-264 today so i will be busy. pictures to follow later.

Никто не Забыт    (No one is Forgotten)
Ничто не Забыто  (Nothing is Forgotten)


  • Member since
    April 2006
  • From: Denver, Colorado
Posted by waynec on Sunday, July 15, 2012 9:26 PM
hi bufflehead they were used by a number of countries as were JS-3, SU-100, KATYUSHAs (even the idf used some of them in '73). the syrians has some PZ-IVGs dug in on the golan heights in '67. mine is going to be egyptian '56, maybe a diorama. so tracks are on and they are tight. had to break my "fixed" idler arm assembly and move it back until it touches the road wheel (as jose mentioned) but got them on. now to get the sag. plan A was to try blue tacky stuff (which you can see it some pics) might work for looser tracks but not this. plan B is superglue the tracks to the road wheels but not sure if it will work and will be messy if it doesn't hold. i can't tie them down with speaker wire like on TIGERs because there aren't any holes. plan C is drill holes in the hull above the road wheel and insert a tin rod. works well enough for sagging tracks on KVs. plan D is buy afv club tracks. i may get a set for my idf M60A1 since the italeri indy tracks are the same material as rubber band tracks and just doesn't stay together. plan M was blow off the no.1 road wheel and the idler, tear up the front fender, lay out the broken track and put a nice hole in the hull. oh and for fun the turret rear overhang does not clear the 2 hand rails on the upper back deck. and i will probably have to freehand some arabic on the turret.

Никто не Забыт    (No one is Forgotten)
Ничто не Забыто  (Nothing is Forgotten)


  • Member since
    July 2006
  • From: San Francisco Bay Area
Posted by bufflehead on Sunday, July 15, 2012 1:10 PM

yeah, that's looking nice Wayne!  What middle eastern countries used the T-34/85?  Egypt?  Syria?  Just curious as I'm not too informed about those conflicts.  

BTW, your comments and Jose's make me want to steer clear of this kit!!  Ick! 

I definitely admire your determination and fortitude!

Ernest

Last Armor Build - 1/35 Dragon M-26A1, 1/35 Emhar Mk.IV Female


Last Aircraft Builds - Hobby Boss 1/72 F4F Wildcat & FW-190A8


  • Member since
    July 2004
  • From: Texas
Posted by wbill76 on Sunday, July 15, 2012 11:03 AM

Coming along nicely Wayne, paint work looks good from here. Yes

  • Member since
    April 2006
  • From: Denver, Colorado
Posted by waynec on Saturday, July 14, 2012 9:19 PM
hi bufflehead right now i am trying to forget zvezda made a T-34/85 too. some tight fits before painting so i had to do some cutting and trimming to compensate for the paint thickness on the road wheel axles. and i sheared off an idler arm axle goining into the hull so that is a drill out and fix. the airbrushing went well for the first 3/4 and tyhen the paint started clogging and i had to clean the airbrush twice before finishing BUT armor is forgiving. will work on tracks and hopefully get them on on sunday. add a couple of arab text in the turret and it will be ready to weather. probably a bit of darker earth around the suspension, rust and smoke up the exhaust and heavy dust overall. since this is '56 may have it off the road with an isareli rcn jeep (mg-34s and british ww2 jeep crew) driving by.

Никто не Забыт    (No one is Forgotten)
Ничто не Забыто  (Nothing is Forgotten)


  • Member since
    April 2006
  • From: Denver, Colorado
Posted by waynec on Saturday, July 14, 2012 9:16 PM
duplicate. see above. forgot to use rtf

Никто не Забыт    (No one is Forgotten)
Ничто не Забыто  (Nothing is Forgotten)


  • Member since
    May 2004
  • From: Somewhere in Lima, Perú
Posted by Zero Enna on Monday, July 9, 2012 12:08 PM

Actually, Zvezda's idler is also in a wrong position (sort of),  you can see where the axle was broken and almost made me throw the kit into the bin. Fortunately, good non-expensive workable tracks appeared (AFV Club). The idler on Tamiya's T-34s is too close to the first road wheel and too low, you can't do to much to fix it due to the metal rod (height can't be fixed). You can position the idler on Zvezda kit, but if you place it in the right position, the tracks will result too short, if you want a good fit of the tracks you'll have to place the idler the closest to the first road wheel as possible, and it will look like a Tamiya kit, but not that much. As I was using AFV Club tracks, I also decided to modify the idler wheel mount, even if it will not be seen (that's just me):
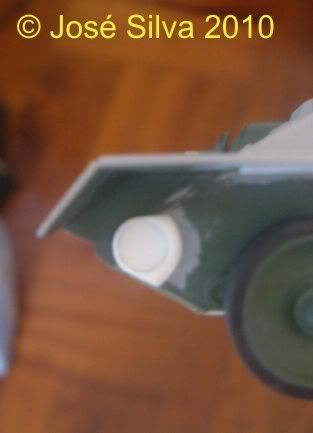
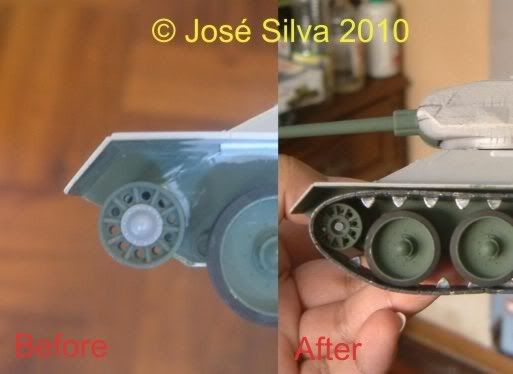
Same modification with some scratchbuilding can be done on Tamiya kit, but AFV Club tracks (or other workable tracks) must be used. Best regards.

José.

P.S. The pics are form 2 years ago, but the project is on hold. I added some more bits, but I'm a bit lazy to replace all handles and bolt heads (I have hex rod though).

"Vivir venciendo o morir matando"
  • Member since
    December 2002
  • From: Fort Knox
Posted by Rob Gronovius on Monday, July 9, 2012 10:49 AM

I first ran across the tight tracks while building the old Lindberg T-80 tank (remember that old thing?).

  • Member since
    April 2006
  • From: Denver, Colorado
Posted by waynec on Monday, July 9, 2012 10:44 AM

hi rob

i had to do that on the italeri LVTs. the first one i did the drive sprocket axle snapped off from the pressure. the next 2 i just cut them flush and added heavy plastic rods right from the beginning. while i would prefer a well designed kit, there is something to be said for working an older one and successfully solving problems.  i very easily could have made my own thinner hand rails. i will try a new way to make tow cables since i like to drape them

Никто не Забыт    (No one is Forgotten)
Ничто не Забыто  (Nothing is Forgotten)


  • Member since
    December 2002
  • From: Fort Knox
Posted by Rob Gronovius on Monday, July 9, 2012 10:34 AM

What I've done to alleviate tight tracks on a kit like this is to replace the plastic mounting axle with a piece of metal rod (like the old Tamiya motorized tanks' non-drive axle). If you look at Jose's photo, just drill a new hole slightly aft of the original plastic axle position to allow for slack.

As far as photos go, it kind of chafes me that you scan them, upload them to the internet and link them to help someone then someone else dings you on the photos. Later that person who complained always seems to want to know where you uploaded your photos because they can't find them and now need them.

My motor pool photos (when I ran an Army maintenance school) where the biggest source of complaints and requests, usually from the same guys.

  • Member since
    April 2006
  • From: Denver, Colorado
Posted by waynec on Monday, July 9, 2012 10:14 AM

rob and jose

thanks for the info and the pics. i did add a plate to the lower hull to "fill in" an overlap. didn't know i was actually making it more accurate. mine is foing to be sitting in sand so not worrying about the bottom or the gaps under the fenders since they won't be seen. if the tracks get too tight may just have to throw one. (i have some experiencee throwing them in M60s).

complaining about photos of real sttuff is like complaining the REAL ME-109s in THE BATTLE OF BRITAIN weren't E-3s or saying the soviet armor green isn't correct and needed 2 more drops of yellow.

Никто не Забыт    (No one is Forgotten)
Ничто не Забыто  (Nothing is Forgotten)


  • Member since
    December 2002
  • From: Fort Knox
Posted by Rob Gronovius on Monday, July 9, 2012 9:37 AM

Very nice work Jose, it looks like quite a job. I know the tank depicted in the kit isn't the same as the actual tank I posted pictures of, that's why I said "a similar tank" and not "the same tank". I only posted photos pertaining to a question he had regarding external fuel tanks (in another thread he wanted to know if they had fuel lines). I decided to post the photos here since this thread was more active and wanted to keep the discussion about his kit in one place.

I took many more photos of that tank but in general have stopped sharing photos as often as I once did. Too many critics of my photography who then turn around and then use the photos. For instance, I once posted photos to help someone with a fuel tank question and then a critic pointed out that it's not the same tank! Can you imagine?

  • Member since
    May 2004
  • From: Somewhere in Lima, Perú
Posted by Zero Enna on Monday, July 9, 2012 2:55 AM

I forgot to add: It seems like the lower hull is shorter that the upper hull, so if you fit the front part first, it won't fit the back part and vice-versa. It's easier to fix if you fit the back part first, just add a plastic strip to make the lower hull contact the upper hull and add an extra plate to the lower glacis. The kit's ground clearance is too high so you must add an extra plate to the lower hull, something like this:

One more about the front lower hull fit:

Sorry for the double-posting, I still don't know how to edit my messages. Best regards.

José.

"Vivir venciendo o morir matando"
  • Member since
    May 2004
  • From: Somewhere in Lima, Perú
Posted by Zero Enna on Monday, July 9, 2012 2:41 AM

Looking good so far. I also had fit problems, but it was in the lower hull front, I had to use some plastic card. I broke the left idler wheel's axle, the tracks were too tight, so I replaced the tracks with AFV Club's. The tank in the actual pics is not the same tank as the kit depicts. The kit is a T-34/85 from the Factory #183, The tank in the actual pics is a T-34/85 from the Factory # 112. Main differences are the hinges on the rear panel and the turret sides. It is very rare to see tanks from the 183 using the "plain dish" wheels, 183's "trademark" were the "spider" wheels. Of course, you can see 183 tanks at Berlin using the plain dish, or a combination of both, but they were also using "bedspring armor". Waiting to see more. Best regards.

José.

P.S. Don't try to convert a 112's turret into a 183's ("flattened turret"), the sides are not the only differences, the shape of the hexagonal plate is different on both turrets, hence the shape of the turret.

"Vivir venciendo o morir matando"
  • Member since
    December 2002
  • From: Fort Knox
Posted by Rob Gronovius on Sunday, July 8, 2012 3:02 PM

Yes, I took the photo inside the Patton Museum. The Patton Museum is still there, but in a much different format. If you think of the old Patton Museum as the Super Bowl, the current Patton Museum is like someone's basement with a broken foosball table.

Yes, I gigged the museum for the seam. I took several shots of the turret; the rough cast looks extremely rough and the cuts are huge.

  • Member since
    April 2006
  • From: Denver, Colorado
Posted by waynec on Sunday, July 8, 2012 2:39 PM
hi rob is that from the used to be patton museum at ft knox? i remember they would run a t-34/85 on the 4th with some of their other vehicles. oh no the second picture (closeup of port fuel tank) has a seam that isn't filled. i would like to do that on a model and have a picture for the nut counter judges. i have some of zvezda predreadnoughts. the protected cruiser VARYAG is a really nice looking model. may even get around to building it. i hear the T-90 is a nice kit too. off to finish priming this one (and ME-264 engine nacelles) and will finish up an MD-500TOW while waiting for this to dry. glad i have a basement. i don't think you can iairbrush acrylics when it gets above 100 though it is nice and cool and wet in denver today. of course the burn areas now have flash flood alerts. nothing on locusts as yet.

Никто не Забыт    (No one is Forgotten)
Ничто не Забыто  (Nothing is Forgotten)


  • Member since
    December 2002
  • From: Fort Knox
Posted by Rob Gronovius on Sunday, July 8, 2012 2:24 PM

For a while, the Zvezda T-34 kits were the most accruate around. Then Dragon started up and left them in the dust.

  • Member since
    July 2006
  • From: San Francisco Bay Area
Posted by bufflehead on Sunday, July 8, 2012 2:17 PM

Good looking build so far wayne!  I forgot that Zvezda made a T-34/85 kit.  I'd definitely like to see this in middle eastern colors.

Ernest

Last Armor Build - 1/35 Dragon M-26A1, 1/35 Emhar Mk.IV Female


Last Aircraft Builds - Hobby Boss 1/72 F4F Wildcat & FW-190A8


  • Member since
    December 2002
  • From: Fort Knox
Posted by Rob Gronovius on Sunday, July 8, 2012 2:01 PM

I took some photos of a similar tank. They may be of use to you.

  • Member since
    April 2006
  • From: Denver, Colorado
Posted by waynec on Sunday, July 8, 2012 1:27 PM

maybe i had fit problems with the front hull because it wasn't too bad in the back. i'll start with the rubber band track. i'm actually fairly good at painting them and hiding boggers. the 2 tone is primer on the lower hull and turret. haven't finished all the fiffley stuff on the hull but it should be primed today. it will be overall MMA armor sand. apparently all the idf stuf in 1956 was od but if i have 2 in a dio i will use 2 diffenent od's for contrast.

i have used fake flower stems for tow cables but mat try picture hanging wire. picked up some solder for cables.

Никто не Забыт    (No one is Forgotten)
Ничто не Забыто  (Nothing is Forgotten)


  • Member since
    July 2004
  • From: Sonora Desert
Posted by stikpusher on Sunday, July 8, 2012 1:04 PM

Yes it is a decent kit. I built one when it was first issued and dont recall any fit issues in the front hull, but rather at the back where the upper rear deck contacts the sides and lower hull. Ah well. With some new tow cables and tracks (good thing AFV Club makes new indie links for these) it can be quite nice for minimal additional investment. I made mine North Korean. Whats going on with the two tone on yours? Is that primer or surfacer?


F is for FIRE, That burns down the whole town!

U is for URANIUM... BOMBS!

N is for NO SURVIVORS...

       - Plankton

LSM


  • Member since
    April 2006
  • From: Denver, Colorado
old zvezda t-34/85
Posted by waynec on Sunday, July 8, 2012 11:05 AM
got this at a club auction years ago bundled with a CENTURION MK3. old kit with some issues but i am in an arab-israeli phase so i pulled it out. some fit issues such as the 3mm gap between front upper and lower hull. easily fixed which just adds to my building confidence though, with all the new stuff out, why do i bother with the older stuff? rubber band tracks, which i prefer. instructions were a tad sparse and i have some leftover pieces not mentioned such as the shovels and hull radio antenna mount. grab rails are rather thick but this isn't worth the effort to make new ones though it would have been easy enough. will make an interesting dio with idf 106mm recoilless rifle jeep.will make new tow cables and rewire smoke generators on back, maybe add a bit of stowage but not much. still need to find arab decals other than the ones i will be using in the kits i have, some of the gaps are filled with white glue, a favorite filler, especially with armor.

Никто не Забыт    (No one is Forgotten)
Ничто не Забыто  (Nothing is Forgotten)


JOIN OUR COMMUNITY!

Our community is FREE to join. To participate you must either login or register for an account.

SEARCH FORUMS
FREE NEWSLETTER
By signing up you may also receive reader surveys and occasional special offers. We do not sell, rent or trade our email lists. View our Privacy Policy.