SEARCH FINESCALE.COM

Enter keywords or a search phrase below:

Tamiya T 34/85 W.I.P. (Updated 8/29/12 FINISHED)

18487 views
64 replies
1 rating 2 rating 3 rating 4 rating 5 rating
  • Member since
    August 2005
  • From: Los Angeles, CA
Tamiya T 34/85 W.I.P. (Updated 8/29/12 FINISHED)
Posted by corvettemike on Monday, July 30, 2012 2:29 AM

My mom gave me a hobby shop gift card for my 26th birthday recently so I grabbed Tamiya's T 34/85 kit since I had never done any Soviet armor before. I plan to do a version from January 1944 with a whitewash so without further adieu lets get started...

Being an older offering (the mold dates back to 1985 or earlier if I'm not mistaken), the lower hull has numerous holes and slots for motorization. Before any other work was done the first step was to plug the holes with sheet styrene and Bondo spot & glazing putty.

There was a slot on either side near the transmission cover on both sides. A backing of .020 styrene formed a base folloed by L shaped plugs of .060 jammed in the hole and carved as needed. Bondo covered the rest in a couple of applications. I decided not to continue the strip with the bolts on it all the way around because once the tracks are on you can't really see up in there as well as I plan on making the bottom pretty muddy when it comes time for weathering which will hide the fact it's not compltete.

When the upper and lower hulls are joined there is a cavernous space left behind. I cut strips of Plastruct .020 sheet to plug the holes with even more Bondo.

Lastly everything on the bottom was primed to see how it all fit together. All I was worried about was getting the seams filled decently but not perfect since like I said earlier you can't really see this area with the tracks installed and I plan on making a muddy bottom so my textured medium will cleverly hide divots and foul-ups.

Rise my brothers we are blessed by steel in my sword I trust...

Arm yourselves the truth shall be revealed In my sword I trust...

Havoc Models

  • Member since
    August 2005
  • From: Sydney, Australia
Posted by Phil_H on Monday, July 30, 2012 2:43 AM

Mike, check the hull top. A T-34/85 should have a sharp front lip. This one seems to have a rounded lip and two slots for the "towing eyes" which are an incorrect feature of Tamiya's T-34/76 kits.

Edit: Disregard the above. There's an insert piece which fits over this to provide the sharp nose.. Embarrassed

  • Member since
    August 2005
  • From: Los Angeles, CA
Posted by corvettemike on Monday, July 30, 2012 3:06 AM

You mean like this?

Might be hard to fix now with the upper and lower hulls permanently joined, I'll need to fiddle with it a bit and see what can be done. I almost missed that thanks :)

Rise my brothers we are blessed by steel in my sword I trust...

Arm yourselves the truth shall be revealed In my sword I trust...

Havoc Models

  • Member since
    August 2005
  • From: Sydney, Australia
Posted by Phil_H on Monday, July 30, 2012 3:10 AM

Yep, I just edited my previous. I hadn't looked at the /85 kit in years but I just pulled it out and checked - there's a "sharp nose" insert which fits over the rounded lip - it's all good.

  • Member since
    November 2006
  • From: Massachusetts
Posted by jadgpanther302 on Tuesday, July 31, 2012 3:25 PM

These kits are the ***, so much fun and so easy to put together!

  • Member since
    July 2004
  • From: Texas
Posted by wbill76 on Tuesday, July 31, 2012 7:27 PM

Looks like you're dealing with the kit's known issues just fine, good job with the filler and putty!

  • Member since
    July 2006
  • From: San Francisco Bay Area
Posted by bufflehead on Tuesday, July 31, 2012 11:03 PM

Hey Mike, that reminds me so much of the first kit I build after a 35 yr hiatus!!  Mine was a Tamiya T-34/76 and I did the same things to the lower hull that you've done, although I don't recall as nicely done as yours!

Ernest

Last Armor Build - 1/35 Dragon M-26A1, 1/35 Emhar Mk.IV Female


Last Aircraft Builds - Hobby Boss 1/72 F4F Wildcat & FW-190A8


  • Member since
    August 2005
  • From: Los Angeles, CA
Posted by corvettemike on Thursday, August 2, 2012 4:52 AM

Thanks everyone :). I'll get to the next round of construction this weekend, trying to juggle this with a Tamiya Kawasaki ZX-14 motorcycle that's about 60% done I want to get done for a show in October. If you've never built a Tamiya 1/12 bike they have 10000000000000000000 pieces so I need to get cracking on some semblance of progress if I want to meet my deadline.

Rise my brothers we are blessed by steel in my sword I trust...

Arm yourselves the truth shall be revealed In my sword I trust...

Havoc Models

  • Member since
    August 2005
  • From: Los Angeles, CA
Posted by corvettemike on Saturday, August 4, 2012 10:09 PM

Tonight I started in on the rear panel. First things first on the /85's there was no center hinge, so I scraped it off and replaced the hinge with a bolt made of .040 Plastruct hex rod. Down the sides the kit bolt pattern looks like this:

X = bolt

- = space

X X - X X

When it should look like this:

X X X X X

The missing bolts are more Plastruct hex rod which I cut slightly thicker than the kit bolts, set with liquid cement and after it had dried I sanded them flush with the kit bolts using a 400 grit sanding stick. I added a grab handle in the center of the circular hatch using .020 Plastruct rod, however I probably need to remove it and fill the peg holes. According to photos it should be narrower and positioned pretty much in line with the two bolts above where I placed mine.

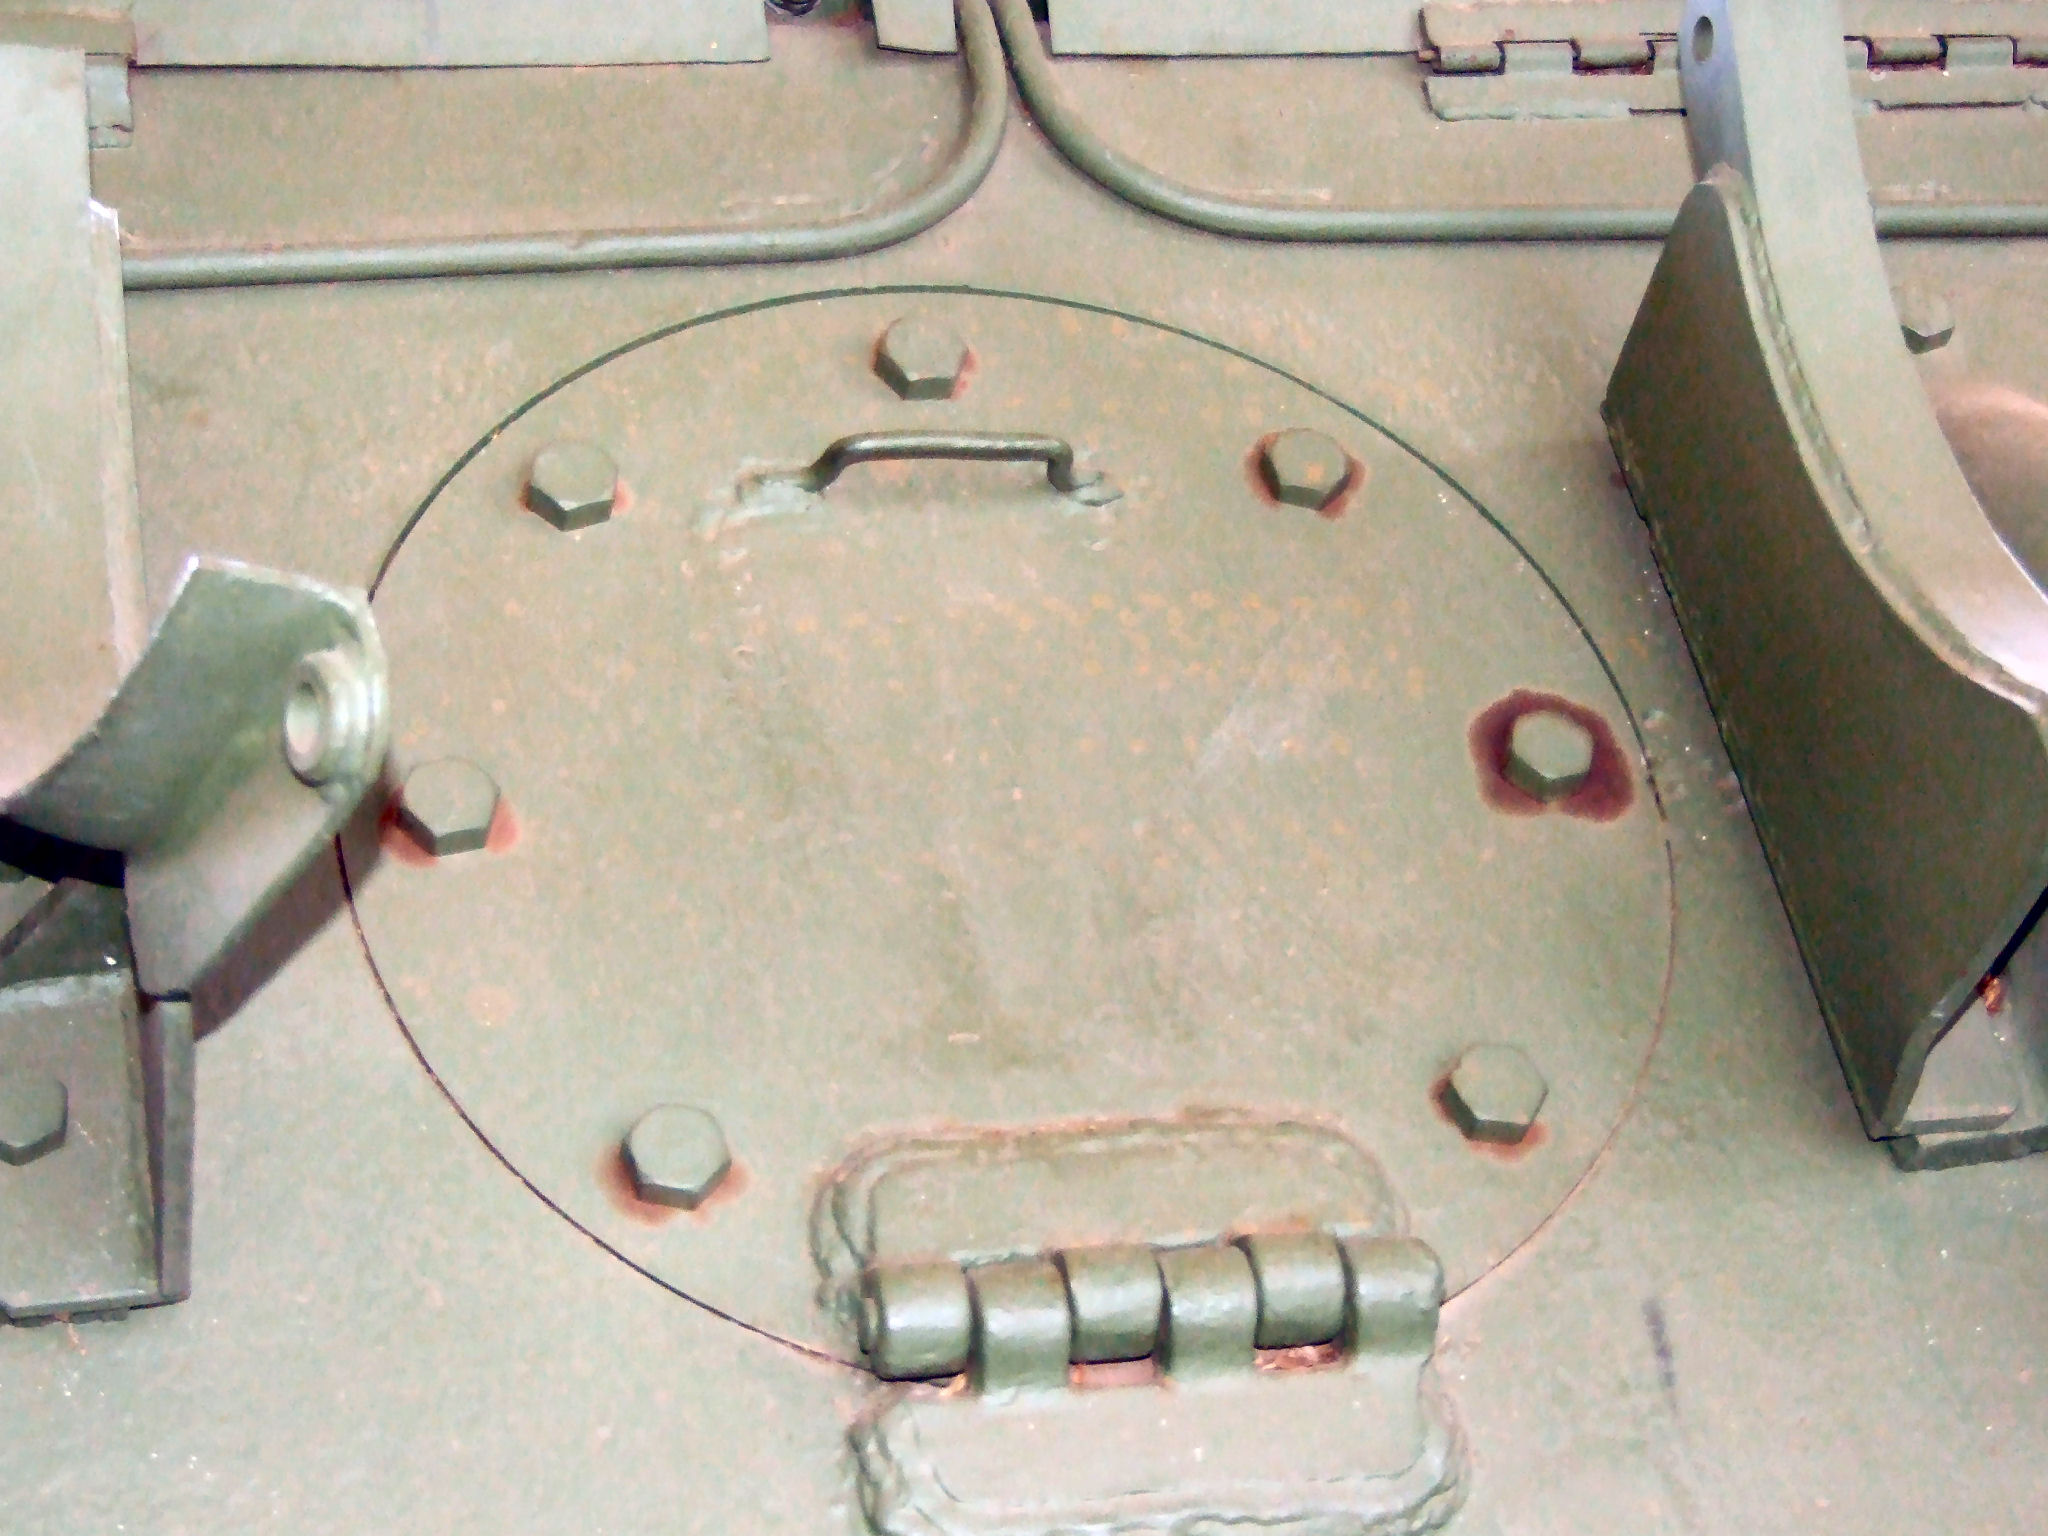
You can see the bolt layout and missing hinge here

And here's what I mean about the grab handle:

Question too. Those pipes(?) that come from the vent on the engine deck and make right angles forming kind of a upside down "T" what are they and should they be on every T 34/85 or are they a unit specific kind of thing?

Rise my brothers we are blessed by steel in my sword I trust...

Arm yourselves the truth shall be revealed In my sword I trust...

Havoc Models

  • Member since
    August 2005
  • From: Los Angeles, CA
Posted by corvettemike on Sunday, August 5, 2012 6:43 AM

The last session for tonight I fixed the issue with the grab handle on the circular hatch then I added the exhausts which were built OOB.

Rise my brothers we are blessed by steel in my sword I trust...

Arm yourselves the truth shall be revealed In my sword I trust...

Havoc Models

  • Member since
    March 2003
  • From: Rain USA, Vancouver WA
Posted by tigerman on Sunday, August 5, 2012 1:01 PM

Keep up the good work Mike. Sorry i can't answer the question on the pipes.

   http://i7.photobucket.com/albums/y269/wing_nut_5o/PANZERJAGERGB.jpg

 Eric 

  • Member since
    August 2005
  • From: Los Angeles, CA
Posted by corvettemike on Monday, August 6, 2012 4:35 AM

I wanted to use photoetch engine grilles on the rear deck of this build so I went to order a set of Eduard TP006 grilles for the Tamiya kit. After about 90 minutes of fruitless searching and 'OUT OF STOCK" screens I finally found a set. The vendor however required a minimum $20 order plus another $20 for shipping. Not willing to pay that much for a $4 part I went to work with a Dremel and a sanding drum thinning the back of the molded vents to paper thinness. Then using a hobby knife and a set of jewelers files I cleaned out the molded in mesh and replaced it with some screen material from my spares box.  A black styrene plate was installed over the void in the hull underneath the engine grille.

Rise my brothers we are blessed by steel in my sword I trust...

Arm yourselves the truth shall be revealed In my sword I trust...

Havoc Models

  • Member since
    August 2005
  • From: Sydney, Australia
Posted by Phil_H on Monday, August 6, 2012 6:58 AM

Looking good so far Mike.

I noticed that you haven't installed the engine deck side grilles yet. It would have been easier to do this before you glued the upper and lower hull parts. The grille parts are slightly undersized compared to the openings, so there is a little potential for alignment problems. Take your time and adjust as the glue dries and it should be ok.

  • Member since
    August 2005
  • From: Los Angeles, CA
Posted by corvettemike on Monday, August 6, 2012 7:30 AM

Thanks for the heads up, Those are the next item on my to do list as I work my way around the upper hull.

Rise my brothers we are blessed by steel in my sword I trust...

Arm yourselves the truth shall be revealed In my sword I trust...

Havoc Models

  • Member since
    July 2004
  • From: Texas
Posted by wbill76 on Monday, August 6, 2012 12:47 PM

Nice job on the replacement screens. Can't help you on the lines question but would speculate that they might be air vents for the internal fuel tanks or engine compartments of some type?

  • Member since
    July 2012
Posted by TBadger on Monday, August 6, 2012 3:12 PM

Thats ridiculous that some vendors require that much of a minmum order and that much for shipping ! Your improvisation of parts to achieve the goals is certainly working out

  • Member since
    August 2005
  • From: Sydney, Australia
Posted by Phil_H on Monday, August 6, 2012 8:34 PM
  • Member since
    September 2005
  • From: beacon falls , Ct.
Posted by treadwell on Monday, August 6, 2012 9:17 PM

Great link Phil !  Ya know, most of these units were converted to extra fuel storage as the canisters were in short supply, but when I researched it I never found this link although I knew what the conduit was for... you must have dug deep !

best regards,

tread :-)


  • Member since
    August 2005
  • From: Sydney, Australia
Posted by Phil_H on Monday, August 6, 2012 10:05 PM

Hi Tread :-) I didn't dig that deep, just did a search using the phrase "t-34 smoke generator" and this was one of the links that came up on the first page. ;-)

  • Member since
    August 2005
  • From: Los Angeles, CA
Posted by corvettemike on Tuesday, August 7, 2012 12:07 AM

Phil_H: Thanks for the info on the conduits. In further research it would seem most of the /85's I saw have them and like what was said they have no canisters or a set of external drums in their place, however there was a fair share of photos showing no equipment at all, just the conduits. Also on those engine deck vents you were more than right. Those things are way too small it took me a good 30min to get them in with all the fiddling and they still don't look completely right. I had to do alot of "shake-n-bake" on the hull to retrieve them a few times after they fell inside the completed hull.

Anyway here are my smoke canister conduits. They are made from hollow core solder bent to a 90 degree angle around a paint brush handle and inserted in to the hole under the engine screen (which now it makes sense what that hole was for and it doesn't look so barren now).

 Hosted on Fotki

Rise my brothers we are blessed by steel in my sword I trust...

Arm yourselves the truth shall be revealed In my sword I trust...

Havoc Models

  • Member since
    May 2004
  • From: Somewhere in Lima, Perú
Posted by Zero Enna on Tuesday, August 7, 2012 1:17 AM

There should be another indent just to the left of the one where the lines come out, it is for a red light. Best regards. It is not present on all tanks though, but maybe it's a different option.

José.

"Vivir venciendo o morir matando"
  • Member since
    August 2005
  • From: Los Angeles, CA
Posted by corvettemike on Tuesday, August 7, 2012 1:54 AM

After going back to Primeportal it would appear the slot I fed my conduits through IS the indent you speak of, the conduits should be slightly further right  in a smaller hole. The way I glued them though there's no real easy way to correct it so I'm just going to leave well enough alone. This is the kind of stuff I write in my 180 page notebooks, so if I ever build another one I won't make the same mistake twice.

Rise my brothers we are blessed by steel in my sword I trust...

Arm yourselves the truth shall be revealed In my sword I trust...

Havoc Models

  • Member since
    September 2006
  • From: Dripping Springs, TX, USA
Posted by RBaer on Tuesday, August 7, 2012 7:57 PM

Tamiya T-34s are fun, very basic but good basic kits, lots of room for simple enhancements. Yours is coming along nicely, good work.

Holes for lights, piping, those are the kind of details that give me AMS flashbacks.......

And, IIRC, the screens you so nicely replaced cover the engine cooling air exhaust. The intake is the side vents. I could have that backwards, but check pics of tank riders in cold weather; they're frequently huddled around those exhaust (I think) vents, on top of all that air that just passed through the radiators, maybe why they got so beat up.

Apprentice rivet counter.

  • Member since
    March 2003
  • From: Western North Carolina
Posted by Tojo72 on Wednesday, August 8, 2012 10:52 AM

Nice work so far,Not sure about the pipes,but they do appear on my Dragon T-34/85 and on my current Dragon SU-100 that I am working on.They must be somethingstandard to all T-34 types.

  • Member since
    August 2005
  • From: Los Angeles, CA
Posted by corvettemike on Saturday, August 11, 2012 2:53 PM

Today's work so far was on the right side of the hull. I wasn't in the mood to clean the mold seams from the grab handles so I drilled some # 76 holes and bent my own from .020 styrene rod. I replaced the molded on angular handles with copper wire. I'm not entirely satisfied with these as they are a bit on the uneven side. I can attribute it to battle damage or cover the uneven ones with a scratch built tarp or something when I get the hull painted. I also roughed up the front fenders a bit with various pliers and added some bullet holes, dents, etc in them.

Rise my brothers we are blessed by steel in my sword I trust...

Arm yourselves the truth shall be revealed In my sword I trust...

Havoc Models

  • Member since
    August 2005
  • From: Los Angeles, CA
Posted by corvettemike on Sunday, August 12, 2012 12:02 PM

This morning I moved on to the fuel drums on the right side. They are built straight from the box and I'm very impressed that they are molded with dents and crumples already in them which aids the effect I'm going for which is a very war weary weather beaten vehicle.

And here is a shot of the overall progress so far.

Next stop the front glacias and the left side hull details. This Tamiya kit is going together fast even with all the extras I'm adding. If I were doing it OOB I'd probably be past paint by now! Toast

Rise my brothers we are blessed by steel in my sword I trust...

Arm yourselves the truth shall be revealed In my sword I trust...

Havoc Models

  • Member since
    July 2004
  • From: Texas
Posted by wbill76 on Sunday, August 12, 2012 4:48 PM

Nice job on the scratched details Mike, dresses up the kit nicely!

  • Member since
    August 2005
  • From: Los Angeles, CA
Posted by corvettemike on Monday, August 20, 2012 10:07 PM

Rather than post a bunch of sporadic smaller updates, I saved up the photo shoot for a big chunk of progress. Photo one shows the completed front end. The first thing I did before anything else was toss on that piece included in the kit to change the front edge from the rounded to proper sharp edge and fair it in with Bondo. The rest was built pretty much OOB. Since there is no interior nor driver figure included in the kit and I don't have the resources to order any at the moment I left the big drivers hatch closed. The end of the machine gun was drilled out with a #76 bit for greater realism.

The left side hull was built primarily OOB except I repeated the procedure from the right side in making the grab handles from .020 Plastruct rod. Next time I do grab handles I'll use brass since it holds it's shape better in my opinion. The styrene ones I made look a bit on the sloppy side compared to similar brass ones I've done. I haven't been able to get out to the hobby store to get any and I want to keep the diameters consistent through out.

And here is a couple of the completed hull.

Next on the to-do list is the wheels, idlers, and sprockets then I'll get a move on the turret. Still debating if I should use my AFV club indi link tracks on this one or save them for another T-34. Opinions?

Rise my brothers we are blessed by steel in my sword I trust...

Arm yourselves the truth shall be revealed In my sword I trust...

Havoc Models

  • Member since
    December 2004
  • From: ohio
Posted by vonryan on Monday, August 20, 2012 10:35 PM

AWESOME BUILD MikeYes this ones for youBeer


Clay

  • Member since
    August 2005
  • From: Los Angeles, CA
Posted by corvettemike on Thursday, August 23, 2012 3:59 AM

The turret is off and running! Step one was to add the cast texture. I used a technique written about by Bob Collignon in the March 2002 FSM. I brushed Testors liquid cement liberally over the turret and let it soften the plastic, then used a boars bristle brush to texture the plastic. Mr Surfacer helped to even out the texture, then the casting seam was added using Squadron putty heavily thinned with liquid cement applied with a hypodermic needle. It ain't pretty but I never seen a real T34 where it was. Smile

The grab irons (I have also seen them referred to as "tarp hangers") are more Plastruct .020 rod bent to shape and pegged in to #76 holes.

There are some missing welds around the turret vents. I brushed liquid cement in to the joint, let it soften up the plastic and pressed in the detail with the back of a #11 blade.

Next update will be the hatches and other small details along with the main gun. Not too much further and I'll be ready to sling some Russian Green on this.

Rise my brothers we are blessed by steel in my sword I trust...

Arm yourselves the truth shall be revealed In my sword I trust...

Havoc Models

JOIN OUR COMMUNITY!

Our community is FREE to join. To participate you must either login or register for an account.

SEARCH FORUMS
FREE NEWSLETTER
By signing up you may also receive reader surveys and occasional special offers. We do not sell, rent or trade our email lists. View our Privacy Policy.