SEARCH FINESCALE.COM

Enter keywords or a search phrase below:

How in the heck do you build tracks?

1560 views
11 replies
1 rating 2 rating 3 rating 4 rating 5 rating
mgh
  • Member since
    May 2011
  • From: Utah County, Utah
How in the heck do you build tracks?
Posted by mgh on Friday, August 24, 2012 7:29 PM

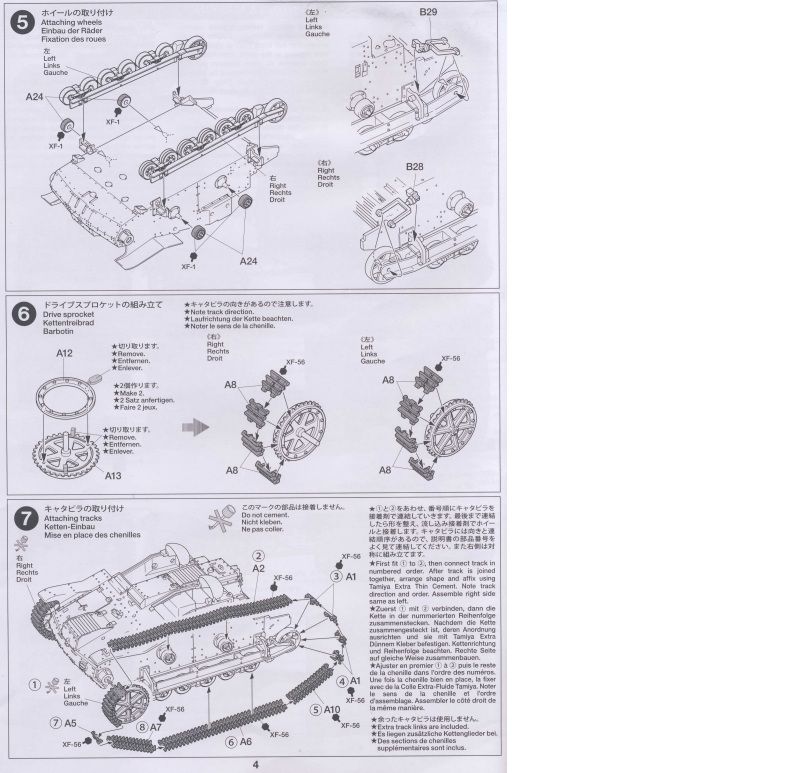
So I am building this Tamiya kit, and having too much fun.  Not to worry, it is now time to attempt building the tracks.  Don't know if the instructions will be readable, but in step 7 they say to position all the pieces, and then glue.  Well I do not know how to defy the law of gravity, and get all the pieces together and positioned before I glue (they do not snap together).  My only other experience with link tracks was a Italeri Tiger tank, and I didn't get the tracks put on that one either!

This is typical Tamiya with outstanding fit, so I could probably glue the links as I went, but there is not much room for error.

How do you put link tracks together?  Any suggestions are appreciated.
  • Member since
    November 2006
  • From: Massachusetts
Posted by jadgpanther302 on Friday, August 24, 2012 7:59 PM

the links that are going over the drive wheels you lay out on a piece of not that sticky tape, connect them and wait for the glue to set but not harden and then you put the links on the sprockets.

  • Member since
    April 2012
Posted by Reserve on Friday, August 24, 2012 9:38 PM

I will make seperate runs and fit them together once dry, but that does not look like it applies here. What I would do with these is get your bottom sections laid out, then glue them with liquid plastic cement. After about five minutes the glue should have set enough to hold things together but still be pliable, so at that point carefully wrap your tracks around the drive sprocket which you hopefully have not glued down yet.


Mark

  • Member since
    September 2006
  • From: Australia
Posted by Blitzwing on Saturday, August 25, 2012 7:37 AM

I'd glue those tracks together in four separate sections.  Leave he top run as is, the bottom run comprising of the three length sections, and then the forward and rear wrap around sections.

Glue them as Reserve  says above. Let the sections dry for a few minutes before assembling them around the road wheels and sprocket. The sagging sections where the return rollers go for the top run will be a good guide for positioning the wrap around sections and then the bottom run. It definitely helps if you haven't glued the drive sprockets but being a Tamiya kit they're probably attached with poly caps.

If you intend to paint the tracks on the wheels then you can just glue them all together, otherwise dry fit the four sections around the wheels and let them dry for a while before taking apart the four fairly rigid sections.

URL=http://picasion.com/]

  • Member since
    August 2012
Posted by Winetanker on Saturday, August 25, 2012 7:38 AM

Like jp302 said....glue the 4 (A8) together and form them around the drive sprocket...let that harden, then add (a2)...then do the same thing for the 4 (a1) on the return roller.

A little blue tack here and there can help hold things together for dry-fitting....

....working my way up the airbrush learning curve......

mgh
  • Member since
    May 2011
  • From: Utah County, Utah
Posted by mgh on Saturday, August 25, 2012 10:36 AM

Thanks for the suggestions.

I hope to give it another try sometime today.  I will try a piece of tape to assemble the sections of track.

The drive wheel does have a poly cap so it turns.  The rear idler does not turn, but if I had a little more experience and foresight I could have left it so that it would have turned.  I am a little surprised that Tamiya did not specify in the instructions to not glue it.  When I was building it my thinking was that since it was plastic tracks they could not move anyway, so what difference does it make if I glue it.  Ah well, (hopefully) I will know better next time.  It certainly would have made assembling the tracks easier.

mgh
  • Member since
    May 2011
  • From: Utah County, Utah
Posted by mgh on Saturday, August 25, 2012 11:07 AM

Blitzwing

If you intend to paint the tracks on the wheels then you can just glue them all together, otherwise dry fit the four sections around the wheels and let them dry for a while before taking apart the four fairly rigid sections.

To make sure I understand what you and Reserve are saying; to paint the tracks before final installation, I would get down to 4 pieces, shaped properly, but not glued to the road/drive wheels.  At that point I can pull the 4 pieces off,paint and weather, and them glue them to the wheels.  As you can tell, I have not been through this beforeEmbarrassed  All but the Italeri kit that I have built had the vinyl tracks.

Thanks for the help.

  • Member since
    August 2012
Posted by Winetanker on Saturday, August 25, 2012 12:51 PM

while it is more time-consuming than vinyl tracks IMO they give a nicer end result.

My Pz III J had "magic Tracks" and I was concerned about putting all 180+ pieces together but with a little patience it wasn't all that difficult.

....working my way up the airbrush learning curve......

  • Member since
    September 2006
  • From: Australia
Posted by Blitzwing on Sunday, August 26, 2012 12:08 AM

Yes once the four sections are fully cured you can paint and weather them before attaching them to the wheels.

Since the rear idler doesn't have any teeth it doesn't matter if you have already glued it in place. I meant don't glue the drive wheel since the teeth can lead to alignment problems if it is not aligned with the sag in the top run of tracks.

URL=http://picasion.com/]

mgh
  • Member since
    May 2011
  • From: Utah County, Utah
Posted by mgh on Saturday, March 23, 2013 12:13 PM

So close!

I am building another Dragon kit with individual link tracks, and my but I came close.  Tigerman, in another post, said he let the links set up for an hour after gluing.  I laid one long run out on tape, brushed on lacquer thinner (what I use for glue), then let it set for 30 minutes.  Then gently pulled it off the tape and formed it.  It came out very well, except for joining it together after forming it.  It was too long, so I took a link out, and then it was too short!

Celebrate your successes!  This is the best result I have gotten yet.


  • Member since
    July 2003
  • From: On my kitchen counter top somewhere in central North Carolina.
Posted by disastermaster on Saturday, March 23, 2013 2:18 PM

mgh

So I am building this Tamiya kit, and having too much fun.  Not to worry, it is now time to attempt building the tracks.  Don't know if the instructions will be readable, but in step 7 they say to position all the pieces, and then glue.  Well I do not know how to defy the law of gravity, and get all the pieces together and positioned before I glue (they do not snap together).  My only other experience with link tracks was a Italeri Tiger tank, and I didn't get the tracks put on that one either!

This is typical Tamiya with outstanding fit, so I could probably glue the links as I went, but there is not much room for error.

How do you put link tracks together?  Any suggestions are appreciated.

           Click here,

  http://i954.photobucket.com/albums/ae29/bioshiko/Searchforums.png

    this'll fix 'ya.

 https://i.imgur.com/LjRRaV1.png


mgh
  • Member since
    May 2011
  • From: Utah County, Utah
Posted by mgh on Saturday, March 23, 2013 7:04 PM

Nice link!  Thanks.

Next step for me to learn is how to get the tracks removed once they are set to paint them, like is shown in the post.

JOIN OUR COMMUNITY!

Our community is FREE to join. To participate you must either login or register for an account.

SEARCH FORUMS
FREE NEWSLETTER
By signing up you may also receive reader surveys and occasional special offers. We do not sell, rent or trade our email lists. View our Privacy Policy.