SEARCH FINESCALE.COM

Enter keywords or a search phrase below:

1/6 panzer II project

23603 views
10 replies
1 rating 2 rating 3 rating 4 rating 5 rating
  • Member since
    April 2005
1/6 panzer II project
Posted by armourguy on Sunday, October 28, 2012 9:57 PM
Hi Guys, with the Tiger I now finished and access to a clean workshop I have started my next build which will be this DML Panzer II ausf.B kit. 
After a complex all scratch build model like the last tiger, I choose this vehicle as a simple quick build. I had this kit in storage for about a year now and I can finally dive into it. After reviewing lots of the other builds on several forums I saw some areas that can be improved with the stock kit.
For those who don't have the kit, or who have opened theirs yet I made a youtube video showing the model's unboxing and kit's contents. 
The kit itself is very easy to put together, and assembles very quickly. The Hull went together in no time, I did have to fight with the lower plate fitting to the sides somewhat, but with the help of some clamps it was over in no time.
Where the panels meet there is a seam line, to cover up the seams I added weld beads, which both cover up the seams and add detail. 
The tank's suspension bump stops were added to the lower hull. The bump stops either have their rubber bump pad upside down,  the pad was going to be a separate part to be glued on, that was left out by DML to save on costs, or there is a mistake with the instruction numbers?
Either way I reversed the parts so that the pad would be on the bottom portion of the hull. The molded in "pad" itself is a bit on the small side so to make them more pronounced I added a small segment of PVC pip to the molded in pads. After some detail mounting hex bolts the bump stops were complete. These pads will be painted flat black after the hull is painted and weathered. 
When I assembled the hull I also mounted the tanks side fenders. The fenders themselves mount easily, and have two small front supports that get glued the fenders and the hull. The fenders have small mounting bolt details, that are represented as small round nub. 
The fenders on this model are easily snagged and are used to support the upper hull.  Because of this I didn't feel that glue alone for the supports was very strong. So I drilled out the molded in numbs, replacing them with small brass hex bolts.
The three bolts are then secured to the tank via small nuts that IMHO give a better more secure hold than glue alone, and the small hex bolt detail looks better than the molded in nub. 
On the tank's rear plate there is a small rod which conects the two sides of the hull together. The kit supplies you with a plastic rod for this. Rather than using the rod I replaced it with a brass rod. From looking at reference images the kit supplied rod looked too thick in appearance.
I just finished assembling the tank's rear idler wheels. The kit supplied idlers come in three parts. the idler itself is nicely detailed. The only mods that I made to them was the removal of the rear knock out marks, and I drilled out the small hole in the wheel all the way through. 
From what I have read and seen the biggest problem with the model was the way the wheels mount to the suspension. The kit is designed so that the return rollers that they must be glued into their roller mounts. The road wheels, sprockets and idlers are designed to spin, but are only to be slipped onto the vehicle, and can pop off. 
When I first saw this I decided to design a retention system. So that the wheels will not fall off the model, but will all still be able to spin freely. 
Starting with the return roller,
the wheel itself is molded hollow. A resin doughnut insert was tooled up to p[lug up the hole.
The system also utilizes the kit roller mount. The plastic roller tip is cut off and a resin insert is mounted into the roller wheel and the roller mount. 
Hidden within the resin inserts is a metal bolt and a nut. Once tightened the roller will spin freely and will not fall out. 
As what was mentioned above the road wheels were deigned to spin, but are not designed to be secured to the model. To fix this I tooled up a small fastener mount that bolts the wheel assembly to the swing arm from inside the wheel. This connection is hidden once the outer half of the wheel is added. 
The tank's drive sprockets have a similar design with the way they are designed to mount / spin. For this component to spin and be secured I destined a resin insert for the final drive. 
 
The kit final drive has a hollow mounting shaft that I saw as being a weak point. The insert fills in the shaft, and moves the load stress from the spindle shaft to the final drive bell. This makes it much stronger.
For the drive sprocket I replaced the kit supplied plastic disc with a mounting brace. 
The brace conceals the mounting bolt 
From the exterior the sprocket looks no different from the way the kit is designed to be mounted. 
Once I complete the suspension I will have add the new retention system to the listings.
After the addition of the sprocket retention system they were added to the model, but not before I added a cast texture to them.
Before I will add the suspension I painted the lower hull and suspension parts with primer, and it's base coat of panzer grey. 
The lower hull will get some basic weathering. Once complete the suspension will be added and the model will be ready for the superstructure. More to come!

  • Member since
    April 2005
Posted by armourguy on Wednesday, November 7, 2012 9:18 PM

It's been a while but I have been working on the project making lots of progress.

The tank's lower hull has been completed. Before I was able to mount and assemble the suspension I weathered the lower hull, and painted the rear portions of the rubber tires. This is all done so that once mounted these areas will be too difficult to reach with the airbrush.

All of the suspension retention bearings have been mounted. The Set is now complete and has been added to the new PZII part listings page. http://www.eastcoastarmory.com/pzii.htm

One quick mod that I made to the suspension was to plug up the rear portion of the kit supplied swing arms. This was done because when the suspension is mounted the hollow rear portion is visible. To fill in the swing arm I packed in the gap with epoxy.

Once dry it was painted and mounted to the model.

After the suspension was added I then focused on the tank's exhaust system. The kit's exhaust is comprised out of several parts. and is covered by a rolled sheet of Brass PE.

To mount on the PE the kit supplies you with several thin plastic mounting rings. These rings are designed to fit over the exhaust tube.

The kit gives you many copies of this part because it is very thin and it will break easily when mounting to the tube. One quick mod that can be made to the rings that will make them easier to mount without breaking is to shorten the mounting tang by about 3/4.

Another mod that I made to the exhaust was the addition of a small plastic strip down the length of the exhaust tube. The strip simulated the crimp seam that is common on exhaust tubes.

The last mod that was made to improve the look of the exhaust was to hollow out the stem. The kit stem has a small indentation molded into it. The indentation is quite shallow and the wall thickness is a little too thick.

with the help of a dremel I increased the size and depth of the indentation, and I thinned out the walls to a more realistic thickness.

After the mods both the exhaust and the cover were primed, painted and weathered.

Before I mounted the exhaust to the tank I airbrushed some sut around the area of where it will be mounted.

Once the weathering was done I mounted the fully painted and completed exhaust system

I have also made some progress on the tank's upper hull.

When I was cutting the thick plastic upper hull parts from the runner I noticed that unlike a smaller scale plastic model a clipper or a knife is too difficult to cut through the thick plastic.

I found the best and easiest way to remove the parts cleanly is with the multimax

When I got to the tank's engine hatches I decided to make them functional. To do this I drilled out the plastic hinges and inserted steel rods for the hinge.

to drill out the hinge I used a flex shaft to squeeze into the tight spot where the hinge is molded onto the rear deck

When I got to install the hatches I found that on my kit both hatches were warped and did not sit on the hull flush.

To fix the problem I placed the hatch in a vise, I then carefully heated the hatch with a heat gun and slowly but surely I twisted the hatch until it was straight again.

After the bending to cool down and solidify the plastic water is poured onto the part.

After the bending the hatches now sit flush with the deck.

I also made two youtube videos showing some of progress including the suspension retention upgrade.

http://youtu.be/hfTxvOorCuQ

http://youtu.be/meugwXjI5ks

I'm now working on installing the upper hull parts and fender details. Once ready it will be onward to the turret. More to come!

  • Member since
    April 2005
Posted by armourguy on Monday, November 12, 2012 11:03 AM

I have made some progress on the tank's upper hull.

The rear and center upper hulls have been mounted

One mod that was made to the rear portion of the rear deck was to fill in the bottom portion of the rear lip. The DML kit has this as a hollow cavity. To fill this section in I used epoxy.

Once the epoxy was dry I sanded it flush and added the missing hex bolt head details. On the PZII the entire rear deck could be removed via these bolts. Because of this mod the rear deck sits flush with the rear wall.

Another mod that was made to the rear deck was the removal of the molded in bolt heads. The molded in bolt heads were simple round nubs,

These nubs were removed and resin hex heads were fitted in their place.

On the rear portion where the engine hatches are the kit omitted the mounting bolts entirely, so when adding the hex heads I added them to this section as well.

When mounting the upper hull halves there is a gap there the engine deck and the top deck meet.

This was an easy fix, to fix this when I was sculpting the weld beads I filled this gap in with the epoxy and with a knife I sculpted the area smooth deleting the gap.

The rest of the tanks upper hull kit supplied fittings (lift hooks, periscopes, turret gear protector) were added, and the upper hull welds were completed.

The tank's front functional visor was added. The kit supplied visor works well and was mounted OOB.

The only mod that I made to the front visor was the addition of the divots to the hinges, which are missing in the molding.

Another project update video was also made and uploaded to youtube.

http://youtu.be/sn1WrM6547w

I will now be working on the tank's turret. More to come. 

  • Member since
    April 2005
Posted by armourguy on Monday, November 19, 2012 3:50 PM

I have made more progress on the model, getting it closer to paint.


The turret is mostly complete with it's welds, and all of the turret's exterior details and components are all kit supplied with some minor tweaks that were made.


The commander's hatch splash guard had it's molded nubs removed and were replaced with small counter sunk slot screws. The same screws were also used on the turret lift hooks.


As of note it was brought to my attention that the hull lift hooks were not welded, but were fitted to the upper hull / engine deck via the same slot screws that were mentioned above. The sculpted welds were removed, and the fasteners were added.


For the tank's commander's hatch the kit supplied hatches are designed to open, but are very basic in detail.


To improve the hatches I first drilled out the plastic retention nubs, which are on the kit hinges, and replaced them with a steel rod. This mod improves the way the hatches open, and well as their durability.


On the interior of the hatches there are small holes that are molded in for the  bump stops that are on the external portion of the turret. A small M3X6mm hex bolt was inserted into the hole both removing the hole, and adding the fastener detail that was missing from the hatch.


Another detail that was omitted from the kit was the small signal hatch lock. This lock would keep the small hatch secured to the main hatch. The lock itself was fabricated out of plastic and aluminum.


Once the mods were made the hatch was painted and weathered. As of note the instructions has the commander's head rests absent, and is recommended that they are not to be used...as for why I can't say. The square head rests are mounted to the pegs that are on the hatch...and are a perfect fit.


This model also has a very basic turret interior. For this build I'm not going to super detail the interior, but I did build the basic interior detailing that is supplied with the kit.


The kit supplies you with the main and coaxel guns, as well as their mantlet gun mounts. The kit is designed to assemble the guns and mounts prior to paint. doing this will make it very difficult to paint. I like to paint and weather the gun and the mounts separately.


The main gun assembles very easily and smoothly. The only mod that was made was the removal of the kit supplied gun muzzle with an armorpax resin version.


To do this I had to modify the mounts. The mounts have two pegs that lock into the main gun's receiver. These pegs were removed and were drilled out to allow the use of a long hex bolt to mount the gun in their place.


With this mod I can paint the two parts separately and mount everything together once complete.


The main gun's barrel will be protected with paper and tape to avoid any overspray when the tank goes into painting.


The tank's MG 34 mounting system is also very basic. One thing to look out for is that on the mount interior there are several large knock out marks that need to be snipped and sanded away, Failure to do so will result in the gun not fitting into the mount properly.


Another mod that was made to the mount was the addition of a small hole for the MG34's barrel bipod mount. I drilled the hole into the mount, otherwise I would have had to remove this detail off of the gun's barrel.


Once this was done the mount was added to the mantlet prior to painting.


The kit supplied MG34 is also a nice touch. The gun is the kit MG34 that is on the market, but is missing the runner's that contain the ammo drum, and barrel case.


One issue that I came across when building the gun was that the instructions for this component was extremely vague at best. Many of the items were not labeled properly...to avoid any headaches when building the gun I recommend having a pre built version on hand to use as a part reference.


One mod that I made was the replacement of the kit supplied plastic rivet with a wire brad for the feed cover. Just like on the M2 I feel that the plastic dragon version is too frail and can easily break during construction, or display. The metal pin is an easy, yet very good mod that can be made to your gun build for either this PZII version, or for your stand alone MG 34 gun kit.


After all of the mods were made the MG 34 was painted, weathered. For the gun's furniture I painted them to resemble red brown Bakelite, rather than trying to replicate wood.


Unlike the Main gun I will be mounting the MG34 after the tank is painted and weathered towards the end of this build.


Before I added the gun mounts, or the interior paint I made a quick mod to the two mantlet hatches. The kit supplied hatches have their hinge as a solid rod.


I decided to add the hinge slits to the rod, to do this I marked where the slits would go and while anchored in a vise I used a small back saw to carefully add the slits tot eh rod.


Once the slits were added the center hatch was mounted to the mantlet. The MG 34 hatch will be mounted after tank is painted and the MG is mounted.


I have also made two youtube videos describing these mods in detail


http://youtu.be/Ew2_tmAKWlE


http://youtu.be/8AnmIEL45xI


With the turret out of the way I have been working on the tank's fenders and fender details. Once complete this model will be ready for painting! More to come.

  • Member since
    January 2010
  • From: St. Louis
Posted by Shawn M. on Monday, November 19, 2012 7:16 PM

love the added details and mods you've done. Looks spectacular.

I love the smell of plastic in the morning

  • Member since
    January 2005
  • From: Las Vegas
Posted by dood_dood on Monday, November 19, 2012 7:20 PM

BITCHIN'!  I'm just sayin..........

  • Member since
    April 2005
Posted by armourguy on Thursday, November 29, 2012 6:57 PM

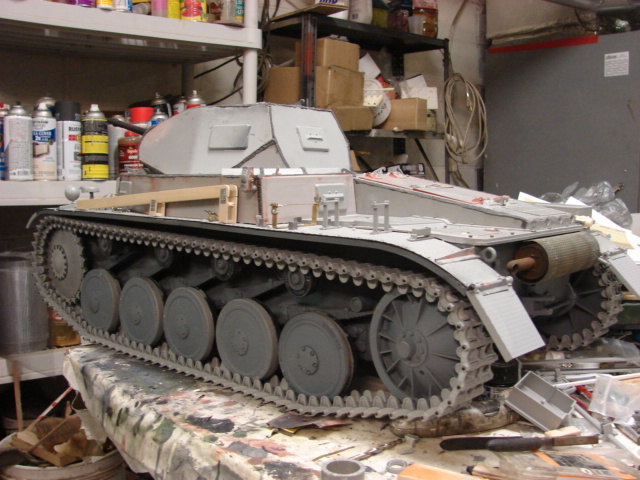
Thanks guys, It has been awhile since I made any updates on this build, but I have made lots of progress on the model which is now ready for painting.


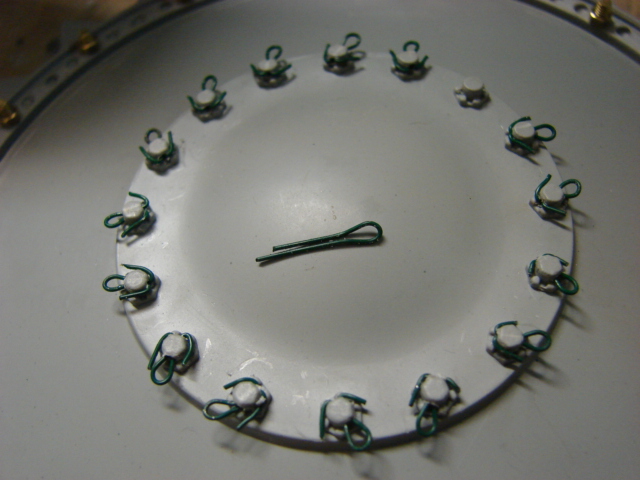
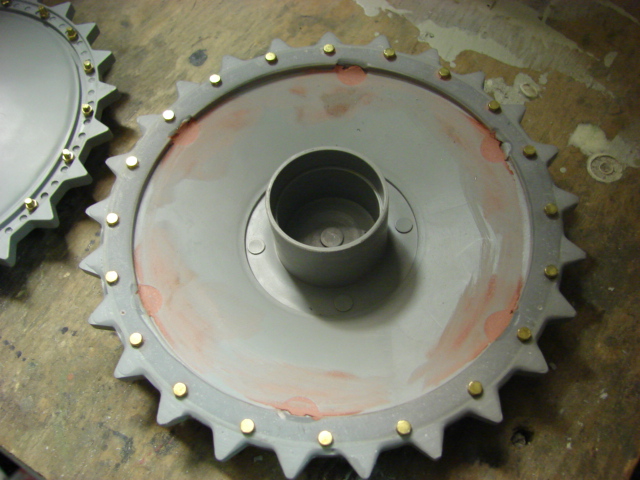
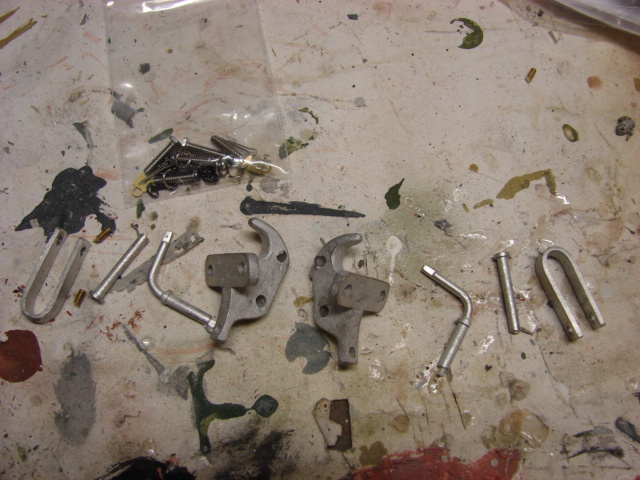
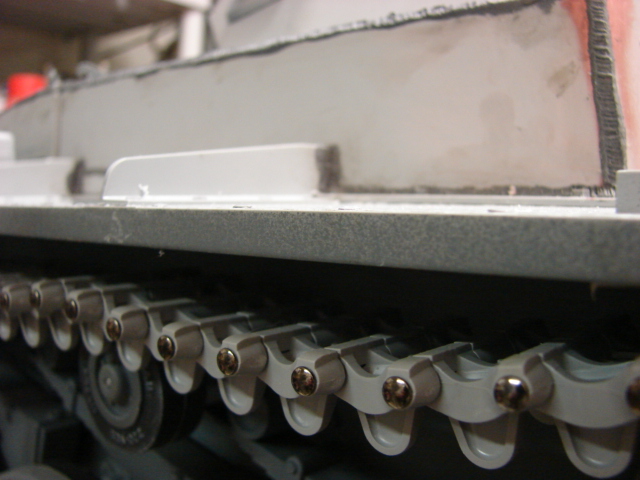
The model's sprocket details were completed. The Kit supplied sprockets have very basic fastener detailing on the tooth ring and the main hub.


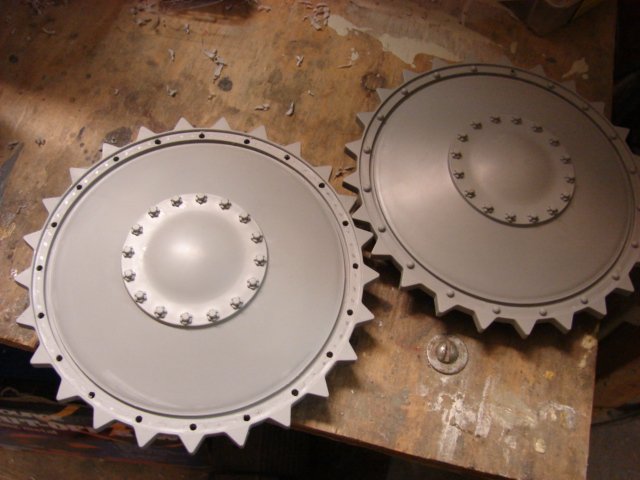
On the tooth ring the panzer II sprocket had many mounting holes, which are absent on the kit. these holes were added via a drill press. The holes are only present on the tooth ring, not on the sprocket itself, so when drilling these holes only make an indention with the bit and not to drill all the way through.


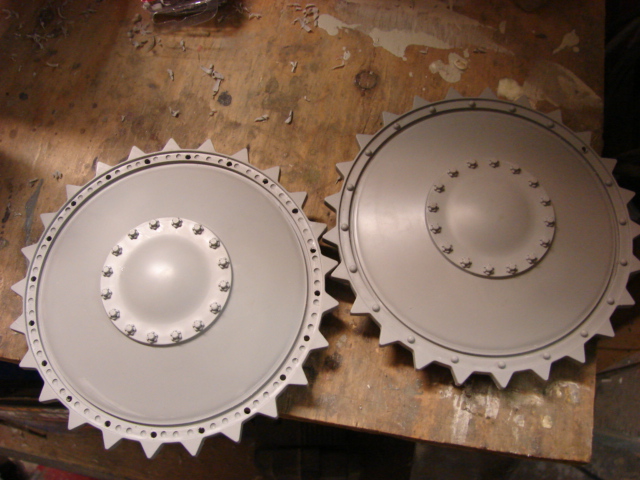
The kit sprocket's ring fasteners are only small plastic nubs, which were frilled out and were replaced with real brass hex bolts and nuts.


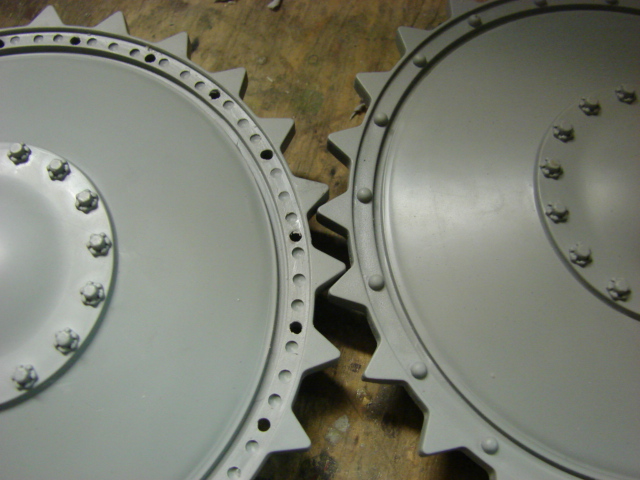
On the sprocket hub the kit has molded in castle nuts. The nuts themselves are detailed. To enhance them I drilled out a small hole in each of the castle nuts and inserted a small wire cotter pin that was scratch built out of wire. The pins are simply inserted in and the ends are bent.


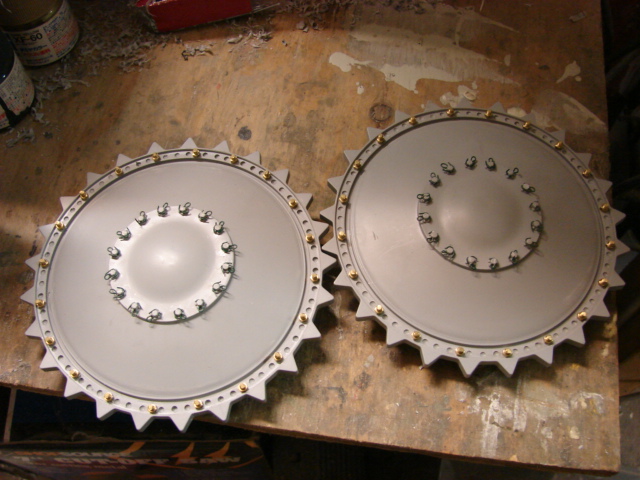
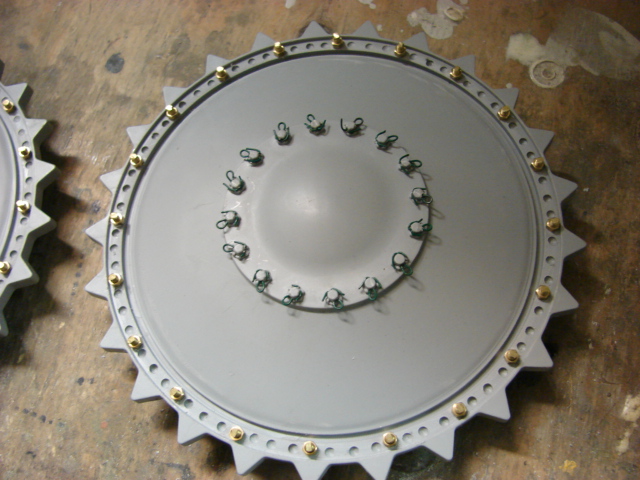
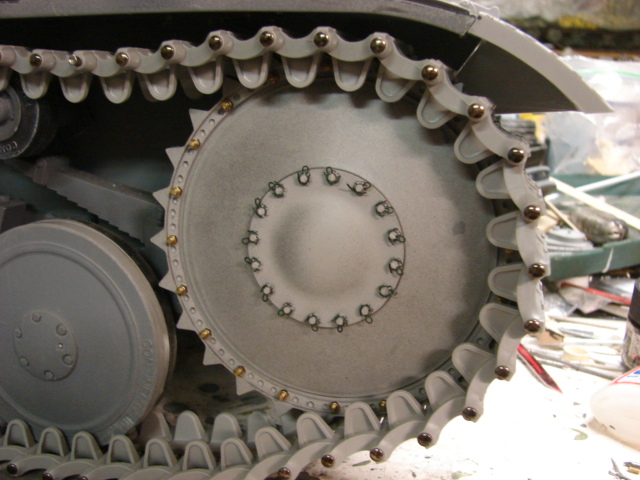
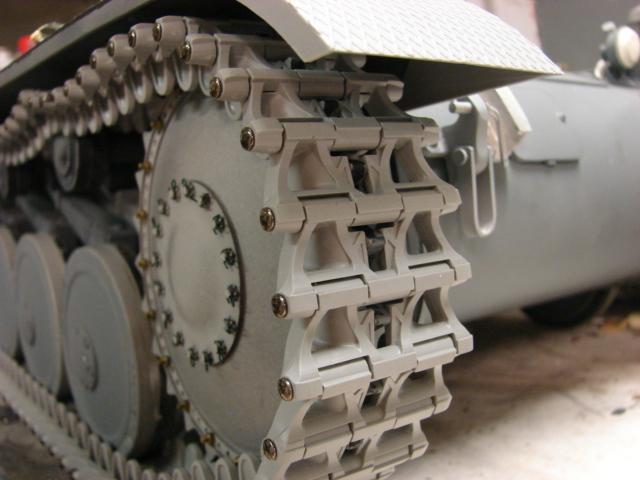
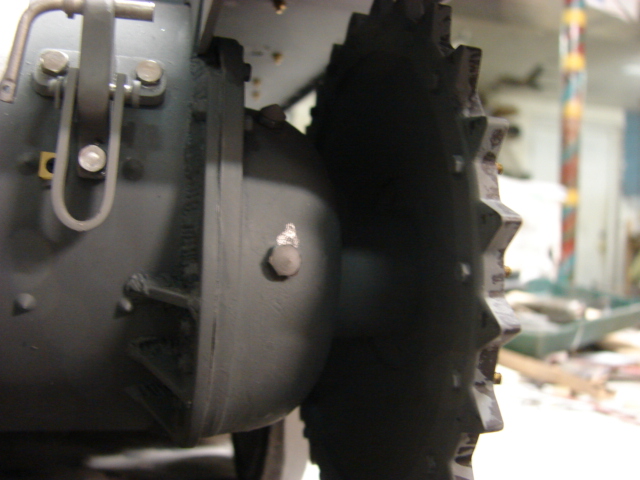
The completed sprockets are now ready for installation. The sprockets themselves will be added after the tank is painted.


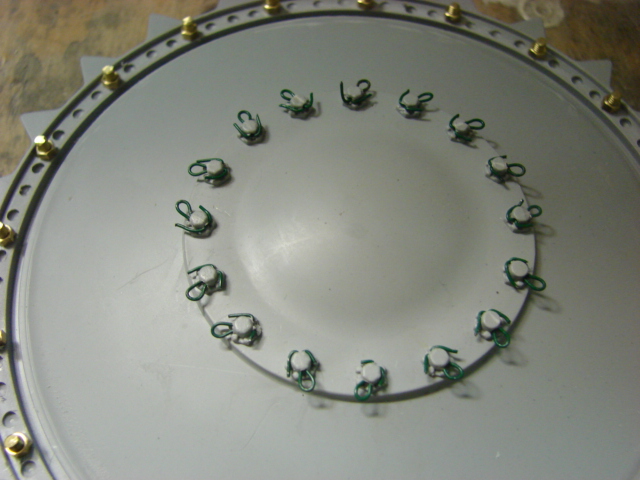
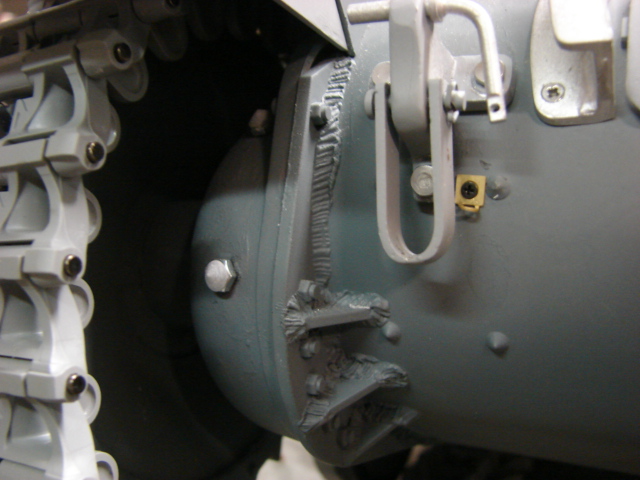
From what I have seen from my reference images the sprocket's fasteners are reversed, leaving the nuts on the exterior of the sprocket and the bolt head facing towards the sprocket's hull. Also as of note the kit sprocket has a hollow area behind the teeth, and the tooth ring. These areas were filled in with resin and were sanded flush.


The sprockets fit very well with the tank's tracks.


All of the tank's front hull detailing was also completed.


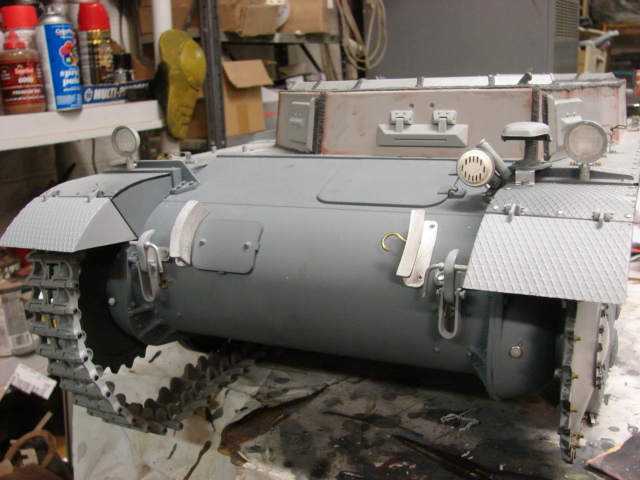
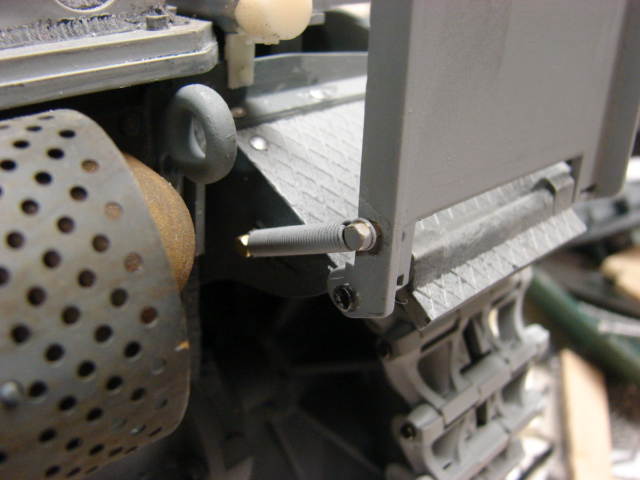
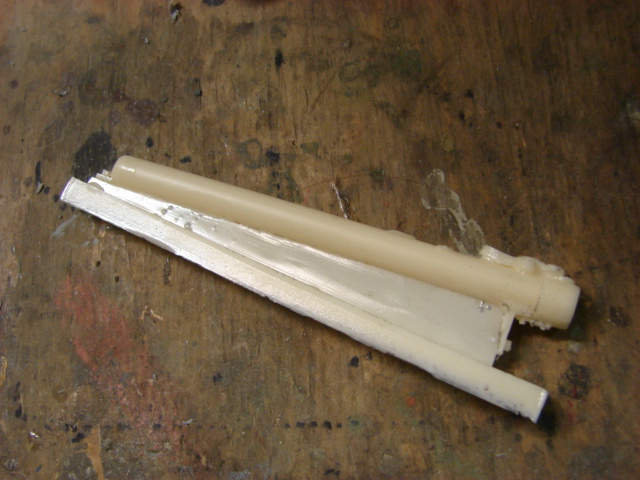
The DML kit omitted the tank's front tow shackle and tow cable mounts. For these part I used the white metal set from Sixth scale icons. The parts are very nice and assemble easy


The kit also omitted the final drive oil drains/ fillers. These two fittings were fabricated out of a Hex bolt and a turned resin cone.


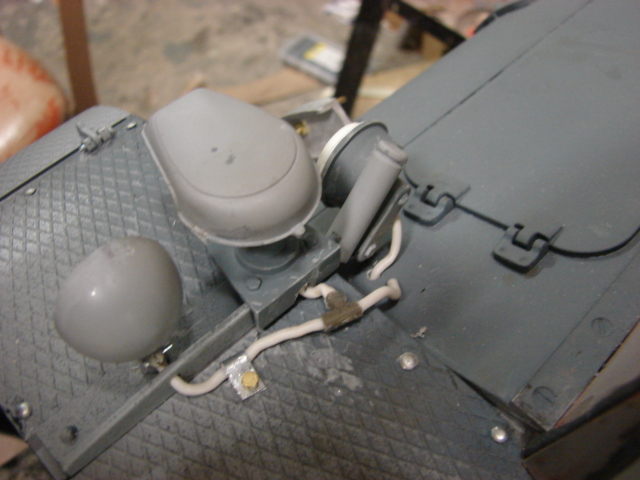
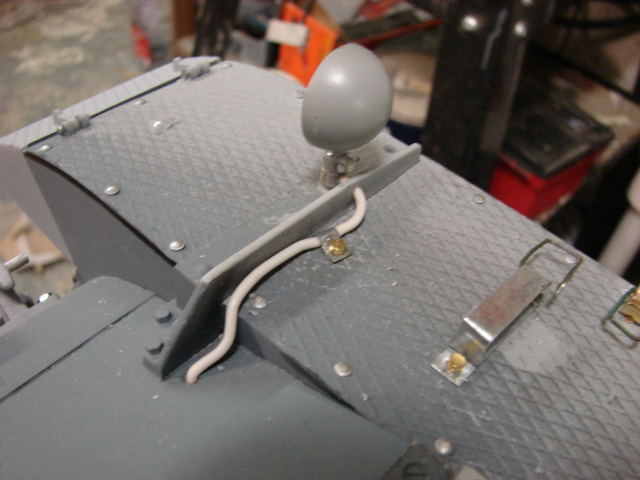
For the tank's head lights the kit supplies you with a basic set. The lights are hollow, but have a closed off black out face plate.


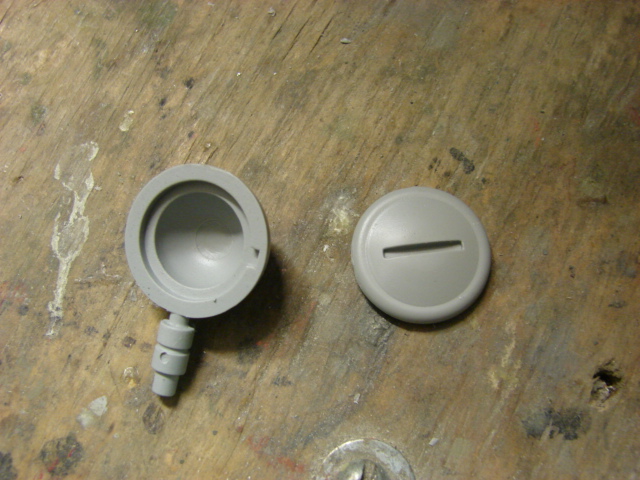
Since the lights were hollow I decided to open up the face plate and to add the detail of the head light lens. The face plates are hollowed out on the lathe


For the lenses I used two of my own clear resin headlight lenses. These lenses are off casts that were in the junk bin. These off casts were used because when the blackout lenses will be mounted the whole lens will not be visible so rather than using a perfect lens I recycled these ones.


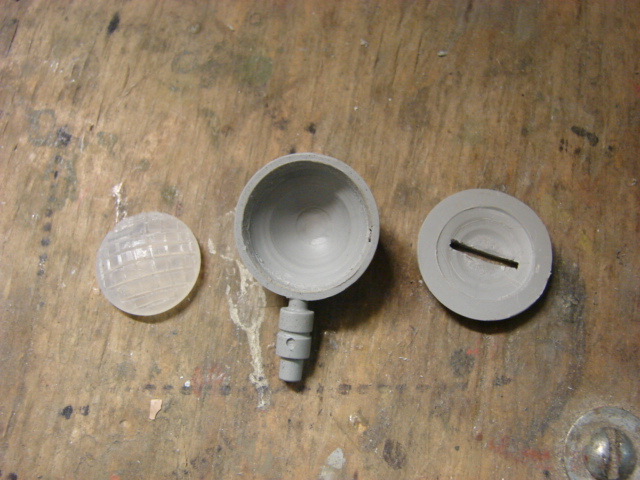
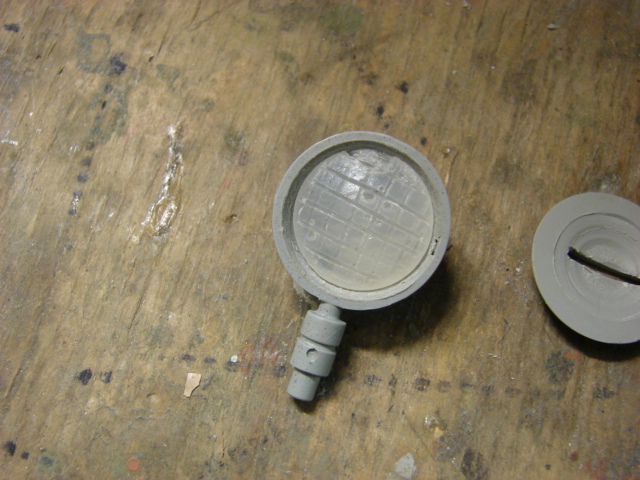
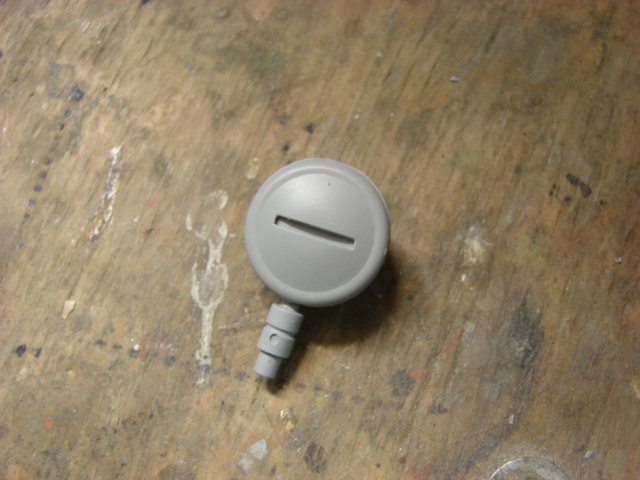
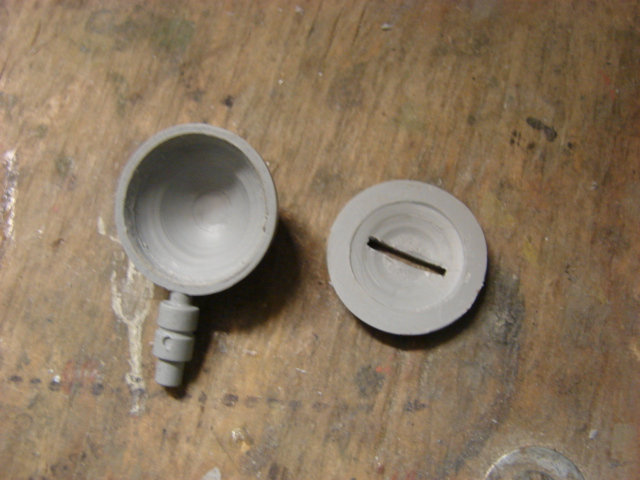
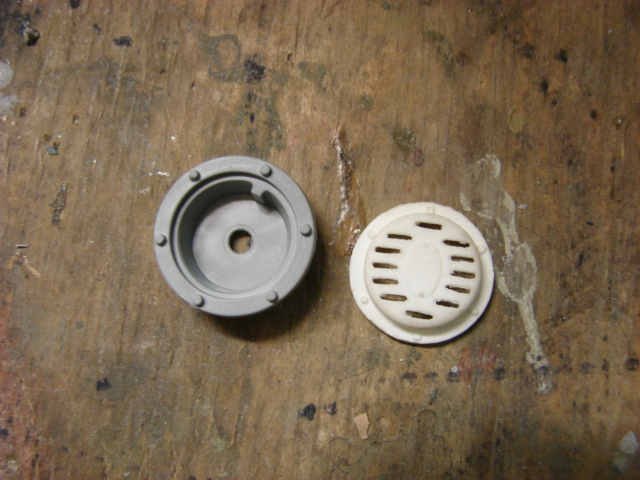
For the tank's siren the kit supplies you with a basic siren. The kit siren is composed of a faceplate and a dish back. The kit face plate has the perforations present, but are not all the way through. Instead of using the kit siren I replaced the kit face plate with an old Pazerwerk resin siren faceplate that I had floating around.


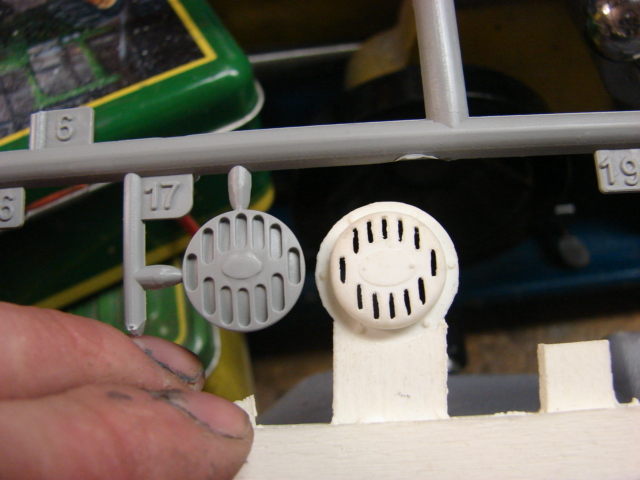
The panzerwerk faceplate features hollow slits which will add to the look of the siren.


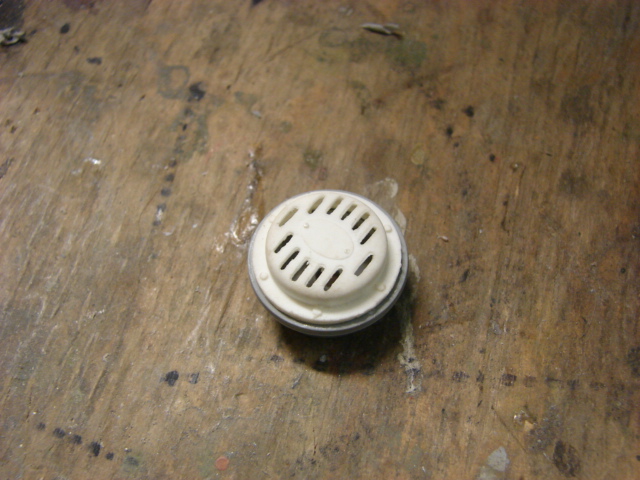
The back portion of the siren mount is hollow, epoxy was placed into the cavity and the lines were sculpted in. This was done before the siren was mounted.


Small tweaks were also made to the kit notek light.


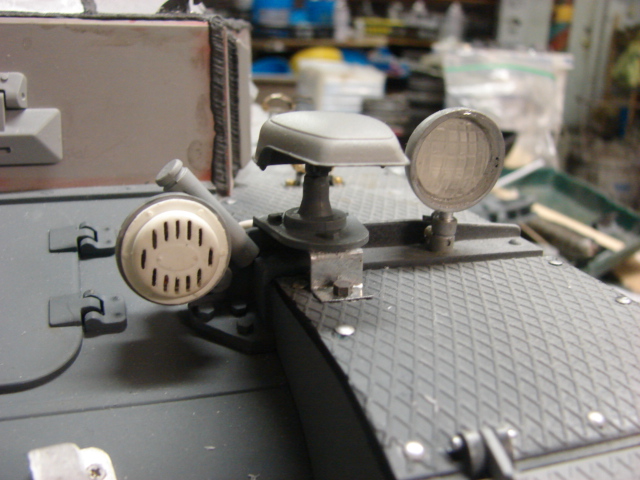
The last bit of detailing the was added to the lights was the addition of the power cables.


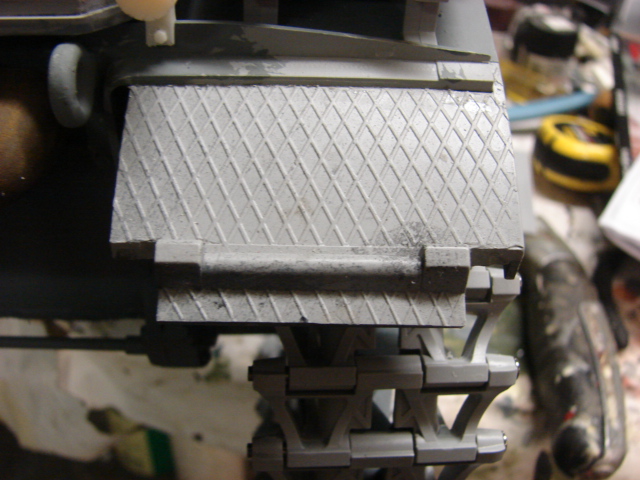
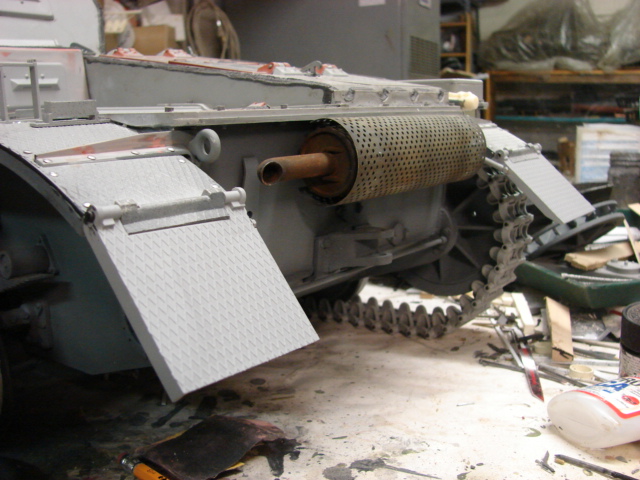
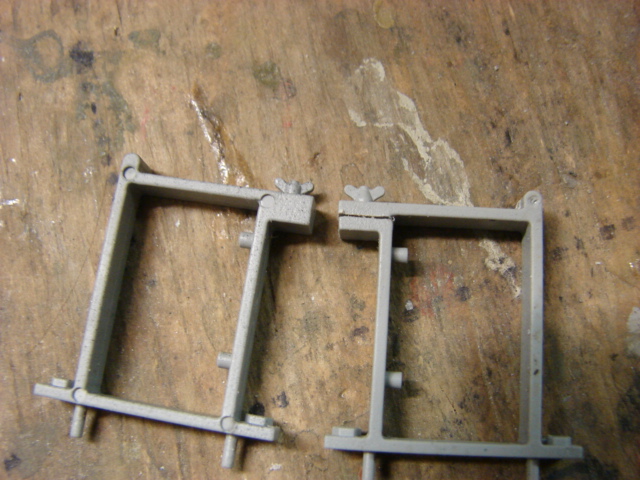
The tank's front mud flaps were also added. The mudflaps are included withy the kit and are designed to be non functional.


To make the mudflaps functional the molded in hinges were drilled out and pins were added.


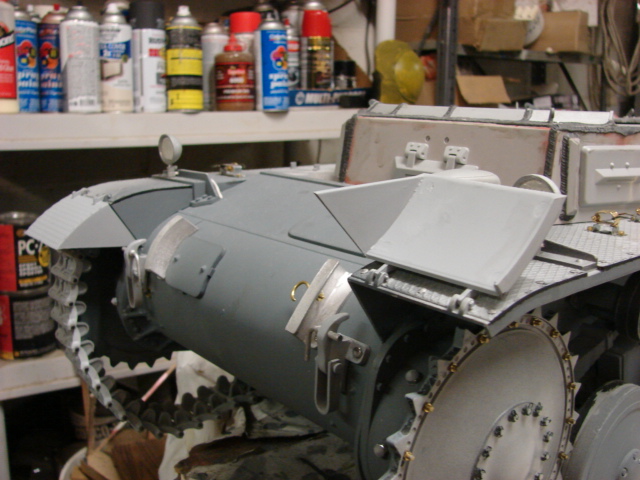
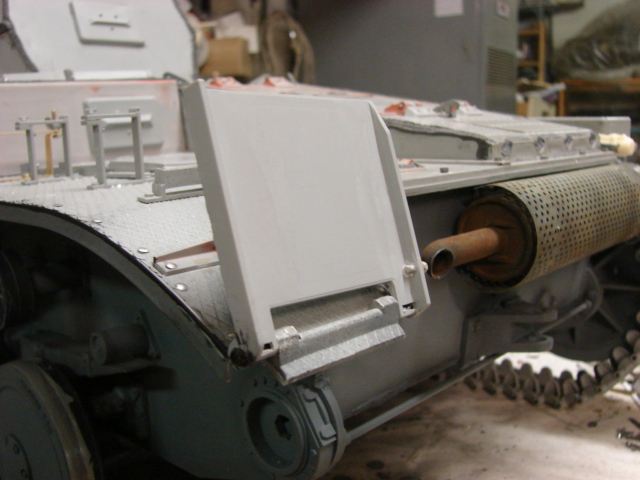
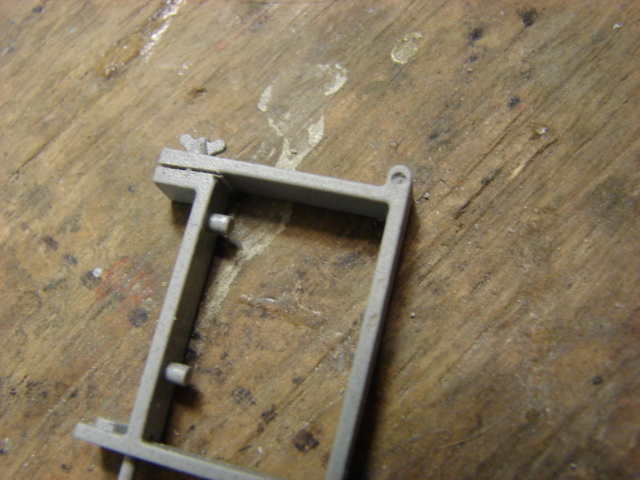
Like the front mud flaps the rear mud flaps were added, and were also made functional.


The rear flaps required more work, The kit is designed for the flaps to get inserted into small pegs on the fenders.


These pegs were deleted and the hinges were again drilled out.


Pins were inserted into the new holes making the flaps functional.


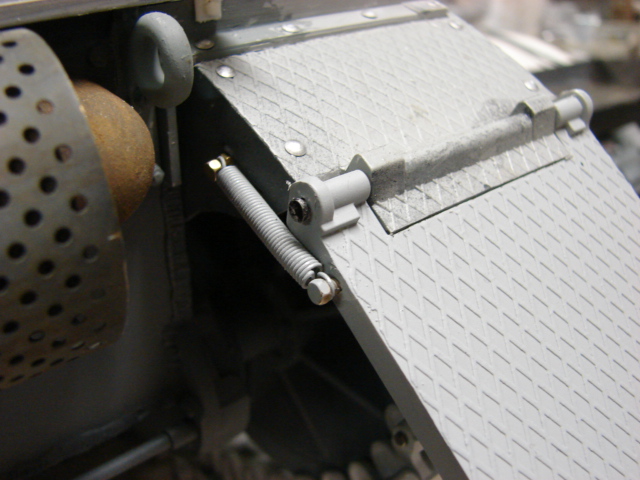
I decided to add an extension spring to the fenders. The spring is fully functional and keeps the mudflap in both the retracted and the open state.


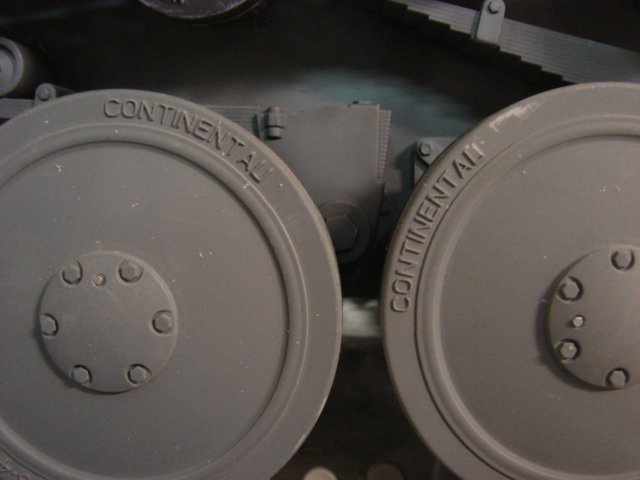
One other mod that was made to the tank's running gear was the modification of the molded in letters. To avoid any legal issues DML fudged the lettering on the tires. Spelling out the continental company name as CONTINENTAU. To fix a simple pass with an exacto turns the U into an L. This was done both to the road wheels and the return rollers.


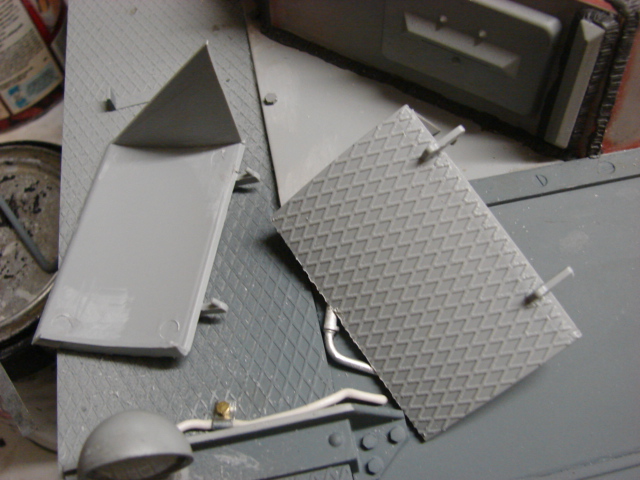
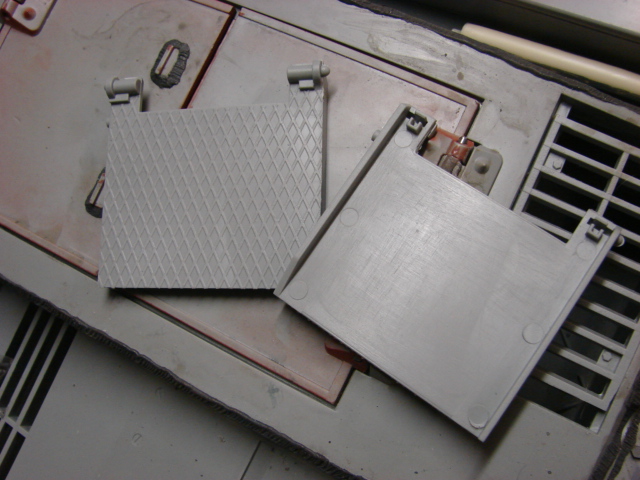
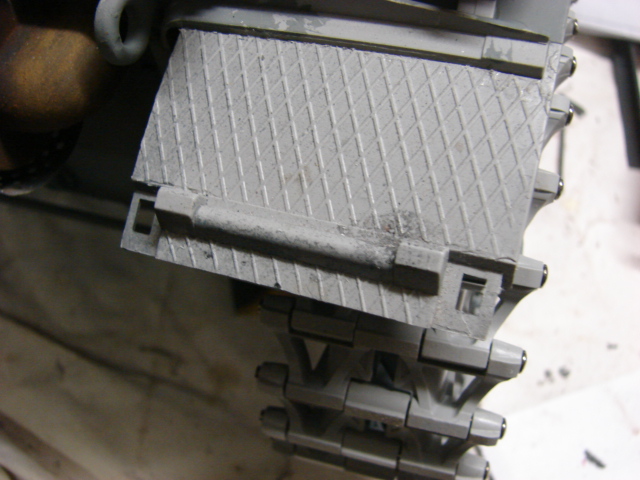
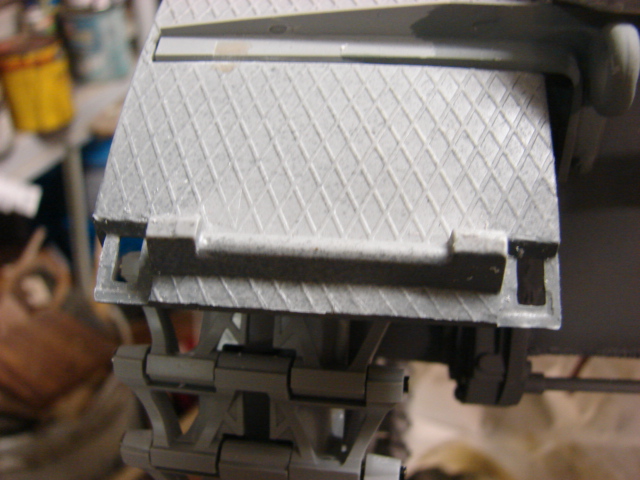
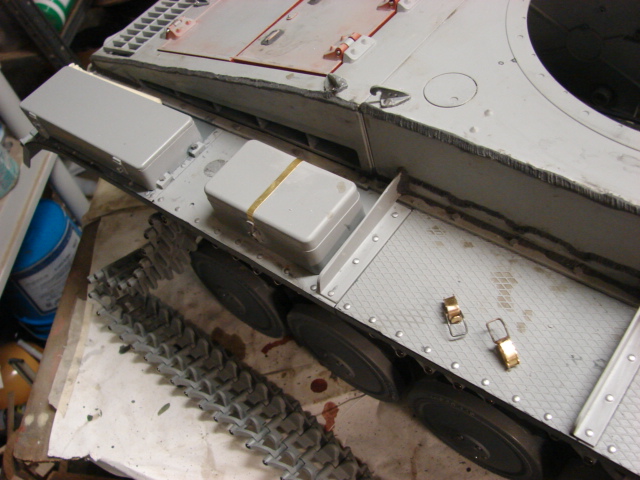
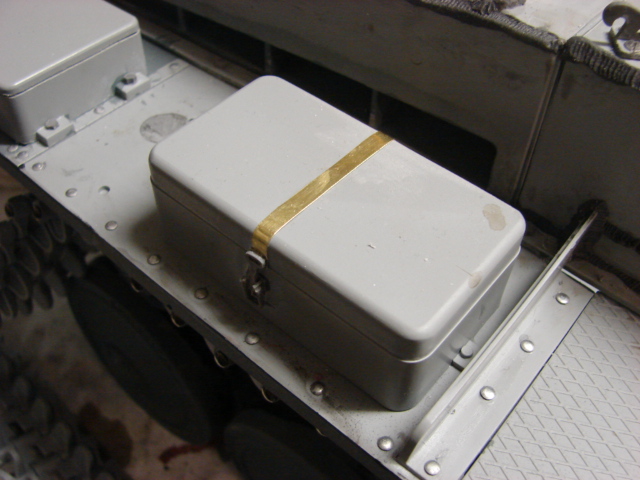
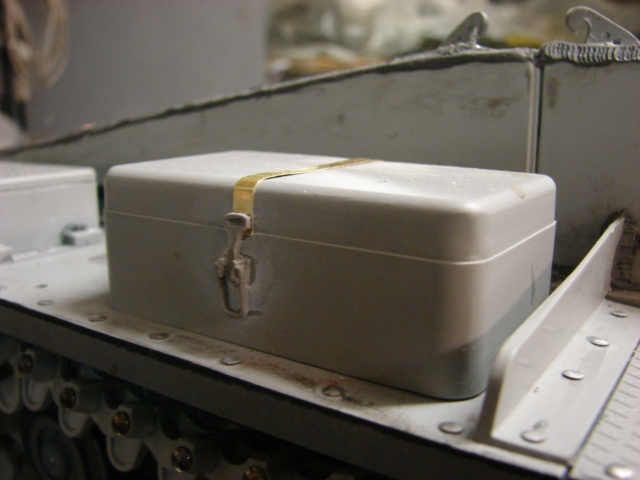
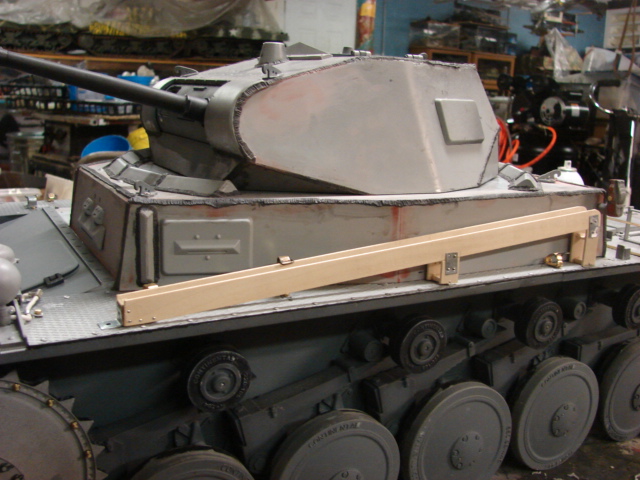
The rest of the fender detailing has been added, this would include the tool posts, storage boxes, and riveting.


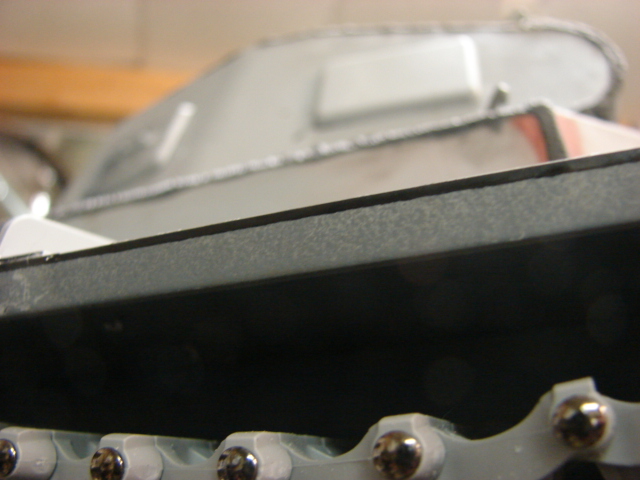
The fender's themselves are missing the seem line that separates the top fender diamond plate surface from the angle iron that would be running along the fender.


The way I added the seam line was I first tapped up the fender side, leaving only a small sliver towards the top of the fender.


Black paint was then brushed onto the fender.


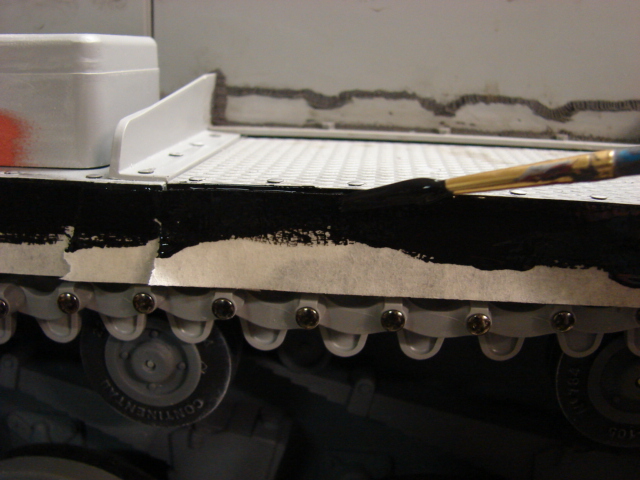
Once the paint dries the tape is removed leaving a strip of paint that creats the missing seam.


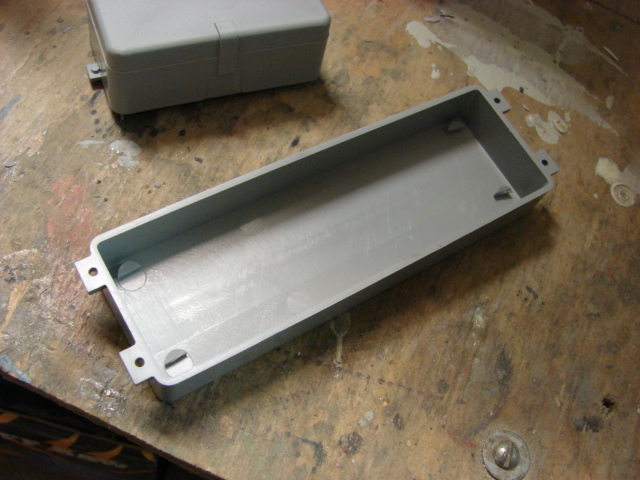
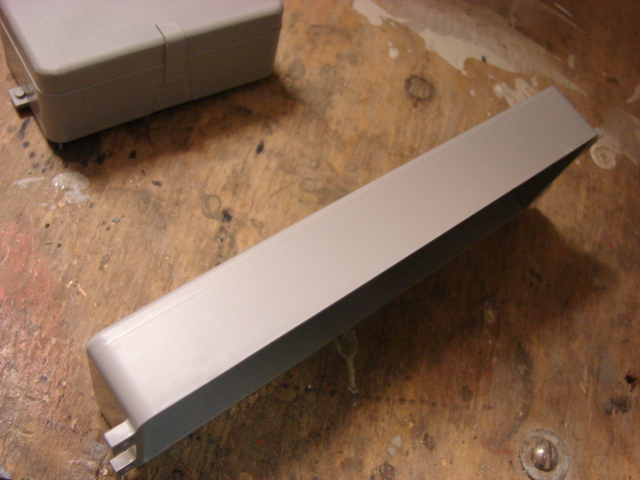
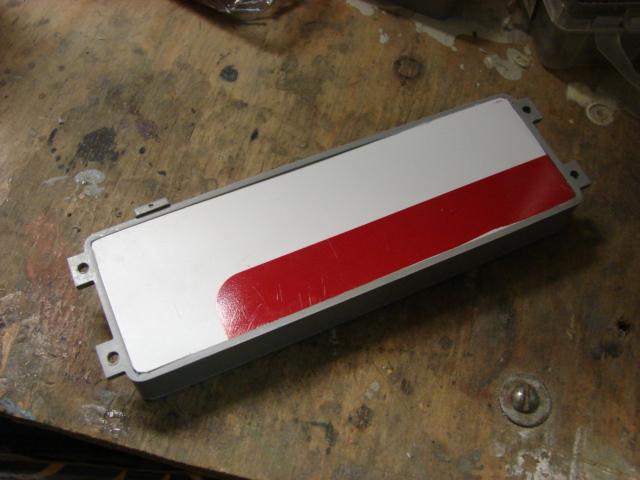
The kit supplies you with two large storage boxes.


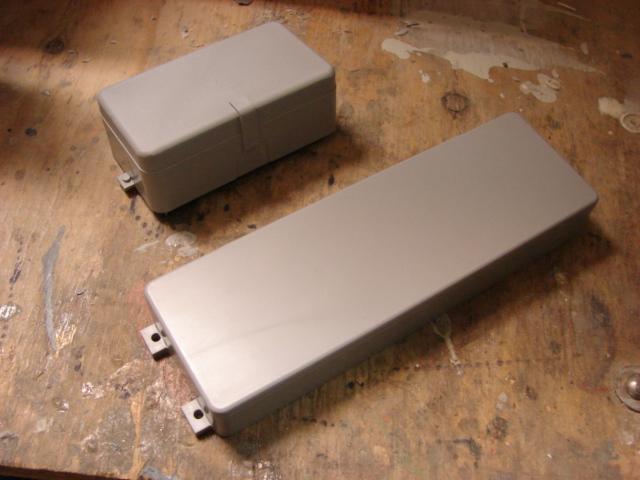
The large box is hollow, and is missing the seam where the lid meets the box's body.


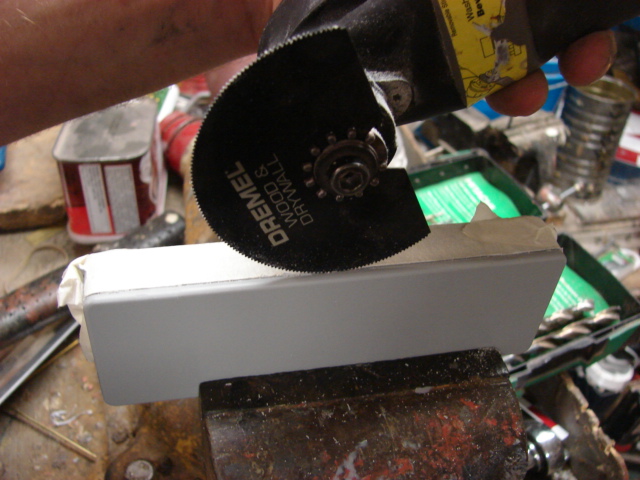
To add the missing seam tape was used to mark the area where the lid is separate from the body. The seam line itself was added via the multimax


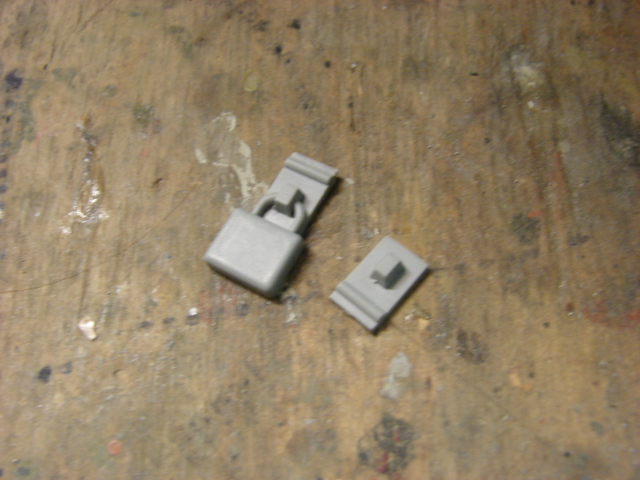
small mods were also made to the box's latch details.


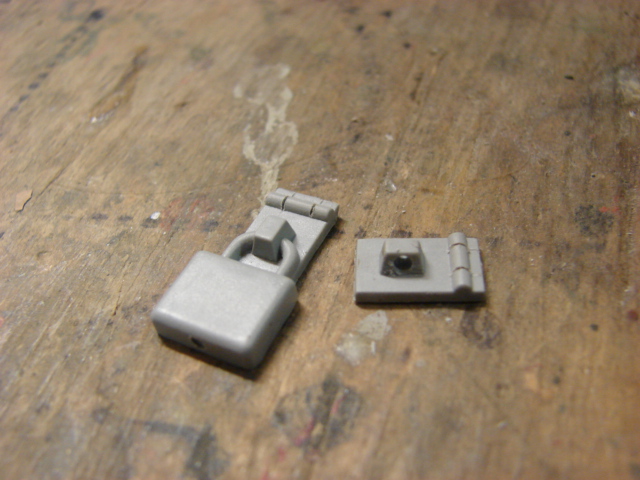
Because the bottom portion of this box is visible a styrene floor was fabricated and mounted.  


The smaller box was missing it's strap detail. A new strap and latch detail was fabricated.


A Armorpax resin MG barrel storage tube was added as is with no needed mods.


The tank's jack mounts were also used. The kit jack mounts have most of their detail, but can be enhanced a bit. To enhance them I added the slit lines on the molded hinges and separated the latch. 


The kit does supply you with a jack block. The Jack block will not be used. A new jackblock will be fabricated out of wood, and new jackblock mounts were added and fabricated out of brass.


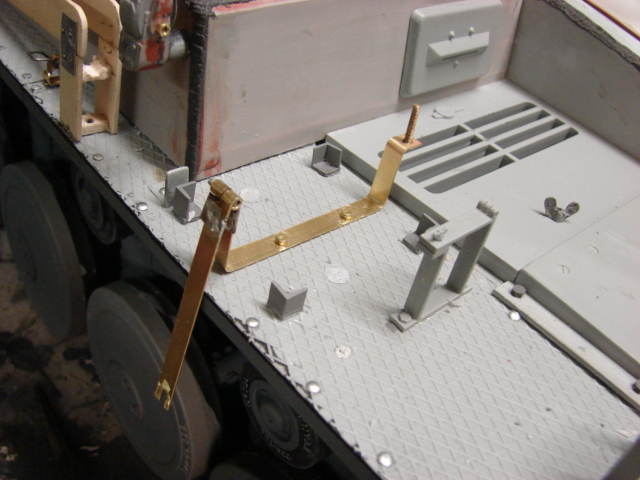
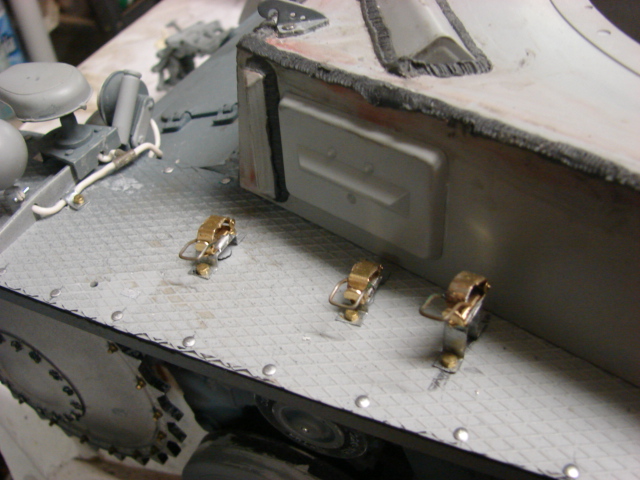
The kit also supplies you with the tools. The kit tools have molded in handles, and molded in latches. Because I will be replacing the handles with wooden ones new brass latches were added and bolted to the fenders.


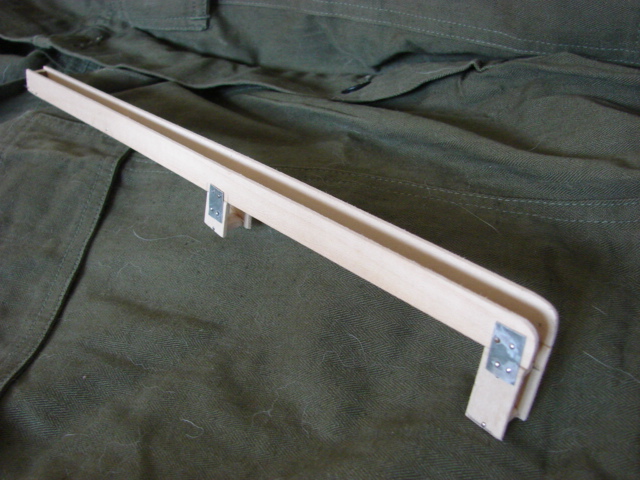
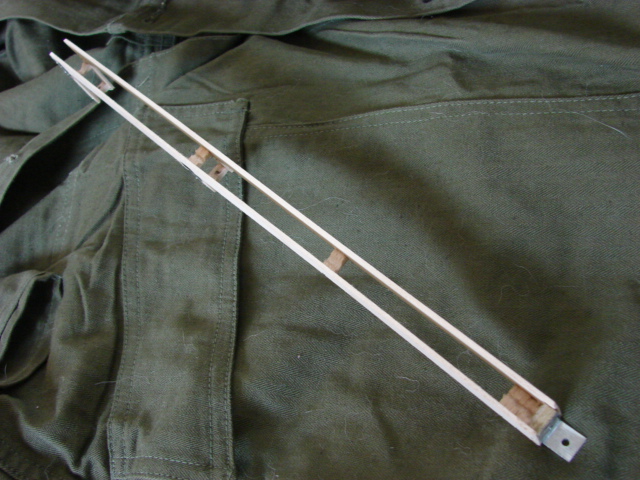
The kit also supplies you with the antenna retract channel. On the real vehicle this part is made from wood. So rather than using the kit supplied version a wooden version was fabricated.


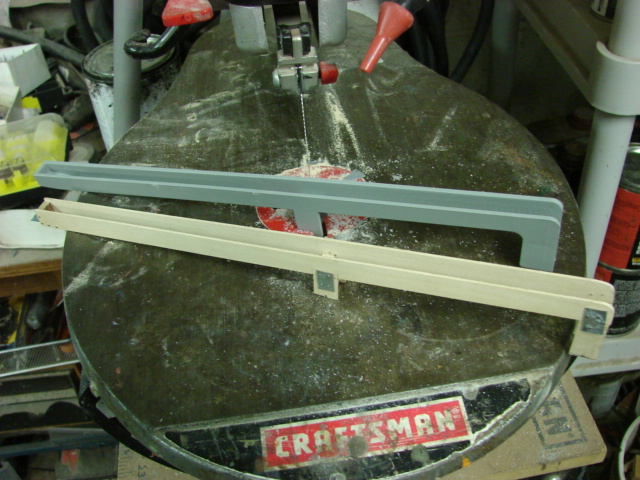
The channel itself has also been added to the part listings. http://eastcoastarmory.com/pzii.htm


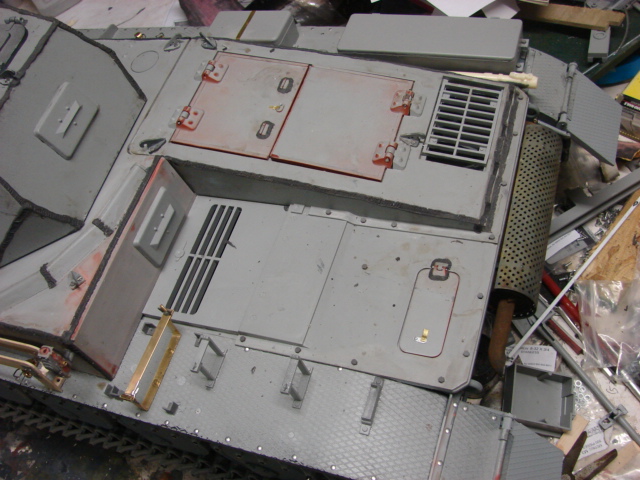
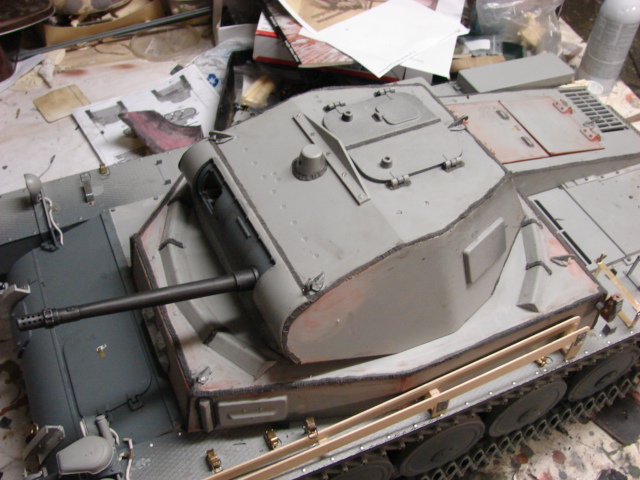
One part of the kit that needed improvement was the way the tank's turret mounts to the hull. The hull has several bulges that grip the turret to the lower hull.


This system is not very effective, and is quite flimsy.


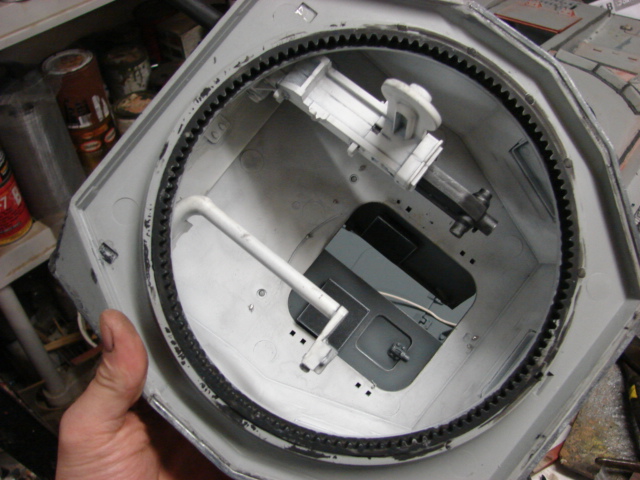
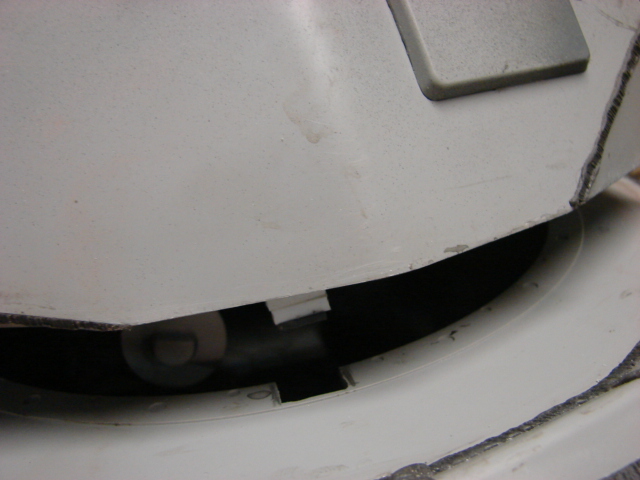
To make the turret lock on I used the same system that is found on 1/35th scale tanks. Two locks were added to the bottom portion of the turret, and two keys were cut out of the hull's roof.


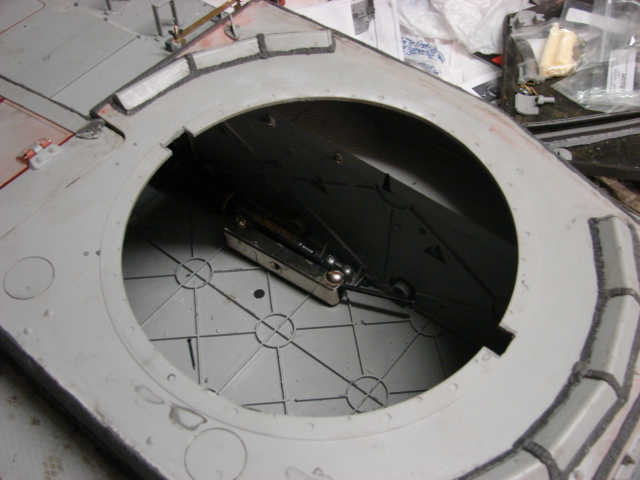
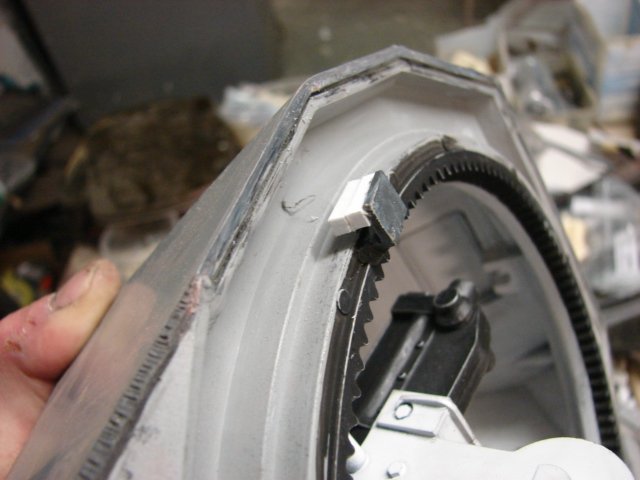
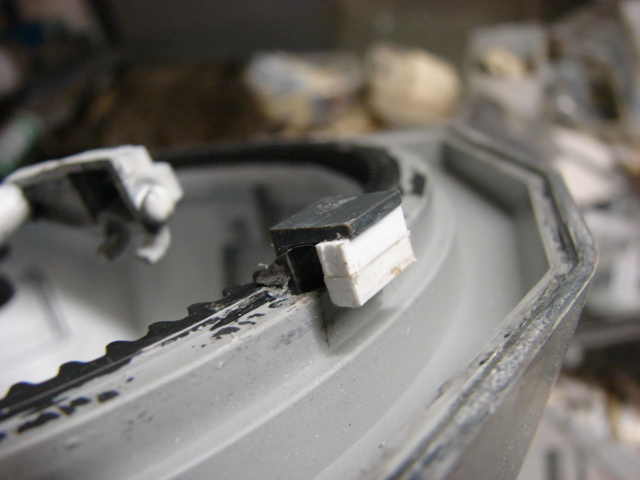
The turret simply slips into the keys and locks on securely.


One change that I had to make to the model involved the welds that I added previously. The upper hull plate welds interfered with the turret and were in the wrong place. These welds were moved to the corners where are where they are on the real vehicle...and were out of the turret's way.


Another change that was made was upon further research I found that the top plate splash guard was not welded to the top deck, rather it was bolted from the inside  . Because all of my welds connecting the rails to the plate were removed.


the model will be heading into painting tomorrow. Also I'm editing several update videos that will be added to youtube once ready. More progress to follow. 

  • Member since
    April 2005
Posted by armourguy on Friday, November 30, 2012 10:33 PM
I forgot to mention in my last post, but I was also able to make the antenna base retract. 
To make the base retract I added a hex bolt that threads into the base. Because of the tight fit in that location of the hull the head of the hex bolt was turned on the lathe so it would fit better. The molded in hex bolt detail was also replaced via a brass hex bolt, which has a better appearance. 
The youtube update videos and tutorials have also been uploaded.
http://youtu.be/HCfPVuM_yMw
http://youtu.be/JaDtVNqJ-Iw
http://youtu.be/xn2SkhPd2Jg
I took advantage of the fair weather today and was able to add the tank's primer and base coat of Panzer Grey. The tank's lower hull, rear plate, and gun mantlet were all masked off.
The primer gives a better surface for the paint to stick to the plastic body. 
The tank now sits in it's base coat of Panzer grey
The model will now get it's markings, followed by the weathering. Once done the tracks, and tools will be added completing this model!

  • Member since
    April 2005
Posted by armourguy on Monday, December 3, 2012 6:37 PM

The tank got it' markings, weathering and now sits on it's tracks.

For the tank's markings I went with the 7th Panzer division. All of the tank's markings were applied via home made stencils and are painted on.

The kit does supply you with three ghosted cross decals, but I always aviod using decals on large scale models. The stenciled markings have a more realistic look and feel, as they are applied in the same manner as the real markings.

One of the reasons why I went with this unit was because they used a white stripe on the engine hatch for aerial Identification.

After the markings were added the tank was weathered.

The zerk fittings that were added to the road wheels and the return rollers were painted in red, (which is common on all of these vehicles).

On the front a clear piece of lexan was added to the Notek light.

The tank's antenna channel was also mounted and weathered. To weather the channel I rubbed the edges down with sandpaper revealing the natural color of the wood.

For the tank's tetra fire extinguisher I rep;laced the kit supplied unit with a resin version from Armopax. I felt that the kit supplied version was too large and clunky.

The tank's rear hull detailing has been added. This would include the rear tail light and the tow pin. Both of these parts are kit included.

On the tow pin a chain was added to the pin connecting it to the tow hitch.

On the model's front the Sixth Scale Icons cable was added to the cable mounts and the sixth scale icons tow hooks had their supplied chains added completing them.

I'm now working on the tank's wooden tool handles. Once added along with the antenna the tank will be completed :D! More to come

  • Member since
    April 2005
Posted by armourguy on Friday, December 7, 2012 7:09 PM

I completed the tank the other day, but due to the bad weather I was unable to take some outdoor shots :(.

All of the tank's tools have been added, because the tool posts were changed some modifications were made to the handles.

I replaced the kit antenna with an antenna made from brass.

I made two youtube videos which go into more detail the work that was made to the tools, and the finishing details.

http://youtu.be/8QiQK0n_718

http://youtu.be/LZGNnt7VqW4

As soon as the weather clears I will be able to get some outdoor shots. Until then I will clean up the shop, and start my next projects. more to come.

  • Member since
    April 2005
Posted by armourguy on Monday, December 10, 2012 5:24 PM

I was able to take advantage in the small break in the rainy weather to get some out door shots.

and I was able to make a quick outdoor dio

I will now be making the tank's gallery webpage. Once complete, this project will be over and it will be off to the next one :P

JOIN OUR COMMUNITY!

Our community is FREE to join. To participate you must either login or register for an account.

SEARCH FORUMS
FREE NEWSLETTER
By signing up you may also receive reader surveys and occasional special offers. We do not sell, rent or trade our email lists. View our Privacy Policy.