SEARCH FINESCALE.COM

Enter keywords or a search phrase below:

Tiger Questions and build progress, May 5.

6356 views
23 replies
1 rating 2 rating 3 rating 4 rating 5 rating
  • Member since
    April 2005
  • From: Gothenburg
Tiger Questions and build progress, May 5.
Posted by JohanT on Friday, March 29, 2013 3:09 PM

Hi,

I have some questions for thous of you who think the Tigerfibel is still the best reading around... 

Q1. The drive wheel, I have seen some where the sprockets are aligned to the bolts and some where they are not. What is correct? If it changed during the production run when was the change?
Q2. Is there any logic behind how the smaller and larger idler wheels where used?
Q3. Zvezda provide you with 2 stencil choices in there recent 1/35 release, white outline 114 and white outline/black center 332. Unfortunately there is no mentioning of what units. Would anyone have any information or reference pictures?

The only pictures I found on the Bundesarchiv was a picture of 114 beeing towed by a Famo.
Interesting but no details in the picture.

Very Best Regards
Johan 

  • Member since
    November 2004
  • From: Cat Central, NC
Posted by Bronto on Friday, March 29, 2013 3:22 PM

The Spielberger book  "Tigers I and II and Their Variants" will answer your first 2 questions, the Zvezda markings I'm not sure about.

  • Member since
    December 2002
  • From: Bury St Edmunds, Suffolk, England
Posted by Bish on Friday, March 29, 2013 3:24 PM

1. I couldn't find any referance to a change is drive sprockets other than the centre being altered early on.

2. I could find any mention of the idler's being altered. But looking at a couple of images, it seemed the smaller one was used with the netal rimmed road wheels.

3. Numbers by themselves mean nothing. Most units used the same numbering system and style of numbers could also be similar. Is the kit an early mid or late production model.

I am a Norfolk man and i glory in being so


On the bench: Airfix 1/72nd Harrier GR.3/Fujimi 1/72nd Ju 87D-3

  • Member since
    October 2008
  • From: England
Posted by P mitch on Friday, March 29, 2013 3:30 PM

Johan

Looking at the info I have the early Tigers had the bolts aligned and later ones not, I'd guess the idlers fall in with that, smaller for later ones. Have a look at the sites below for info on markings

tigers.htm

tigerlinks.shtml

I'm no expert on these I used mainly by reference book Tiger Tank the Haynes manual all about the Tiger 131

Phil

"If anybody ever tells you anything about an aeroplane which is so bloody complicated you can't understand it, take it from me: it's all balls." R J Mitchell


  • Member since
    May 2005
Posted by pyrman64 on Friday, March 29, 2013 3:39 PM

Greg H

"There is many a boy here today who looks on war as all glory, but, boys, it is all hell." Gen. Wm T. Sherman (11 April 1880, Columbus, Ohio)

  • Member since
    April 2005
  • From: Gothenburg
Posted by JohanT on Saturday, March 30, 2013 4:12 AM

Dear all,

thank you for helping out!

I could not find the information on David Byrden's Tiger1 and for some reason I got a 401 on Alan Hamby's site.

But the link to Jentz & Doyles listing did the trick.

The drive sprocket changed in April 43 to a "star pattern" and the small diameter idler was part off the change to steel rimmed road wheels.

Bish: Zvezda call this Early Production.

The stencil marking for 332 includes a double Balkenkreutz for the stowage bin indicating that this is SHPzAbt 503. This is supposed to be all over Dessert Yellow.

The one of picture I have of 114 is Bild 101I-022-2926-11A Sowjetunion.- "Unternehmen Zitadelle".
This is also 503 but it is very difficult to see any detail, and the turret number is black with white outline.
  

Enclosed a picture of # 231 in what seems to be an all over yellow scheme. There is no mentioning of the unit appart from that it bellongs to Heeresgruppe Nord.

My current thinking is that I go with this one :)


Very Best Regards
Johan 

  • Member since
    May 2010
Posted by Shawker on Saturday, March 30, 2013 2:54 PM

here is another site it is in both English and German

www.tiif.de/index.php

  • Member since
    January 2008
  • From: Austria
Posted by Byrden on Sunday, March 31, 2013 3:42 AM

Re. the sprocket. Which bolts do you mean?

If the inner 5, this was random.

If the outer ones, they were aligned with the teeth for just a few vehicles at the very beginning. The APG Museum Tiger has one of these sprockets. Yes, I said one, not two.

The small idler was introduced shortly after the steel road wheels.

Re. the decals. JohanT is correct about "332". The bull logo implies that "114" is from s.Pz.Abt. 505

www.tiif.de/thread.php

(I don't think either of the real Tigers match the kit exactly.)

David

  • Member since
    April 2005
  • From: Gothenburg
Posted by JohanT on Wednesday, April 3, 2013 4:13 PM

Thank you for the links guys and thank you for your input David.

I was thinking about the inner bolts, the russian guys keep coming back to a star pattern - but I will go with randome :)

#114 off 505 looks interesting and I will try this one.

From the pictures I can see the showel on the front, simplified style Fifel's, mine throwers and 7 spare tracks.

According to Zvezda the paint scheme is Red Brown in broad streaks over Dessert Yellow.

I would greatly appreciate any further input.

Here is progress so far;

The upper hull was badly warped
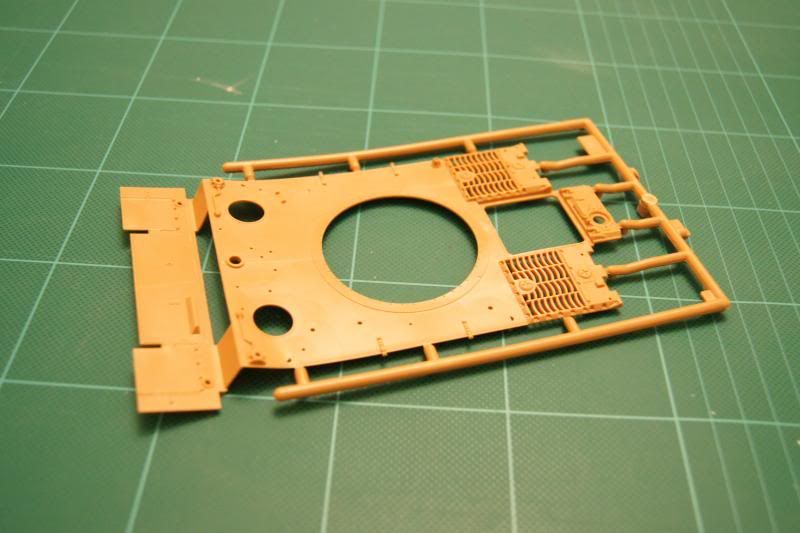
But I think I managed to reinforce it with some stripes from an old CD cover.
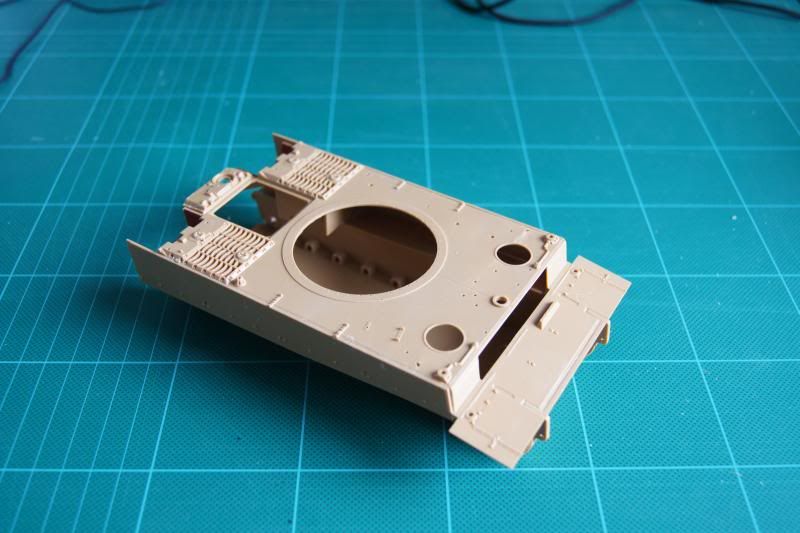
There are some sink marks on visible areas such as the drivers front shield and the rear plate but nothing that filler cant fix.

More confusing is the the fact that although we get a detailed turret the coaxial MG is missing inside.

The radio operators MG is detailed though, same way as Dragon do it so I just swithch the two.

My main problem is shown in the picture bellow
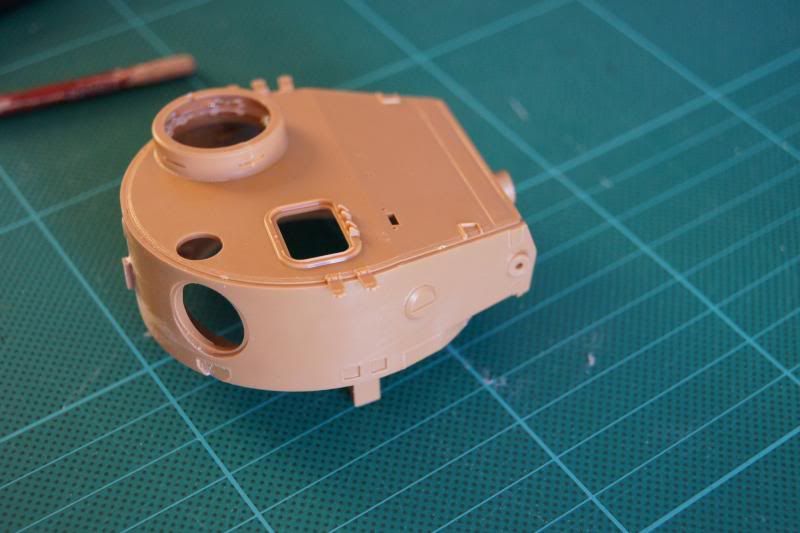
The turret roof sits slightly over the turret walls, this does not look OK for this version of the turret.

I will try to chim it with some evergreen strip styrene.

Anyway, thank you all for stopping by and taking interest!

Very Best Regards

Johan

Edited 2013-04-03 23:29.
I got myself a second copy today and the hull was correctly packed with no sign of warping. Monday-issue. 

  • Member since
    January 2008
  • From: Austria
Posted by Byrden on Wednesday, April 3, 2013 5:25 PM

The turret roof should be level with the top edge of the walls. Is there some way to thin the bottom edge of it so that it sits in deeper?

About the sprocket, let me correct and explain what I was trying to say.

There were 5 bolts in the central area. They could be aligned with the 10 arms, or they could be aligned with the holes between the arms, this was random.

The shape of the central area could be a flat star or a dome. For this version, I think a star is correct.

The outer bolts were always aligned with the teeth.  The arms were originally aligned with these bolts, but after making just a few sprockets, they moved the arms to NOT align with these bolts.

David

  • Member since
    April 2005
  • From: Gothenburg
Posted by JohanT on Friday, April 5, 2013 1:05 PM

David,

Thank you for clarifying this.

I thought it was about the alignment of the inner bolts, so thanks for the support!

The supplied part has the star pattern, I am afraid I could not get this very well in the picture bellow.

In order to level the turret roof with the edge of the wall I decided to shim the turret wall.

Shaving of the roof or trying to deepen the recess seems risky and also the turret wall of the Zvezda is slightly lower the the Dragon or Tamiya.

I would not know which one is correct though...

Very Best Regards

Johan

  • Member since
    January 2008
  • From: Austria
Posted by Byrden on Friday, April 5, 2013 2:26 PM

It should be 23.3 mm tall.

David

  • Member since
    April 2005
  • From: Gothenburg
Posted by JohanT on Saturday, April 6, 2013 3:15 AM

Now it is :)

Thank you for your advice and support!

Very Best Regards

Johan

  • Member since
    April 2005
  • From: Gothenburg
Posted by JohanT on Sunday, April 7, 2013 2:20 PM

Hi again,

very little progress this weekend, the sun has been shining and the winter is finally losing the battle.

Work on the main body continues, unfortunately I am out of my favorite primer.

Not sure if i need to do something about the back plate protruding over the engine deck, happy to take advice on that. I guess I missed that when I was fighting the warped hull...

I started to work on the road wheels. I had conveniently forgotten that there are 96 of them :)

Thinking about picking up the idea that Karl has followed through on the Jagdpanzer IV and leave all off the inner wheels in red primer.

For that purpose I got myself a standard grade automotive primer, trying that out on the tracks atm.

One question for you, the instructions say that the overall color should be Humbrol 93 Dessert Yellow (Zvezda #18). Would that be Tamiya XF59 Dessert Yellow? I was expecting Dark Yellow (Dunkelgelb nach Muster)? 

Thanks for stopping by, your comments and criticism is always welcome!

Very Best Regards

Johan

  • Member since
    April 2005
  • From: Gothenburg
Posted by JohanT on Sunday, April 14, 2013 1:25 PM

Hi again.

I had to work out of the German office so I can only report very little progress.

The Zvezda kit continues to surprise me, they have actually gone through the effort of giving you cast numbers for the track holders on the turret.

But then there seems to have been a problem in the mold of the turret roof, to little material in the tool leaving me with a gap that has to be filled manually.

This is anoying since the kit is really doing itself injustice with this mix of excellent detail and yet fairly basic problems.

As you can see I have had to fill some sink marks on the drivers plate as well.

I am using the screens from The Great Wall Hobby set # 35017.

The screens are top notch and you get a gun tube in the kit as well.

So now I am thinking that I might break away from my initial idea about going OOB.

I had allmost decided to go with my gut feeling that when the Zvezda guys talk about Dessert Yellow they actually mean Dark Yellow.

Until I found this article hsfeatures.com/tigeriearlydj_1.htm

That is a great result using XF59 rather the XF60.

Thanks for looking by, your comments and suggestions are more then wellcome.

Very Best Regards

Johan

  • Member since
    July 2004
  • From: Texas
Posted by wbill76 on Monday, April 15, 2013 10:53 AM

Making good progress on this one Johan, nice! Beer

  • Member since
    April 2005
  • From: Gothenburg
Posted by JohanT on Monday, April 15, 2013 3:06 PM

Hi Bill,

Thank you for your kind comment!

Even with some issues in the kit itself I enjoy the build a lot!

I wanted to get back to that feeling I had when I opened Airfix 1/76 Tiger back in 197something and bashed it together in an afternoon.

With the Dragon and AFV kits released since 2005 I almost feel intimidated by the price/complexity but with the Zvezda price tag I feel it is more of load and go :)

Very Best Regards

Johan  

  • Member since
    April 2005
  • From: Gothenburg
Posted by JohanT on Monday, April 22, 2013 1:17 AM

Hi again,

The spring has definitely arrived in sunny Gothenburg and we were seeing temperatures up to +15 C' in the weekend.

I am not getting a lot of time at the bench under those conditions :)

Some progress and some setbacks.

My standard grade automotive red primer turned out to be a mistake.

The stuff flakes off the kit in some areas and bites in others. I have tried to seal it with a coat of Clear and we will see how that goes.

I mentioned before that the kit is a curious mix of excellent detail and somewhat random execution.

Check out the casting numbers on the track hinges of the turret.

And here the hollow guide horns of the old style rubber tracks.

Painting has started, here are the road wheels after the initial round, I am going to leave them with the red primer for the inner road wheels.


The hull, I am using Xtracrylix DG, seems to spray OK when cut 50-50 with Tamiya X-20A but I am getting a frosted surface in some areas.

Guess I need to take down pressure and reduce distance.

Anyway, thank you for looking by and taking interest, your comments are always welcome as usual.

Very Best Regards

Johan

  • Member since
    July 2004
  • From: Texas
Posted by wbill76 on Tuesday, April 23, 2013 10:32 AM

Making good progress on this one Johan! Always neat to see the casting details get included on parts. Looking forward to more. Yes

  • Member since
    May 2004
  • From: Mount Bretherton Model Aircraft Observatory
Posted by f8sader on Tuesday, April 23, 2013 11:21 AM

Good info you guys!

Lon-ski

  • Member since
    April 2005
  • From: Gothenburg
Posted by JohanT on Thursday, April 25, 2013 4:01 PM

Thank you for stopping by and for your kind comments Bill, David and Lonski, much appreciated!
I have restarted Indifferent the Camo job since the TIIF reference pictures show a fairly high contrast indicating that # 114 had a hand painted scheme, I started off with cloudy broad stripes Embarrassed.
Have an appointment with my Awata Neo and the Tiger on Saturday, cant wait Big Smile

Very Best Regards
Johan 


  • Member since
    April 2005
  • From: Gothenburg
Posted by JohanT on Sunday, May 5, 2013 3:17 PM

Hi Again,

Finally I decided to go for a soft edge scheme apart from the heat shields and gun barrel.

As I mentioned before the primer I was using is crap and even playdo lifts the color when masking.

I should probably strip it down to the plastic but the formula is persistant to Windex.

Here she is with the first redbrown layer.

Next to go is a heavily thinned coat of Sand Grey on the running gear and undercarriage and then a filter using the Tamiya X-26 Clear Orange.

One important lessons learnt - do not try to cut the Xtracrilix stuff with Tamiya Thinner (Yellow cap).

The chemical reaction turns the paint into glue.

Thanks for stopping by

Johan

  • Member since
    July 2004
  • From: Texas
Posted by wbill76 on Monday, May 6, 2013 7:17 PM

Sorry to hear about your chemistry experiment-type woes Johan but the camo pattern looks good on this so far. Yes

  • Member since
    April 2005
  • From: Gothenburg
Posted by JohanT on Friday, May 10, 2013 11:14 AM

Hi Bill,

Thank you for your support and commenting Big Smile, much appreciated Beer
Considering stripping the vehicle sins the bad primer gives me so much headache but I am hoping that the clear orange coat will hold the paint down for weathering...
Someone commented on the solid air intakes so I am drilling them out, will post the result in a bit.
  
As I said before, I really enjoy the ride and got myself a second kit.

After # 114 of 505 the next attempt will be either:

#123 of 503
 

or

S33 of DR/101
  

Very Best Regards
Johan 

JOIN OUR COMMUNITY!

Our community is FREE to join. To participate you must either login or register for an account.

SEARCH FORUMS
FREE NEWSLETTER
By signing up you may also receive reader surveys and occasional special offers. We do not sell, rent or trade our email lists. View our Privacy Policy.