SEARCH FINESCALE.COM

Enter keywords or a search phrase below:

StuG III F/8 Fun in the Sun Complete Pics P.3

12861 views
53 replies
1 rating 2 rating 3 rating 4 rating 5 rating
  • Member since
    July 2004
  • From: Texas
Posted by wbill76 on Sunday, July 27, 2014 2:17 PM

Thanks J-M! Still a bit more work to do on this one, so don't worry there! Wink The StuGs build up a little faster due to their nature. Have to agree with you on the look...this was the last of the 'fast-back' superstructure designs with that big gun and block mantlet plopped on and spoiling its lines! Glad to hear the WIPs are helpful. Yes

  • Member since
    July 2004
  • From: Texas
Posted by wbill76 on Monday, July 28, 2014 7:59 PM

Worked on the tracks and suspension a bit in preparation for the weathering stages later on. I created some scuffing/chipping by stippling some Panzer Schwarzgrau on the hull and sprocket and idler. The contact surfaces on the idler and the sprocket teeth were treated to some non-buffing Metalizer Steel followed by some dry-brushed Burnt Umber to create their look. A test fit with the MK runs showed that 93 links per side on both side did the trick just right for sag.

I also used a 10/0 pointed brush to paint the gunner's sight with some MM non-buffing metalizer Gunmetal through the birdcage, then touched up the exterior of the cage so it once more matched the hull. Laid down a sealing coat of acrylic Future floor polish, let that air dry for about an hour, then added the simple vehicle markings. The reference photo showed an 'A' on the rear hull plate, so I added that by cutting one off the kit-supplied 'name' decals as an added touch.

Applied a 2nd coat of Future over the decals after they had thoroughly set to seal them in, will let that cure for a good 24 hours before starting in on the filters and weathering.

  • Member since
    July 2004
  • From: Texas
Posted by wbill76 on Tuesday, July 29, 2014 4:40 PM

Today's efforts took a little bit of a detour...I had planned to start on the filters and weathering but when I started in on the front left fender, the paint started to lift...so that means I either a) the Future didn't fully cure since we've had some high humidity due to some rain storms or b) I didn't get it on solid enough around the raised pattern or some combination of the two! So after a momentary panic, the colors were re-sprayed over the affected area and it will get some time to fully cure for sure before work continues.

So the detour instead led me to work on the tracks. These were airbrushed with MM Burnt Umber for their base coat, then heavily dry-brushed with MM Steel. Last but not least they got a wash of Raw Umber to prep them for later pigment weathering.

The spare track run for the rear tailgate was given the same treatment but also got some extra attention in the form of an MM Rust wash followed by various rust-colored artist pastels. The tailgate has a lip that runs around the top edge that was designed to match up with retaining pins that held the run in place. Dragon didn't include those in the kit, so I scratched up a pair using some thin sheet styrene and some 0.5mm diameter solder.

Fingers crossed that round 2 with the Future/weathering goes according to plan. ;)

  • Member since
    July 2004
  • From: Texas
Posted by wbill76 on Wednesday, July 30, 2014 5:34 PM

All the stars aligned today so I was able to start in on the weathering. First step was an overall wash of thinned MM enamel Panzer Schwarzgrau. Normally I would use Raw Umber in this step but since the colors are so light to begin with, I used the gray instead to avoid overpowering the scheme.

Next came the dot filters. I used Raw Sienna and Flat White and blended the dots using a square tip shader/blender brush lightly dampened with thinner. Since the enamel dots will dry quicker than oils, I worked in small sections at a time progressing from the front of the vehicle to the rear in stages.

After a few hours, the whole vehicle from the fenders upward got the filter treatment. The lower hull and suspension received only the Panzer Schwarzgrau wash since the pigment weathering will deal with those areas later.

Pin wash will come next to help pop out the details a bit more.

  • Member since
    April 2006
  • From: ON, Canada
Posted by jgeratic on Wednesday, July 30, 2014 11:25 PM

Bill, fine stellar work here.  That choice of Panzer Schwarzgrau wash is interesting from another point, because blue grey is pretty close to the complimentary colour of the sand tones.  

regards,

Jack

  • Member since
    December 2002
  • From: Bury St Edmunds, Suffolk, England
Posted by Bish on Thursday, July 31, 2014 3:09 AM

Looking really good there Bill.

A Pz Grey wash, would not have thought of that one.

I am a Norfolk man and i glory in being so


On the bench: Airfix 1/72nd Harrier GR.3/Fujimi 1/72nd Ju 87D-3

  • Member since
    July 2004
  • From: Texas
Posted by wbill76 on Thursday, July 31, 2014 10:20 AM

Thanks Jack! The panzer grey did just the trick for the reasons you mention. Light/sand colors are harder to weather convincingly and when you look at the available 'weathering sets' for desert colors, the filters they recommend are almost always a dark or medium gray depending. It also helped, ever so slightly, to emphasize the contrast between the two tones of the camo scheme. Yes

Bish

Thanks as well my friend! Wink It's not something I can claim as an original idea but it does work!  
  • Member since
    July 2004
  • From: Texas
Posted by wbill76 on Thursday, July 31, 2014 5:23 PM

Next step in the weathering process is the pin wash to bring out the details. I used a highly thinned mix of MM enamel Burnt Umber and a fine point 10/0 brush to apply it. Then used the same brush and some clean thinner and cleaned up the excess, fine tuned it here and there, etc. Takes some time to pull it off but worth it.

Will let that sit overnight and check it with 'fresh eyes' to see if there's any additional points/adjustments that need attention before moving on to the pigment weathering.

  • Member since
    July 2004
  • From: Texas
Posted by wbill76 on Friday, August 1, 2014 8:19 PM

Got all the pigment weathering done today. The first step was to seal in all the previous weathering work with some Testors MM Lusterles Flat in the spray can.

I used Mig Productions Gulf War Sand and applied it as a wet mixture first to the lower hull and suspension. Adding a drop of liquid dish washing soap to ordinary tap water breaks the surface tension and allows it to flow easily. Left to air dry, it looks like a mess at first but this is just a foundation.

Using stiff bristled brushes to remove the excess, further adjustments were done with some dry q-tips as well to get the look I was after.

The tracks received the same wet pigment treatment followed by stiff brushes. One of the advantages of workable tracks is the flexibility in weathering prior to installation.

Tracks were then installed to both sides and the sprockets and idlers permanently glued in place to create the necessary sag/tension on both sides.

Just a few small details remain before this one is all done!

  • Member since
    July 2004
  • From: Texas
Posted by wbill76 on Saturday, August 2, 2014 4:46 PM

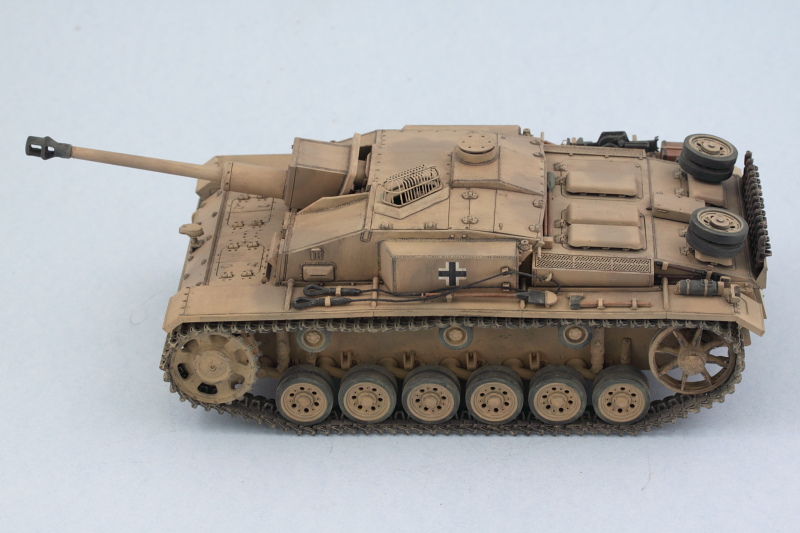
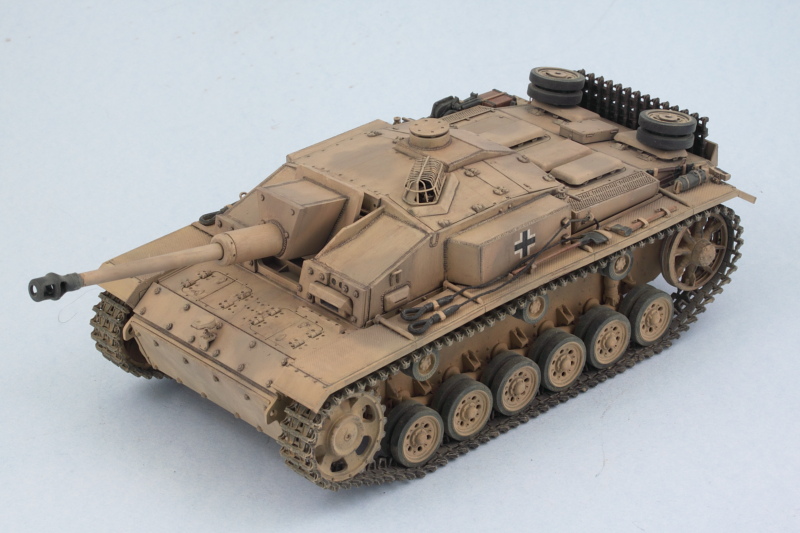
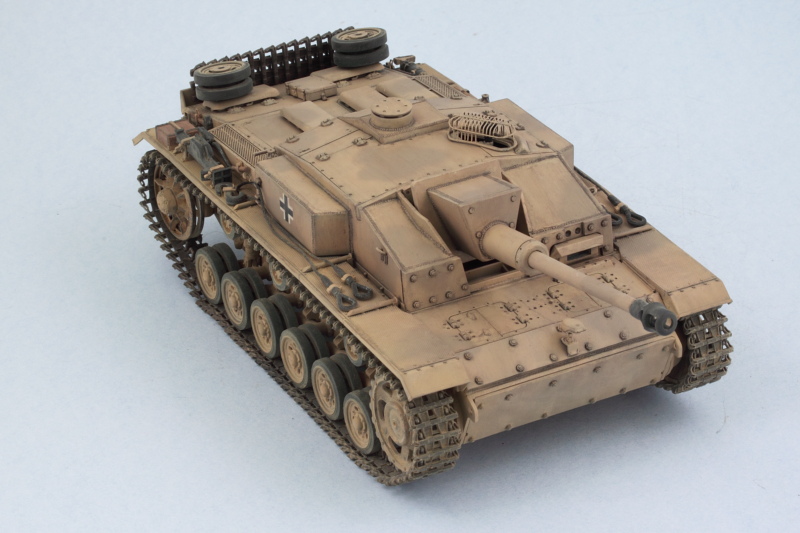
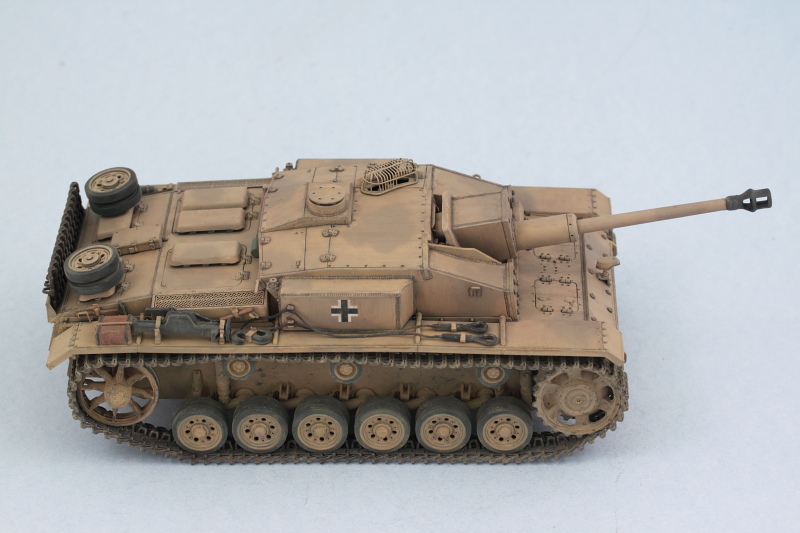
One of the last remaining details that I deliberately left to the very end was the tow cables. The Dragon kit supplies some braided steel wire for this but it's extremely stiff/stubborn to work with. I replaced it with my go-to substitute, crochet rope/thread.

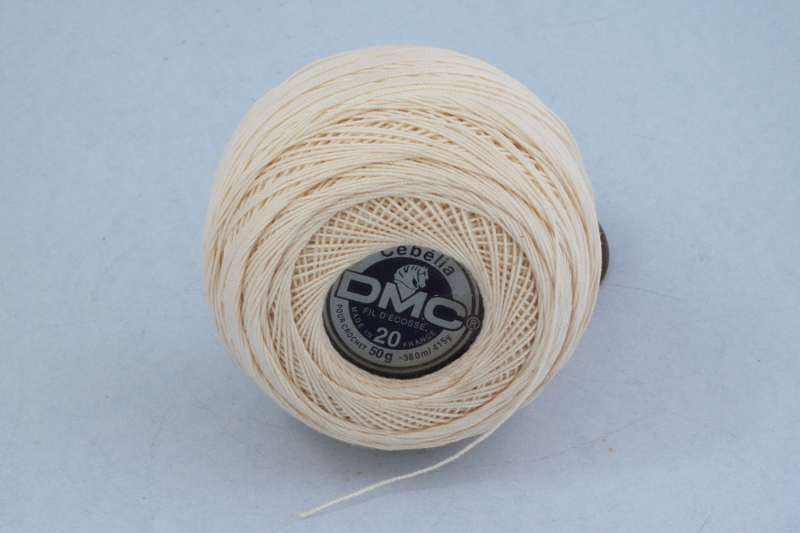
This stuff is very cheap at any Michael's/Hobby Lobby and a single roll will last a very, very long time. It's also handy for tie-down ropes for stowage. For tow cables, I cut a long length from the spool and then dip it into some Future so it will stiffen and take paint better. It also prevents any 'fuzzing' of the line as well. Once it dries, simply cut to the length needed, in this case 110mm per cable, and attach with CA glue to the cable ends.

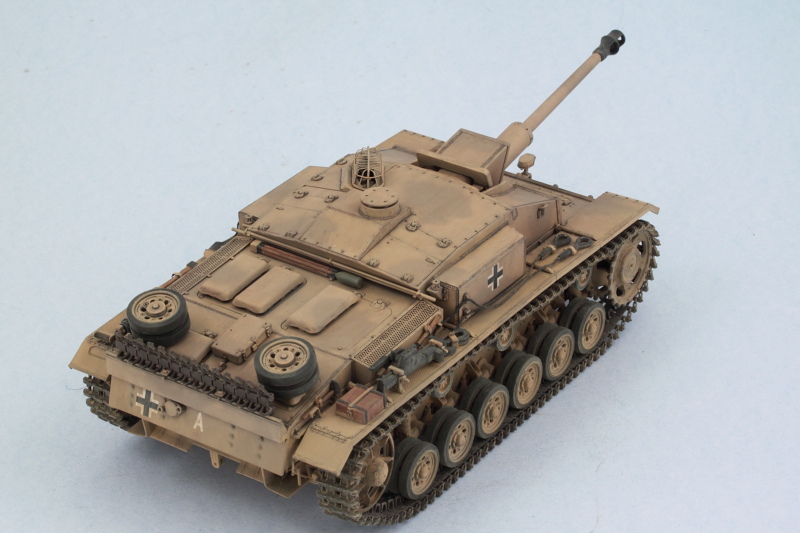
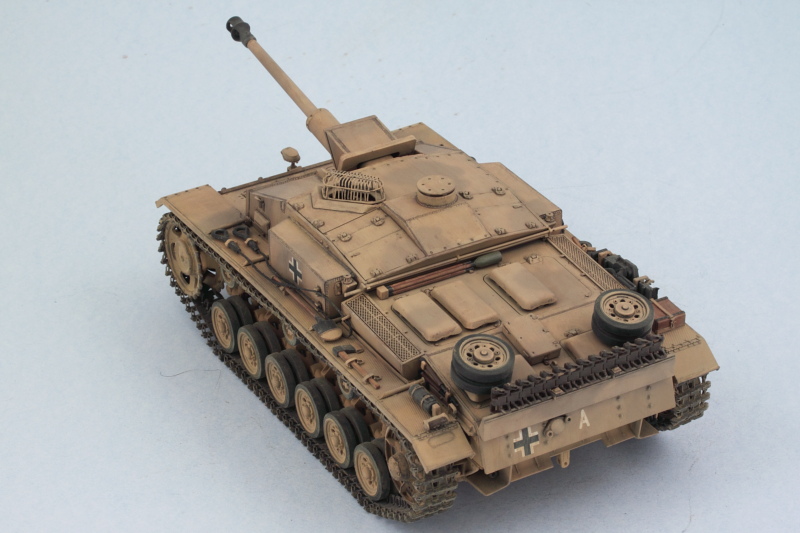
Since the cables don't have any real clamps at the loop end, only the 'guides' on the sponson sides, the cables always appear sloppy in the reference photos of these vehicles, so I used the thread's flexibility to my advantage and draped the cables accordingly before carefully gluing them down in the sponson guides. That's why these were saved to the very end, so they could interact properly with all the other stuff on the fenders.

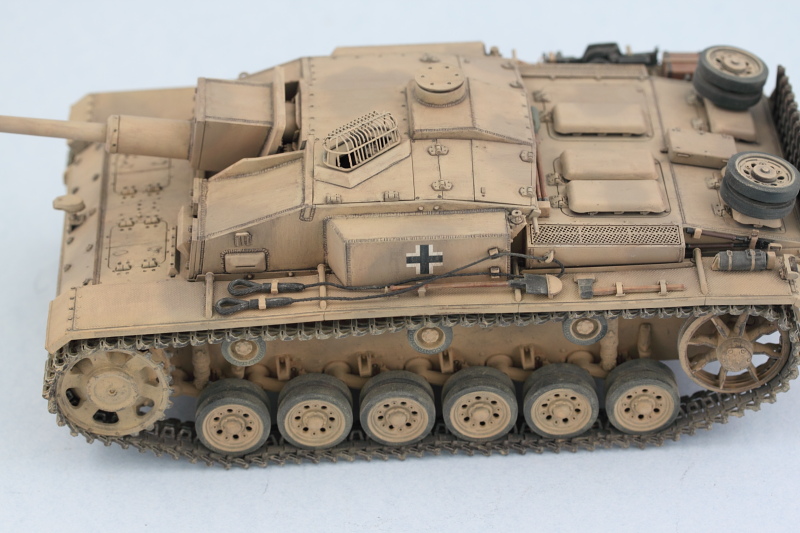
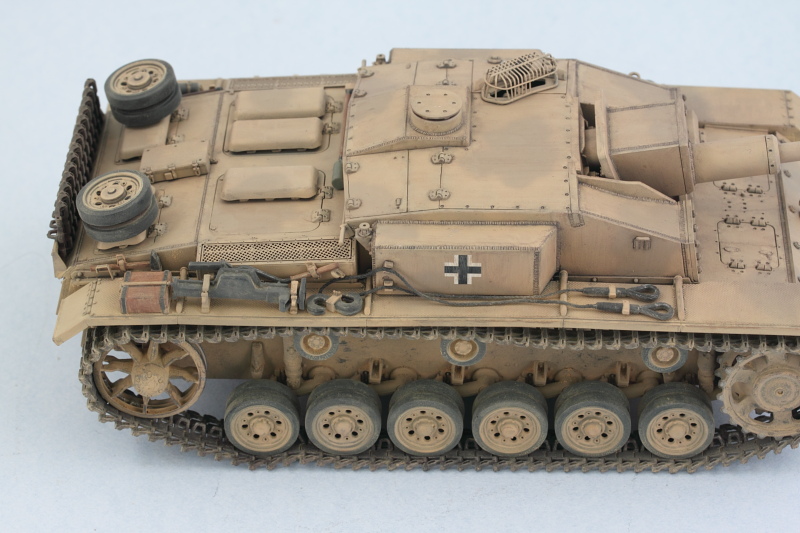
Once in place, the cables were lightly dusted with pigments to blend them in with the rest of the vehicle. The final little detail was the install of the rear Notek convoy light, this was provided in the kit as a clear cylinder that I painted with Tamiya Clear Smoke and installed into its holder on the rear fender. Then it was time for the walk-arounds to make sure I hadn't missed anything or make any last minute adjustments.

  • Member since
    January 2013
Posted by jibber on Saturday, August 2, 2014 5:30 PM

Bill once again a really fine build. It looks dusted without piles of pigment all over and the camo came through perfectly. I notice that you don't use a lot of chipping or touch up the edges with something like a piece of graphite. Terry    

  • Member since
    December 2002
  • From: Bury St Edmunds, Suffolk, England
Posted by Bish on Saturday, August 2, 2014 5:36 PM

Sweet, as always Bill. Great subtle weathering, I like the dusty look on the tools. Crochet thread dipped in future, going to have to remember that one.

I am a Norfolk man and i glory in being so


On the bench: Airfix 1/72nd Harrier GR.3/Fujimi 1/72nd Ju 87D-3

  • Member since
    July 2004
  • From: Texas
Posted by wbill76 on Saturday, August 2, 2014 6:55 PM

Thanks Terry! You're right, I tend to not go in for the heavy chipping depending on what I'm depicting. That's not to say that heavy wear doesn't have its place of course, but unless I'm doing an open-top vehicle or something that's like a white-wash where you would have a lot of heavy wear-and-tear, I generally stay away from it.

Thanks as well Bish! Hope that thread trick is helpful for you in the future (no pun intended! Wink) Beer

  • Member since
    December 2002
  • From: Bury St Edmunds, Suffolk, England
Posted by Bish on Saturday, August 2, 2014 7:06 PM

O, I know it will. And I am in the same club when it come's to chipping.

I am a Norfolk man and i glory in being so


On the bench: Airfix 1/72nd Harrier GR.3/Fujimi 1/72nd Ju 87D-3

cml
  • Member since
    March 2007
  • From: Brisbane, Australia
Posted by cml on Monday, August 4, 2014 7:00 AM

Thanks for sharing this thread Bill. Some excellent tips for me and other newbie armour modellers to take away.

I'm with Bish, the crochet thread is definitely something to remember. I have some dragon kits in the stash with the metal wire - was always nervous about how to tackle it, but you may have put that apprehension to rest.

Chris

  • Member since
    March 2003
  • From: Western North Carolina
Posted by Tojo72 on Monday, August 4, 2014 8:58 AM

Another great build Bill, appreciate the string tip

  • Member since
    April 2006
  • From: ON, Canada
Posted by jgeratic on Monday, August 4, 2014 12:08 PM

Bill - she looks great, and I can appreciate the subtle nuances in the weathering. Yes

I think the other advantage of using string for cables is the metal wire does not hold paint very well, at least not the acrylic brands I have used.

regards,

 Jack

  • Member since
    April 2014
Posted by r13b20 on Monday, August 4, 2014 12:33 PM

Excellent build. Great tips and fast also. <sigh> One day, maybe... Bob

  • Member since
    July 2004
  • From: Texas
Posted by wbill76 on Monday, August 4, 2014 12:53 PM

Chris

thanks for the comments and my pleasure to share with the gang here. Glad the tips are helpful.

Anthony

thanks as well my friend! Yes

Jack

much appreciated, and I agree with you about the whole holding paint issue. Even with enamels that braided wire can be a real pain IMHO. Wink

Bob

this one came together pretty quickly, but then StuGs don't really have all that much to them especially since I decided not to display any of the fighting compartment hatches open. Thanks for the comments! Beer
  • Member since
    April 2005
  • From: Gothenburg
Posted by JohanT on Monday, August 4, 2014 3:45 PM

Hi Bill,

Congratulations on this Fun in the sun - StuG III, thank you for sharing as always!

This goes right into my "How to" section.

Nothing to add to the positive remarks :)

Except that that this particular paint scheme is very interesting and you have done it extremely well.

Jack did something similar with his "Heidi" and to me this is where I would like to end up with my Pz IV.

Although my skills and ability are still very much "under construction" ;)

The one thing that I notice is that the towing cable seems slightly under scale.

Or maybe the end loops provided in the kit are over scale?

No matter what - another exiting and very well executed build!

Very Best Regards

Johan

  • Member since
    July 2004
  • From: Texas
Posted by wbill76 on Monday, August 4, 2014 5:44 PM

Thanks Johan! The Africa/Tropen schemes are always fun to play with as something a little out of the ordinary. Don't worry about skills being 'under construction', I feel the same way about mine! Wink It's a never ending process. You are right about their being a slight scale difference between the thread and the end loops, but it's just a fraction of a mm in the diameter. For larger vehicle tow cables, like on a Panther or Tiger, this particular option wouldn't work. Glad you enjoyed the build with me! Yes

  • Member since
    September 2012
Posted by Tankster on Wednesday, August 6, 2014 2:34 PM

Excellent work man,  I started using thread for the tow cables as well.  Its so much easier to work with.  

On The Bench: Dragon  1/35 Jagdtiger Henschel

On Deck: Dragon 1/35 Ferdinand

  • Member since
    March 2013
  • From: Puebla, Mexico
Posted by garzonh on Wednesday, August 6, 2014 4:57 PM

Hey very nice!, I like the overall dusty but not too much weathered. All details look nice and with the pinwash everything pops out.

I also like your photos that look like made from a text book or manual.

What color did you use over all the tank?

  • Member since
    July 2004
  • From: Texas
Posted by wbill76 on Wednesday, August 6, 2014 6:56 PM

Thanks Tankster! Good to know I'm not the only one who can be seen in the thread aisle for 'off label' use! Wink

Garzon

appreciate the comments! If I understand your question correctly, are you asking what color I used for the base coat? For that I used Testors Model Master enamel Afrika Braun (their version of RAL 8020). HTH! Beer
JOIN OUR COMMUNITY!

Our community is FREE to join. To participate you must either login or register for an account.

SEARCH FORUMS
FREE NEWSLETTER
By signing up you may also receive reader surveys and occasional special offers. We do not sell, rent or trade our email lists. View our Privacy Policy.