SEARCH FINESCALE.COM

Enter keywords or a search phrase below:

Australian Bushmaster AFGHANISTAN EOD Variant (WIP)

5639 views
17 replies
1 rating 2 rating 3 rating 4 rating 5 rating
  • Member since
    May 2013
Australian Bushmaster AFGHANISTAN EOD Variant (WIP)
Posted by Blairy on Saturday, August 16, 2014 7:19 AM

G'Day all and thanks for dropping by.

I would first like to say that I have been viewing this forum for a while now and the quality of the work produced here is absolutely amazing. I hope to pick up lots of tips and receive lots of criticism in regards to my new hobby, and I produce some work even a fraction of the quality of what I have seen.

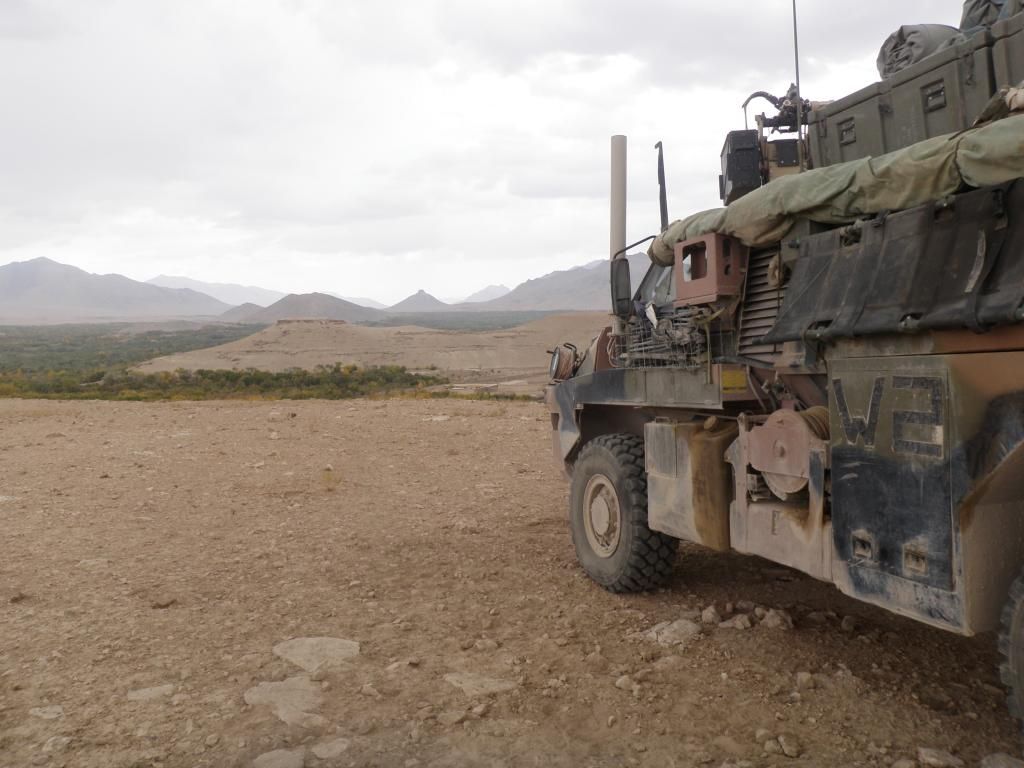
For my first project I have decided to portray my time in Afghanistan by replicating my vehicle (Callsign Wallaby 2) I commanded for 6 months in Uruzghan Province late 2012. The Australian Bushmaster is a renowned AFV throughout the world and has helped save the lives of countless soldiers for the last decade. It is worth mentioning that not one life has been lost inside this vehicle.

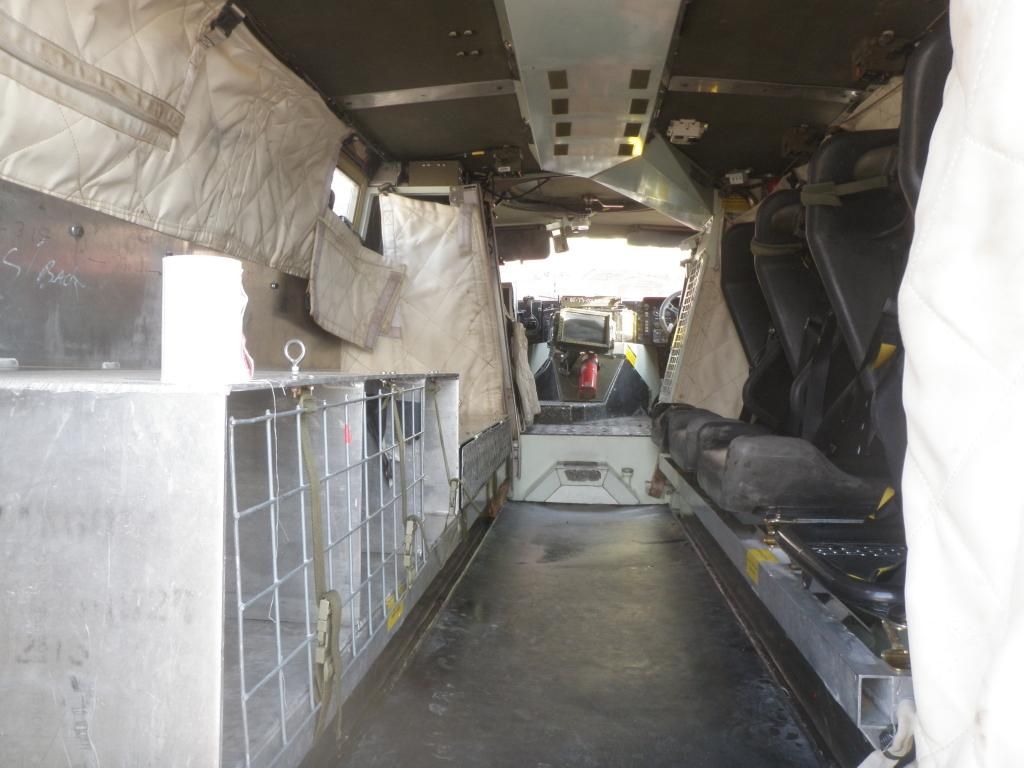
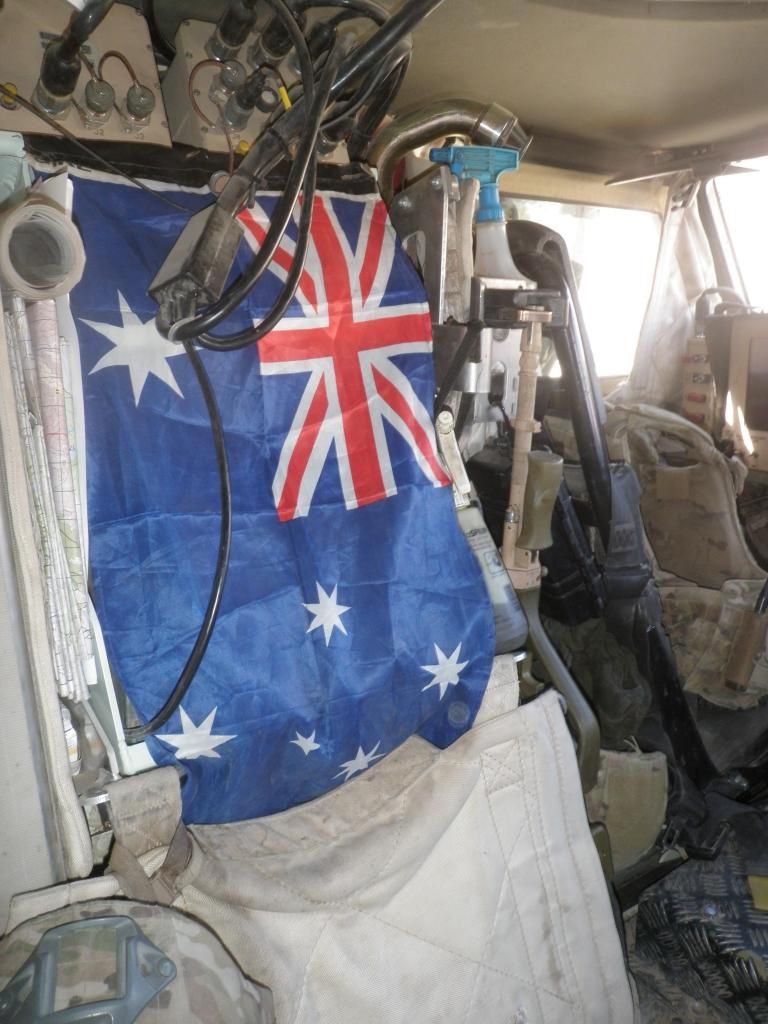
The kit I have used is the Showcase 1:35 Australian Bushmaster IMV. I ave found that the exterior if the kit is well detailed and accurate as far as I can see. Unfortunately on the flip side, the interior is not very accurate nor detailed as much as I would like. But in all fairness, this kits is not designed to have the interior on show. My plan is to have a cross section cut out so that the interior can be viewed in detail. This kit is the more common troop variant, where I commanded the EOD variant which had custom shelving in the rear compartment to store our extra equipment and most importantly..... fridge Wink This will require a bit of altering and alot of scratch building of our equipment and the Operation blast protection upgrade. For obvious reasons I can not show post detailed pictures of what I am trying to replicate, but I have a couple to give you and idea of what I am trying to recreate. Later I will be purchasing some AM bits to complete the exterior as the picture below.

I have already completed some of this project, so this WIP is not from the very start. I actually started this months ago, but thanks to work commitments the progress was slow and I was unable to post what I had completed so far. Non the less here we are now and I can share my first project learn my first lessons. The way I have approached this build is all over the place, so I apologize if my build method doesn't make sense.

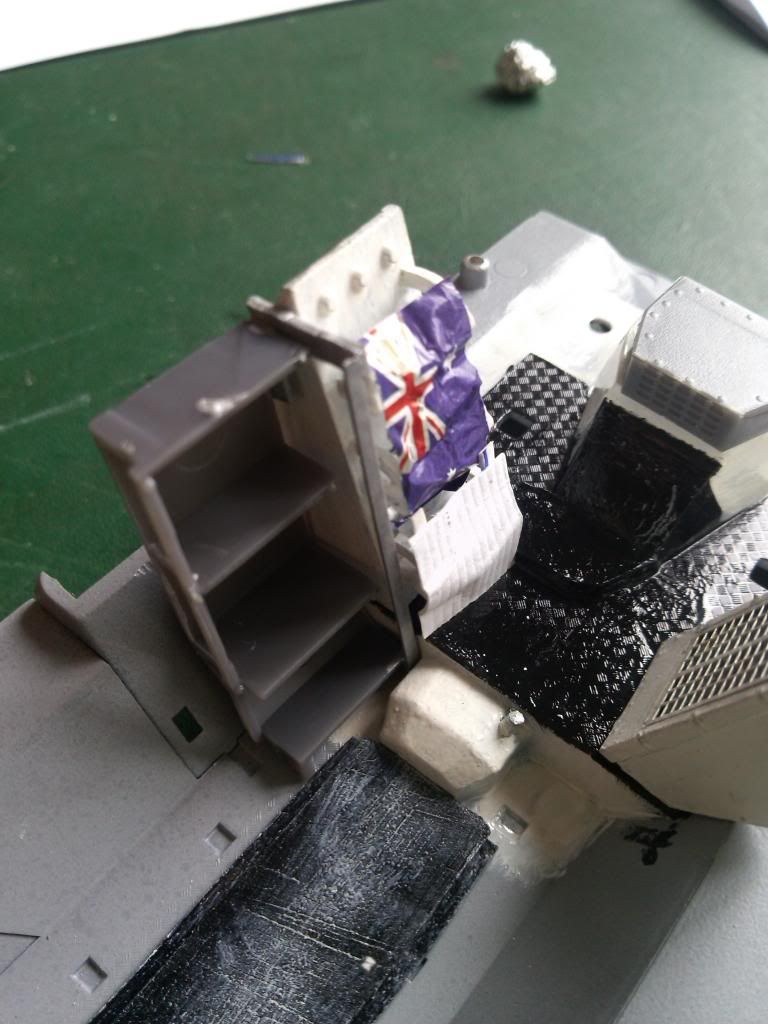
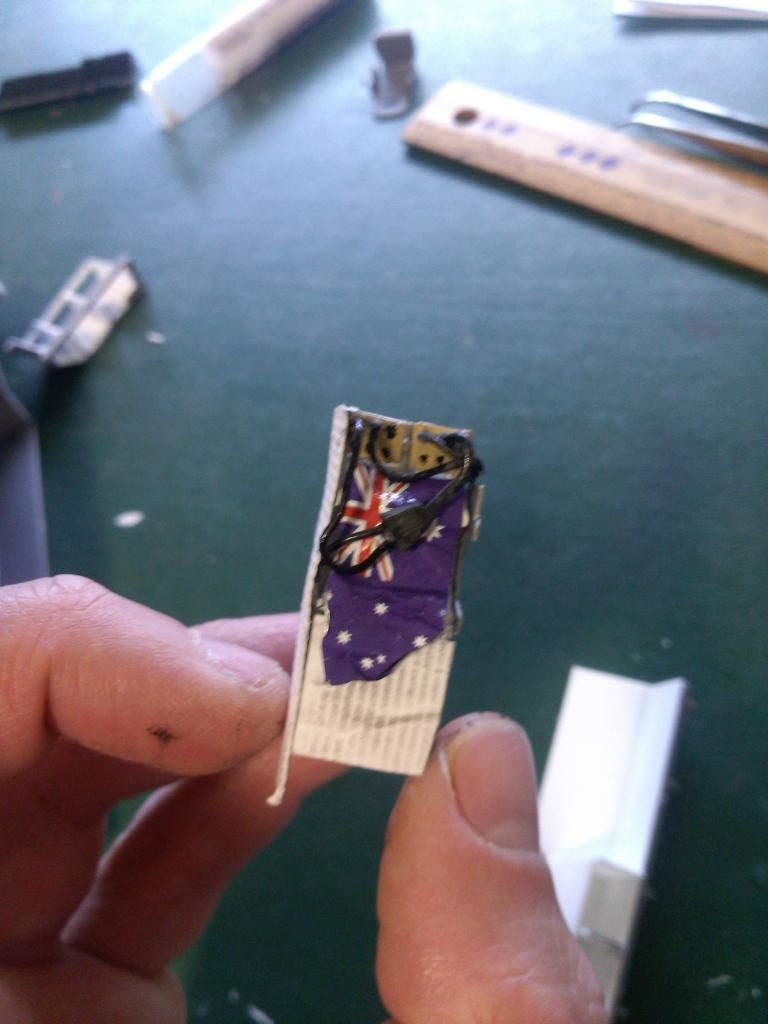
Above is one of the pics I snapped at the start of this build. There is the radio stack (unpainted), the Ammo and Isolator stack (with the flag) and the custom blast protection floor down the bottom. I tried to simulate years of wear on vinyl for this but fear I have over done it with the dry brushing. I will have to re address this later.


Here is the finished product (minus weathering) of the Ammo and ISO stack.

Here I have started to mock up the shelving in the rear compartment. I have also painted a little more. It is starting to take shape here.

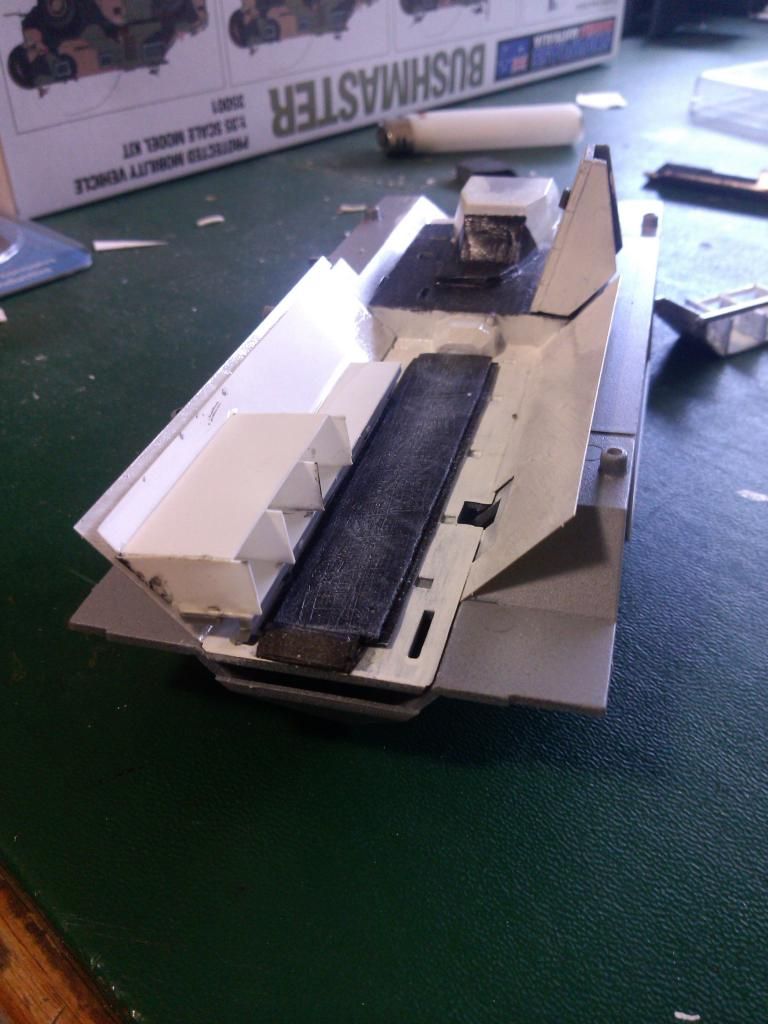
This is where the interior is up to at the moment. none of this is glued down at this stage as I still need to work on the underside.

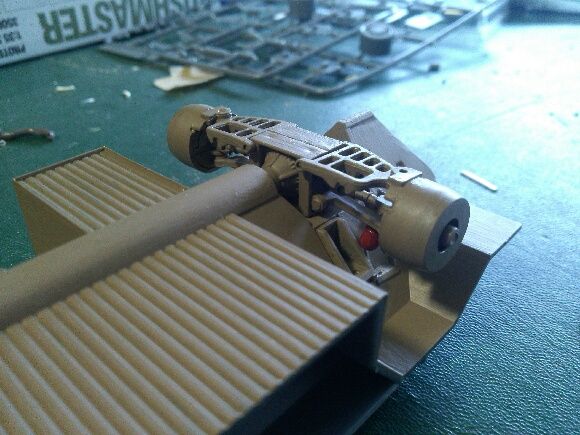
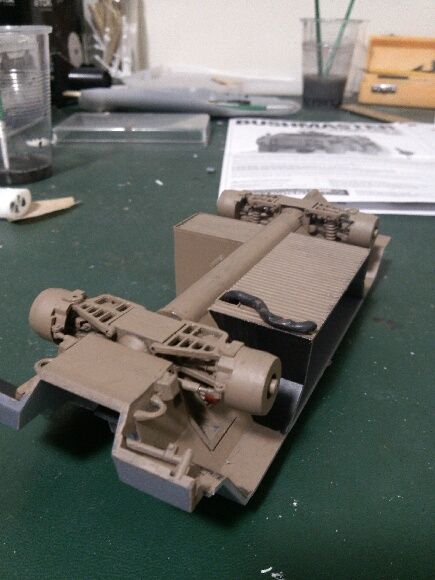
This is the underside almost complete. All I need to do now is custom make the winch system and paint and fit the fuel tank.

I will post some more progress pics when I can, but for now I hope you have enjoyed looking on. and please pass on some tipsif you have them. I look forward to reading them.

  • Member since
    December 2002
  • From: Bury St Edmunds, Suffolk, England
Posted by Bish on Saturday, August 16, 2014 7:48 AM

Great idea for a build, and a nice start. And good to see you back.

I am a Norfolk man and i glory in being so


On the bench: Airfix 1/72nd Harrier GR.3/Fujimi 1/72nd Ju 87D-3

  • Member since
    May 2013
Posted by Blairy on Saturday, August 16, 2014 8:03 AM

Haha thanks bish. I am surprised you remembered me. I was only here very briefly and then life decided it needed me more. Good to be back.

  • Member since
    January 2013
Posted by jibber on Saturday, August 16, 2014 12:20 PM

Blairy thats an ambitious build, it sure looks to me this isn't  "new hobby" you're doing some real nice work there. Great start. I'm not familiar with Showcase kits, how are the fits, detail etc.  

  • Member since
    January 2013
Posted by jibber on Saturday, August 16, 2014 12:23 PM

I just found the kit, that vehicle looks awesome and the parts, cool decals and PE should make it a nice build.

  • Member since
    December 2002
  • From: Bury St Edmunds, Suffolk, England
Posted by Bish on Saturday, August 16, 2014 12:46 PM

Blairy, I recalled you had put your name down for the D-Day build. Sorry you missed it, but I know life has a habit of getting in the way. You have certainly made a good start back.

I knew you Diggers were spoilt, a bloody fridge. That's just showing off.

No tinny's in there of course. Wink

I am a Norfolk man and i glory in being so


On the bench: Airfix 1/72nd Harrier GR.3/Fujimi 1/72nd Ju 87D-3

  • Member since
    May 2013
Posted by Blairy on Saturday, August 16, 2014 6:27 PM

JIbber: Yes it is a very ambitious project, but for some reason I tend to always through myself in the deep end lol.  it is my second model, but I did not complete my first one so it doesn't count in my opinion. I must admit that it is not a bad kit at all (except for what I mentioned earlier), all the pieces fit together nicely, no warping and yes the PE and Decals give it a nice touch with lots of options. Though I will have to make some of my own decals which I have seen done on here and I am interested in trying.

Bish: I did put myself down for the group build and I was really keen to jump in there, unfortunately I didn't even get to buy the model. In fact I was just in the model shop the other day looking at the exact model I wanted to do and kicking myself that I only walked in there to buy paints. Though I nearly changed my mind.

Haha yes some of us are spoilt, But lets be honest, if you have the room and it is not hindrance.... why not carry it to make your life that little bit more comfortable. PLUS it is actually part of our kit to keep the water boxes cold for the cooling suit on the bomb suit...... and by water boxes I don't mean cokes....... ;-)

  • Member since
    December 2002
  • From: Bury St Edmunds, Suffolk, England
Posted by Bish on Saturday, August 16, 2014 6:37 PM

O believe me, if we had had room in the warrior, I would have put a fridge in. But for me, as long as the BV's worked, that all that matter. Got to have my brews.

And I know what you lot are like. when I was in Bosnia in 2000, we had 2 Aussie Officers attached to us. One was my boss, the IO. He just could get his head round the British Army Officers mess and was always trying to get into our bar.

And you deserve more than just a Coke just for getting in that bloody suit. Let alone in Afghan. Bugger that for a living.

I am a Norfolk man and i glory in being so


On the bench: Airfix 1/72nd Harrier GR.3/Fujimi 1/72nd Ju 87D-3

  • Member since
    May 2013
  • From: Indiana, USA
Posted by Greg on Saturday, August 16, 2014 6:51 PM

That is a very cool project, and it's coming along GREAT!

Talk about having first-hand knowledge of your subject!

Welcome back. I'm just a newbie so I hope that is appropriate.

  • Member since
    May 2013
Posted by Blairy on Monday, August 18, 2014 4:37 AM

Hey all, I have made some more progress today after getting a nice early knock from work. I was able to complete the bottom section of the rear shelving and the commander remote weapon station. Though I have a feeling that I will rip it out and redo it as it is not entirely accurate. Also had a go at BFT but I will definitely be ripping this out and reattempting this. But it is not looking tooooo bad.

Enjoy the pics.

This is the completed remote weapon controls. Not 100% happy but will redo only if it really annoys me.

This is the bottom half shelving, I am very happy with the way this turned out, though I will have to add a couple more straps to make it a little more realistic. Have to find out the way I want to do it first.

The BFT I will be reattempting, I am not happy with the screen as it looks like some crappy green box LOL. I also have to add some cables and detail, I am still trying to figure out how I am going to do that.

And below are just some extra progress pics.

Thanks for dropping by.

  • Member since
    May 2013
Posted by Blairy on Wednesday, September 10, 2014 3:18 AM

Hello everyone,

Some more progress on this fun little project. All in all it is turning out fairly well and I am not having to much trouble. ALOT of it I am still building from scratch which is taking some decent time. and it doesn't help that I am only getting a few minutes here and there to do some. So as per the last post, I stated that i was going to redo the commanders remote weapon station and the BFT. I have also 80% finished the driver and crew commanders section, dry fitted and 50% completed the rear seats and cut out the cross section of the body to alow a nice view into the cabin.

Here are some pics.

To finish the interior is till have to add the Fridge, robot, ECM, Radios, vehicle intercom and cabling, more spool lining, rear shelving, finish off the drivers area, maybe some personal gear, add decals and weather..... as far as I can think.

Thanks for stopping by,

Eli

  • Member since
    May 2013
Posted by Blairy on Friday, October 24, 2014 4:37 AM

G'Day Everybody,

I haven't been on here a while mainly due to moving house, which has also delayed all progress on this neat little project. Although now I have finished moving and are now settled down I have made some significant progress. The interior is now almost finished, I still need to construct the robot, second ECM and everything that attaches to the roof. And the exterior has had the Camo pattern painted. There is still a significant amount of work to do on the outside which will include the addition of a couple of kits like the Black Dog bushmaster accessories kit and a blast models BL35200K Crows RWS for bushmaster (Which I cannot seem to find anywhere...... if anyone can help with locating one that would be awesome! and the company is currently not producing anything until further notice.), and I will have to make some extra stuff that I cant find in kits such as a tarp, custom wire cages etc.

So far I am really enjoying the build, I have not come across any major problems. and I have found that the instructions does not tell you where to put all decals. But all was easily rectified. Anyway, here are some pics of the current state.

Thanks for stopping by.

Eli

  • Member since
    December 2002
  • From: Bury St Edmunds, Suffolk, England
Posted by Bish on Saturday, October 25, 2014 12:19 PM

Looking really good Eli.

I am a Norfolk man and i glory in being so


On the bench: Airfix 1/72nd Harrier GR.3/Fujimi 1/72nd Ju 87D-3

  • Member since
    May 2013
Posted by Blairy on Sunday, October 26, 2014 2:20 AM

Thanks bish, I am learning alot of lessons! For one, I learned not to rush into painting, and to ensure my masking is up to scratch before doing so lol. Ahh well, its what it is all about isn't it. Learning and having fun.

  • Member since
    December 2002
  • From: Bury St Edmunds, Suffolk, England
Posted by Bish on Sunday, October 26, 2014 3:00 AM

Indeed it is, I think we all learn something on every build.

I am a Norfolk man and i glory in being so


On the bench: Airfix 1/72nd Harrier GR.3/Fujimi 1/72nd Ju 87D-3

  • Member since
    May 2013
Posted by Blairy on Monday, November 10, 2014 9:52 PM

Finally ordered the last components to finish it off. it was a BLAST Model CROWS unit for the Bushmaster and a Bushmaster accessories pack by Black Dog.

  • Member since
    December 2002
  • From: Bury St Edmunds, Suffolk, England
Posted by Bish on Tuesday, November 11, 2014 3:28 AM

A couple of nice looking sets there, no shortage of equipment to load on it.

I am a Norfolk man and i glory in being so


On the bench: Airfix 1/72nd Harrier GR.3/Fujimi 1/72nd Ju 87D-3

  • Member since
    May 2013
Posted by Blairy on Tuesday, November 11, 2014 2:46 PM

haha, no shortage at all. I will have a few spares thats for sure.

JOIN OUR COMMUNITY!

Our community is FREE to join. To participate you must either login or register for an account.

SEARCH FORUMS
FREE NEWSLETTER
By signing up you may also receive reader surveys and occasional special offers. We do not sell, rent or trade our email lists. View our Privacy Policy.