SEARCH FINESCALE.COM

Enter keywords or a search phrase below:

1/35 Tamiya M-48A3 (E1?)

7290 views
93 replies
1 rating 2 rating 3 rating 4 rating 5 rating
  • Member since
    January 2015
  • From: Tumwater, WA.
1/35 Tamiya M-48A3 (E1?)
Posted by M. Brindos on Tuesday, September 15, 2015 1:02 PM

I believe its time to begin my build log on this kit. I've got a few things accomplished so far and I've been spending time building on this kit while I wait for things on the M-60A1 to get finished.

So here is my work thus far on this old Tamiya offering.  :)

******************************************

If you've been following my M-60A1 thread then you already know where this build began. I started with the figures and the TC's cupola. I did a little updating and fabrication to the M2, adding a shield and changing the mount location.

I used the mantlet from Legend Productions and the gun tube base from Verlinden to extend the 90mm cannon by 5mm in length. I know a few of you think the turret is too squat, but I think the gun tube is too short and that's what I decided to change.

I had to build up some Bondo to meet the sides of the mantlet cover. I'm not sure if the slope is wrong or if the mantlet cover is wrong, but it was far easier to match the slope to the cover than to modify and carve the mantlet cover to match the turret slope.

Since the turret is cast I decided to embelish and beef it up some. The cast texture on the kit is soft like most of the other details and I wanted it to be more pronounced. I will be repeating this method on the hull as well. I simple smudged on some Bondo with my finger and then rubbed it down after it dried to reduce any high spots or protrusions.

I added some turret cast numbers from the Verlinden M-48/M-60 upgrade set.

It shouldn't take much for this effect to be noticable under some paint.

This morning I began constructing the TC's cupola dust cover. I started buy trimming a piece of sticky note paper and attached it with super glue.

That made a base for the packing paper I used next to stick to. I glued the back edge down, again with super glue, to hold the back in place.

Using some white glue thinned with water I liberally brushed it under and over the packing paper to soften it up.

After a couple of minutes I gently moved the packing paper into position, making sure to leave wrinkles but also leaving a bit to overhang the front of the MG mantlet.

After that dried I trimmed off the overhanging paper. Its a tad rough at the moment but I'll clean up the edges later and it'll be fine. When I took this last picture the super glue was still setting to hold it permanently in place.

That's my progress so far. Not nearly as glorious as some of the other builds also taking place on this very same kit right now, but I'm just beginning so please be patient with my progress.

My main concern is building the M-60 for now.  :)

- Mike Brindos "Lost Boy"

  • Member since
    May 2009
  • From: Poland
Posted by Pawel on Tuesday, September 15, 2015 3:25 PM

Hello Mike!

I'm going to watch this one, too! I like what you did to the gun shield and its cover - this is a necessary modification to the Tamiya kit. Good luck with your build and have a nice day

Paweł

All comments and critique welcomed. Thanks for your honest opinions!

www.vietnam.net.pl

  • Member since
    September 2006
  • From: Dripping Springs, TX, USA
Posted by RBaer on Wednesday, September 16, 2015 10:41 AM

Following too.

A word: US castings are pretty good as a rule and cast texturing is generally relatively fine and uniform. I normally use some Mr.Surfacer over all the turret and hull castings, and only do light stippling, with maybe even some sanding after that. Your choice of course, but at this point it would be fairly easy to add some more of the bondo and even things out.

Apprentice rivet counter.

  • Member since
    December 2002
  • From: Valrico, FL
Posted by HeavyArty on Wednesday, September 16, 2015 11:23 AM

I used the mantlet from Legend Productions...
I had to build up some Bondo to meet the sides of the mantlet cover. I'm not sure if the slope is wrong or if the mantlet cover is wrong, but it was far easier to match the slope to the cover than to modify and carve the mantlet cover to match the turret slope..

 
Which Legend mantlet did you use?  The reason I ask is if you used the one from set #1268, that set is for the new Dragon M48A3s.  Set #1033 is the older set for the Tamiya kit.  The Dragon and Tamiya kits have slightly different shaped turrets.  The Dragon one is more correct. 


Gino P. Quintiliani - Field Artillery - The KING of BATTLE!!!

Check out my Gallery: https://app.photobucket.com/u/HeavyArty

"People sleep peaceably in their beds at night only because rough men stand ready to do violence on their behalf." -- George Orwell

  • Member since
    September 2012
Posted by GMorrison on Wednesday, September 16, 2015 12:21 PM

I don't know if the Legends kit has them, but there's a very visible set of clips that run around the outside of the frame at the back of the mantlet cover, where it mates to the turret.

 Modeling is an excuse to buy books.


  • Member since
    December 2002
  • From: Valrico, FL
Posted by HeavyArty on Wednesday, September 16, 2015 12:45 PM

I don't know if the Legends kit has them, but there's a very visible set of clips that run around the outside of the frame at the back of the mantlet cover, where it mates to the turret.

I don't know about set #1033, but #1268 has the attachment clips as PE parts.  It comes out nicely.  I used it on the Dragon kit.

Gino P. Quintiliani - Field Artillery - The KING of BATTLE!!!

Check out my Gallery: https://app.photobucket.com/u/HeavyArty

"People sleep peaceably in their beds at night only because rough men stand ready to do violence on their behalf." -- George Orwell

  • Member since
    January 2015
  • From: Tumwater, WA.
Posted by M. Brindos on Wednesday, September 16, 2015 1:20 PM

RBaer

Following too.

A word: US castings are pretty good as a rule and cast texturing is generally relatively fine and uniform. I normally use some Mr.Surfacer over all the turret and hull castings, and only do light stippling, with maybe even some sanding after that. Your choice of course, but at this point it would be fairly easy to add some more of the bondo and even things out.


Don't worry. This should even out fairly well after some paint. I'm not leaving much of it raised too much as I don't want it to look like a rough Russian copy. I'm aiming for uneven, but level. I still wanted some of the smooth left on there and that's why the Bondo is not covering the entire turret.

That texture, I don't think, is what I will end up with. I will see better after some primer goes down.

- Mike Brindos "Lost Boy"

  • Member since
    January 2015
  • From: Tumwater, WA.
Posted by M. Brindos on Wednesday, September 16, 2015 1:21 PM

HeavyArty


I used the mantlet from Legend Productions...
I had to build up some Bondo to meet the sides of the mantlet cover. I'm not sure if the slope is wrong or if the mantlet cover is wrong, but it was far easier to match the slope to the cover than to modify and carve the mantlet cover to match the turret slope..


Which Legend mantlet did you use?  The reason I ask is if you used the one from set #1268, that set is for the new Dragon M48A3s.  Set #1033 is the older set for the Tamiya kit.  The Dragon and Tamiya kits have slightly different shaped turrets.  The Dragon one is more correct. 


I have the set for the Dragon kit, which is okay with me anyways because if that's what the slope should be, then I'm golden there, right?

- Mike Brindos "Lost Boy"

  • Member since
    January 2015
  • From: Tumwater, WA.
Posted by M. Brindos on Wednesday, September 16, 2015 1:24 PM

GMorrison

I don't know if the Legends kit has them, but there's a very visible set of clips that run around the outside of the frame at the back of the mantlet cover, where it mates to the turret.


Yes it comes with the clips. I just haven't added them yet. Just like Arty says.  :)

It's a wonderfull kit of resin and PE and I highly recommend it. My set seems to be an updated kit because it even comes with resin bolt heads for the clips. Tiny little things that I know are going to drive me nuts for an afternoon lol.

- Mike Brindos "Lost Boy"

  • Member since
    January 2015
  • From: Tumwater, WA.
Posted by M. Brindos on Monday, September 21, 2015 11:53 AM

I've gotten into the first steps of assembling the hull. Of couse this began with the obligatory filling-in of the holes in the bottom of the hull. I'm still marvelling over the effort its going to take to fill in the ginormous gap in the back over the drive sprockets. Holy poo that's a huuuuuuge area to fill in. Can't skip it.

Luckily I still have a lot of spare parts from the M-103 that I can use to update some of the features on this model. Specifically the rear deck grills. Those are pretty sad in detail compared to more modern replicas. I'll also be trying to use the final drive assemblies to replace the Tamiya ones, but I'm uncertain of how I will get the drive sprockets adapted yet. I have a lot of spare road wheels and I plan on mixing up a few of those for fun.

While I was playing with the suspension arms I realized the front right arm is off center. Seems Tamiya engineered it to be in line with the arm on the other side so they are even. That's not how this works Tamiya lol. So a little fabrication is going into that one. The rest are where they should be and line up fine.

Alright, lets discuss the suspension height. I notice that a lot of you think it's too high and so you lower the arms to compensate for it. Well that's not the problem at all. I don't know if anyone has mentioned it before or if it has ever been discussed, but its the hull itself that is the issue. Its too tall and out of proportion. That's not a problem one can easily fix however. Not without a lot of effort and refabrication. So I'm not going to even go there. This kit, in my opinion, is not worth THAT kind of effort. Not when there are better, modern, and more accurate kits out there.

I toyed with the idea of adding the older style engine deck, but I've decided I'm going to stick with the classic Tamiya style this kit has and just add my own brand of detailing and upgrades as I go. Its still going to look pretty cool when I'm done and only the "Tank Guys" will really notice what is wrong anyways.

Since accuracy will be an issue anyways I'm already decided on going for a "Time Slip" build where everything is different, but the same. Like the tanks orriginal design features were chosen differently and the vehicle was made based on slightly different choices being made during testing, before production. Why not? I can't make an accurate model based on this kit with out Herculean efforts to do so, and that's not worth the time for the above mentioned reason already stated.

So, its fun time in imagination land lol.
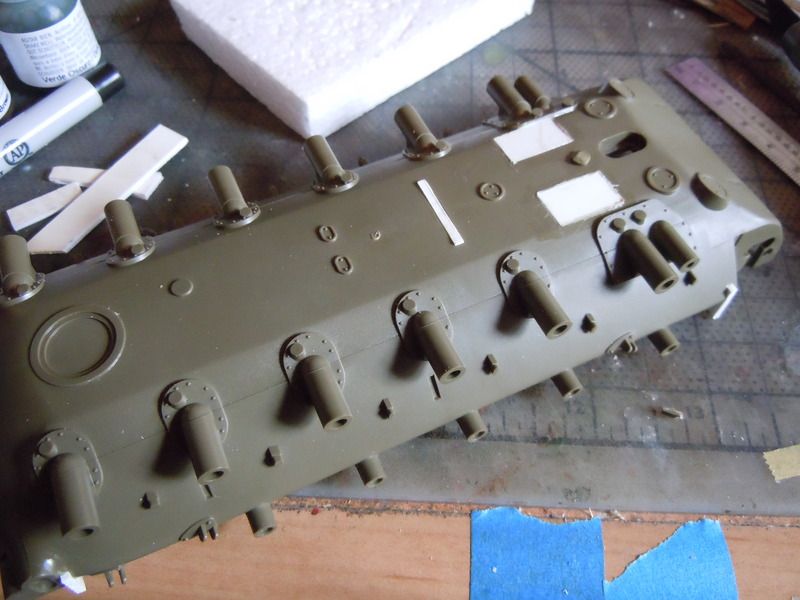
^ I closed up the holes on the bottom, except for the switch hole which I plan to use for the switch for the search light. I have a plan.  ;)

Unfortunately I forgot to take pictures of the rest of the things I talked about. [sigh] I need to remain focused.

Have a great day Gentlemen and keep modelling!

- Mike Brindos "Lost Boy"

  • Member since
    January 2015
  • From: Tumwater, WA.
Posted by M. Brindos on Tuesday, September 22, 2015 2:29 PM

I got further into building the suspension last night and then again this morning. Its all sorts of wrong lol. Well I'm going to make the best of it regardless and I'll make it look cool.  :)

First thing I noticed is that there are locations for the tensioner rollers, but no arms or rollers supplied in the kit. Not sure why this was left on the lower hull, but I'm going to have a little fun building because of it.

Once again the left-overs from the Dragon M-103 come in very handy. I had extra suspension arms and idler wheels and I think I've put them to good use here.

I began with the usual chopping and dry fitting to get an estimated 25mm in length. They could stand to be a few mm longer, but these will work well anyways.

I used some lengths of paper clip to pin the pieces together and add strength and support to my concoctions.

Then dry fitting, dry fitting, and more dry fitting.

I then worked out how I'm going to fit the final drives to the hull and the drive sprockets. I came up with a combination of Dragon and Tamiya parts with Def Models slotted drive sprockets made to fit the Tamiya kit. The way I have these mounted up will allow me to adjust the final angle of the final drives/sprockets to get them just where I want them without any problems. I'm going to have them angled downward slightly like I should have done on the M-103, showing the influence that the developement of the M-103 had on the features of the M-48. Which never happened in our history, but I'm having a bit of fun playing with alternate time lines here, so give me a little slack.

And another round of dry fitting and alignments made after that.

I'm loving all of this re-engineering. Its fun and it's really going to look pretty cool I think.

I will have myself an unusual and unique M-48 by the time this is all done.  :)


- Mike Brindos "Lost Boy"

  • Member since
    May 2009
  • From: Poland
Posted by Pawel on Tuesday, September 22, 2015 3:24 PM

Hello Mike!

I'm happy you're havin' fun!

Now the tensioning rollers were there on the -A2 tanks and gone on the -A2C and -A3 tanks. But the fittings were the same, left with empty holes - so Tamiya is somewhat accurate here. Granted, it looks funny.

You might want to check the sprockets again - I believe they should each have two disks and the track guide horns go between these. You also have M60 style sprockets there, with those recessed rings on them. On my M60 I used some light sanding to convert them back to M48 style.

Good luck with your build and have a nice day

Paweł

All comments and critique welcomed. Thanks for your honest opinions!

www.vietnam.net.pl

  • Member since
    January 2015
  • From: Tumwater, WA.
Posted by M. Brindos on Tuesday, September 22, 2015 3:36 PM

That's all dry fitted and unfinished so far, Pawel. Yeah, I figured there was not supposed to be any tensioner rollers, but they look cool, don't they? lol

I pulling a Baer here, and building up my own tank. I am fully aware of what I am doing and I'm okay with it. But I will modify those drive sprockets later. I just have them there for the pictures as that was how I was dry fitting things and making sure I had the room to play with. They are still unassembled.

This isn't going to be accurate, Pawel. This is an alternate version of my own design. Because I can.  :D

But by no means take any of what I just said as a brush-off for your advice. I value your advice because you're right on the mark with it. I still plan on using it so keep it coming, my friend.  :)

- Mike Brindos "Lost Boy"

  • Member since
    January 2015
  • From: Tumwater, WA.
Posted by M. Brindos on Tuesday, September 22, 2015 7:29 PM

Ginormous hole is now filled. Once this cures overnight I'll start filling and shaping it.

- Mike Brindos "Lost Boy"

  • Member since
    May 2009
  • From: Poland
Posted by Pawel on Wednesday, September 23, 2015 1:00 PM

Mike - I got you on that build philosophy - it's fine with me, and it's your model anyhow! Just wanted to add some info in case somebody finds it interesting. That gap above the sprocket sure is something to fill. But now I believe you'll be OK. Good luck with your build and have a nice day!

Paweł

All comments and critique welcomed. Thanks for your honest opinions!

www.vietnam.net.pl

  • Member since
    November 2009
  • From: SW Virginia
Posted by Gamera on Thursday, September 24, 2015 7:54 AM

Super cool Mike! I recently won this Tamiya kit in a raffle and have one of the new Dragon ones in the stash too. Will be refering back to this if I ever get around to building either of them. 

"I dream in fire but work in clay." -Arthur Machen


  • Member since
    January 2015
  • From: Tumwater, WA.
Posted by M. Brindos on Thursday, September 24, 2015 11:38 AM

I am truly flattered, Gamera. There are literally hundreds of builds based on this kit and you want to use mine as a reference later?! I'm not even building mine accurately!

I will need to process this.   :D  [stunned]

- Mike Brindos "Lost Boy"

  • Member since
    January 2015
  • From: Tumwater, WA.
Posted by M. Brindos on Friday, September 25, 2015 11:11 AM

I finished up the other side of the wheels last night. I don't have them chipped or roughed out yet, but the seams are gone. This morning I installed the power switch for the searchlight.

Now to finish up the return rollers and all of the fittings on the lower hull.

- Mike Brindos "Lost Boy"

  • Member since
    November 2009
  • From: SW Virginia
Posted by Gamera on Friday, September 25, 2015 11:21 AM

M. Brindos

I am truly flattered, Gamera. There are literally hundreds of builds based on this kit and you want to use mine as a reference later?! I'm not even building mine accurately!

I will need to process this.   :D  [stunned]


Lol, well whenever I get around to them I'll probably be using several builds including yours Wink

You're making some real progress there. 

"I dream in fire but work in clay." -Arthur Machen


  • Member since
    January 2015
  • From: Tumwater, WA.
Posted by M. Brindos on Friday, September 25, 2015 11:49 AM

You honor me. I'm always picking up things from you guys to improve my own builds, so I guess this shouldn't come as a shock lol. But still, I look up to many of you and I rufuse to think of myself as better than anyone.  :)

I am making significant progress because I'm not bogging myself down in crafting too many extra details. I should have filled in the backs of all of the suspension arms and I may still yet do that. I just wanted to make some progress as the M-60 is still waiting for more reference photos and scratch building to take place before I can move forward again.

Because that build is more accurate it does take more time to make progress in any significant way. This one has been more fun.  :)

Thank you for your input! I hope I can continue to entertain all of you with my oddball M-48 build lol.


- Mike Brindos "Lost Boy"

  • Member since
    July 2003
  • From: On my kitchen counter top somewhere in central North Carolina.
Posted by disastermaster on Friday, September 25, 2015 7:45 PM


What a bright idea...... 


                                         http://forum.fonarevka.ru/images/smilies/flashlight/Sonne.gif

http://img.photobucket.com/albums/v315/DJMikeOz/DSCN2094.jpg

                                   Gonna look awesome!


 https://i.imgur.com/LjRRaV1.png


  • Member since
    January 2015
  • From: Tumwater, WA.
Posted by M. Brindos on Friday, September 25, 2015 8:29 PM

Thanks DM!! These Pico LED's are so perfect for this stuff. I've always wanted to light one of these searchlights up! I feel like a kid in a candy store lol.

- Mike Brindos "Lost Boy"

  • Member since
    January 2006
  • From: NW Washington
Posted by dirkpitt77 on Friday, September 25, 2015 9:48 PM

Hahaha! That searchlight just made me giggle out loud. Love it!

I believe this build has officially crossed over into 'awesome' territory. Well done.

--Chris

    "Some say the alien didn't die in the crash.  It survived and drank whiskey and played poker with the locals 'til the Texas Rangers caught wind of it and shot it dead."

  • Member since
    January 2015
  • From: Tumwater, WA.
Posted by M. Brindos on Friday, September 25, 2015 9:58 PM

He he he he! Yeah. Isn't that neat?!

Sorry, sometimes I'm just a little kid. :)

- Mike Brindos "Lost Boy"

  • Member since
    January 2006
  • From: California
Posted by SprueOne on Sunday, September 27, 2015 12:35 PM

Idea YES on the LED Yes

Anyone with a good car don't need to be justified - Hazel Motes


Iron Rails 2015 by Wayne Cassell Weekend Madness sprueone

  • Member since
    July 2003
  • From: On my kitchen counter top somewhere in central North Carolina.
Posted by disastermaster on Sunday, September 27, 2015 4:34 PM

M. Brindos

He he he he! Yeah. Isn't that neat?!

Sorry, sometimes I'm just a little kid. :)


   http://i283.photobucket.com/albums/kk302/herekitty1960/smilies/ththYouStink.gif~originalhttp://emoticoner.com/files/emoticons/smileys/baby2-smiley.gif http://www.emoticons.gr/albums/uploads/megmoticons/faint.gif

I'm always a little kid............   (der).

 https://i.imgur.com/LjRRaV1.png


JOIN OUR COMMUNITY!

Our community is FREE to join. To participate you must either login or register for an account.

SEARCH FORUMS
FREE NEWSLETTER
By signing up you may also receive reader surveys and occasional special offers. We do not sell, rent or trade our email lists. View our Privacy Policy.