SEARCH FINESCALE.COM

Enter keywords or a search phrase below:

XM-706 635th Security Police Squadron

2486 views
14 replies
1 rating 2 rating 3 rating 4 rating 5 rating
  • Member since
    October 2004
  • From: Orlando, Florida
Posted by ikar01 on Wednesday, January 20, 2016 7:55 PM

He didn't get into any real trouble, just a lot of harrasemane from the other guys in the flight and l talking to by the flight chief and N.C.O.I.C., unlike like the guy who sank his 706 in the bay. 

That building was supposed to be one of our barracks.  It was located about 200 yards from one of the active runways, a stone's throw from the on base jungle area and about a 10-15 minute drive to the armory and the occupied part of the base. To get there you would have ot drive all the way around both 12,000 for runways and past the Navy area.  We were pretty sure it was an attempt to have us moved away from the rest of the base populationbecause we weren't too popular with them.

  • Member since
    November 2009
  • From: SW Virginia
Posted by Gamera on Wednesday, January 20, 2016 7:54 AM

Wow, those are awesome photos! Thanks for sharing. 

I bet your buddy got a real butt chewing out on those little accidents. 

And a barracks built of a patch of quicksand, sounds like the management here! 

"I dream in fire but work in clay." -Arthur Machen


  • Member since
    November 2009
  • From: SW Virginia
Posted by Gamera on Tuesday, January 19, 2016 7:30 AM

Thanks Ikar, I had no idea the bases were mostly paved and gravel roads and the vehicles were washed down after use, so I learned something new today. 

Now I'll go stand in the corner and shut up Embarrassed

"I dream in fire but work in clay." -Arthur Machen


  • Member since
    October 2004
  • From: Orlando, Florida
Posted by ikar01 on Monday, January 18, 2016 7:38 PM

Most people never even heard of us or how we operated.  When you mention Air Force they automatically ask a person what they flew. Normally when they hear of armor they automatically think of the Army and its tanks in the field.

We didn't operate our vehicles like the Army.  We were restricted to the base and it was a extremely rare event that would have us going past the fence.  Most of the time we would drive on the perimeter road which was gravel in some areas and dirt in others and at times we used to paved roads that led to a sector's resources, if any. 

At the end of each shift, the driver of each vehicle would refuel, unload all personnel, weapons, and equipment at the armory and then drive around back and wash the vehicle down with a hose and a street broom.  Then you park in the stand by area and return to the armory window and turn in the vehicle's I.D. card or report it ready.  This was done by anyone of us driving any type of vehicle.  That's why some of them had a semi-gloss shine on them.

  • Member since
    November 2009
  • From: SW Virginia
Posted by Gamera on Sunday, January 17, 2016 5:53 PM

She looks really good, nice work!

Although to nitpick maybe add a little Vietnam red mud thrown up on the tires and fenders?

"I dream in fire but work in clay." -Arthur Machen


  • Member since
    October 2004
  • From: Orlando, Florida
Posted by ikar01 on Sunday, January 17, 2016 4:10 PM

I checked the photos of the green pigs looking for tire pressure markings and vehicle numbers but found only shots without any markings at all.  Only the cammoflaged ones had markings for some reason.

  • Member since
    May 2009
  • From: Poland
Posted by Pawel on Sunday, January 17, 2016 1:42 PM

ikar01 - it's lookin' very good! Congratulations on the conversion! How about the markings - on the photos you posted I see Air Force V-100's were unmarked or almost unmarked. Didn't they really have any "bumper numbers"?

Thanks for sharing and have a nice day

Paweł

All comments and critique welcomed. Thanks for your honest opinions!

www.vietnam.net.pl

  • Member since
    October 2004
  • From: Orlando, Florida
Posted by ikar01 on Saturday, January 16, 2016 7:38 PM

She's all finished, finally.


  • Member since
    October 2004
  • From: Orlando, Florida
Posted by ikar01 on Wednesday, January 6, 2016 10:13 PM

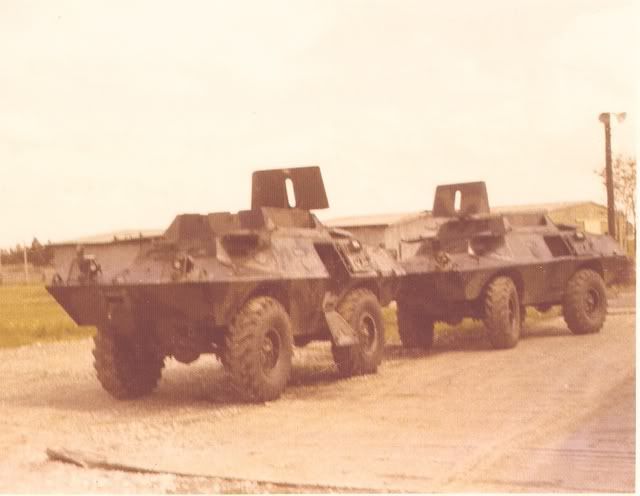
The Army used the V-100 with the gun turret and I think they used tjem mostly for convoy work.  Our 706s were for carrying around a Quick Response Team (Q.R.T.) to backup the towers, bunkers, or other positions or patrols  during an alert. 

They were easy to drive once you got used to them and drive and rode better than our 113s.  Learning how to drive both these vehicles took about two weeks, I think, of eight hour classes.  For me, that happened after my mid shift so I wouldn't get to sleep until about 4-5 o'clock and I had to be at the armory before 11.It was a couple long weeks, but worth it. 


The cammo we used was only the sandard tan over the green drab from the factory,  some were left green.  Not all squadrons used the same cammoflage though.  I think these vehicles were assigned to Ubon with the 8th S.P.S. and used a black over what lookd like a medium green instead of the greed drab.  It's a bit hard to tell in the photo.
 

  • Member since
    May 2009
  • From: Poland
Posted by Pawel on Wednesday, January 6, 2016 12:53 PM

ikar01 - that's some serious reference! I'd love to come back to you when I'm tackling my V100. That camouflaged vehicle - does it have two tones of green, or is it just tan over OD? Were the V100's good machines to use? Thanks for sharing and have a nice day

Paweł

All comments and critique welcomed. Thanks for your honest opinions!

www.vietnam.net.pl

  • Member since
    November 2009
  • From: SW Virginia
Posted by Gamera on Tuesday, January 5, 2016 7:42 AM

Wow, that's a boatload of work but going to be awesome once you're finished. 

"I dream in fire but work in clay." -Arthur Machen


  • Member since
    October 2004
  • From: Orlando, Florida
Posted by ikar01 on Monday, January 4, 2016 6:45 PM

I have a Squadron walk around book and photos of the vehicles I took when I drive them during the war.


  • Member since
    May 2009
  • From: Poland
Posted by Pawel on Monday, January 4, 2016 3:30 PM

ikar01 - very interesting build! Looks like you don't need no conversion kit, you're doing the whole conversion on your own - nice! What are your referencef for it? Thanks for sharing and have a nice day

Paweł

All comments and critique welcomed. Thanks for your honest opinions!

www.vietnam.net.pl

  • Member since
    October 2004
  • From: Orlando, Florida
XM-706 635th Security Police Squadron
Posted by ikar01 on Monday, January 4, 2016 5:58 AM

This is the Hobby Box kit that started out as a Army V-100 Police vehicle.

I thought this would be a fairly straight up piece of work until I got into it. 
The first thing I did was mark off where the parapet armor and blast doors would be. Once I started to get a good look at the rest of the kit I realized that I was in for a major project

This vehicle was powered by a big Chrysler engine and the kit gives you a long rectangular ...something.
Since I wasn't going to have the engine exposed I didn't worry about this too much.  I did however have to build a engine compartment on three sides, adding detail like the auxilliary outlet on the right side and a couple panels on the front.

I started to detail the driver's area and noticed that there was no shaft for the aquatic drive system and only one foot pedal where we had two because we had a manual transmission.  It was here that I discovered that the hull was marked for the V-150 series and had no interior to speak of.  I also had to use thin plastic to c over the interior floor area to get rid of these words and the sink marks in my kit.

I taped the top and bottom of the hull together and started fitting pieces together to form the coverings over the wheel wells, the interior lining pads for the passengers and driver.  I cut the driver's seat loose and made the parts that would allow the seat to raise or drop into the combat position.

I found the passenger seats were wrong and made new ones with their braces including the bench seats on the hull sides.

I had to make the housing for the shock absorber as well as the platform for the radio equipment that we didn't have but did make a good table for drinks and cards when the patrol was sitting for a period.

I added the gun port covers to the outside and found out that there were no parts for the inside port covers. I built these from scrap plastic as well as the tightening knobs to keep the doors sealed against the hull added the ribbing on the inside of the hatches as well as the locking levers and handles on both sides of the doors. I made the opening for the winch out of half round plastic strip and angled the ends.  The kit gives you a chain but it should be a cable.  A chain would never work and I don't know why they added this except for lack of research.  I added a bolt near the fuel caps for the small retaining chain that needed to be added.

I though about weather I should have the blast doors open and after mentioning it on another forum and getting a reply, I realized that I really wanted to have to doors open to show off the interior.  I did decide to have most of the hatches closed to show it in a partly readied state like it was doing a post check, being readied at the armory, or having lunch somewhere.  I did leave the rear gun port partly opened which was a common practice.

I cut open the top of the hull and started taking measurements for the armor plates, figuring height and angles and where to place the fixed weapons mounts, two in front and one in back.  I decided to have the side mounts locked down.  They were not used that much and if down would be almost invisible with the blast doors open.  I built he blast doors with their rails , reinforced plates that had the handles for lifting the heavy doors into their vertical position.


It was about this time I discovered that there is a M-706 conversion kit on the market.   When I checked it out I found out that even though it looked like a good kit I had to refuse to get it on the grounds that the conversion costs way too much, on the order of about 90.00.

I was not happy with the rubber wheels provided in the kit and ordered the resin set from Squadron.  These were much firmer and would not melt in the future and also had the "Commando" lettering on the sides.  When adding them to the vehicle you have to make sure the treads are facing in the right direction.  On the real vehicle getting this wrong would ruin its swimming capability as well as ground traction.  The tires were primed and then painted with a flat black with grey mixed in.  This would help show some of the effects of the sun that started to turn them lighter.

I fitted in the viewports and painted them clear green.  I will have to flatten them out a bit to cut down the high shine of the gloss paint. 

Speaking of paint, the interior is painted sky type but the hatches, inside and out are the same green as the vehicle's original green color.  I decided to paint the vehicle green instead of the cammoflage I put on the Verlinden kit.  There's a comment or two  I could make about that kit.  it also worked to my advantage when going through some of my reference photos for vehicle numbers that I came across a pictures of a green duck but couldn't see any numbers.  I looked through a magnifying glass and discovered that this one was completely unmarked.  For the first time I can actually do a model with no decals and be correct, and have proof.

The pig now sits on the workbench painted and waiting for the mirrors, weapons, and supplies to be added.  This one will carry two M-60s, one with a cover over it, and a M-174 automatic grenade launcher with it's clip loaded.


JOIN OUR COMMUNITY!

Our community is FREE to join. To participate you must either login or register for an account.

SEARCH FORUMS
FREE NEWSLETTER
By signing up you may also receive reader surveys and occasional special offers. We do not sell, rent or trade our email lists. View our Privacy Policy.