SEARCH FINESCALE.COM

Enter keywords or a search phrase below:

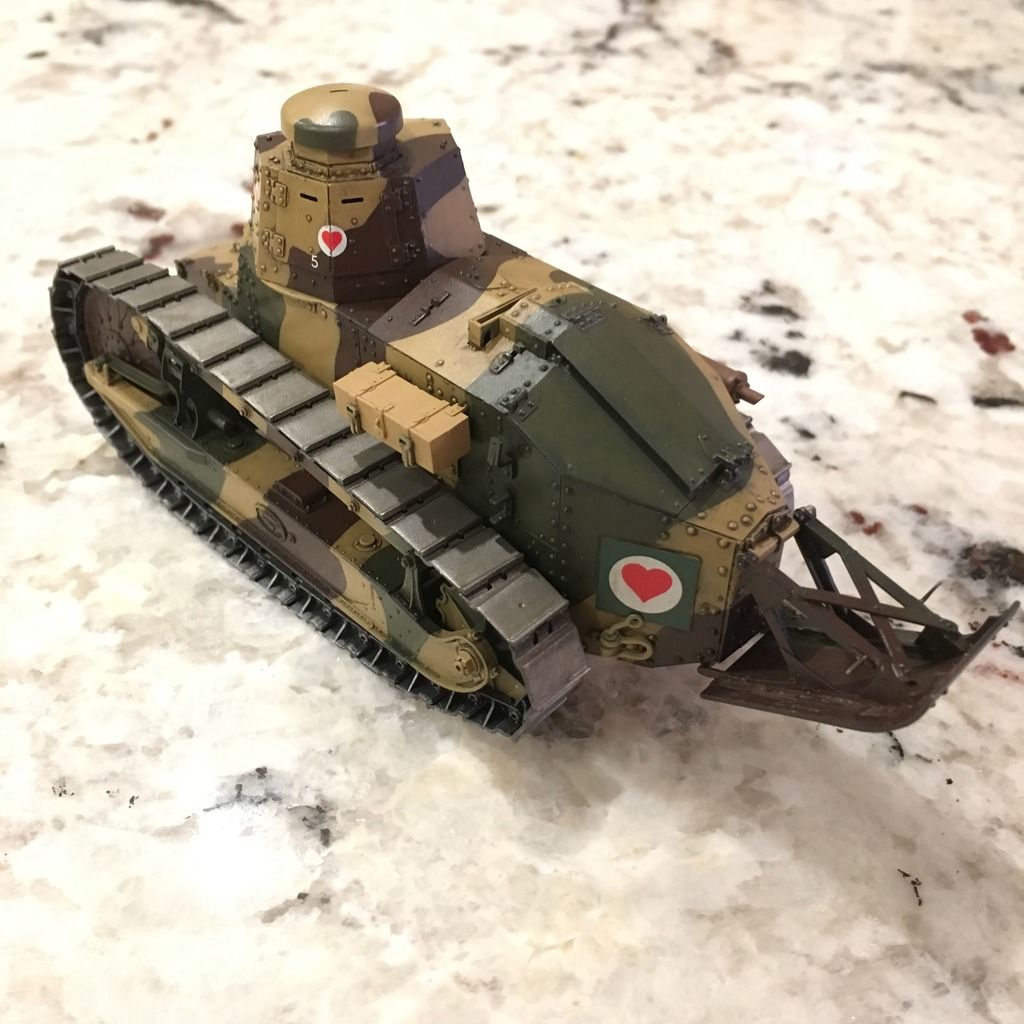
Finished: 1/35 Meng Renault FT-17 WIP from an Aircraft guy

2794 views
29 replies
1 rating 2 rating 3 rating 4 rating 5 rating
  • Member since
    January 2015
Posted by BrandonD on Friday, March 17, 2017 5:22 PM

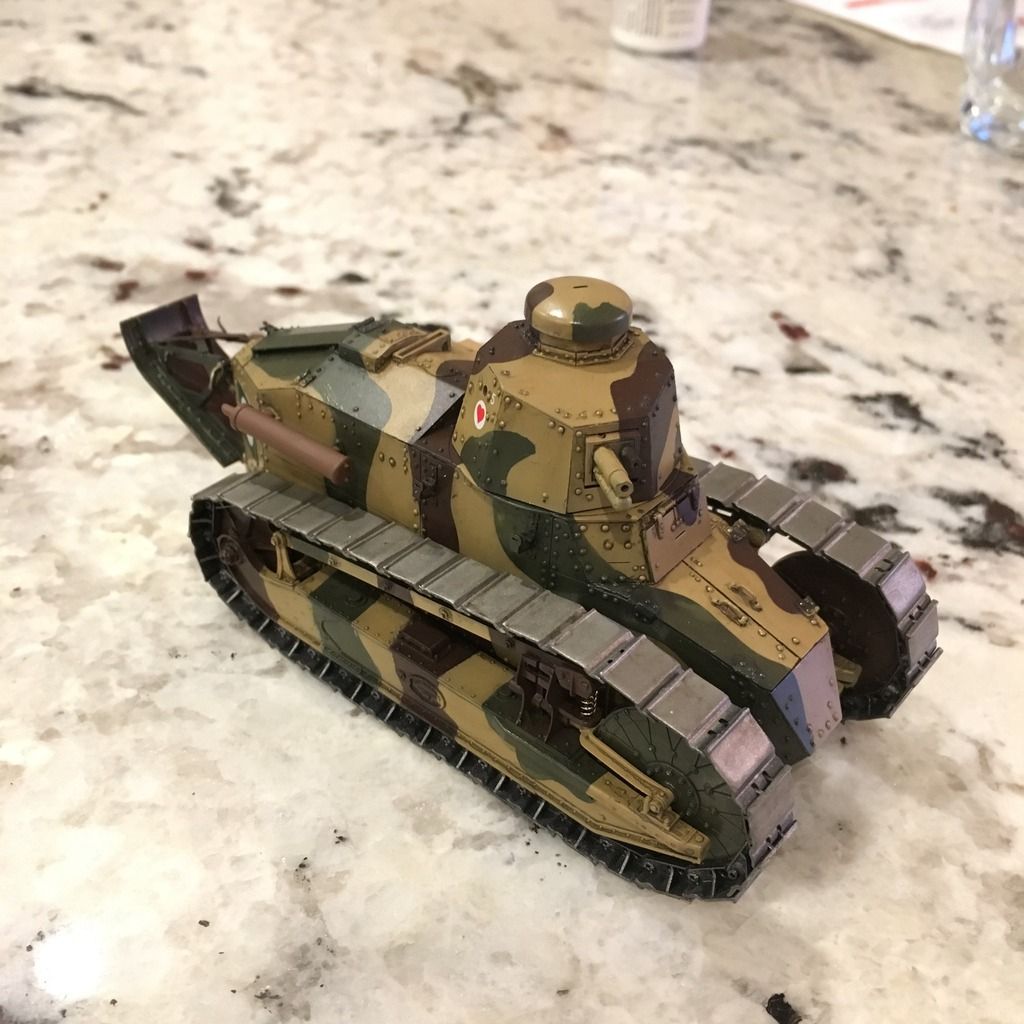
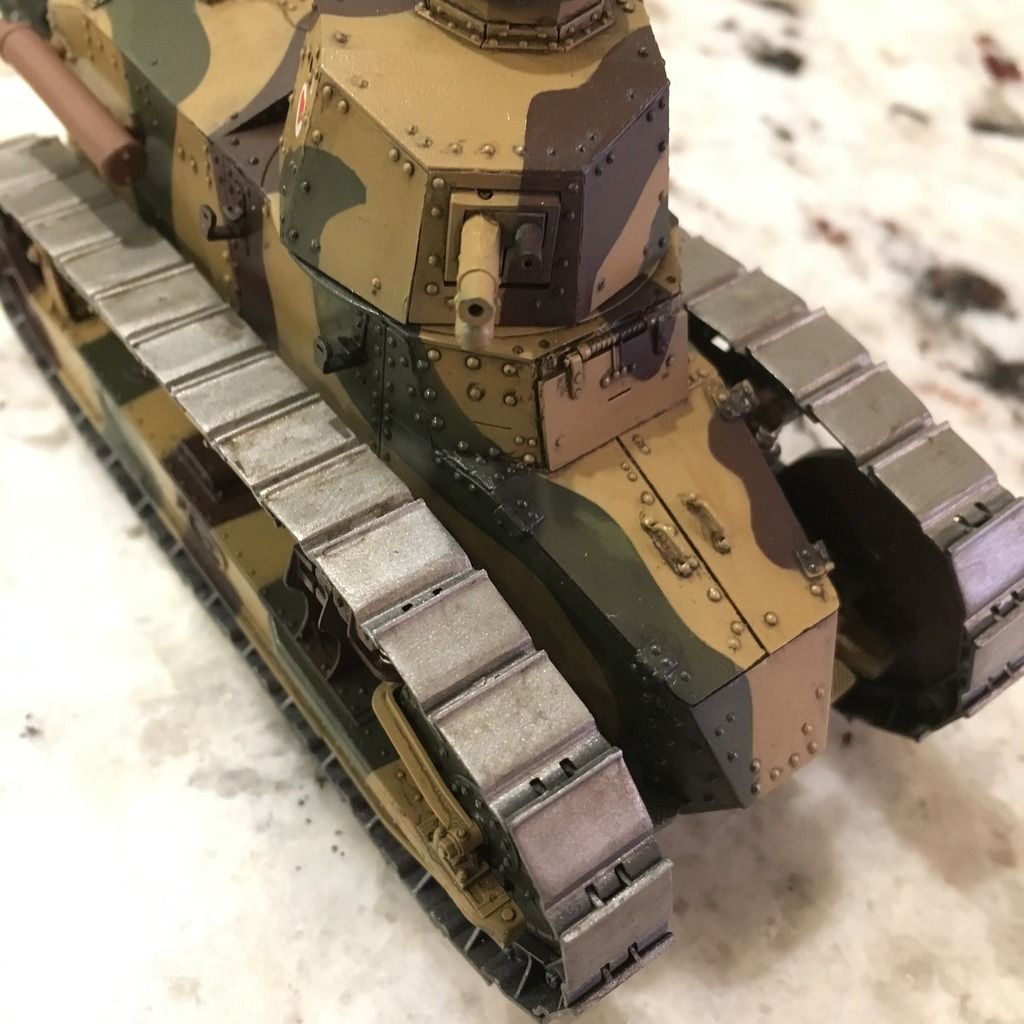
Thanks, all! It was a lot of fun. As for the tracks, they are Alclad Steel sprayed directly over Mr. Surfacer 500 (gray). Then some burnt umber pigments for weathering.

Bish - probably not too much more heavy metal, but I do have a Meng Mk.V and a Takom Turtle you're likely to see.

Thanks again for all the help and encouragement.

-BD-

  • Member since
    November 2009
  • From: SW Virginia
Posted by Gamera on Thursday, March 16, 2017 11:18 AM

Great job on her, I wouldn't want to cover all the work you did with mud either. Yes

"I dream in fire but work in clay." -Arthur Machen


  • Member since
    December 2015
  • From: providence ,r.i.
Posted by templar1099 on Thursday, March 16, 2017 7:48 AM

I agree with all the above,really nice build and a nice deft touch on the weathering.NOW add wings.

"le plaisir delicieux et toujours nouveau d'une occupation inutile"

  • Member since
    April 2015
Posted by Mopar Madness on Wednesday, March 15, 2017 8:07 PM

Great job on the tracks.  Very convincing!

Chad

God, Family, Models...

At the plate: 1/48 Airfix Bf109 & 1/35 Tamiya Famo

On deck: Who knows!

  • Member since
    July 2014
  • From: Rifle, CO. USA
Posted by M1GarandFan on Wednesday, March 15, 2017 5:35 PM

It looks really good. Very nice job. Those tracks look so............metallic!

  • Member since
    December 2002
  • From: Bury St Edmunds, Suffolk, England
Posted by Bish on Wednesday, March 15, 2017 4:02 PM

You have done a really nice job on that Brandon. I think you made the right choice with the weathering, no point jumping in at the deep end.

Hope we will be seeing more hevy metal from you.

I am a Norfolk man and i glory in being so


On the bench: Airfix 1/72nd Harrier GR.3/Fujimi 1/72nd Ju 87D-3

  • Member since
    January 2015
Posted by BrandonD on Wednesday, March 15, 2017 3:23 PM

Ok, it's finished!

I didn't do the mud on the suspension, but used pigments to add dirtiness to the tracks and sides, and used some of the Vallejo mud to little effect on the front.

Hope you all like it. It's been a fun diversion from wingy things.

Thanks for all the help and encouragement. It's been a fun ride.

-BD-

  • Member since
    November 2009
  • From: SW Virginia
Posted by Gamera on Thursday, March 2, 2017 9:14 AM

She's looking really good there BD. 


Wish I could help with the weathering but I have a weird thing with stucco paint for texture and airbrushing paint in for mud that doesn't look it would work that well here. 

"I dream in fire but work in clay." -Arthur Machen


  • Member since
    December 2002
  • From: Bury St Edmunds, Suffolk, England
Posted by Bish on Tuesday, February 28, 2017 5:04 PM

As you can see in that pic, mud tands not to stick to the areas that meet the ground, but mainly in the recesses and on the suspension in side the tracks.

For mud on the tracks i would use pigments mixed in a small amoutn of water and applied wet. For the mud bult up on the suspension i would mix some pigment, water and plaster of paris powder, but you could try your vellejo mud.

I am a Norfolk man and i glory in being so


On the bench: Airfix 1/72nd Harrier GR.3/Fujimi 1/72nd Ju 87D-3

  • Member since
    April 2012
Posted by Reserve on Tuesday, February 28, 2017 1:02 PM

I generally mix up some lightweight hydrocal and dump an appropriate quantity of acrylic paint into the mix, then stipple it on with an old paitbrush. This works well for fine smooth mud. If I want something with a little more texture I will mix some blue gerbil dust in; this stuff is very fine and makes for a good stiff mud. You could probably eve get away with some finer kitty litter for rocks altho I have not done this.

 When the stuff dries you can, if you wish, take a stiff brush and remove some here and there for an adjusted effect. Hope this helps


Regards,

Mark

  • Member since
    January 2015
Posted by BrandonD on Tuesday, February 28, 2017 11:30 AM

Ok, so...what now, armor experts?

I think I'm at a snag. I keep staring at it and wondering which way to go next. Most of this is still just press-fit in subassemblies, and the tracks are removable at this point. I painted them Mr. Paint Steel, then dropped some Flory Dark Dirt panel line wash on them, using a brush to rough it up and remove most of it. But they're still clean, and while pigments sound fun, I don't know if that's going to be enough. But judging by this pic of the same tank I am building, maybe it is?

There appears to be some mud on the big suspension bars, but the rest appears rather clean. Maybe some mud in the forward part of the track cleats.
This thing served in Verdun, according to Meng, and having visited Verdun, that's one of the things that drew me to this scheme. I remember Verdun being muddy, even in 2008 when the grass and trees had grown back.

So I guess what I'm asking is this: What's the best way to replicate some stuck-on mud in the tracks as shown in the pic? I have some of the Vallejo Mud product, but have yet to use it, or even open it. I have considered mixing paint with Tamiya putty and stippling it in, and even just dropping pigments onto a wet surface and building them up, but I don't know if that would work.

As for the rest of the vehicle, I still need to add a metal screen on top (one of the PE parts), finish the exhaust and finish painting the wooden storage box and tools, then cement them on.

I also feel like there should be more tonal variation in the paint, and I might hit it with another round of oil filters now that it has a mostly flat coat on it. I oil dot filtered it when it was glossy, and I liked the effect, but it's a bit muted now.

Thanks in advance for any input and advice. This has been a lot of fun, and I will definintely be looking forward to the Mk.V I have in the stash.

-BD-

  • Member since
    January 2015
Posted by BrandonD on Tuesday, February 28, 2017 11:19 AM

Thanks, Gamera and Bish!

Bish - putting wings on it is a GREAT idea! I'm thinking maybe the main wing from a Fokker D.VIII on the turret and some stabilizers on the rear part that I always think of as a wheelie bar for a tank.

-BD-

  • Member since
    November 2009
  • From: SW Virginia
Posted by Gamera on Thursday, February 23, 2017 7:39 AM

She's coming along great BD, and the weathering is the fun part. 

"I dream in fire but work in clay." -Arthur Machen


  • Member since
    December 2002
  • From: Bury St Edmunds, Suffolk, England
Posted by Bish on Wednesday, February 22, 2017 4:27 AM

Looking good. Glad to see you have resisted temptation and not put wings on it.

When you start ordering Pz Grey by the gallon, its time to panic Big Smile

I am a Norfolk man and i glory in being so


On the bench: Airfix 1/72nd Harrier GR.3/Fujimi 1/72nd Ju 87D-3

  • Member since
    January 2015
Posted by BrandonD on Tuesday, February 21, 2017 9:36 PM

Very small update on the Meng FT-17. I got the decals (all six of them) on. After building a Mirage last year that felt like it had 70 or 80 decals/stencils, this is a nice change of pace, especially when looking at a Phantom that has 100+.

I've since touched up paint on the uppermost part of the suspension so it matches the camouflage pattern on the body. I also got some more parts glued together, but this is still largely press-fit subassemblies.

As of now, it all has a gloss clear on it, and I can start on the weathering. I still need to paint the tools, wooden box on the side and exhaust pipe. But it feels like a tank now.

-BD-

  • Member since
    January 2015
Posted by BrandonD on Tuesday, February 21, 2017 9:36 PM

Gamera

BD: What you've got looks great!!! I'm just trying to save you a little extra work the next time around! Wink


And believe me, it's MUCH appreciated Big Smile

-BD-

  • Member since
    November 2009
  • From: SW Virginia
Posted by Gamera on Sunday, February 12, 2017 6:52 PM

BD: What you've got looks great!!! I'm just trying to save you a little extra work the next time around! Wink

"I dream in fire but work in clay." -Arthur Machen


  • Member since
    October 2010
  • From: Rockford, IL
Posted by AlanF on Saturday, February 11, 2017 5:52 PM

Nice work so far, from another aircraft guy that found armor!

-Alan

  • Member since
    January 2015
Posted by BrandonD on Friday, February 10, 2017 3:12 PM

Thanks for the kind words, everyone! It's been fun, to say the least.

No new progress at the moment, as I'm making the house ready for the girlfriend to move into, so I've been busy.

Gamera - I thought about using that but didn't have any handy when I wanted to paint. I'll probably go that route when I do the Skoda Turtle.

-BD-

  • Member since
    January 2010
Posted by CrashTestDummy on Thursday, February 9, 2017 3:38 PM

Yeah, your camo came out fine!  I know you were just dipping your toe in the water, but that kit with the full interior is a very fun build!  The engine compartment is mostly accurate, and a few additional wires and some weathering make the engine look almost runable. 

I'm in the middle of one right now.  Just about to get to the exterior paint now.  Still not 100% what scheme I'm going to use. 

Gene Beaird,
Pearland, Texas

G. Beaird,

Pearland, Texas

  • Member since
    November 2009
  • From: SW Virginia
Posted by Gamera on Tuesday, February 7, 2017 12:28 PM

Hey BD, the camo came out great!!! 

Frankly though I 'll agree that masking over irregular subjects like armour is a pain with tape. A lot of people use Silly Putty or poster tack. I've had good experiences with SP and it's become my go to item for masking tanks:

"I dream in fire but work in clay." -Arthur Machen


  • Member since
    July 2003
  • From: Cincinnati, Ohio
Posted by ridleusmc on Tuesday, February 7, 2017 4:08 AM

It looks spectacular, and I do enjoy seeing early armor.  You're making quick progress on the kit.  I especially like your interior weathering.  The compartment walls look appropriately and convincingly beat up and dirty.  

-Chris

  • Member since
    August 2016
  • From: Eufaula, Alabama
Posted by WannabeFarmboy on Tuesday, February 7, 2017 1:33 AM

I'd love to build a piece of armor soon, but my modeling budget isn't anywhere near what I'd like it to be right now and I keep finding great deals on planes I've been wanting to build. Then my dad sent me a 1/48 B-24 and I signed up for two group builds that will involve building planes. So, doesn't look like 2017 is going to be the year I branch out into armor. Confused

Great looking build so far btw. 

  • Member since
    January 2013
Posted by Wood on Monday, February 6, 2017 7:13 PM
Everyone should build an armor kit. There is too much fun to be had to turn down the opportunity to build armor.
  • Member since
    January 2015
Posted by BrandonD on Monday, February 6, 2017 12:04 PM

I thought I'd have to wait till tonight for paint, but I managed to spray the brown and green on Friday night, and I spent most of late Saturday night masking it.

I used Tamiya Tape for Curves on this, and I wouldn't again. I have used it on aircraft and been happy, but I think the more irregular surface of armor needs something that has a little more bite to it. The vinyl tape kept moving around.

Thin strips (like 0.5mm) of standard Tamiya Kabuki tape were much more useful.

Sunday morning, I sprayed the tan color and pulled up the masks. Lots of work to do still, and some touching up is in order, but overall I'm happy with it.

For colors, I used Tamiya paints: RAF Dark Green, Flat Brown and a 1:1 mix of Buff and Desert Yellow.

Hopefully I'll gewt some time tonight to touch up the areas where themasks lifted, and I'm hoping I can do that with a brush.

Weathering will probably mostly be done with oils, though I may toss a Flory Dark Dirt wash in some of the panel lines.

-BD-

  • Member since
    January 2015
Posted by BrandonD on Monday, February 6, 2017 11:58 AM

Thanks, guys. This has been a lot of fun. I don't see myself branching out into armor too much, though I do have one of those Skoda Turtles and a Mk.V Male tank in the stash. There's a Dragon Stug somewhere around, but no idea if it has all the parts.

-BD-

  • Member since
    November 2009
  • From: SW Virginia
Posted by Gamera on Sunday, February 5, 2017 5:32 PM

For someone who doesn't do much armour you're doing a great job on her. Yes

"I dream in fire but work in clay." -Arthur Machen


  • Member since
    March 2007
  • From: Northeast WA State
Posted by armornut on Friday, February 3, 2017 11:58 PM

Back in the saddle again, once you build a tank no matter how long you stray they always call you back....always. Cool WIPs, should be a sweet ride when your done.

we're modelers it's what we do

  • Member since
    May 2013
  • From: From the Mit, but live in Mason, O high ho
Posted by hogfanfs on Friday, February 3, 2017 4:27 PM

Brandon,

Looking great so far!

But, be very careful, next thing you know, you buy another tank, and another, and then you have crossed over to the dark side! Big Smile

Actually, not a bad place to be! 

I'm Looking forward to more progress!

 Bruce


 On the bench:  1/48 Eduard MiG-21MF

                        1/35 Takom Merkava Mk.I


JOIN OUR COMMUNITY!

Our community is FREE to join. To participate you must either login or register for an account.

SEARCH FORUMS
FREE NEWSLETTER
By signing up you may also receive reader surveys and occasional special offers. We do not sell, rent or trade our email lists. View our Privacy Policy.