SEARCH FINESCALE.COM

Enter keywords or a search phrase below:

academy stug

2440 views
12 replies
1 rating 2 rating 3 rating 4 rating 5 rating
  • Member since
    September 2013
academy stug
Posted by blackdog62 on Sunday, June 4, 2017 5:45 PM

just wanted to throw up a pick of this stug i have been working on. it still needs to be washed and weatherd. the kit it self was easy much like a older tamyia kit battery and motor placement all in place to make a moveing toy.

the only thing i have done is cut the side armor into there own plates. they still nead a better placment or to hang more propper.

im always on the look out for somthing diferent and i thought wy not add a sloped armor to the front. so i did. it just so happens in my internet resurch for stugs i found that exact smae idea. i dont have a pic of it. its on the eastern front and showed a squad of stugs and the closest one had this sloping armor on it. i hope you enjpy and ill add more as it progreses.

  • Member since
    September 2013
Posted by blackdog62 on Sunday, June 4, 2017 5:53 PM

sorry for the aircraft i couldent remove them after adding them by mistake. a pic of the plastic for the added armor.

  • Member since
    March 2003
  • From: Rain USA, Vancouver WA
Posted by tigerman on Monday, June 5, 2017 1:09 AM

Off to a good start. As you said, the kit from my understanding is that it was indeed a copy of a Tamiya kit. 

   http://i7.photobucket.com/albums/y269/wing_nut_5o/PANZERJAGERGB.jpg

 Eric 

  • Member since
    December 2002
  • From: Bury St Edmunds, Suffolk, England
Posted by Bish on Monday, June 5, 2017 1:11 AM

This loks nice, and like the addition of the extra armour. I believe a lot of the early Academy armour kits were copies of Tamiya kits.

I am a Norfolk man and i glory in being so


On the bench: Airfix 1/72nd Harrier GR.3/Fujimi 1/72nd Ju 87D-3

  • Member since
    November 2009
  • From: SW Virginia
Posted by Gamera on Monday, June 5, 2017 7:48 AM

Very neat clean job with her! 

You might try a little weathering in the future but you've got the basics down. Yes

"I dream in fire but work in clay." -Arthur Machen


  • Member since
    September 2013
Posted by blackdog62 on Monday, June 5, 2017 8:53 AM

Thanks guys that's my next step to do some washes dirty it up some. I think I'm going to try make some welding that holdes my armored plat on the front. May even try some new side armor. Somthing that looks more to scale.

  • Member since
    September 2013
Posted by blackdog62 on Friday, June 9, 2017 6:05 PM

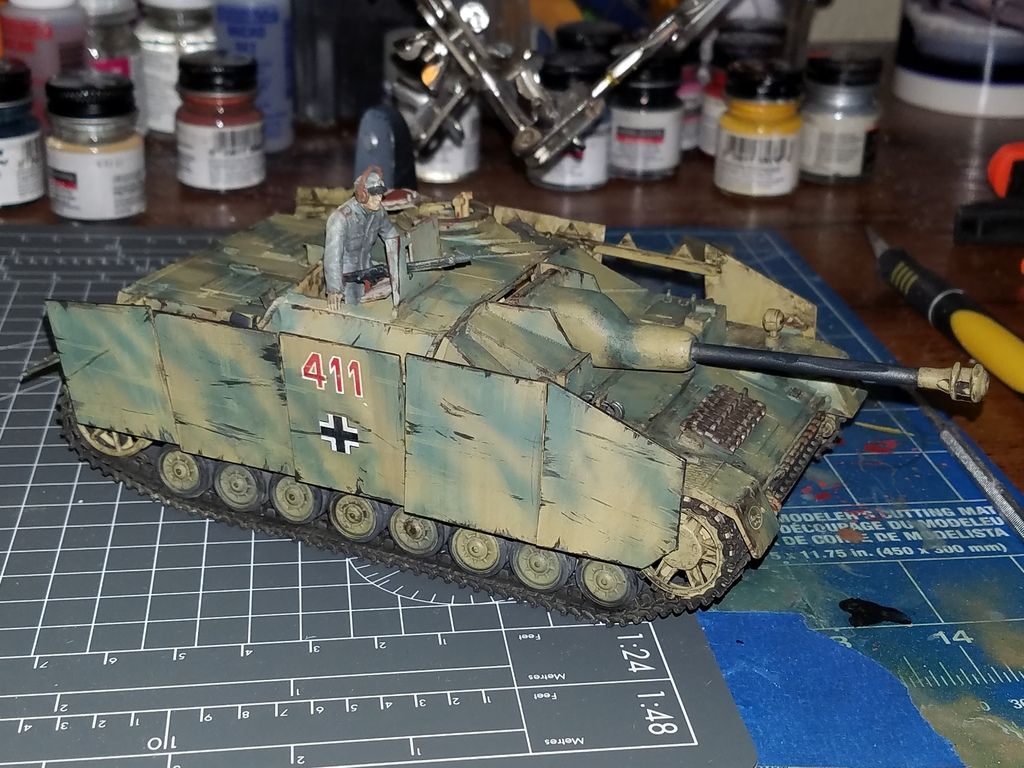
well i got some time on my bench yesterday and got some weathering done.

first of i did get some chiping done. i used rust with a little black in it and then another wich was black with some steel added folowed up with some deluted dunkelgelb. all paints are model master acryl.

then i did a wash useing vallejo. its there black wash also arcrylic. i did not put on a clear coat so i worked slow in small areas with a q-tip with windex to help clean it up.

clean it up quick or its permanent.
  • Member since
    September 2013
Posted by blackdog62 on Friday, June 9, 2017 6:09 PM

and yet another pic. i took some better ones but photobucket is take like 24 hr to post. i still have way to go but this is a good start. tools and hatches fell during weathering alsoStick out tongue

  • Member since
    September 2013
Posted by blackdog62 on Friday, June 9, 2017 7:41 PM

close up

  • Member since
    July 2006
  • From: San Francisco Bay Area
Posted by bufflehead on Sunday, June 11, 2017 5:05 PM

blackdog, that's some really nice progression from the first photo with the clean vehicle to the chipped and dirty one in the last photos!  very nice work sir!

Ernest

Last Armor Build - 1/35 Dragon M-26A1, 1/35 Emhar Mk.IV Female


Last Aircraft Builds - Hobby Boss 1/72 F4F Wildcat & FW-190A8


  • Member since
    September 2013
Posted by blackdog62 on Tuesday, June 13, 2017 8:48 PM

bufflehead  thank you i should have posred more pics of the building progres so i could start this post more proper. i still have a way to go. kicking around the idea of building somthing to place it on.

  • Member since
    November 2009
  • From: SW Virginia
Posted by Gamera on Wednesday, June 14, 2017 7:19 AM

Oh gee hadn't noticed you'd updated your post. 

Looks pretty decent to me, I like the worn areas on the front of the skirts. 

"I dream in fire but work in clay." -Arthur Machen


  • Member since
    September 2013
Posted by blackdog62 on Saturday, June 17, 2017 4:48 PM

thanks  guys next is just a bunch of gear not sure how much. bin a bit slow as of late bababy sitting my 17 month old grand daughter. while my daughter works. shes a hand full Cowboy

JOIN OUR COMMUNITY!

Our community is FREE to join. To participate you must either login or register for an account.

SEARCH FORUMS
FREE NEWSLETTER
By signing up you may also receive reader surveys and occasional special offers. We do not sell, rent or trade our email lists. View our Privacy Policy.