SEARCH FINESCALE.COM

Enter keywords or a search phrase below:

Panzer II: Double Trouble - ICM Ausf D. and Hobby Boss Ausf. J - Aug. 6 Update

10850 views
31 replies
1 rating 2 rating 3 rating 4 rating 5 rating
  • Member since
    July 2006
  • From: San Francisco Bay Area
Panzer II: Double Trouble - ICM Ausf D. and Hobby Boss Ausf. J - Aug. 6 Update
Posted by bufflehead on Monday, June 19, 2017 12:42 AM

Hello all!  I'm moving back up to my favorite scale, 1/35 and decided to do sort of a double Panzer build.

First round will be ICM's Panzer II Ausf. D.  I've had this kit in the stash for a long while and it always seemed like a simple, easy kit.

At some point I picked up these accessories so I figure I might as well use them:

They should spruce up this old kit nicely!

For the second round I chose this Hobby Boss Panzer II Ausf. J.  Much newer kit with better details and very nice molding.  Both will be painted in good ol' panzer grey!

Right off the bat the ICM kit presented some challenges as there are numerous sink marks on some parts:

But that's nothing a little putty and elbow grease can't take care of!

OK, most of the sink marks have been filled and sanded, suspension cleaned up and lower hull tub assembled.

The upper hull has a lot of hatches and panels to install.  Of course, most of them don't fit properly so more sanding will be required. Indifferent

Lastly the turret has been cleaned up and waiting for the commander to add the weapons systems and other details. Big Smile

As soon as I get most of the Ausf. D assembled I'll start work on the Ausf. J.

Happy Modeling Everyone!Smile


Ernest

Last Armor Build - 1/35 Dragon M-26A1, 1/35 Emhar Mk.IV Female


Last Aircraft Builds - Hobby Boss 1/72 F4F Wildcat & FW-190A8


  • Member since
    December 2002
  • From: Bury St Edmunds, Suffolk, England
Posted by Bish on Monday, June 19, 2017 2:01 AM

This will be one to watch, looking forward to thise Ernst, especially the Ausf J.

I am a Norfolk man and i glory in being so


On the bench: Airfix 1/72nd Harrier GR.3/Fujimi 1/72nd Ju 87D-3

  • Member since
    July 2003
  • From: On my kitchen counter top somewhere in central North Carolina.
Posted by disastermaster on Monday, June 19, 2017 2:39 AM

Stand back gang........

Earnest is gettin all wound up with a pair of mini~kitties.

                          http://i20.photobucket.com/albums/b232/gluetank/Animated/th_1-Animated-Disastermaster.gif?t=1296616998

 https://i.imgur.com/LjRRaV1.png


  • Member since
    September 2016
  • From: Albany, New York
Posted by ManCityFan on Monday, June 19, 2017 8:16 AM

Definitely following this thread.  Those AM gun barrels look excellent. 

Dwayne or Dman or just D.  All comments are welcome on my builds. 

  • Member since
    December 2002
  • From: Bury St Edmunds, Suffolk, England
Posted by Bish on Monday, June 19, 2017 9:06 AM

ManCityFan

Definitely following this thread.  Those AM gun barrels look excellent. 


Metal barrels are the way to go. Those Lion marc ones are rather nice.

I am a Norfolk man and i glory in being so


On the bench: Airfix 1/72nd Harrier GR.3/Fujimi 1/72nd Ju 87D-3

  • Member since
    November 2009
  • From: SW Virginia
Posted by Gamera on Monday, June 19, 2017 11:51 AM

Great to see you back and back at the bench no less!!!

Looking forward to these. And kudos for building an ICM kit, not sure I'd have to guts to try. 

"I dream in fire but work in clay." -Arthur Machen


  • Member since
    July 2006
  • From: San Francisco Bay Area
Posted by bufflehead on Tuesday, June 20, 2017 1:43 AM

- Hey Bish, thanks for stopping by and taking a look!  Yeah, I'm eager to get started on the Ausf. J, but I want to knock this ICM kit into shape first! 

-  good one Steve, but no way is this going to compare to your superb Phantom Kitties build that you recently completed!

- Thanks Dwayne!  I hope one of those gun barrels fits OK!  Bish seems to think the Lion Marc barrel is the one! Not sure what I bought them for, but no point having them just sitting in the spares box!

- Nice to hear from you Gamera!  Call me a glutton for punishment, but those old kits still have some charm as long as you're willing to put in the extra time and effort.

OK, here's a bit of an update.  The upper hull has been glued on and all the hatches have been dry-fitted into place.  Took a bit of fine sanding to all of them to make them fit, but that's something to be expected with this type of kit.

In order to fix the sink mark on the turret top I had to shave off one of the molded on lift hooks.  Fortunately I have quite a few of these in resin that I cast for a previous build.  I'll replace all of them with the resin castings.

That's all for now!

Ernest

Last Armor Build - 1/35 Dragon M-26A1, 1/35 Emhar Mk.IV Female


Last Aircraft Builds - Hobby Boss 1/72 F4F Wildcat & FW-190A8


  • Member since
    November 2009
  • From: SW Virginia
Posted by Gamera on Thursday, June 22, 2017 10:19 AM

Nice! Looks like you've off to a solid start.

"I dream in fire but work in clay." -Arthur Machen


  • Member since
    February 2017
Posted by ugamodels on Thursday, June 29, 2017 10:30 PM

Can you mark a "sink mark" on a picture and tell me how to identify them?

I type on a tablet. Please excuse the terseness and the autocorrect. Not to mention the erors. 

  • Member since
    July 2006
  • From: San Francisco Bay Area
Posted by bufflehead on Saturday, July 1, 2017 9:31 PM

Sure thing ugamodels, I will as soon as this photobucket mess is taken care of!

*UPDATE*

ugamodels, refer back to my original post.  I had to reload all the pics from a new image hosting site and in the process I also updated the photo with the sink marks.  Now it has the sink mark areas clearly indicated.

BTW, a sink mark is caused by improper molding by the manufacturer.  It happens a lot with older kits as the molds/equipment used for them are also older and probably don't function properly.  I think its also caused by the plastic cooling unevenly in the molds.   Fortunately sink marks can usually be corrected by filling with model putty or plastic and then sanding the area flush and smooth to the original surface.

Ernest

Last Armor Build - 1/35 Dragon M-26A1, 1/35 Emhar Mk.IV Female


Last Aircraft Builds - Hobby Boss 1/72 F4F Wildcat & FW-190A8


  • Member since
    July 2006
  • From: San Francisco Bay Area
Posted by bufflehead on Saturday, July 1, 2017 11:07 PM

Wow, what a mess this Photobucket fiasco has caused!  I would have posted this update a few hours ago instead I spent that time dealing with the PB update.   I made the switch to imgur and it seems to be working ok.  Yes

The Pz II Ausf D is finally nearing completion, but I had to spend a quite a bit of time knocking this old kit into shape.  One thing I decided to do was to thin out the fenders to a more scale thickness.  In the pic the right side (tank driver right!) has been thinned, but the left side still needs to be done:

I replaced nearly all the tools with spares from a Dragon kit (not sure which).  The only problem was that they were bare tools, missing the clamps.  Lion Roar's German Tool Clamp PE set to the rescue, along with some pcs leftover from Eduard PE sets !  After the long layoff, it was challenging assembling all those PE tool clamps, but once I figured out the best technique it became quite fun.  The only problem is the jack...I only had one of the clamps.  I'll have to figure out what do with the second clamp Confused

Installed the Armorscale metal gun barrel as it was a better fit to the mantlet.  I also found a brass MG34 gun barrel so that was installed as well.

There are a few more detail pieces to add, but I'll do that after I've got the tracks installed as I have a tendency to be a bit heavy handed during track installation and I don't want to break off any delicate parts.

Here's the Bronco Pz II Ausf D indy links.  They're very nicely detailed!

I put a dozen together to see how they fit the sprocket:

They fit perfectly!  I did the same with the kit tracks.  You tell me which is better!

OK, next update should be with the completed Ausf D. and then I'll get started on the Ausf. J!

Ernest

Last Armor Build - 1/35 Dragon M-26A1, 1/35 Emhar Mk.IV Female


Last Aircraft Builds - Hobby Boss 1/72 F4F Wildcat & FW-190A8


  • Member since
    September 2016
  • From: Albany, New York
Posted by ManCityFan on Sunday, July 2, 2017 8:50 AM

Looking good.  The barrels and PE clamps are definitely an improvement.  The Bronco tracks look like they were made for this kit.  Looking forward to future updates.

D

Dwayne or Dman or just D.  All comments are welcome on my builds. 

  • Member since
    June 2004
  • From: East Stroudsburg, PA
Posted by TigerII on Monday, July 3, 2017 12:04 AM

So far so good. I really like the addition of the brass MG.

Achtung Panzer! Colonel General Heinz Guderian
  • Member since
    December 2002
  • From: Bury St Edmunds, Suffolk, England
Posted by Bish on Monday, July 3, 2017 2:19 AM

Thats looking good there Ernest. Its a nicer kit than i was expecting and with a bit of work it scrubs up well.

Nice to see those tracks as well. I havbe just ordered their set for the AS 90 and was not sure what to expect.

I am a Norfolk man and i glory in being so


On the bench: Airfix 1/72nd Harrier GR.3/Fujimi 1/72nd Ju 87D-3

  • Member since
    November 2009
  • From: SW Virginia
Posted by Gamera on Tuesday, July 4, 2017 8:13 AM

Oh wow, looking sharp!!! 


I will admit I'm assuming the Bronco tracks fit better, I can't really tell that much of a difference just looking at them. Embarrassed

"I dream in fire but work in clay." -Arthur Machen


  • Member since
    July 2006
  • From: San Francisco Bay Area
Posted by bufflehead on Saturday, July 8, 2017 1:34 PM

Thanks for taking a look guys!

D, the kit is pretty basic so I figured I might as well use some of the upgrades I have lying around.

Tiger II, to be honest I wanted to use a plastic MG, but I couldn't find any spares of the unarmored version so metal it is!

Bish, a lot of older kits can build up nice even though they may lack a lot of the details of the newer kits.  This one took a bit more work than I thought at first, but I'm happy with the results.  I've also used Bronco's A13 Cruiser indy links and those are also nice and simple, but the AS90 tracks look a bit more complicated...looks like each link is comprised of four parts? Surprise

Well this kit is practically done!  All I have to do is add back in those hooks that I shaved off and it will be ready for the paint booth.

Here's some WIP photos of the track work.  I used "the doog method" for assembling and installing the tracks. As always, big thanks to fellow forum member Karl "thedoog" Logan for showing us this method several years ago!

The kit instructions specify 96 links per side, but Bronco's instructions specify 92.  I decided to start with 92..more can always be added later.  After cleaning up the necessary number of links I layed down 92 onto a piece of low tack masking tape (sticky side up), using a metal ruler to keep the links nice and straight.  Once all were lined up I brushed Testors liquid all across the top of the links allowing the cement to run into all the seams. 

After waiting about 30 minutes for the glue to set up (Testors LC sets up slowly) I gently pulled the entire track assembly off the tape (recall the low tack!).  The entire track is now pliable enough to wrap around the running gear without falling apart!

Oh, I wanted to have the proper sag in the tracks and didn't want to rely on wadded up tissue or pieces of foam for this so I made a track sag jig from Evergreen styrene sheet.  Took a couple of attempts to get the dimensions right...

Tracks installed with the homemade track sag jig in place.  Turns out 92 links wasn't enough so I had to add in three more links for a total of 95 links per side.

With the tracks done I focused on installing the rest of the itty bits (head/tail/Notek lights, jack, tow cable, spare tracks).  I also decided to add the commander figure that came with the kit.   Here she is pretty much done.

Rear deck details.

The kit supplied tank commander really isn't that bad!  I still need to add his headphones and pistol.

Next up is the assembly of the Hobby Boss Ausf. J!!Smile


Ernest

Last Armor Build - 1/35 Dragon M-26A1, 1/35 Emhar Mk.IV Female


Last Aircraft Builds - Hobby Boss 1/72 F4F Wildcat & FW-190A8


  • Member since
    September 2016
  • From: Albany, New York
Posted by ManCityFan on Saturday, July 8, 2017 6:51 PM

That is some nice work.  The track sag jig worked perfectly.  Gonna keep that trick in the back of my mind for future builds.  Looking forward to more updates.

Dwayne or Dman or just D.  All comments are welcome on my builds. 

  • Member since
    December 2002
  • From: Bury St Edmunds, Suffolk, England
Posted by Bish on Sunday, July 9, 2017 2:03 AM

Now that looks real nice, great job on those tracsks.

My AS90 tracks should be hear tomorrow, so i'll be able to check those out.

I am a Norfolk man and i glory in being so


On the bench: Airfix 1/72nd Harrier GR.3/Fujimi 1/72nd Ju 87D-3

  • Member since
    September 2005
  • From: Groton, CT
Posted by warshipguy on Sunday, July 9, 2017 7:26 AM

I am very impressed!  I am building the old Alan PzKfw.II C and am running into the same issues with sink holes, but, like someone here said, they are nothing that a little putty and elbow grease can't solve. Your idea for the sag jig is terrific, and I will emulate it for the II C.  Thanks for the idea!

Bill Morrison

  • Member since
    November 2009
  • From: SW Virginia
Posted by Gamera on Monday, July 10, 2017 12:30 PM

She's looking great, love that track sag jig. 

"I dream in fire but work in clay." -Arthur Machen


  • Member since
    December 2002
  • From: Bury St Edmunds, Suffolk, England
Posted by Bish on Monday, July 10, 2017 1:44 PM

Bish

Now that looks real nice, great job on those tracsks.

My AS90 tracks should be hear tomorrow, so i'll be able to check those out.


Ernest, got my AS 90 tracks today. Its not 4 part per link. O no, its 6, Yes 6.

I had to check, the piece with the track pads and the piece that the wheels run along are both 2 pieces each. But they do look like single pieces in the instructions.

These are gonna be fun Bang Head

They look nice though and i like the look of how they build up.

I am a Norfolk man and i glory in being so


On the bench: Airfix 1/72nd Harrier GR.3/Fujimi 1/72nd Ju 87D-3

  • Member since
    September 2014
Posted by rooster513 on Monday, July 10, 2017 3:05 PM

Looking really good Ernest! I have very little experience with armor, so for the tracks do you leave the road and drive wheels unglued so you can easily get the tracks off for painting once the glue has fully cured?

-Andy

  • Member since
    April 2015
Posted by Mopar Madness on Monday, July 10, 2017 3:14 PM

That track jig is quite clever!  Nicely done.

Chad

God, Family, Models...

At the plate: 1/48 Airfix Bf109 & 1/35 Tamiya Famo

On deck: Who knows!

  • Member since
    November 2008
  • From: Central Florida
Posted by plasticjunkie on Monday, July 10, 2017 7:28 PM

Glad to talk to another Ernest! These early Panzers are very classy so I will be watching your progress.

I see you had better luck with those Bronco tracks than me. They look awesome! I while back I got some for my Tamiya M8 and ended up using the rubber band tracks. Each link had something like 5 or 6 tiny parts to assemble so I gave up on it.

 GIFMaker.org_jy_Ayj_O


Too many models to build, not enough time in a lifetime!!

  • Member since
    July 2006
  • From: San Francisco Bay Area
Posted by bufflehead on Saturday, July 15, 2017 3:06 PM

Sorry all for not responding, I've been out of town for work and returned yesterday.  I used my cell phone occasionally to read some of the threads but I have a hard time using the phone for posting....fat fingers and little keypads don't get along!

Dwayne, Bill, Bish, Gamera, Chad thanks for your kind words!  I've made track jigs before, they really do help with assembling and shaping the track.

Bish - the AS90 set is made up of 6 parts each??  Yikes!  Fun may not be the word I would use for those!!  I'm eager to see how they build up!

Andy - thanks for your comments, much appreciated!  I usually leave all the roadwheels, sprockets and idlers off and unassembled until the painting and weathering is mostly done, but I'm not sure with this kit.  The tracks are link&length and I may need to glue everything in place to add the tracks....not sure yet.

Ernest - HEY!  Another Ernest!  YAY!!  I've known you on the forums for quite a while but didn't know your name is Ernest!  Toast  Yeah, the Pz II D are one piece links, no assembly required (per link that is), so they were easy. 

So I didn't get that much done because of work, but I did manage to complete the suspension last night.  Here's the hull with all the little arms, shocks and bumpers in place.

The sprockets and idlers were easy to clean up, but all the wheels had mold seams on them, worse than I expected for a relatively newer kit.  Each one took some sanding and polishing to remove the seams.

And here's everything in place, but not glued.  This little tank is going to look quite interesting with those interleaved roadwheels.
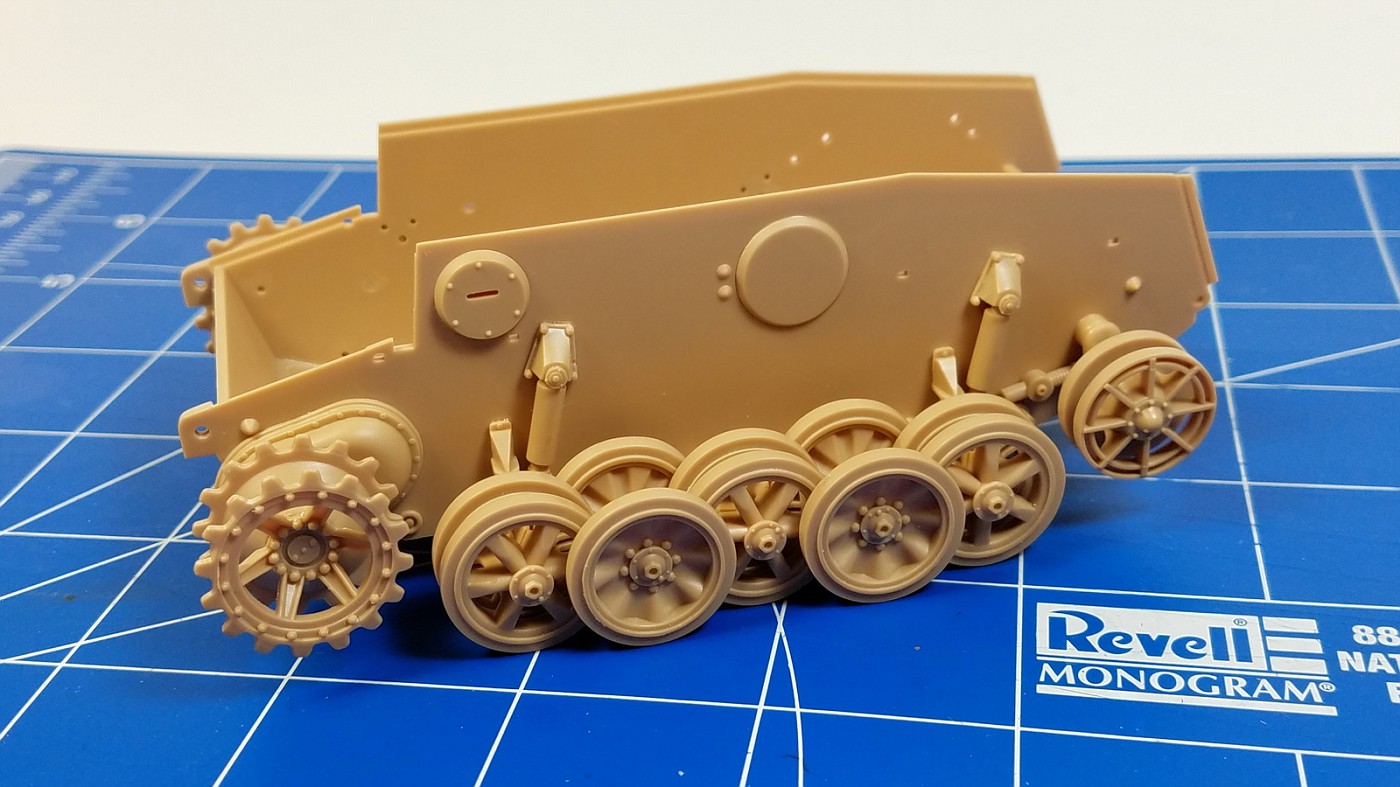
To Andy's point:  I'm not sure how to handle the tracks on this one.   All the parts that are in place in the photo just fall off if touched so I'm not sure how to keep them in place in order to install the l&l tracks.  I prefer not to glue any of the roadwheels together so that I can paint them easier, but even if I do glue them, the sprockets and idlers don't have much contact.  I may have to glue everything in place and worry about the painting later.

BTW, here's the link and length tracks.  A bit different than the individual link tracks I used on the Ausf.D

I'm out of town again next week for business so I probably won't post another update for a week or two.   Until then, Happy Modeling!


Ernest

Last Armor Build - 1/35 Dragon M-26A1, 1/35 Emhar Mk.IV Female


Last Aircraft Builds - Hobby Boss 1/72 F4F Wildcat & FW-190A8


  • Member since
    November 2008
  • From: Central Florida
Posted by plasticjunkie on Saturday, July 15, 2017 9:22 PM

bufflehead


Ernest - HEY!  Another Ernest!  YAY!!  I've known you on the forums for quite a while but didn't know your name is Ernest!  Toast  Yeah, the Pz II D are one piece links, no assembly required (per link that is), so they were easy. 


Actually everybody calls me Ernie except my son Ernie who calls me Ernest LOL. Now let's see what my grandson Ernest will call me once the little guy starts talking, hopefully grandpa Ernie.

Glad to hear your track links are one piece and not multiples like with my M-8. Can't wait to see more!

 GIFMaker.org_jy_Ayj_O


Too many models to build, not enough time in a lifetime!!

  • Member since
    December 2002
  • From: Bury St Edmunds, Suffolk, England
Posted by Bish on Sunday, July 16, 2017 5:32 AM

Looking good Ernest. Interesting how that kit comes with the lower and upper hull sides all in one piece. And i agree about those road wheels.

I am hoping i can get to the AS 90 next year, still got to pick up the Accurate Armour update set for it.

I am a Norfolk man and i glory in being so


On the bench: Airfix 1/72nd Harrier GR.3/Fujimi 1/72nd Ju 87D-3

  • Member since
    March 2003
  • From: Rain USA, Vancouver WA
Posted by tigerman on Sunday, July 16, 2017 11:53 AM

Superb work my friend. Cool idea with the jig. What glue do you use on the tracks?

   http://i7.photobucket.com/albums/y269/wing_nut_5o/PANZERJAGERGB.jpg

 Eric 

  • Member since
    July 2006
  • From: San Francisco Bay Area
Posted by bufflehead on Sunday, July 16, 2017 1:43 PM

plasticjunkie - Ernie it is!  I'm somewhat opposite....most everyone calls me Ernest and only a couple of coworkers call me Ernie. 

Bish - yeah, the lower hull is just a simple tub, but he upper hull is more complex.  All the fenders are separate pieces with a lot of parts and PE.  Working on the upper hull now and might get a couple of pics in before I have to hit the road.

Eric - thank you sir!  I used Testors liquid Plastic Cement in the small glass jar.  This is a better pic from a different build:


Ernest

Last Armor Build - 1/35 Dragon M-26A1, 1/35 Emhar Mk.IV Female


Last Aircraft Builds - Hobby Boss 1/72 F4F Wildcat & FW-190A8


  • Member since
    March 2003
  • From: Rain USA, Vancouver WA
Posted by tigerman on Sunday, July 16, 2017 2:59 PM

Thanks Ernest. I too have used it, but for some reason it didn't seem to work for me last time through. Maybe I didn't let it set long enough

   http://i7.photobucket.com/albums/y269/wing_nut_5o/PANZERJAGERGB.jpg

 Eric 

JOIN OUR COMMUNITY!

Our community is FREE to join. To participate you must either login or register for an account.

SEARCH FORUMS
FREE NEWSLETTER
By signing up you may also receive reader surveys and occasional special offers. We do not sell, rent or trade our email lists. View our Privacy Policy.