SEARCH FINESCALE.COM

Enter keywords or a search phrase below:

Academy 1/35th Warrior FV511 Completed Page 2

4590 views
43 replies
1 rating 2 rating 3 rating 4 rating 5 rating
  • Member since
    December 2002
  • From: Bury St Edmunds, Suffolk, England
Academy 1/35th Warrior FV511 Completed Page 2
Posted by Bish on Sunday, June 14, 2020 10:45 AM

Starting fully on my next build tonight, Academy's 1/35th warrior converted to a 511 Command vehicle.

I am building the vehicle as it looked in the summer of 2006. This is after the clansman radio's had been replaced with Bowman sets and the old style drivers hatch with 1 vision block was replaced with a new one with 3. But before she was fitted with Chobham armour and other extras for deployment to Iraq in Op Telic 9 during the winter of 06/07.

I am useing an Accurate Armour 511 conversion set as well as the drivers hatch.

I have a set of Fruil tracks and some resin wheels from Panzer art which have a couple of minor features the kit ones miss.

Also from Accurate Armour, the Bowman antenna bases and from RB Models a metal barrel for the 30mm Rarden.

I say making a proper start as for the past week or so i have been getting the tracks together. A bit different from my normal Fruil sets as these mave small metal track bolts heds to close off the end where the wire goes in. Fiddly but a nice touch. 82 links in each track.

More to follow.

I am a Norfolk man and i glory in being so


On the bench: Airfix 1/72nd Harrier GR.3/Fujimi 1/72nd Ju 87D-3

  • Member since
    July 2004
  • From: Sonora Desert
Posted by stikpusher on Sunday, June 14, 2020 1:10 PM

I definitely want to watch this project of yours! The firsthand experience with these vehicles will show.


F is for FIRE, That burns down the whole town!

U is for URANIUM... BOMBS!

N is for NO SURVIVORS...

       - Plankton

LSM


  • Member since
    December 2002
  • From: Bury St Edmunds, Suffolk, England
Posted by Bish on Sunday, June 14, 2020 1:13 PM

Thanks Carlos. I hope so as i am mostly working from memory as i lost most of my own photo's.

I am a Norfolk man and i glory in being so


On the bench: Airfix 1/72nd Harrier GR.3/Fujimi 1/72nd Ju 87D-3

  • Member since
    September 2006
  • From: Dripping Springs, TX, USA
Posted by RBaer on Sunday, June 14, 2020 3:54 PM

Friuls make me happy......

Even pictures of other peoples' Friuls.

Apprentice rivet counter.

  • Member since
    December 2002
  • From: Bury St Edmunds, Suffolk, England
Posted by Bish on Monday, June 15, 2020 1:29 PM

Glad i could add to your happiness RB.

I am a Norfolk man and i glory in being so


On the bench: Airfix 1/72nd Harrier GR.3/Fujimi 1/72nd Ju 87D-3

  • Member since
    September 2018
  • From: Vancouver, Washington USA
Posted by Sergeant on Monday, June 15, 2020 6:07 PM

Bish

Starting fully on my next build tonight, Academy's 1/35th warrior converted to a 511 Command vehicle.

I am building the vehicle as it looked in the summer of 2006. This is after the clansman radio's had been replaced with Bowman sets and the old style drivers hatch with 1 vision block was replaced with a new one with 3. But before she was fitted with Chobham armour and other extras for deployment to Iraq in Op Telic 9 during the winter of 06/07.

I am useing an Accurate Armour 511 conversion set as well as the drivers hatch.

I have a set of Fruil tracks and some resin wheels from Panzer art which have a couple of minor features the kit ones miss.

Also from Accurate Armour, the Bowman antenna bases and from RB Models a metal barrel for the 30mm Rarden.

I say making a proper start as for the past week or so i have been getting the tracks together. A bit different from my normal Fruil sets as these mave small metal track bolts heds to close off the end where the wire goes in. Fiddly but a nice touch. 82 links in each track.

More to follow.


Bish, I'm not a big fan of Academy models, but I've only done one, the M50A1 ONTOS. However, with all the neat Accurate Armor stuff, Bowman antenna, metal barrel, Fruil tracks and your craftsmanship this should be a very interesting build in deed.

Harold

  • Member since
    December 2002
  • From: Bury St Edmunds, Suffolk, England
Posted by Bish on Tuesday, June 16, 2020 6:29 AM

I've always avoided Academy armour kits, but for a 35th Warrior, there has not been any chouice until now. And of course the Accurate Armour sets were intended to work with the Academy kits and i was always going to do a 511. Generally it looks pretty accurate and the detail is nice, though i did come across one issue last night, the set up of the running gear is compltly wrong and would make the vehicle un-usable in the real world. But not much i can do with cutting up the lower hull.

I have thought about doing a 510 section vehicle with Accurate Armours interior set, but i might see how the new Meng kit looks.

I am a Norfolk man and i glory in being so


On the bench: Airfix 1/72nd Harrier GR.3/Fujimi 1/72nd Ju 87D-3

  • Member since
    December 2002
  • From: Bury St Edmunds, Suffolk, England
Posted by Bish on Sunday, June 21, 2020 5:18 AM

Work has been progressing nicely on the Warrior. In addition to all the AM, i am also doing some scratch building, partly down to an issue with the AA conversion set that doesn't convert the from right of the hull, and also some other minor changes to the kit. And i decided to deal with one of these later changes first, the handles and covers for the fire engine compartment suppression system. There is one located on each side of the hull.

As you can see they are molded on and so very flat and un-natural looking. The real flaps are often curled up through regular lifting as part of the monthly inspections and other check. So the first thing i did is make some new ones with styrene sheet and strip useing the molded parts as a guide.

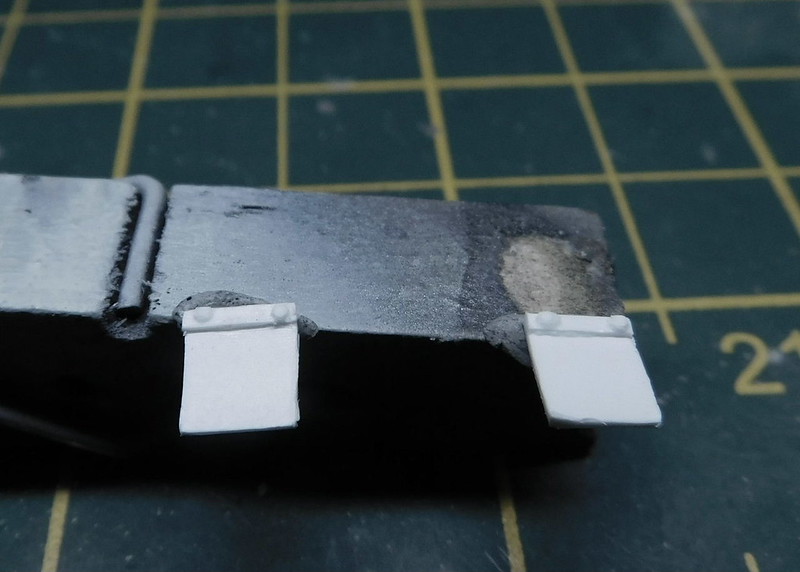
I then cut out the centre of the molded part leaving the securing strip and a bit around the edge.

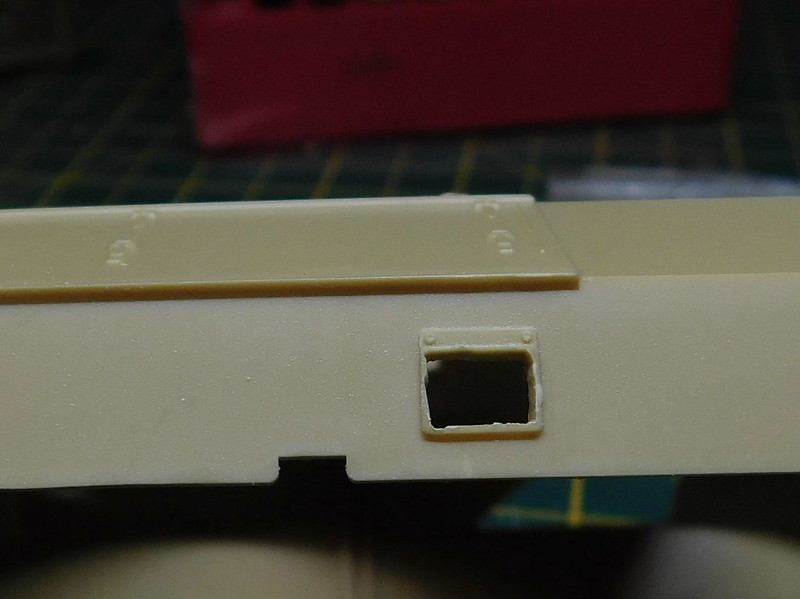
This was then sanded flat and the hole boxed in.

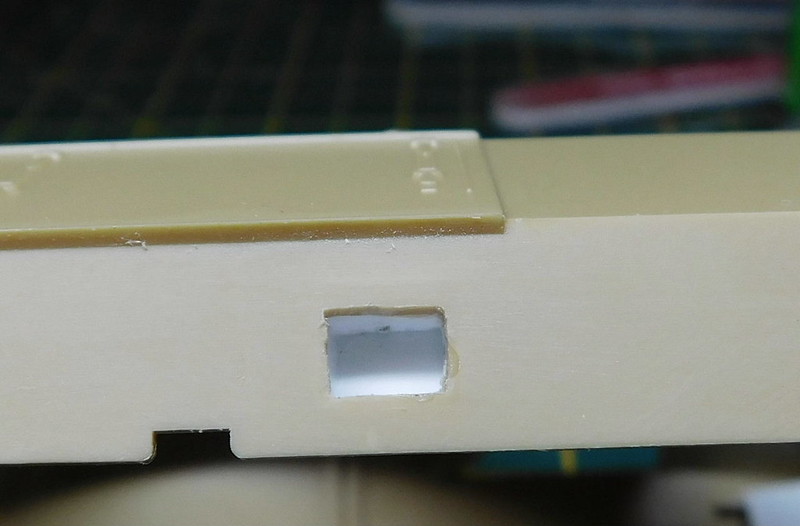
I then took a large piece of styrene rod, drilled it out, fitted into the hole. The space around was filled and then sanded flush. Now i just need to add the handle which i will probably have to scratch build.

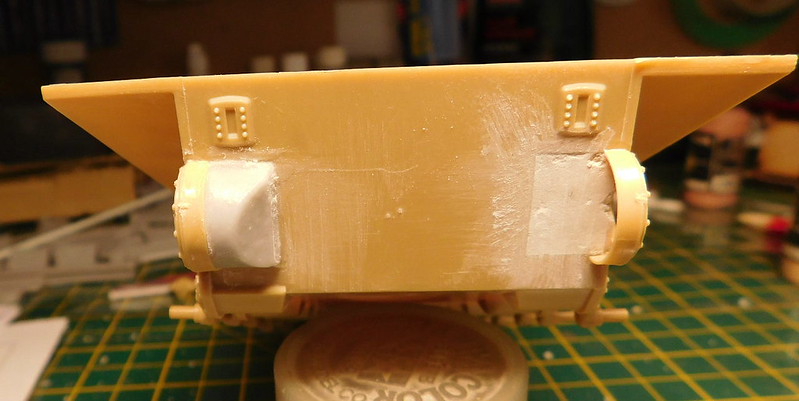
I then decided to fit the running gear, a nice easy job, just attach the axle arms. But straight away i realised something didn't look right, and i realised that the opposing wheel stations didn't line up correctly. After a few moments and checking with a ruler, i noticed that the securing points for the torsion bars don't line up with there respective axle arm postions on the other side. This means that the torsion bars would run an angles across the hull and would have to cross over each other. makeing them un-workable.

Then i realised where the issue was. The wheel stations on the right side are the wrong way round. Both sides have the torsion bar securing points to the front of each wheel station, but on the right, they should be at the rear. This image shows the right side and i have indicated one of the securing points.

This photo from Prime Portal is also of the right side, this time a real warrior of course, and again, i have marked the torsion bar securing point.

I am really annoyed about this. I wanted this bild to be as accurate as possable, more so than with any other build. And this is such a silly mistake. Its clear the makers of this kit have no idea how a torsion bar suspensipon works.

I spent a while considering my options. I thought about slicing off each wheel station and turning them around. But they are so thin i would be sure to destroy at least one, and its not a simple case of just turning some of them. But, i do have one thing in my favour. After 2 weeks on salisbury plain, this area is covered in mud and dust that sets like concrete. So, i'll just have to cover it up. But i am still bloody annoyed.

I also got the final drive housing fitted to the front. These are AA resin parts with weld seams around them and nice texture. You have top fill in the large hole for the kit part.

Next up i wanted to tackle the part of the conversion that the AA set leaves out, the front right corner. I think this is understandable given the shortage of close up photo's of that area of the Command and Artillery variants.

This pic shows the front of the upper hul The bit in blue and the bases for the lifting eyes which have to be removed, AA does tell you to do that. The large hole in the middle is where the main engine deck goes, and this is spot on for a 510. This would be removed along with the panels on top when lifting out the power pack. But on a 511, this piece of decking extends right to the edge, as indicated by the red line. Also, the molded piece to the bottom, which is the tool rack for the picks and sledge hammer need to be moved slight to the left side, right in the pic.

This is the main engine deck with the radiator covers. The parts indicated and the securing clamps and will have to be sliced off and moved to the new outer edge of the panel.

And this is the side panel. The liurve, whcih i had started to remove before i thought about getting a pic, need to come off. Thats fitted to the 510, 514 and 515 but not the 511. I also need to fit hinges to the bottom as this has to be opened to lift the main deck and reposion the handles.

And finally the light guards. On a 510, these are the same left and right. But on a 511, but the left one is the same as the 510, the right one does not extend so far back, otherwise it would extend onto the main engine deck.

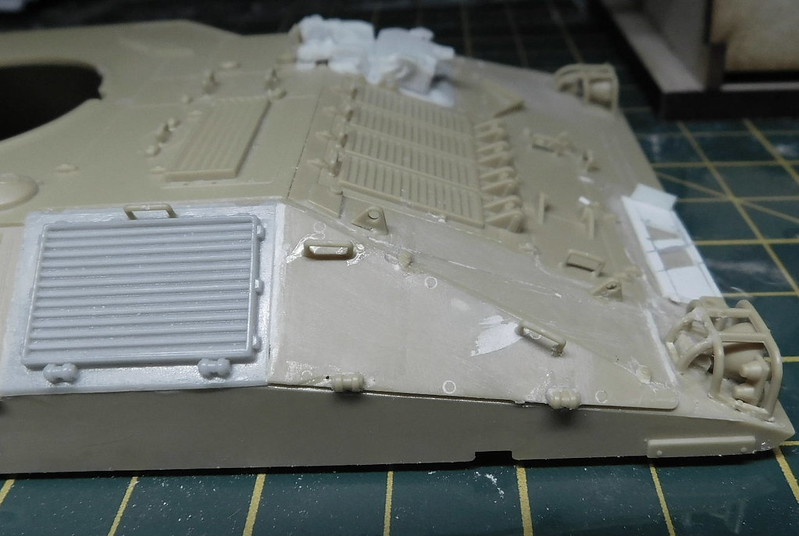
And this is the result of the work need to correct this. The engine deck was fitted after the 2 clamps had been removed, and the seamed was filled in. The front of the engine deck has a slightly raised edge, so i carried this on with some styrene strip. The rear arms of the light guard were cut off, shortened and re-attached. I made a new tool rack useing the kit one as a guide, and after sanding the kit part smooth, i fited the new piece, 3mm further from the light that the kit part.

The side panel was smoothed out, the kit handles placed in the new positions. I thought i might have to scratch build the hinges, but after fitting the resin exhaust louvre, i realised the kit part had the same hinges, so this were sliced off and used here.

And you can see here that other parts have been fitted, all the handles, the new drivers hatch, lights etc. The lights are a vert tight fit as the edges of the light guards were to thick and i cut them down, but it meant the fit of the lights was slightly out. Also, the lights have solid lenses. But i will be covering these with sandbags anyway, so thats not a problem. You can just see a small object just between the light guard and the new tool rack. I don't kow anyone who ever figured out what that is for, but its on the vehciles. I thouhgt i mght have to scratch that, but after fitting the new drivers hatch, i noticed that the hinges for the kit hatch were exactly the same, and so i used one of those.

Also made a start on the rear deck, removing the periscope bases and fitted the top hatch. The domed piece on the edge of the hull with the 4 bolt heads on top is part of the NBC filter system. AA says not to fit this, but thats not correct.

And finally the right side with the resin exhaust part. The molded on straps to the rear will have to be removed and i will make a cover for the side stowage bin.

There a a few photo's on line of 511's, but most are not close up or very clear. One of the best is on Wikipedia, the main photo is labeled as a 510, but its nit, its a 511. As my memory is having to stretch back 13 years, all these pics have been useful in confirming certain items and the location of some thing. But i am guessing many of these did not come out until after AA did there conversion set. So they just used what info they had at the time.

More soon.

I am a Norfolk man and i glory in being so


On the bench: Airfix 1/72nd Harrier GR.3/Fujimi 1/72nd Ju 87D-3

  • Member since
    December 2002
  • From: Bury St Edmunds, Suffolk, England
Posted by Bish on Monday, June 29, 2020 3:45 PM

The Warrior is now at the painting stage, given the amount of AM and scratch work, i am surprised at how quick it come together.

After the last update, the next thing i got to was prepping the road wheels. In this pic, the kit wheels are on the left, resin the right. On the inner wheels at top, you can see bolt detail on the resin wheels. And on the outer set, the resin wheels have much nice detail around the hub as well as the oil filler plug for the hub oil reservoir.

The resin wheels were cleaned up by running a rough sanding stick around then and then i took a needle file to some to take out a few small chunks of rubber. Then they all got primed. Can't beat wheels on sticks.

I also primed the inside of the hull after fitting the rear. I had to open the 2 small windows as these were solid.

While that was drying i got most of the turret together. The barrel trough was fitted as this is the same green as the rest of the vehicle. The barrel will be painted seperatly and added later. The antenna base mounts came with clansman antenna bases. These were removed and replaced with bowman one. The set included 3 styles. The small device on the front right antenna is a GPS transciever and had to be taken from one of the other style of bases.The armoured covers for the Raven sites have been left off to paint seperatly. By 2006 this vehicle had the new BGTI sites, but the houseing is the same and externally there is no differance.

There are still a few more bits to add.

These two parts are the rear light houseing which comes with the bottom and rear of the rear bins attached. The two areas indicated are the buttons for the door of the 510. But on the real vehicle, these buttons are only on the left, the right is just a blanking plate. However, the 511 has a manually operated door so there are no butons at all. Accurate Armour does not mention that the buttons have to be removed. A quick swipe with a scalpel blade will do the job.

And the cam pole holders are pretty poor. I wil replace these with brass tube. There are 8 sets in total.

And with all these parts sorted and the hull fully assemebled, its now ready for some paint. I had to modify and move the fire extingusher holder just behind the left lights. Tools are secured with canvas webbing straps secured with a metal plate. I use lead foil and styrene rod for these. The long bit of lead foil and the metal brackets for the shovels and axe. I will trim to fit later.

The cover for the side bin was cut out of lead foil.

Close up of the front tool holders. Also you can see the access step. this had to be thined and reshaped. The part coming out from the side is the step thats designed to be fited with the chobham. The kit step was to short. You can also see one of the new cam pole holders on the front light guards. The lightguards had to be raised at the front as i realised the angle was wrong when fitting the cam pole holders.

Closer short of the right side cam pole holder.

Rear all fitted out.

The the whole thing was hit with primer and the underside painted with Alclad aluminium.

I also sprayed Alclad where i will do some light chipping. namely the ice breaker and access step.

I have since given it a coat of green. Tomorrow it should be ready for masking and the black.

I am a Norfolk man and i glory in being so


On the bench: Airfix 1/72nd Harrier GR.3/Fujimi 1/72nd Ju 87D-3

  • Member since
    September 2018
  • From: Vancouver, Washington USA
Posted by Sergeant on Monday, June 29, 2020 4:18 PM

I'm not surprised at the error in Academy's engineering, what I am surprised about is they are still in business. I know the feeling Mate when you want this project to be accurate and fine an unacceptable situation that would require major surgery or cover it up with paint and mud, what a let down. But you have the right attitude and in the end I believe you will make it look good, just keep going.

Harold

  • Member since
    December 2002
  • From: Valrico, FL
Posted by HeavyArty on Monday, June 29, 2020 7:46 PM

Looks like it is coming along well.  I did the same basic conversion for a Brit Army Capt I served with.  It was his vehicle in Iraq in '03.  I didn't do all that you have though, and I just had a couple of pics, so it isn't totally accurate.

More of it can be seen here:  https://armorama.kitmaker.net/modules.php?op=modload&name=SquawkBox&file=index&req=viewtopic&topic_id=77261&page=1&ord=0

I'm not surprised at the error in Academy's engineering, what I am surprised about is they are still in business...  Harold

The thing you have to understand Harold is that most modelers are happy with a model that looks sort of like what it is supposed to represent.  Most are not detail and accuracy fanatics like we are.  Academy offers kits that look pretty close to the real thing and are affordable.  That is why they are still in business and actually doing well.

Gino P. Quintiliani - Field Artillery - The KING of BATTLE!!!

Check out my Gallery: https://app.photobucket.com/u/HeavyArty

"People sleep peaceably in their beds at night only because rough men stand ready to do violence on their behalf." -- George Orwell

  • Member since
    April 2018
  • From: Australia
Posted by Panzer Joe on Monday, June 29, 2020 9:40 PM

I agree no OOB model, even if it's Dragon or Rye field, is perfectly accurate.

Very nice detail on your warrior Bish.

  • Member since
    September 2018
  • From: Vancouver, Washington USA
Posted by Sergeant on Monday, June 29, 2020 10:26 PM

Bish, you are making great progress.

Gino, I take your word for it regarding Academy. I have only built one Academy model and as you know, had much the same problem Bish does with his model. That's why I like AFV Club, but even they have issues. Like Joe said, no out of the box model is perfectly accurate, or I would add 100% free of manufacturing issues.

Harold

  • Member since
    December 2002
  • From: Bury St Edmunds, Suffolk, England
Posted by Bish on Tuesday, June 30, 2020 7:06 AM

Gino, thats a cracking job you have done on that. Do you know what Regt he belonged to. My battalion was on Telic 2 so we replaced the guys who had invaded Iraq in 03, so i might have seen that vehicle.

I am a Norfolk man and i glory in being so


On the bench: Airfix 1/72nd Harrier GR.3/Fujimi 1/72nd Ju 87D-3

  • Member since
    December 2002
  • From: Valrico, FL
Posted by HeavyArty on Tuesday, June 30, 2020 7:16 AM

Thanks Bish.  No idea what Regt he was in.  The markings were correct for his Regt though, if that helps.  There are a couple pics of the actual vehicle at the link I gave too.

Gino P. Quintiliani - Field Artillery - The KING of BATTLE!!!

Check out my Gallery: https://app.photobucket.com/u/HeavyArty

"People sleep peaceably in their beds at night only because rough men stand ready to do violence on their behalf." -- George Orwell

  • Member since
    December 2002
  • From: Bury St Edmunds, Suffolk, England
Posted by Bish on Tuesday, June 30, 2020 7:37 AM

Thanks Gino, i will check the link tonight as i can't see the pics at work. British vehicles often don't have any marking to indicate the exact Regt. The circle with the C/S OB indicates the Coy Commander of B Coy. But i'll check the pics later. Thanks.

I am a Norfolk man and i glory in being so


On the bench: Airfix 1/72nd Harrier GR.3/Fujimi 1/72nd Ju 87D-3

  • Member since
    December 2002
  • From: Valrico, FL
Posted by HeavyArty on Tuesday, June 30, 2020 11:30 AM

There was a red/white checkered flag on the antenna too, if that helps to ID the Regt.

Here are the reference pics he gave me to work from. 

Gino P. Quintiliani - Field Artillery - The KING of BATTLE!!!

Check out my Gallery: https://app.photobucket.com/u/HeavyArty

"People sleep peaceably in their beds at night only because rough men stand ready to do violence on their behalf." -- George Orwell

  • Member since
    November 2009
  • From: SW Virginia
Posted by Gamera on Tuesday, June 30, 2020 12:52 PM

Gino: Really nice work there, beautiful recreation of the real thing. 

Bish: I've said it over on your GB but I'll say it again- thats some sharp work! 


Only Academy armour I've built is their K1A1. Maybe they're a little more careful when doing their own national equipment or maybe it's a newer kit but I was very impressed by the detailing. I have no idea how accurate it is but the plastic detail on some stuff like the engine intakes was almost as good as PE aftermarket. 

"I dream in fire but work in clay." -Arthur Machen


  • Member since
    December 2002
  • From: Bury St Edmunds, Suffolk, England
Posted by Bish on Tuesday, June 30, 2020 1:24 PM

Given that he is a Scot, i would say Black Watch. You really have done it justice looking at those photo's. Thank you.

I am a Norfolk man and i glory in being so


On the bench: Airfix 1/72nd Harrier GR.3/Fujimi 1/72nd Ju 87D-3

  • Member since
    December 2002
  • From: Bury St Edmunds, Suffolk, England
Posted by Bish on Tuesday, June 30, 2020 1:29 PM

Thank you everyone for your comments and for following along. The running gear ashide, this is a nice kit. I have to say i am more disapointed in the AA conversion. But in their defence, i guess back in 99 they did not have much to work with. If it wasn't for the fact that i spent 6 years driving a 511, i would not have had a clue about what needed to be done.

Green paint is dried so tonight its time for white tac spaghetti.

I am a Norfolk man and i glory in being so


On the bench: Airfix 1/72nd Harrier GR.3/Fujimi 1/72nd Ju 87D-3

  • Member since
    September 2018
  • From: Vancouver, Washington USA
Posted by Sergeant on Tuesday, June 30, 2020 5:44 PM

Bish, I didn't realize you were a driver of this tank you're building. That is really great first-hand experience, I can see why you chose this model.

Harold

  • Member since
    December 2002
  • From: Bury St Edmunds, Suffolk, England
Posted by Bish on Wednesday, July 1, 2020 6:34 AM

Sergeant

Bish, I didn't realize you were a driver of this tank you're building. That is really great first-hand experience, I can see why you chose this model.

Harold


I first trained as a gunner, but later as a driver and i drove the same 511 for the 6 years. I became quite attached to it, hence my desire to get it as accurate as i can.

I am a Norfolk man and i glory in being so


On the bench: Airfix 1/72nd Harrier GR.3/Fujimi 1/72nd Ju 87D-3

  • Member since
    December 2002
  • From: Bury St Edmunds, Suffolk, England
Posted by Bish on Monday, July 6, 2020 3:59 PM

Short update this week with the Warrior painted and decals added. I used tamiya acrylics and the green is NATO Green with a touch of field grey added. The black was done freehand. After a coat of Alclad aqua gloss, i applied the decals. The registration number is from an AM set for the Chally 1. This had individual letters and numbers so i could creat the one i wanted. They are a bit large so the one son the back and closer together than they should be. The convoy marking on the backdoor is also from the spares.

I made the callsigns and bridge plate myself. The callsigns are a bit rough as i had to paint over the black as my printer doesn't seem to like printing black on white decal paper. But seeing as the guy who painted the callsigns on the real vehicle is a ham fisted clumsey idiot, its appropriate that they are not perfect.

I have since made a start on the weathering with some dot filters.

More soon.

I am a Norfolk man and i glory in being so


On the bench: Airfix 1/72nd Harrier GR.3/Fujimi 1/72nd Ju 87D-3

  • Member since
    September 2018
  • From: Vancouver, Washington USA
Posted by Sergeant on Monday, July 6, 2020 4:43 PM

Bish

Bish, you have made amazing progess in three weeks. What does the OC inside a triagle mean?

Harold

  • Member since
    December 2002
  • From: Bury St Edmunds, Suffolk, England
Posted by Bish on Tuesday, July 7, 2020 4:16 AM

Thanks Harold.

The OC, poronouced Zero Charlie, is the vehicle call sign. This being the vehilce of the Company second in command. The teriangle is the Company indicator, in this case A Company.

I am a Norfolk man and i glory in being so


On the bench: Airfix 1/72nd Harrier GR.3/Fujimi 1/72nd Ju 87D-3

  • Member since
    September 2018
  • From: Vancouver, Washington USA
Posted by Sergeant on Tuesday, July 7, 2020 10:55 AM

Bish

Thanks Harold.

The OC, poronouced Zero Charlie, is the vehicle call sign. This being the vehilce of the Company second in command. The teriangle is the Company indicator, in this case A Company.


Thank you Bish, nice work on your FV511... It is going so fast I can hardly believe you have time to work for a living. My last project took three months and I'm retired. However, you have a lot more experience with this subject than most people and that makes a big difference too.

Harold

  • Member since
    December 2002
  • From: Bury St Edmunds, Suffolk, England
Posted by Bish on Tuesday, July 7, 2020 2:58 PM

Thanks harold. I am lucky to get lots of modelling time, at least 2 to 3 hours each evening. Most armour dio's will take 5 or 6 weeks. As i don't do dio's for my British stuff, its usually quicker.

I am a Norfolk man and i glory in being so


On the bench: Airfix 1/72nd Harrier GR.3/Fujimi 1/72nd Ju 87D-3

  • Member since
    December 2002
  • From: Bury St Edmunds, Suffolk, England
Posted by Bish on Saturday, July 18, 2020 4:57 AM

Final update before i wrap this up. I did an oil pin wash followed by some AK streaking grime which gave it a nice grubby look.

After this i started getting other parts fitted. Here, the wheels are on, the thermal sheeting was main with tissue and the bungees were done with black wire with a thinner wire added for the hooks.

Afraid i messed around with my camera setting, the pics adove give a much more accurate sense of the colours.

The turret has the site covers added as well as the side bins.

Then, with the barrel painted that was added and stowage added to the rear basket. I have added the slaves leads, a daysack, oil drum and some ammo tins. Roll mates were added to the back of it.

Here i have added the spare track links, crew tent and more thermal sheeting on the engine deck along with a drip tray made from some styrene sheet. Also have the fabric tow rope on the front.

Items on the back include D10 reel, fire extinguishers and 8m radio mast. The AA conversion included 2 masts but my vehicle only carries 1. As i was fitting this i realised i also need to add the mounts and bracket for the other. So i cut the mount off the base of the other mast and made the brackets from some lead foil. The windows have been filled with white glue and these will clear up once dry.

Next up some dust effects, a flat coat and pigments. Should be finished by the end of the weekend.

I am a Norfolk man and i glory in being so


On the bench: Airfix 1/72nd Harrier GR.3/Fujimi 1/72nd Ju 87D-3

  • Member since
    September 2018
  • From: Vancouver, Washington USA
Posted by Sergeant on Saturday, July 18, 2020 12:12 PM

Great progress Mate... It's turning out really nice.

  • Member since
    December 2002
  • From: Bury St Edmunds, Suffolk, England
Posted by Bish on Saturday, July 18, 2020 12:54 PM

Thanks buddy.

I am a Norfolk man and i glory in being so


On the bench: Airfix 1/72nd Harrier GR.3/Fujimi 1/72nd Ju 87D-3

JOIN OUR COMMUNITY!

Our community is FREE to join. To participate you must either login or register for an account.

SEARCH FORUMS
FREE NEWSLETTER
By signing up you may also receive reader surveys and occasional special offers. We do not sell, rent or trade our email lists. View our Privacy Policy.