SEARCH FINESCALE.COM

Enter keywords or a search phrase below:

Hetzer: progenitor

2334 views
24 replies
1 rating 2 rating 3 rating 4 rating 5 rating
  • Member since
    August 2020
Hetzer: progenitor
Posted by lposter on Friday, December 4, 2020 10:45 AM

Hello

The Maresal vehicles were a series of domestically produced Romanian anti tank guns which proceeded from the prototype M-00 to the final series of prototypes designated M-05 and M-06, the M-05 being the one of interest as it was the one which dropped the T-60 chassis on which they were being built up to that point.

The M-04 was field tested in early 1944 and this testing was witnessed by a German officer called Ventz and another one or two according to some historians. The M-05 was tested in March of 1944.

The Romanians planned to produce the Maresal domestically (I imagine with German help) and a battalion was formed specifically to use the M-05 of which 200 were initially planned. Testing continued through out the summer of 1944 and the M-05 compared favourably to a Stug III in field trials during June 1944, again in front of German officers who reportedly liked it very much.


Wikipedia has the following to say about the assertions as to Hetzer/Maresal relationship.

"British historian Mark Axworthy suggests that the design for the Hetzer was likely rooted from the Romanian "Maresal" tank destroyer. In November–December 1943, a Romanian commission ordered from Germany and German-occupied France several components which could not be made in Romania, and this drew German attention to the Maresal. Hitler had approved the development of the Hetzer on 7 December 1943. That same month, Marshal Antonescu (Conducator of Romania at the time) commended the Maresal project to Hitler. Soon afterwards, on 6 January 1944, Hitler was presented with the plans of the Maresal M-04 prototype. Axworthy notes that the Hetzer's armament, armor configuration and chassis broadening were very similar to those of the M-04. He also reports that in May 1944, German Lieutenant-Colonel Ventz (a delegate of the Waffenamt) admitted that the Hetzer had followed the Romanian design solution. American historian Steven Zaloga writes that "The Germans were impressed with the overall layout of the Maresal, and it is credited with being the inspiration for the German Jagdpanzer 38(t) tank destroyer."

Im not getting into a discussion about whether or not the M-05 being the Hetzer inspiration is true or not but I thought iI would have a go at one in steel in 1:16 scale from scratch if I can.


  • Member since
    August 2020
Posted by lposter on Friday, December 4, 2020 10:50 AM

This will be built out of 1.5mm steel and whatever else comes to hand. Tracks will be PzIII I reckon as they are a reasonable approximation and especially as the Romanians were getting stuff from the German factories.


Dividing it into two major pieces, top hull and bottom hull, I set off laying out, cutting and shaping the bits I needed. 


These are the main bottom hull bits

and the top hull bits

  • Member since
    August 2020
Posted by lposter on Friday, December 4, 2020 10:55 AM

The next major challenge was gettingthe top hull bits together as they form a weird turtle like carapace that is not amenable to normal work holding methods I use like welding magnets etc.

In the end, I just laid them out flat and slowly adjusted them until they all came together. I used brass rod to beef up the joins and form a backstop for the inevitable gobs of filler Im going to need to smooth things over.

Sorry for the scabby nature of the photos.


Pleased with the result. Scabby it is but more importantly it lies flat and there are no obvious wonky bits or "thresholds" from one panel to the next which are always a pain to fix.

  • Member since
    August 2020
Posted by lposter on Friday, December 4, 2020 11:00 AM

Curiosity being what it is, I had to check if the top was ever going to line up with bottom. If not...scrapbin is the next destination.

I wiped off the worst of the mess and lined up the main panels of the bottom bit in the corresponding locations. As luck would have it...I reckon Im half a mm out in some of the lengths and maybe half a degree on an angle or two which is more than acceptable for me. Pleased as can be with that. Assuming my measurements are correct.

  • Member since
    November 2009
  • From: SW Virginia
Posted by Gamera on Friday, December 4, 2020 11:29 AM

That looks neat! Nice work. 

Guess the slab-sided look is a little easier to replicate than the cast designs the Allies used as the war ground on. As far as I can tell from here everything looks nice and square. 

"I dream in fire but work in clay." -Arthur Machen


  • Member since
    October 2019
  • From: New Braunfels, Texas
Posted by Tanker-Builder on Friday, December 4, 2020 11:34 AM

You Know;

 The " Hetzer" always reminded me of a Rhinoceros Beetle with a Bad attitude!!

  • Member since
    August 2020
Posted by lposter on Friday, December 4, 2020 12:58 PM

Gamera

Guess the slab-sided look is a little easier to replicate than the cast designs the Allies used as the war ground on. As far as I can tell from here everything looks nice and square. 


It is Im afraid. Casting is out from my side due to a lack of any experience and the lack of any capacity. The wife wouldnt be too happy about molten aluminium and green sand flying around the spare bedroom!!

Its a shame really..... there are a lot of nice tanks that require casting something.

P

  • Member since
    September 2012
Posted by GMorrison on Saturday, December 5, 2020 12:28 PM

Super work. Interesting vehicle.

I did some reading following your post. The first four had the 122mm howitzer, presumably somewhat the same as that of the SU-122. Not a direct fire weapon and not capable of using AP ammunition. The latter prototypes did use a higher velocity direct fire weapon, similar to a PAK-40.

What's really different is the armor. Sources list the armor as 10-20mm thick. The Hetzer is listed at about 10-60 mm and the Stg 3 at 20-80 mm.

It that sense the 'Maresal" was a tin can. 


Bill

 Modeling is an excuse to buy books.


  • Member since
    August 2020
Posted by lposter on Sunday, December 6, 2020 3:11 AM

I guess the ferocious slope on the sides of the casemate would increase the effective thickness to something less butt clenching?

All the same..... I wouldnt fancy sitting in one myself.


P


  • Member since
    February 2011
Posted by GreySnake on Sunday, December 6, 2020 8:00 AM
That is some very impressive work and I admire the skill that you are putting into it. I’ve always been interested in Maresal ever since reading a build article in an old issue of Finescale a number of years ago. I’ve every interested to see how this turns out.
  • Member since
    August 2020
Posted by lposter on Saturday, January 23, 2021 11:21 AM

It didnt go entirely to plan however as when I placed the hull on the tub, there was a 2 mm gap which I dont know the cause for (apart from being bad at measuring).

So the rear back plate had to come off and the lower hull had to be reshaped and then resoldered.

And after that it all lined up nicely.

p


  • Member since
    August 2020
Posted by lposter on Saturday, January 23, 2021 11:31 AM

Next were the suspension assemblies. These were striking me as a waste of time as they are essentially non-visible but I need some kind of suspension as the tank is supposed to move in the future..

The assemblies were tricky as there are a number of bits: a mounting plate on the side of the hull, multicomponent swing arms, the spring mount and the springs themselves.

To start, I approached the mounting plates. I first cut out some rectangles of 2mm steel and squared them all up. I need four but made six as there will be some casualties along the way.

There are then three important holes - two that line up (hope so at least) with the marker holes on the hull and which form the pivots for the swing arms and a central hole which forms the bottom mounting point for the spring holder. So I marked off the positions and drilled and chamfered the holes.

Then some corners needed to go so I marked the lines off and used a bit of square tool steel as an edge to file against.


Then there were some curves which I simply roughed out with a Dremel cutting wheel and finished off with a half round file. I then lined all four up using the two placer holes and made sure they were all the same (!) by filing all at once.

The basic part of the swing arms is relatively simple, its a rectangle with two holes at the centres of two radii, one on either end.

I cut out the rectangles (more than I need) and marked off the two holes necessary.

I then used a hardened filing button to put the curves on each end of the swing arm.

p

  • Member since
    August 2020
Posted by lposter on Saturday, January 23, 2021 11:39 AM

The holders for the springs were a bit fiddly. I cut out the basic shapes from some brass bar stock and the drilled the one important hole in each one as this acts as a reference point.

I then stuck them in the vice and filed out a deep slot to a cetain depth. The slot is too deep but I will shorten the arms of it once I know how deep it should be. 

Once I did figure that out I simply shortened the arms and fashioned a cap for the arms from 2mm steel. This was then silver soldered to the arms and forms the top of the holder.

The springs are being made from junior hacksaw blades which are already hardened and springy.

I used a dermel wheel to cut off the required lengths using water to ensure they didnt too hot and mess the hardness up.

Then I used a mini belt grinder I was given for christmas one year . Dont use it very often but it works, the belts are cheap and available and it was suited to the job. Used it to grind off most of the teeth and round the edges. I think they cost like 20 euro on fleabay or alibaba or wherever. Quite nicely made little thing actually.

Then I stuffed some of the spring blades into the holder. I had to drill and tap the top cap for an M3 set screw to keep the springs where they should. These dont look great but they aint visible and they function as suspensions so Im OK with them.

  • Member since
    August 2020
Posted by lposter on Saturday, January 23, 2021 11:48 AM


It was time to start on the wheels which, for a nice change, there are only eight of. After much to-ing and fro-ing I decided on one guide horn Pz III tracks for simplicity. This was a mistake for a number of reasons. Mostly the sprocket being way to big.

So the wheels I made had a groove for that single horn. But then I discovered the sprocket problem which necessitated a change to a Sherman type sprocket. Which uses two guide horns (which the M-05 did in reality use) so the wheels I made were not suitable any longer. But I had an idea to pull back from the problem. I will get to that.


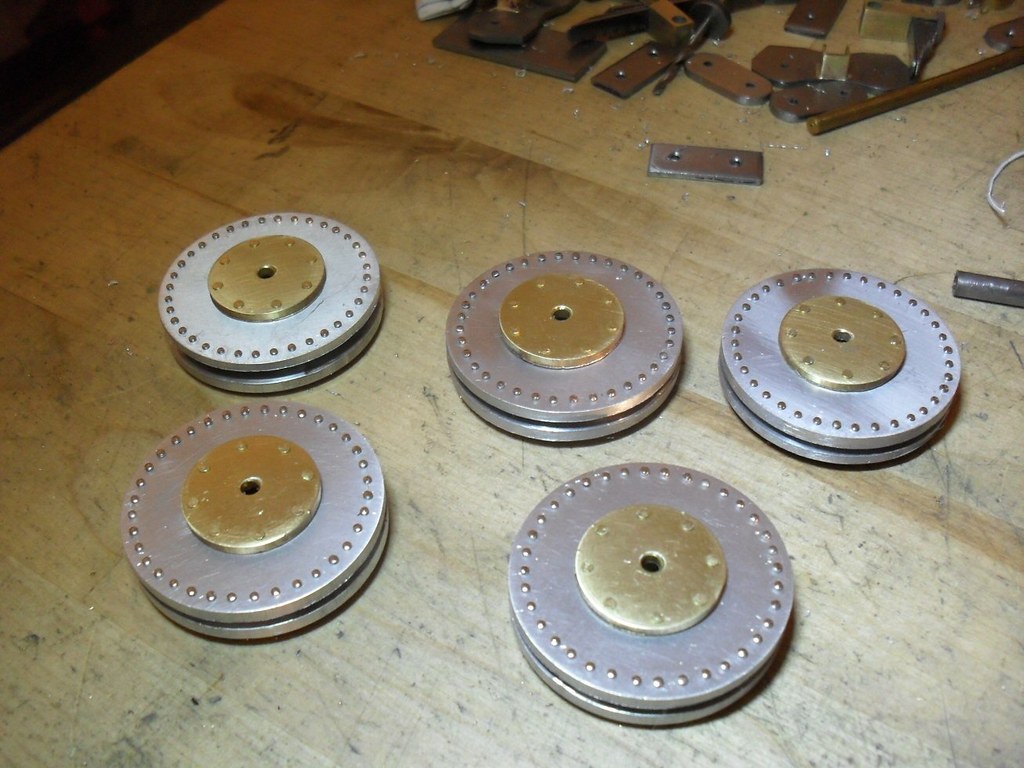
For the wheels, I am using a set of aluminium pulley type things from an old Hewlett Packard plotter thing (large sheets of paper) I think. Its been a few years since I got them. They had a plastic rim type of thing which had to come off and a plastic hub which also came off. Then all they needed were sanding and a minor trim here and there.

Around the outside, 36 0.6 mm holes were drilled. The actual wheels had a load of rivets or bolts or something around teh edges. Buying tiny rivets (300) from some modellbau is crazy expensive so Im using shirt pins which cost essentially nothing. They have a shaft diameter of 0.6 mm and I simply cut off most of the shaft and press fit them in. Tedious work indeed.

I then got brass discs I had from a previous project and just centre bored them to 3 mm. Then I drilled holes around teh edges and stuffed picture framers tacks into the holes. I trimmed off the pointy bits and simply peened the backsides.

Lengths of 6mm OD brass tube were cut with a tube cutter. These had to be soldered on dead centre to the back side of the brass discs. I centered the rotary table on the Proxxon and then inserted a centre (a deburrer actually) in teh chuck. This then allowed me to centre the brass tube over the centre hole on the disc. Then I soldered it on.

These hubs were then press fit into the aluminium wheels.

The way Im going to solve the slot bit is to just cut single tyres the entire width of the whole wheel . These tyres will be cut froma  black delrin pipe of the correct internal and external diameter. I will get back to that as I have not done it yet.

P


  • Member since
    August 2020
Posted by lposter on Saturday, January 23, 2021 11:53 AM

This is the current state of teh tank. I have some minor bits and pieces to finish on the hull but not much actually. 

The seams all need finishing with filler and sanding but that usually comes at the end. Everything on it is either stock diameter rod or tube. The louvred air vents are trimmed down heatsinks from a  PC I had scrapped. 

There are things like headlights to make, I bought a Notek light, and then the rest will primarily be the idlers and returns rollers as well as sorting out the internal bits related to the gear box etc.

I will get to those.

P

  • Member since
    May 2020
Posted by Keyserj on Saturday, January 23, 2021 6:43 PM

This is a really cool project. Will you end up making this motorized?

"Why don't you knock it off with them negative waves?"- Oddball


John

On the bench:


  • Member since
    February 2011
Posted by GreySnake on Sunday, January 24, 2021 1:08 PM
That looks amazing! How many hours have you spent on it do you think?
  • Member since
    November 2009
  • From: SW Virginia
Posted by Gamera on Monday, January 25, 2021 11:33 AM

So cool! I hope you motorize her! 

"I dream in fire but work in clay." -Arthur Machen


  • Member since
    August 2020
Posted by lposter on Monday, January 25, 2021 12:27 PM

Hello

I think I have spent a couple of hours per evening, 3 or 4 days a week for a few months I guess. Shaping the pieces takes the most time as I am not in possession of a mill or lathe. 

I got some more done - mostly bits and bobs for the top hull. Apart from cleaning and flling some holes - the top is done.

I mounted my wheels and the gearboxes. They all seem OK. The sprocket and track will be from a sherman. The sprocket should be unrecognisable as I can mod it into something approaching what the M-05 appeared to have but the track is what it is. 

I may in the future buy a set of metal sherman tracks and modify them by grinding off the chevrons/grousers or whatever. Its not really a concern for me as 99.9% of people who see the model will not know a sherman track from a chicken egg.


P

  • Member since
    February 2011
Posted by GreySnake on Tuesday, January 26, 2021 11:50 AM
That is some very impressive work.
  • Member since
    November 2009
  • From: SW Virginia
Posted by Gamera on Tuesday, January 26, 2021 9:06 PM

So she is motorized- very cool! And Sherman tracks sound fine by me. Yes

"I dream in fire but work in clay." -Arthur Machen


  • Member since
    August 2020
Posted by lposter on Sunday, January 31, 2021 10:24 AM

Hello 


Im finally finished (as far as I am concerned) with my Maresal. Some photos witha  Stug III for size comparison which is appropriate as it was against the Stug in tests that the Maresal caught the Germans attention. Now it goes in a box awaiting paint and electronics. Along with a worrying amount of other tanks I might add.

P

  • Member since
    October 2019
  • From: New Braunfels, Texas
Posted by Tanker-Builder on Sunday, January 31, 2021 10:37 AM

You Know;

       When I built for a lot of clients in the early years I built in metal. There's a ton of satisfaction in the finished product. and Operational? Kudos times 4, Plus based on your comments,your thread PROVES you don't NEED ( Although they would be nice to have) All the tools folks think you do. It caused by this strange Gene called a Desire to Create in Miniature. Luv it!

    Oh! and concerning your comment about Sherman Tracks and Eggs. I did a Crawler crane for a client. The Tracks were similiar to a Sherman's. I used the tracks from a D-9 Cat I had laying around.They loved it. Therefore, it proves that comment!

  • Member since
    November 2005
  • From: Formerly Bryan, now Arlington, Texas
Posted by CapnMac82 on Sunday, January 31, 2021 5:33 PM

Having seen Nick Moran's Insidethe Hatch on Hetzer, I can't imagine how cramped that vehicle would be.

It's a gorgeous model and an exquisite build.

  • Member since
    July 2009
  • From: North Carolina
Posted by Back to the bench on Sunday, January 31, 2021 6:00 PM

Amazing engenuity and craftsmanship! All the more so considering the tools used to accomplish this build. Thanks for sharing your work.

Gil

JOIN OUR COMMUNITY!

Our community is FREE to join. To participate you must either login or register for an account.

SEARCH FORUMS
FREE NEWSLETTER
By signing up you may also receive reader surveys and occasional special offers. We do not sell, rent or trade our email lists. View our Privacy Policy.