SEARCH FINESCALE.COM

Enter keywords or a search phrase below:

On track - an afternoon with single links

2006 views
19 replies
1 rating 2 rating 3 rating 4 rating 5 rating
  • Member since
    November 2020
On track - an afternoon with single links
Posted by Also known as Rob on Sunday, December 13, 2020 3:22 PM

I've been making slow progress with building a MiniArt Valentine, and after completing the rest of the build, I couldn't put off assembling the tracks any longer.
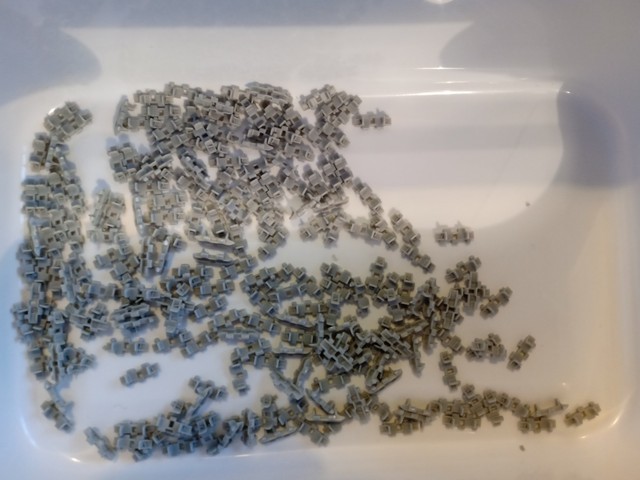
Individual track links

I'd watched a VMS video on Youtube which seemed to show a good way of going about the track assembly.

Yesterday I bought a piece of mdf sheet and a moulding strip. The strip had one square edge and one rounded. I cut off a piece of the sheet and glued a section of the moulding down the centre. I did it down the centre so that I could use either side (square or rounded) as a guide. I cut a second piece that I'd also use as a guide, but clamped rather than glued so that it could be set to a size to match the track size, and so that it could be removed easily.

I then started placing individual links into the guide. I wanted to make the track in two parts so that it could be easily removed from the tank for painting.
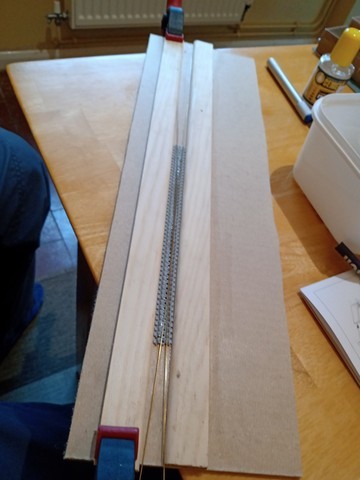
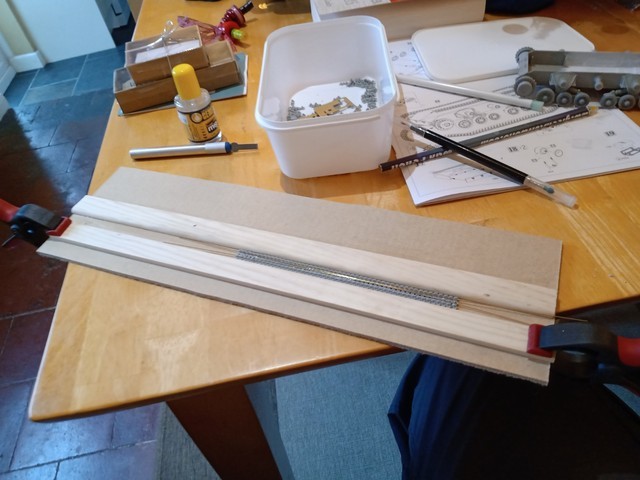
Laying track into guide - 1Laying track in guide - 2

The first ten links went in fine but as more links were added, the earlier ones started to ruck up. Initially I used some brass wire to try and weigh down the links and keep them in place. However, I then realised that a third piece of moulding on it's side would nicely sit in the gap between the track prongs, and would make an excellent tool to keep the tracks down and in place.

Moulding edge used to align track

Once the links were in place, it was time to glue them. I'd hoped to use the VMS slow setting styrene cement, but it's been on order for ages - so instead I tried a couple of alternatives. I realised that the humbrol cement I already had took an hour to set fully so was a possible candidate. However, I also bought some Ammo of Mig Slow Dry Cement which I hoped would work.

For the first section I used the Ammo of Mig cement. I attempted to touch a spot of cement onto the joint between each link, but this proved quite difficult, and in the end I just painted the cement onto the links. I let them dry for a minute or two - until they were stuck together enough to stay together.

Being able to remove one of the guides, and use the moulding edge to move the track as one, helped a lot in moving the track so that it didn't stick to the guide, and lift it as one piece. Also I found the rounded edge of the moulding worked fine for the main jig and I didn't need to try using the square edges for this task.

I then lay the track onto the wheels - starting at the cogged sprocket - about halfway round to give a good guide point for joining the two main sections of track. I lay the first section along the bottom of the wheels. Once it was moulded into place, I removed the track to make sure it wasn't stuck to the wheels. I then placed it back in place to check the shape. I did that a couple of times. Once the track was holding it's shape, I found I could place it one its side and it would keep it's shape. So I left the track like that to set.

I then started assembling the next section of track. This time I used the Humbrol cement, and this worked better because this cement was thinner. It was easier to applied smaller amounts into the joints between links. That is, with the sections abutted together, I touched a drop cement onto the joint and let it run in between the two links. I used the Humbrol cement for the rest of the sections. I then repeated the shaping of the tracks to the other side of the Valentine hull.

Once the first section of track was dry, I started assembling the next section of track. This section I lay along the top of the wheels. I put the lower section in place so that I had the right starting point on the sprocket wheel. Once I had the section in place I started to shape it with my fingers to get a bit of sag between idlers.
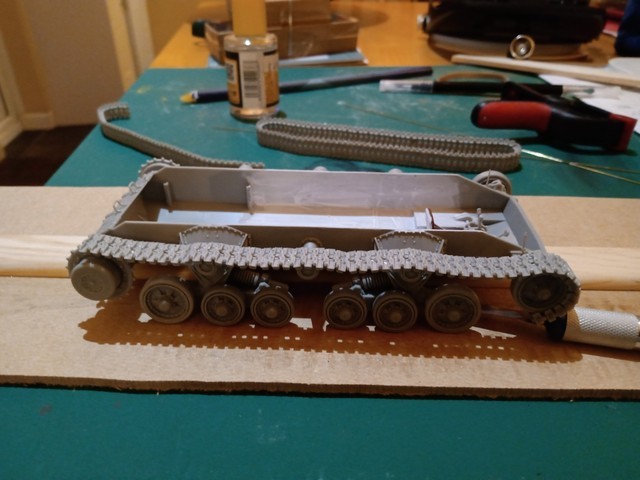
Track upper section

Again I lay the track on its side to dry once it started retaining it's shape. Once it had dried, I placed both upper and lower half sections of track onto the hull. I found that I had to add a couple more links to get them to join, but this was fairly easy now that the track had retained it's shape.

With that done, I had one completed track.
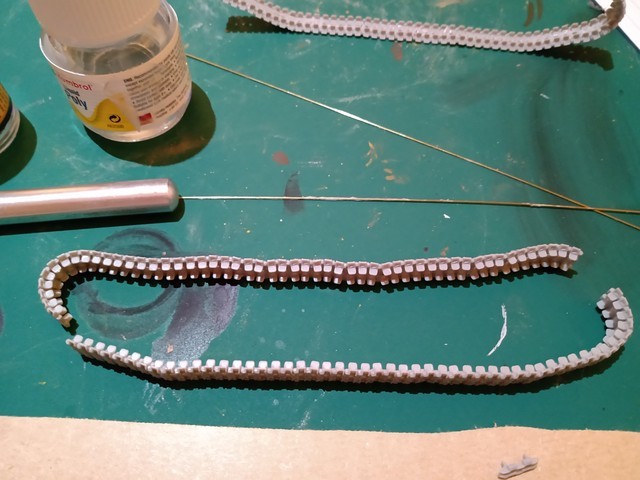
Completed two sections of one track

It was then just a case of doing the same for the last section of track.

All in all, it wasn't as bad as I feared it would be. I'm glad I did the prep - to build the jig and get a couple of cements to try. As a first attempt at assembling this kind of track, I'm pleased with the result.

Unfortunately, I think it will be next weekend before I get some time to start painting, but I think this has been a successful afternoon's construction. 


Tags: single link , track
  • Member since
    May 2020
  • From: North East of England
Posted by Hutch6390 on Sunday, December 13, 2020 3:45 PM

That looks like an object lesson in how to do the job - I'm definitely keeping that one in mind for when I (eventually) get round to building the Bronco Comet!  Fortunately, I have an adequate supply of MDF & clampsSmile  I don't have any Humbrol glue, but I'd guess the Tamiya liquid cement (not the quick-drying sort) would behave similarly, or I could have a trip to the local model shop, assuming it's allowed to open.

Nice job, and thanks for sharing.

Vell, Zaphod's just zis guy, you know?


TakkaTakkaTakkaTakkaTakkaTakka


  • Member since
    November 2008
  • From: Far Northern CA
Posted by mrmike on Sunday, December 13, 2020 4:12 PM

An enjoyable afternoon - small parts, big success!

  • Member since
    November 2009
  • From: SW Virginia
Posted by Gamera on Sunday, December 13, 2020 5:17 PM

Despite the issues the results look good! Nice work!

"I dream in fire but work in clay." -Arthur Machen


  • Member since
    November 2020
Posted by Also known as Rob on Monday, December 14, 2020 5:37 AM

Thank you all for the encouraging comments.

Hutch6390
I'm definitely keeping that one in mind for when I (eventually) get round to building the Bronco Comet!

Yes - the Bronco Comet's on my list of tanks I want to build in the not too distant future. So I'll be glad to see how you get on with it.

Hutch6390
I don't have any Humbrol glue, but I'd guess the Tamiya liquid cement (not the quick-drying sort) would behave similarly

I think it's all about the cement. There's an underlying problem. You have to get enough pieces stuck together to have a section that you can work with, but all have to be joined at about the same time so that they stay maleable for about the same amount of time and set together. So you have to glue a lot of joints in a short time and with them in place. I think applying glue and then placing the link into a segment would take too much time. You could do with double the number of links so you have plenty to experiment with and do trial runs. The problem is a segment of track only behaves as such once the links have been glued together, and it stays malleable for about 15-20 mins.

So having a cement that's thin and sets slowly is essential. Having a cement that only requires the application of a small spot on the joint - and will flow into the joint from that spot, would be perfect.

There was a lot of excess glue about on this my first go - especially with the thicker Ammo cement. I think I got away with it because the links are such an irregular shape - the excess glue doesn't show up the way it would on a flat surface. Also glue from previous section builds started to build up on the jig - which wasn't too much of a problem - but meant I had to get the segment moving quickly once the cement was applied - to stop the segment sticking to the jig.

My next tank is a Centurian which has the same type of individual link tracks. So I'll see how that goes. Hopefully I'll be a little better at doing it the second time around. After that, I think I'll give metal tracks a go to see how they compare.

  • Member since
    March 2003
  • From: Western North Carolina
Posted by Tojo72 on Monday, December 14, 2020 7:45 AM

Interesting,I keep it simple,I use Tamiya Extra Thin and two straight edges to keep the run straight and to keep flattening it.I also do the whole run in one piece minus 2-3 links which if needed add at the end.

Looks like you have a good process too

  • Member since
    November 2009
  • From: SW Virginia
Posted by Gamera on Monday, December 14, 2020 11:40 AM

They look good to me! 

Of course it's a simple enough thing to hide any issues with a little sand or mud. 

"I dream in fire but work in clay." -Arthur Machen


  • Member since
    May 2020
  • From: North East of England
Posted by Hutch6390 on Monday, December 14, 2020 11:53 AM

Also known as Rob
a cement that's thin and sets slowly is essential

I've had a rummage through the dust-and-cobweb covered recesses of my modelling kit - I kid you not - and found a (very old) bottle of Beatties Liquid Poly cement, which I think was actually made by Humbrol.  I've tried it and it still works - I must have had it for about 30 years!  It's fairly thin & flows well between joined parts, but doesn't set too quickly, might be just what I need.  

Also known as Rob
the Bronco Comet's on my list of tanks I want to build in the not too distant future. So I'll be glad to see how you get on with it.

As for my Comet build, it'll probably be some time next year, but don't hold your breathSmile  Thanks again for sharing this, I'm really finding it useful.

Vell, Zaphod's just zis guy, you know?


TakkaTakkaTakkaTakkaTakkaTakka


  • Member since
    September 2012
Posted by GMorrison on Monday, December 14, 2020 1:26 PM

A clinic on how-to.

You're right- having it all prepped and set at hand really makes it go smoothly.

I look forward to your vehicle build.


Bill

 Modeling is an excuse to buy books.


  • Member since
    November 2020
Posted by Also known as Rob on Tuesday, December 15, 2020 11:33 AM

Thank you Bill

  • Member since
    February 2011
Posted by GreySnake on Wednesday, December 16, 2020 6:56 AM

The tracks came out very nicely.Using a jig for assembling track links makes things so much easier.  

  • Member since
    April 2003
Posted by nfafan on Thursday, December 17, 2020 3:57 PM
Bless you! This is why I like "rubber band" tracks...
  • Member since
    November 2009
  • From: SW Virginia
Posted by Gamera on Friday, December 18, 2020 9:21 AM

Any updates? I'm crossing my fingers that this turns out perfectly for you! 

"I dream in fire but work in clay." -Arthur Machen


  • Member since
    November 2020
Posted by Also known as Rob on Friday, December 18, 2020 12:54 PM

Gamera

Any updates? I'm crossing my fingers that this turns out perfectly for you!  

Thank you!

I've been busy all week (starting new contract), but am looking forward to getting some painting done this weekend.

  • Member since
    November 2020
Posted by Also known as Rob on Sunday, December 20, 2020 12:36 PM

I've had a good weekend painting .... and the tracks are painted and on.

The results are mixed.

Valentine Painted

I need to take some pictures that better show the tracks. The main problem is that there is very little play with the tracks once they've set so if you've made a mistake (which it looks like I have) then there is little that can be done about it.

Generally - excepting once small three link section - they look OK and I'm happy as a first attempt, but definitely room for improvement.

  • Member since
    November 2020
Posted by Also known as Rob on Monday, December 21, 2020 1:17 PM

Well, here are a few photographs. As I think this one shows, the top runs have come out as I was hoping with a reasonably realistic sag.

However, I wonder if I've concentrated too much on the top run and getting the track nicely around the drive and rear spocket wheels, at the cost of the bottom run. The kink on for the upward turn doesn't quite line up with the front wheel. It's almost as if I've concentrated on getting the hard bits right I've overlooked the simpler bits.

And there was a misalignment on this side, which meant there was a gap between the two halves. I've filed the gap with an extra couple of links. They were a little too long so I tried filing one down a little, but am not happy with the result as there's an obvious kink.

The other side is better I think. But still there's a misalignment here too along the lower run.

I think one problem is that I didn't properly label the two halves for each side, which I'd need to think through better next time.

The main problem is that you need to stick the links together before they stay together as a run, and if you don't get it right first time it's not obvious how you fix it.

As I said in my last post, as a first attempt it's OK. But I think it requires more practice to get right. My overall conclusion is that individual link tracks are a pain and difficult to get right.

I think I might try metal tracks next, or even working plastic tracks that just click together rather than needing to be glued.

  • Member since
    November 2009
  • From: SW Virginia
Posted by Gamera on Monday, December 21, 2020 8:27 PM

The Valentine herself looks great! The tracks, well they can be annoying. Maybe someone else has some advice- I have no idea what to do there. Is the cement still flexible enough to bend it at all?

I guess if nothing else you could just stick a figure there in front of the right front idler to cover up the droopy track.

"I dream in fire but work in clay." -Arthur Machen


  • Member since
    December 2020
Posted by TheDemiGod on Monday, December 21, 2020 9:19 PM

Wow... what a great idea for a jig to do track links. The one reason whay I hate doing ndividual trak links. This looks promising and maybe lit a little fire to resome doing armor kits. As I said in my introduction thread, I never shy away from a challenge.

  • Member since
    November 2020
Posted by Also known as Rob on Tuesday, December 22, 2020 2:51 AM

Thank you Gamera and TheDemiGod. I'm getting better at this model making lark, and I am pleased with how the Valentine is coming along (excepting the tracks - which are "could do better")

On reflection, this won't put me off getting a model with this type of tracks, but I hope next time I'll do a better job, or at least have a better appreciation of whether to glue the tracks to the tank or scrap them and get alternatives.

  • Member since
    September 2006
  • From: Dripping Springs, TX, USA
Posted by RBaer on Tuesday, January 5, 2021 9:46 AM

This is a perfect example of why I use either one-piece tracks or Friuls: there's always room for adjustment after assembly. I should say that when I use the term "one-piece" I mean glueable one-piece, or even two-piece like the Asuka Sherman tracks, and not the old melty-pin non-glueable. I'm just not talented enough to make non-workable indies look good on the model, so my hat's off to you AKA Rob, and all of you who can make them look "right".

Apprentice rivet counter.

JOIN OUR COMMUNITY!

Our community is FREE to join. To participate you must either login or register for an account.

SEARCH FORUMS
FREE NEWSLETTER
By signing up you may also receive reader surveys and occasional special offers. We do not sell, rent or trade our email lists. View our Privacy Policy.