SEARCH FINESCALE.COM

Enter keywords or a search phrase below:

KV U-19 self propelled gun: 1/16, kit bashed, steel

2711 views
11 replies
1 rating 2 rating 3 rating 4 rating 5 rating
  • Member since
    August 2020
KV U-19 self propelled gun: 1/16, kit bashed, steel
Posted by lposter on Tuesday, May 18, 2021 2:56 AM

In April 1942, deputy commissar of the Soviet tank Industry, Kotin, commissioned development of a heavy assault gun, called U-19, with  a 203-mm howitzer on a KV chassis. The howitzer was installed in a casemate with 75 mm frontal armor and 60 mm sides with a removable 30 mm thick roof. For the convenience of loading the howitzer , special equipment was designed, which resembled a similar system used in "Sturmtiger" .

According to the design , the  weight of the U-19 was 66 tons, and the height was 3505 mm, which is 5 mm higher than the Maus. The U-19 project entered the Artkom GAU in September 1942 and was ultimately rejected.

At the beginning of 1942, it became clear that one could forget  the production of the KV-3 heavy tank in Chelyabinsk. The plans for the manufacture of heavy assault self-propelled guns on the basis of the KV-3 were finally given up in April 1942, although the designers did not abandon the idea of ​​a heavy assault self-propelled gun. The KV-7 assault tank was chosen as the base for the new vehicle, the internal space of the wheelhouse of which made it possible to place the 152-mm ML-20 howitzer-gun. The project of a 152-mm self-propelled unit based on the KV-7, indexed U-18, was developed in April 1942 by the UZTM Design Bureau.

The U-19, unlike the U-18, was not reported at all during reports on the experimental work of the UZTM. It seems that the project was in a lower priority and performed rather as a safety net. Despite this, the team completed the development of the preliminary design of the U-19 earlier than the U-18.  The preliminary design of the U-19 went to the GAU and GABTU on August 12, 1942 - 3 weeks earlier than the U-18. The main task of the U-19 developed by the UZTM Design Bureau was the destruction of fortified structures, which were too tough for less powerful systems. The base of the KV-1 tank underwent minimal alterations: the turret plate was removed, the engine partition was made removable, the fuel tanks and air intakes were changed. A massive casemate was put in place of the turret, completely covering the gun installed in the fighting compartment. At the same time, the casemate partially covered the roof of the engine compartment, which could potentially create difficulties with engine maintenance.

The ambiguous design of the U-19 led to the natural result. On September 9, 1942, the chief engineer of UZTM received a letter signed by the head of the BTU GABTU KA outlining that it would be going no further. It was too heavy, was killing the KV-1 gearbox and was entirely victim to much of the problems of the KV-2.

The project went to the archive, and only mentions of its existence remained. As a result, this played a cruel joke with the U-19: since all information about the project was limited to the B-4 based on the KV-1, a completely different vehicle was mistakenly recognized for it. In a number of publications, including encyclopedias, as an illustration of the U-19, a project for the installation of a 203-mm U-3 case howitzer in the SU-152 is given. This project has nothing to do with the U-19 at all.


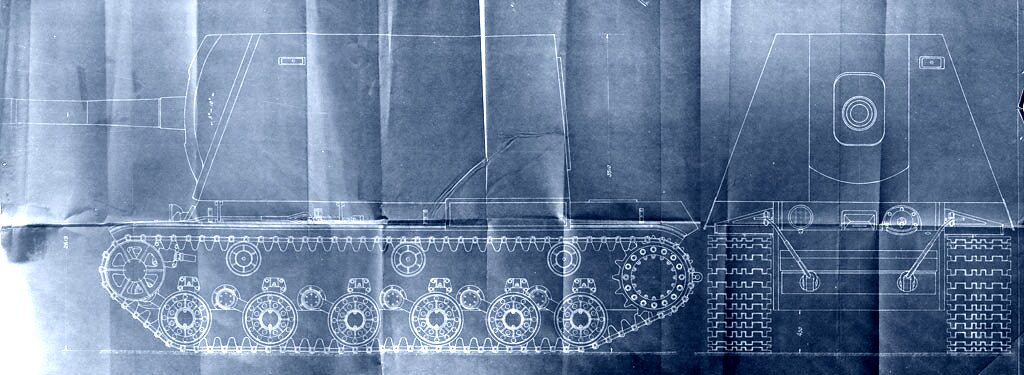
The U-19 really was a Soviet fever-dream. Seriously ugly, totally impracticable and brutally simple. So this is my next project. Apart from the above pictures, there are very few reference points.

You can find some shots of a very nice 1:35 kitbashed U-19 on : https://maschinenkrueger.com/joomla/...gress&Itemid=6

And there was a very cool 1:35 kitbashed with full interior on https://artmodels.forum2x2.ru/t164-topic. This chap really went all out on this model and I will be taking inspiration from his model.

Otherwise, its thin on the ground for reference material.

Mine will be 1:16, no interior, kit bashed, in 100% metal, by hand.

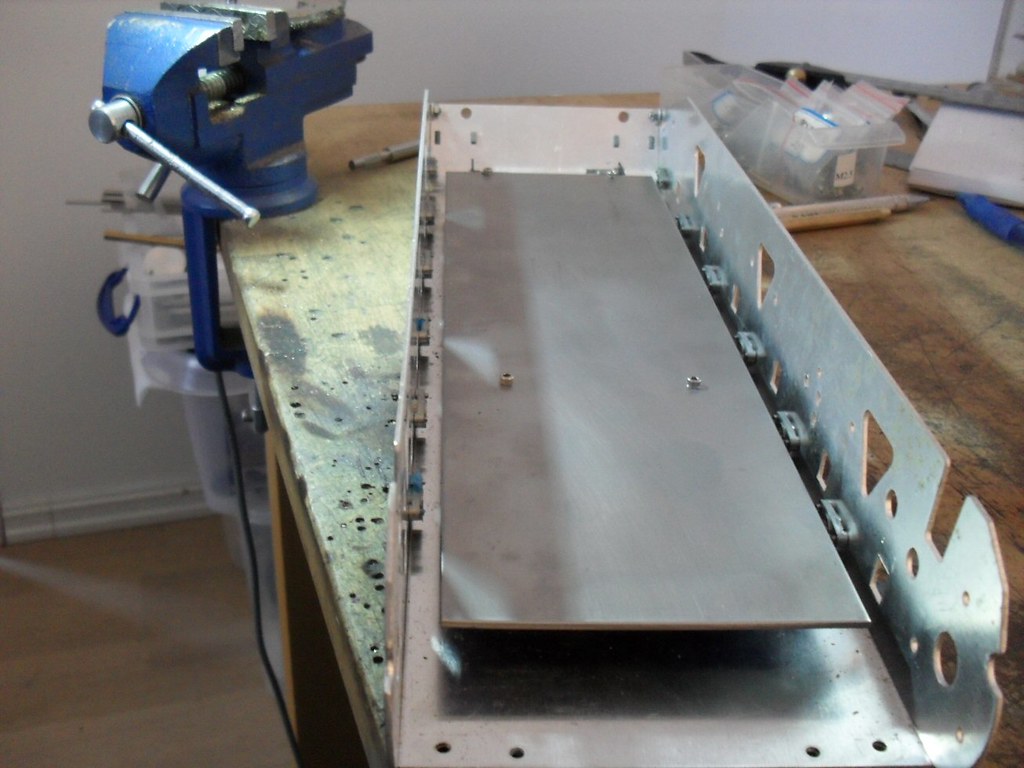
My starting point is a Taigen metal lower hull from an RC KV-1. Because Im am tired of running gear and trying to source bar stock of correct diameters and so on and so forth. So Im going to take all of the Taigen hull, strip it of the plastic bits, replace them with 2 mm steel and reassemble it.

Then build the casemate on the top. I think the gearboxes will need some work too given the weight.

So far I have gotten the hull and taken all the plastic bits off. These being the two side panels. These then serve as templates for creation of the new 2 mm side panels in steel.

These will be a bit different to the plastic one as they are going to stretch up to the engine deck as oposed to ending in the armpits under the fenders.

The templates should let me drill all the holes in the correct places to allow me to reattach all the metal bits to the new sidewalls.

These are the plastic panels used to map onto the steel plates.

This is the Taigen hull without the plastic. It has a nice torsion system and reasonable detail on the metal running gear and wheels. But the metal is cheap diecast stuff.


There was a plastic plate over the torsion bars but this was too weak so it was replaced with  a sheet of 2mm steel.

p

  • Member since
    August 2020
Posted by lposter on Tuesday, May 18, 2021 3:12 AM

Regarding motors. I got hold of some of those right angle motors one sees on ebay all the time. They are 12 V but I will run the tank on 7.2V. Given the rpm listed and the speed reduction due to voltage (although torque remains the same), they should be good enough and slow enough. I had to modify the gears boxes a little. 

I need to make a mount and luckily enough the motors came with drawings so I made some plates and simply brazed them together. Worked fine.

Here they are mounted on the steel base plate with the new steel sidewalls added.

This is the drive system ..... small chains are driving the shafts which are mounted in sidewall bushings and a central shaft support unit. 

Here it is from the back and with the diecast rear transmission cover installed. Some hand fitting to do there. 

p

  • Member since
    August 2020
Posted by lposter on Tuesday, May 18, 2021 3:21 AM

The upper part of the hull was tricky as it simply is huge. I made a baseplate and erected a series of 6 mm silver steel bars to form the frame of the unit. 

Then attached some sides to it and placed it on top of the hull.

All these sidepanels and so on are shaped from 2mm mild steel sheet and handfitted to the others.


P

  • Member since
    August 2020
Posted by lposter on Tuesday, May 18, 2021 3:26 AM

The mantle was shapped by hand from a large chunk of aluminium over a couple of weeks. It is not correct shape (at least comparing to the other two models) but I dont care as I was sick of filing it. The gun is simply aluminium stock and bar.

All the bit and pieces on the top are standrd KV type accoutrements and the positioning of them was based on other models.


  • Member since
    November 2009
  • From: SW Virginia
Posted by Gamera on Tuesday, May 18, 2021 11:46 AM

Oh wow, that's so cool!!! Being made out of metal I bet she's pretty darn weighty!

"I dream in fire but work in clay." -Arthur Machen


  • Member since
    July 2003
  • From: On my kitchen counter top somewhere in North Carolina.
Posted by disastermaster on Tuesday, May 18, 2021 2:07 PM

As far as the mantle goes, nobody but you would know it isn't perfect ~  but then again it's most likely something that would be irritating to you.

It's great to have the talent and tools to build things like this.

Awesome!

Sherman-Jumbo-1945

"I was so much older then, I'm younger than that now"


  • Member since
    August 2020
Posted by lposter on Wednesday, June 23, 2021 3:06 AM


I had to move along with this tank to clear some aspace so the suspension was next. The hull innards I used had a torsion bar suspension but when I tested this the weight of the tank caused it to bottom out very badly. Aside from twisting the torsion bars there was no means of adejustment. So I removed the retainers for the non turning bar end and replaced them with clamps made from mild steel. This allowed me to shorten the bars and adjust them but simply placing the swing arms where I wanted and tightening the clamp.

Happy with them.


Some Russian  modellers have added bits to their U19s to refelct the 203 mm cannon - mostly additions reflecting loading the ammo and reducing the recoil so I added them too as I think its reasonable.


By this astage the whole thing was looking a bit tatty as the steel surface had been tarnished badly so I got a can of etch primer, some grey paint and a lot of graphite and painted the whole thing.

I included a metal stug III and a plastic KV-1 for sccale.

It badly needs a lens for the headlight and the slack in the track needs tweaking. But the idler adjuster works so that will help.

I will rc it later but as of now it is going on the shelf!

because it was tiresome to build and is awful heavy!

P


  • Member since
    September 2012
Posted by GMorrison on Wednesday, June 23, 2021 9:16 AM

thing. I am afraid your table will collapse.

I really enjoy your builds as you think your way through how to put them together.


Bill

 Modeling is an excuse to buy books.


  • Member since
    November 2009
  • From: SW Virginia
Posted by Gamera on Thursday, June 24, 2021 11:20 AM

I agree with Bill, that's going to take one helfty shelf!

Nice job! All the work your put into this is impressive and I love the results!

"I dream in fire but work in clay." -Arthur Machen


  • Member since
    August 2020
Posted by lposter on Friday, July 2, 2021 5:19 AM

I normally do not bother, and I appreciate I am going outside of the bounds of what Finescale is probably meant to be, but I went about making this U-19 move a bit. My objective was to make it crawl along like a 66 ton monster should. As it weighs around 15 kg this should be feasible. 

In the tank I stuffed a 4000 mAh NimH battery and two speed controllers from boats. There is a Beier sound card in the plastic box and I stuck a voltmeter in there too for fun.

The speaker is a six inch speaker mounted in the casemate. The feeds from the speed controllers go through the soound card and the engine adjusts with speed. 

I have not sorted out the cannon and MG noises yet. I will but its a faff and Im not good with that sort of thing.

Here is a short video of it moving. I am sorry about the dog. he is less controllable than the tank. Both in terms of volume and motion.


P


https://www.youtube.com/watch?v=F38EWKMUyiQ


ddd

  • Member since
    April 2003
  • From: USA
Posted by keavdog on Friday, July 2, 2021 6:25 AM

I have the same kit in my stash.  So how did it go together Stick out tongue  Crazy cool stuff dude!

Thanks,

John

  • Member since
    November 2009
  • From: SW Virginia
Posted by Gamera on Friday, July 2, 2021 4:09 PM

Oh wow that looks great! Love how she handles and moves like a real AFV. 


And my sister's wussy dog would have found a place to hide... 

"I dream in fire but work in clay." -Arthur Machen


JOIN OUR COMMUNITY!

Our community is FREE to join. To participate you must either login or register for an account.

SEARCH FORUMS
FREE NEWSLETTER
By signing up you may also receive reader surveys and occasional special offers. We do not sell, rent or trade our email lists. View our Privacy Policy.