SEARCH FINESCALE.COM

Enter keywords or a search phrase below:

Su-12 scratch built

1831 views
14 replies
1 rating 2 rating 3 rating 4 rating 5 rating
  • Member since
    November 2009
  • From: SW Virginia
Posted by Gamera on Wednesday, July 26, 2023 6:52 PM

Looks terrific, moving around like the real thing! 

And yeah I can see your dog doesn't seem to be very impressed... Stick out tongue

"I dream in fire but work in clay." -Arthur Machen


  • Member since
    April 2003
  • From: USA
Posted by keavdog on Wednesday, July 26, 2023 8:07 AM

Works!  Very cool - I'd be chasing the cat around with that Stick out tongue

Thanks,

John

  • Member since
    August 2020
Posted by lposter on Wednesday, July 26, 2023 6:22 AM

keavdog

Very nice.  Looks spot on to my eye.  Any videos of your tanks running?

Some short ones....not many though. I am not exactly Stanley Kubrick. You can find one or two on teh channel linked below.

Today I rigged it up with the electrics. I am using JP Marine 60 Amp ESCs (for boats) - not fancy, no jumpers or switches but they are bullet proof and easy to work with.
A beier sound card and a Visatron speaker. And the wiring loom from hell. And some kind of Motorbike battery. I hate wiring up ammeters but got it done in the end.


Here are some shots:

And here is a litttle video of its first maiden test run. I really need to sort out the mix on the tx but it will do as proof of mobility! Really sorry about the dog. He is a pest and hates tanks.

https://www.youtube.com/watch?v=WAgO020kI_U

You may have to hit "replay from start' or something 


I hope that link works...


p

  • Member since
    November 2009
  • From: SW Virginia
Posted by Gamera on Sunday, July 23, 2023 7:30 PM

Wow, super work there! 

I'd guess you don't have to be too perfect, I think the Soviets just cranked tanks and assualt guns out and weren't too worried about them being perfect. 

"I dream in fire but work in clay." -Arthur Machen


  • Member since
    April 2003
  • From: USA
Posted by keavdog on Sunday, July 23, 2023 12:03 PM

Very nice.  Looks spot on to my eye.  Any videos of your tanks running?

Thanks,

John

  • Member since
    August 2020
Posted by lposter on Sunday, July 23, 2023 10:58 AM

As far as I am concerned…construction is now complete on this. Two outstanding issues:

Headlight lens
two missing rivets needing replacement (only remembered them after I took the photos!)

I am no Michelangelo and the purpose of my painting is utilitarian at most - preventing rust and hiding the blemishes.

Some mistakes made, some lessons learned along the way. Bit crude in places but thats the limit of my skill.
Oceans of room inside and I hope to start on the electronics as soon as I can.

It will only ever be a backyard runner so I’m not overly fussy as to the minor details and the ignored details.

P


  • Member since
    August 2020
Posted by lposter on Saturday, July 8, 2023 11:10 AM

Its been a while since I updated this so I thought I would as I seem to be in the final lap.

Essentially…construction is complete. I have to make and attach a horn. One or two rivets need replacing. Hubcaps for the return rollers are made … I just could not be ar&ed to attach them now. I need to make hubcaps for the road wheels and there is a lot of them Then I need to start wiring up.

It was painted with primer all over but I notice some rust (or something else) so it may need a respray. Corners were cut - primarily on the sprockets. There are two halves to a tiger sprocket - the front and back. These sprockets are two back halves joined. I then made a hubcap that sits over the central boss. And that was it. Not perfect but it was the only solution as I did not fancy making sprockets from scratch.

The whole thing is actually quite smooth - it rolls on its tracks when I shove it! Bit surprised about that but I will take the win.

P

image

image

image

image

image

image

image

image

image

image


  • Member since
    November 2009
  • From: SW Virginia
Posted by Gamera on Wednesday, May 24, 2023 7:52 PM

Wow, the running gear looks so intricate. I love how this is coming along. 

"I dream in fire but work in clay." -Arthur Machen


  • Member since
    August 2020
Posted by lposter on Monday, May 22, 2023 5:16 AM

The first dry fitting of the suspension system so I could take some measurements. 

Pretty pleased with the most of it. Some things need adjusting - the front swing arms need a different angle than the others due to their being on the upward sloping glacis plate but thats no issue.

For some reason I doubted my first measurements and thought that the rear spring retainers were 3 mm too low relative to the retainer on the swinging bit. So I made a load of spacers.

But when I mounted them I see that my original measurements were fine. So the spacers have to come out again. What a pain in the a%%. The last image down below shows them installed with springs fitted and ready to go,

I also mounted my drive axle and chains for the motors - no real problems there. Bit fiddly - it all lokks very spacious but my fingers are a bit chunky these days.


p


  • Member since
    November 2009
  • From: SW Virginia
Posted by Gamera on Monday, April 24, 2023 8:33 PM

That's so awesome!!! I can't even get a kit built and here you are scratchbuilding the whole thing!!! 

It was based off the chassis of a T-60 or T-70 wasn't it? I guess there's no kit larger than 1/35th though. 

"I dream in fire but work in clay." -Arthur Machen


  • Member since
    August 2020
Posted by lposter on Sunday, April 23, 2023 12:12 PM

The past few weeks have been focused primarily on the running gear. This was very consuming because it involved a large number of disks and rods with very small deep holes being tapped to M1.6 and M2.

To cut disks I simply clamped Dremel cutoff wheels in the Proxxon and mounted the tube or bar to be cut in the rotary table and tediously cut the slices. I used a lot of cut off wheels but I had a lot got cheap from aliexpress so that was OK. But it took a long time indeed.

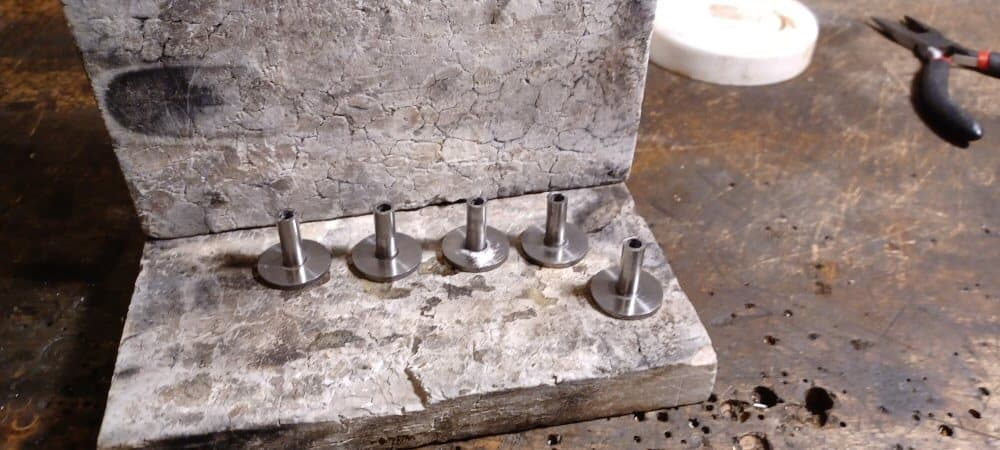
First I made the return roller mounts. Simply 6 mm steel rod silver soldered into disks with 6mm holes drilled in them. Then the centre bar was drilled out to 4 mm. Into this will go the axle for the return roller.

This is the mounts before soldering.

image

Here are all the bits for the rollers and the finished mounts:


image

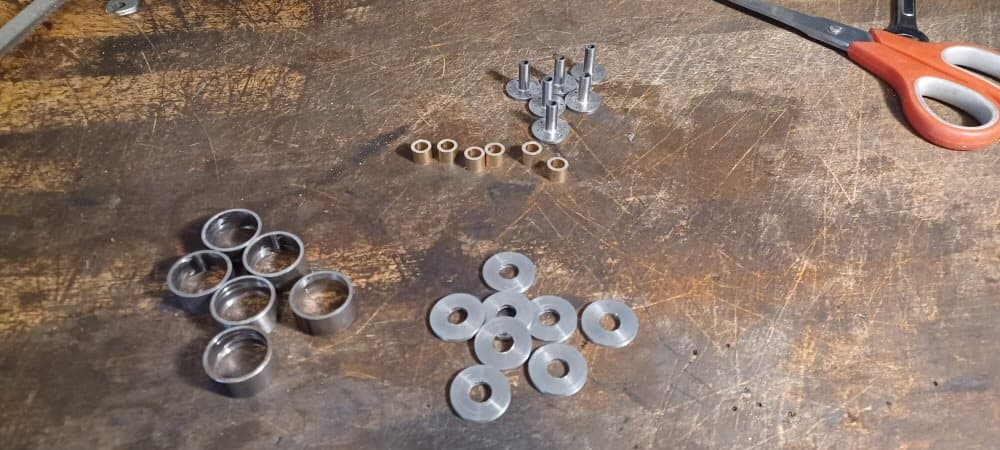
The rims are just slices off the same tubing I used in the gun mantlet.

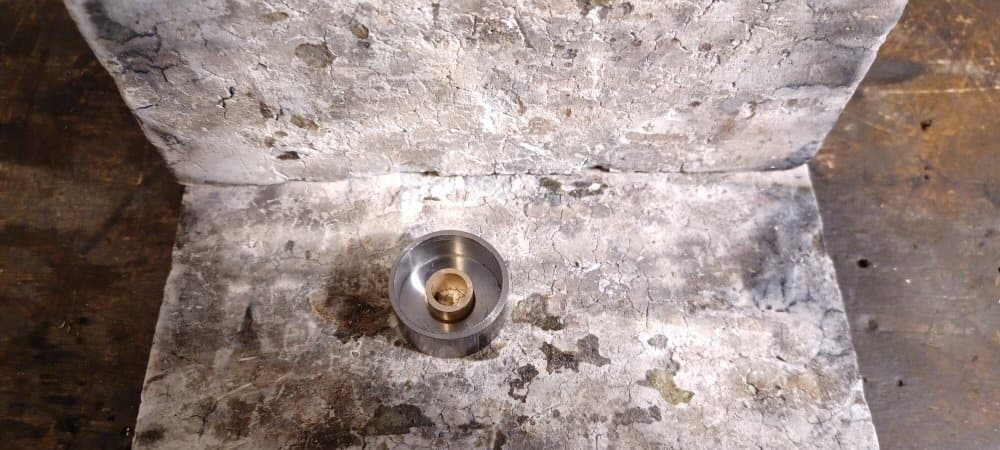
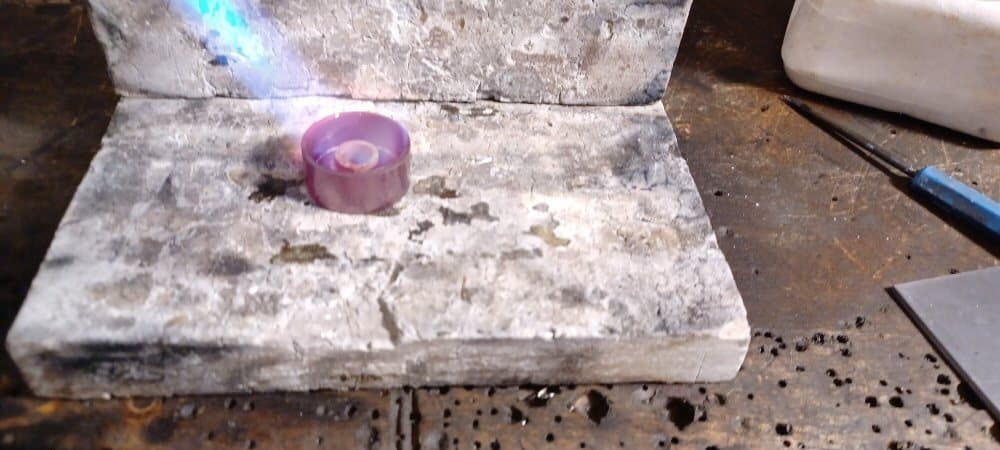
here it is being soldered.


image


image

I then press fit 4mm ID needle bearings into the central hole. I now need caps for the rollers to cover the hole but that will have to be later.

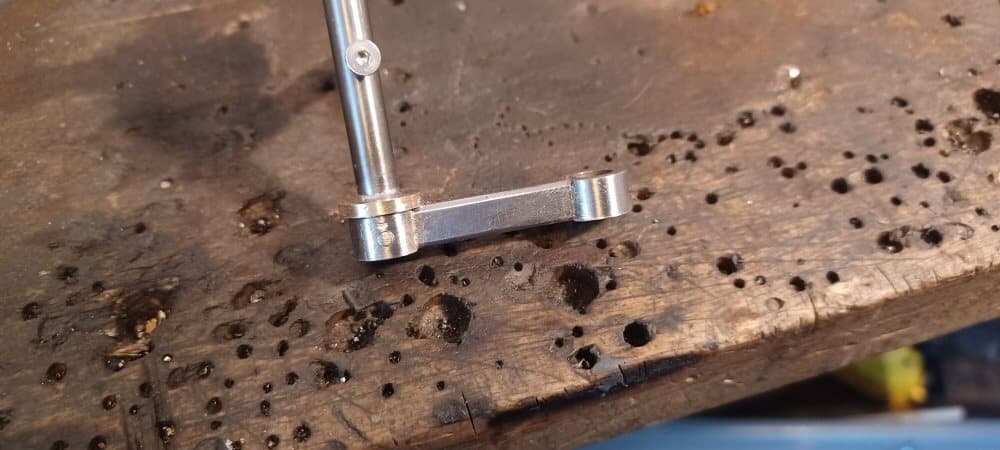
Then I started making the swing arm fixtures. This is just 6 mm silver steel silver soldered into the top end of the swing arm.


image


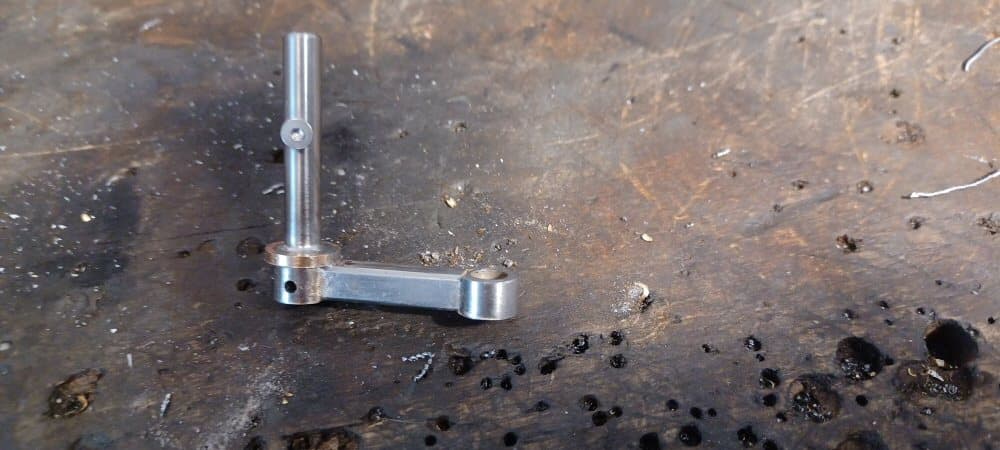
These joints will be under the most stress and while I trust silver solder, I am not always 100% I have done a good job and a failure later after paint is a major issue. So I drilled a 2mm hole through the swing arm and into the shaft and pinned them together with 2mm drill rod.


image

And here are all the bits for the running gear. The racks are simply off the shelf 20 mm square aluminium tube with approporiate holes drilled. The entire thing is adjustable for swing angle etc.


image

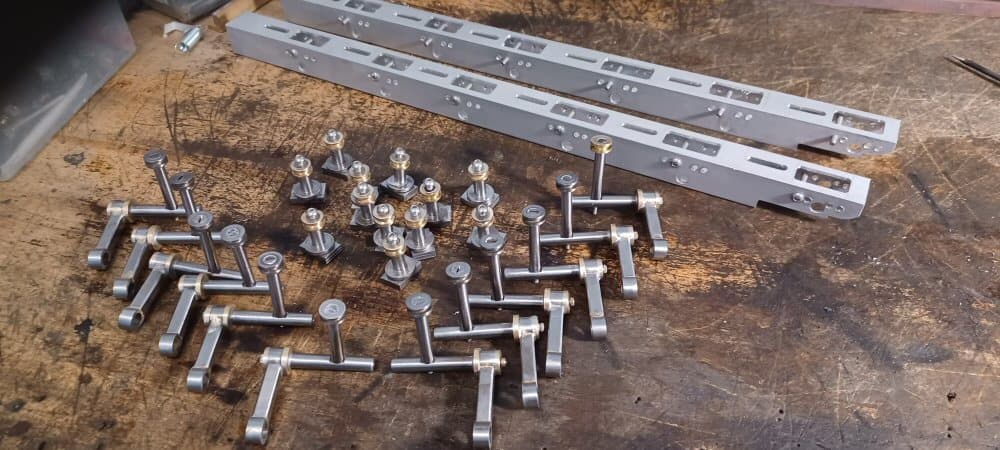
Its a bit hard to visualize but the brass rims on the shafts off the swing arms hold onne end of the spring and the things that look like chess pawns hold the other. These bits are clamped to the slots in the top of the racks.

The springs I was going to use are way too stiff but ebay has really stepped up its game in the spring world and I have ordered some more suitable ones. If they dont work I will just get some made.

I know this is not exactly visually interesting but there was a lot of work sunk into this and it all had to be done as I am pushing to get to a state where I can primer the whole thing.

p


  • Member since
    April 2003
  • From: USA
Posted by keavdog on Monday, April 17, 2023 8:51 AM

Love watching these projects.  Great work so far.

Thanks,

John

  • Member since
    August 2020
Posted by lposter on Monday, April 17, 2023 6:59 AM

The gun shroud or whatever is an odd thing to make by hand.


I got two steel tubes of the right diameters and joined them together like this.


Then I filed some flats and added side plates. I will fill and sand the seams later.


Then I started sticking all the big bits together.


And then I added some more bits.

Still a long way to go. I need to start the running gear.

Looks tatty as well so I am in a hurry to get to a point where I can prime it.


p

  • Member since
    August 2020
Posted by lposter on Monday, April 17, 2023 6:56 AM

I rooghed out some swing arms from bored out steel rod and steel bar (6mm) I can tidy these up later.


Then I started on teh hull. Tedious chain drilling and filing in my far too small vice but I got the big plates done.

Then I soldered the plates together.

The top bit has some room for mounting switches and charging ports and so on.

Then I made some motor mounts for my curtain motors. This lump will bolt to the floor and has some tensioners in it to remove slack from teh chains.


p


  • Member since
    August 2020
Su-12 scratch built
Posted by lposter on Monday, April 17, 2023 6:51 AM

Hello

I am going to build one of these here:

from scratch in steel and brass in 1:10 scale. It is an Su-12 which went on to be the Su-76 at some point as is fully explained here:   https://www.tankarchives.ca/2018/04/...fated-spg.html 

I started, as is traditional, on the tow hitches. Sandwiched together some steel bits and filed them down to shape. Melted the solder to separate them and nounted them on some flat bits with holes drilled in them.

Then I made the big boxy vents that stick out the side with some louvres in them.

Simply silver soldered some bits together and then kind of made a jig to get the louvres in. Did not go well on one but I have a solution

Then I made some stowage boxes by just soldering sheet steel together. I wll make some latches and so on later.

Then I moved onto some of the less important bits!


P


JOIN OUR COMMUNITY!

Our community is FREE to join. To participate you must either login or register for an account.

SEARCH FORUMS
FREE NEWSLETTER
By signing up you may also receive reader surveys and occasional special offers. We do not sell, rent or trade our email lists. View our Privacy Policy.