SEARCH FINESCALE.COM

Enter keywords or a search phrase below:

A November 2023 build update (Tanks and Figures)

2429 views
20 replies
1 rating 2 rating 3 rating 4 rating 5 rating
  • Member since
    January 2015
  • From: Tumwater, WA.
A November 2023 build update (Tanks and Figures)
Posted by M. Brindos on Monday, December 11, 2023 11:07 PM

Hey guys! I've been busy at the workbench for a few weeks now and I want to share some of what I've been up to. There's a bit to muddle through here so be paient as I try to explain it all.

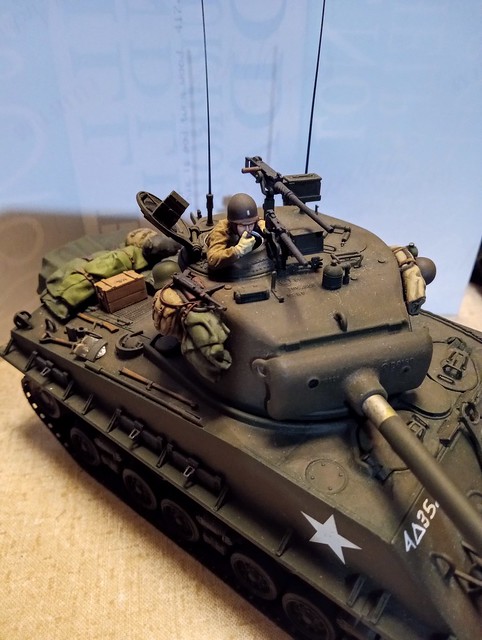
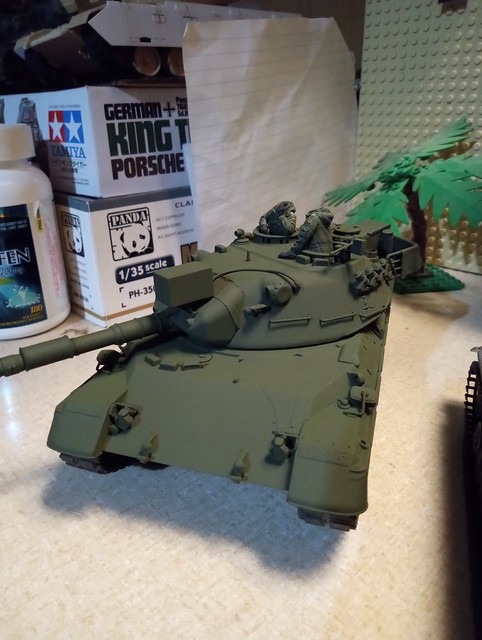
First, as many of you know I completed Tamiya's gorgeous M4A3E8 over a year ago, but I never got around to adding the beautifully sculpted TC figure. Well thanks largely to a new lighted magnifier I was able to really do this figure some justice.

 1/35 Tamiya M4A3E8 by Mike Brindos, on Flickr

 1/35 Tamiya M4A3E8 by Mike Brindos, on Flickr

 1/35 Tamiya M4A3E8 by Mike Brindos, on Flickr

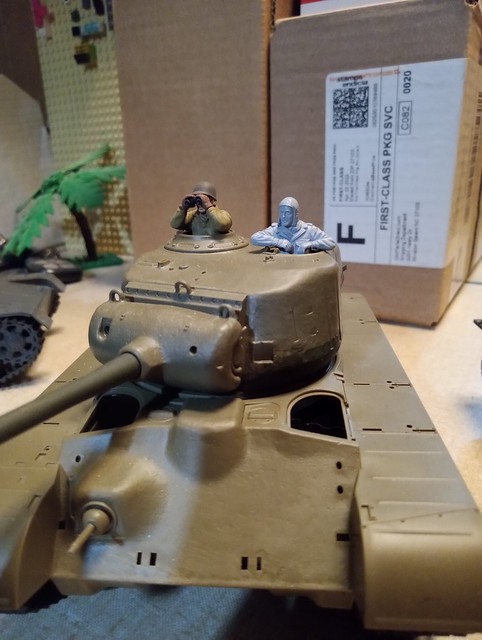
I also assembled just enough of the Tamiya M26 Pershing to have a place for its figures to go. The Loader is primed and ready for my next figure painting session.

 Tamiya 1/35 by Mike Brindos, on Flickr

 Tamiya 1/35 by Mike Brindos, on Flickr

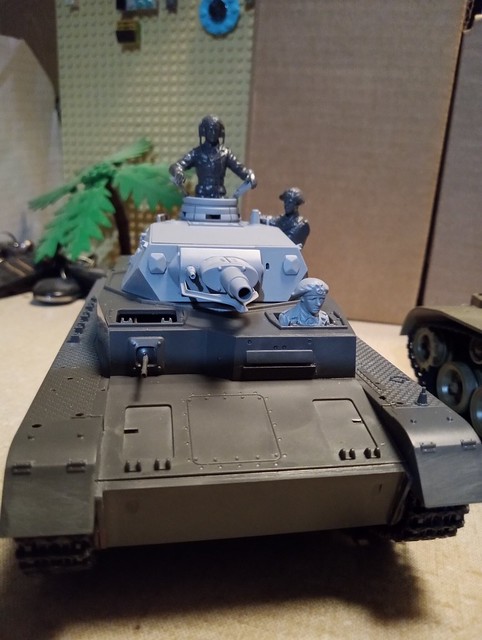
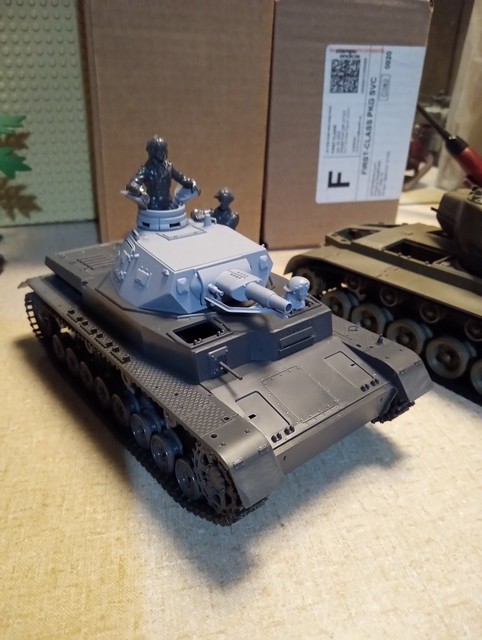
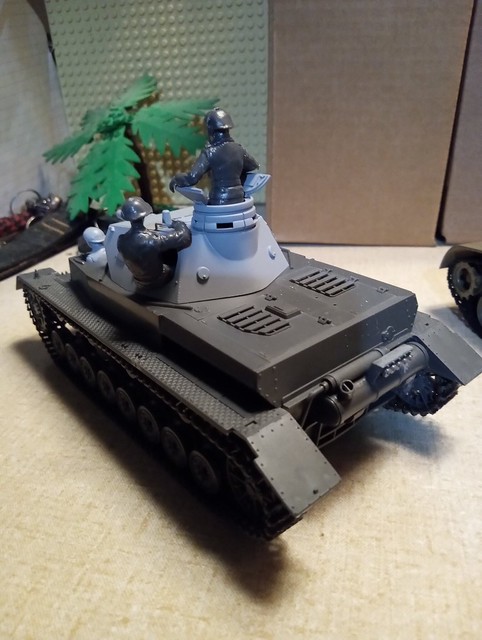
More recently I started on the old (1975)Tamiya Panzer IV Ausf D. I've been at it for a couple of days now and its not nearly as bad as I'd have thought it to be. While no where near as detailed as most of the more modern releases it has been surprising me with how much detail it does have, albeit a bit soft in some respects. Its nothing that a few tricks up my sleeve haven't been able to sqeek out of the molds. Some smart uses of micro saws, Bondo, and PPP have been instrumental in getting me this far with it. 

You'll see that I haven't finished assembling the hull and that I've used the tropical deck plates to spice it up a bit. I know those deck plates shouldn't be on an Ausf D but I think they add some much needed visual interest to the back deck so I'm claiming artisitc license on that one.

The figures are kinda sad. They're the typical soft sculpts of the early Tamiya years and their age shows. The Driver was shortened by 3mm, his shoulders have had sprue glue added to build up some sunken areas on both sides of his collar, and I filled in his cheeks with Bondo so he didn't look so skull-like. The TC has had hand surgery so they actually contact the hatch lids and the Gunner hanging out of the side of the turret has also had a hand sugically moved while his left arm is in limbo waiting for the glue on his right hand to fully cure before I can position the left arm on the hatch.

 Tamiya 1/35 by Mike Brindos, on Flickr

 Tamiya 1/35 by Mike Brindos, on Flickr

 Tamiya 1/35 by Mike Brindos, on Flickr

 Tamiya 1/35 by Mike Brindos, on Flickr

 Tamiya 1/35 by Mike Brindos, on Flickr

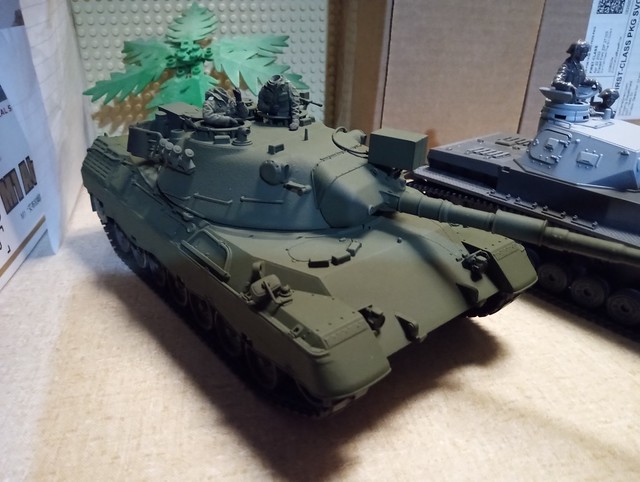
Last, but not least, I've spent an enormous amount of hours building the Revell  Leopard 1A1. Not because its a bad kit, but because of all of the tiny sink holes, misalignments, and flash. I absolutely hate the smoke grenade dischargers. They should have made the brackets separate from the launch tubes as that would've made them easier to clean up and the detail level would be much appreciated. They took far too much time to scrape seams from and I'm still not entirely happy with the results.

The turret bustle rack is tricky, but if you don't glue the top brackets to the antanae housings until AFTER you've lined up, glued together, and let fully cure then things line up pretty well. I wasn't too happy with the rack on mine because some of the bars were getting a bit too thin after all of my sanding so I threw some brown paper bag "blankets" over them lol.

But those were to only real problem areas I had with the build. Everything else just needed a bit of attention to go together properly. 

The figures are from Valkyrie and they are stunning and work perfectly for this build, but because of the sculpts of the heads I'm using, I'm on my third repaint of them. Thanks to the afore mentioned magnifier I keep seeing flaws in my work and the sculpts are so fine that painting over them just makes it all worse and I lose the details. So the bodies are headless, for now.

 Revell of Germany 1/35 Leopard 1 A1 by Mike Brindos, on Flickr

 Revell of Germany 1/35 Leopard 1 A1 by Mike Brindos, on Flickr

 Revell of Germany 1/35 Leopard 1 A1 by Mike Brindos, on Flickr

The Leopard is just waiting on me to want to finish painting it for now. I really like how the build turned out and it should be a real stunner once I've completed it.

- Mike Brindos "Lost Boy"

  • Member since
    November 2009
  • From: SW Virginia
Posted by Gamera on Wednesday, December 13, 2023 9:25 PM

Those are you usual sharp work Mike! Yes

Gosh, I need to motivate myself to get off my butt and get something finished... 

"I dream in fire but work in clay." -Arthur Machen


  • Member since
    June 2004
  • From: East Stroudsburg, PA
Posted by TigerII on Wednesday, December 13, 2023 10:26 PM

Wow, you have been a very busy beaver. The Sherman looks great. I can't wait to see that Pz IV in Afrika Korps colors. I always liked the curved turret of the A1 & A2 Leopards. Looking good.

Achtung Panzer! Colonel General Heinz Guderian
  • Member since
    January 2015
  • From: Tumwater, WA.
Posted by M. Brindos on Monday, December 18, 2023 6:22 PM

Gamera

Those are you usual sharp work Mike! Yes

Gosh, I need to motivate myself to get off my butt and get something finished... 


Thanks, Gam. I'm fighting severe depression these days so this is my world, in miniature, right now. It's a lot easier to deal with. 

- Mike Brindos "Lost Boy"

  • Member since
    January 2015
  • From: Tumwater, WA.
Posted by M. Brindos on Monday, December 18, 2023 6:32 PM

TigerII

Wow, you have been a very busy beaver. The Sherman looks great. I can't wait to see that Pz IV in Afrika Korps colors. I always liked the curved turret of the A1 & A2 Leopards. Looking good.


Quite busy indeed. I can control this world, lol. 

I've actually made a diorama base for the Sherman and I don't like the "trees" and I've been researching how to make Pines for the Ardenes area I'm trying to depict. The Panzer IV is going to be an early paintscheme in northern France around 1940, so it's going grey. Like I mentioned above I know the Tropical engine covers are wrong for the model, but the solid plates looked boring to me. 

The early Leopards and other Cold War era tanks seem to peek my interest because of my Dad. He served in Germany from '74-'76, where I was born and have a curiosity about that time period which isn't modelled much. I have the Tamiya A4 which I've painted and repainted four times until I was happy withthe results of the camo I wanted to see. I've got the decals on it now and I need to seal them up and start working with oils and washes next.

 Tamiya 1/35 Leopard A4 by Mike Brindos, on Flickr

As much as I love Tamiya kits this one is a bit lackluster. I'm not a big fan of the blocky turret armor on this version. I prefer the rounded turrets of the early models like you do. 

- Mike Brindos "Lost Boy"

  • Member since
    January 2015
  • From: Tumwater, WA.
Posted by M. Brindos on Monday, December 18, 2023 6:43 PM

And now for another update. 

I'll start with another project I already started a long time ago, the Tamiya Sd.Kfz. 222. I finished assembly and closed off the back of the storage bins with card stock, replaced the mudflaps with thinner card stock (because those are some thick stock pieces), and I added some ammo to the machine gun, whichis U.S. .30cal but at this scale you really have to look closely to notice. I added an ammo bag to the MG and a spent 20mm shell catching bag to the guns.

 Tamiya 1/35 SD.Kfz. 222 by Mike Brindos, on Flickr

 Tamiya 1/35 SD.Kfz. 222 by Mike Brindos, on Flickr

 Tamiya 1/35 SD.Kfz. 222 by Mike Brindos, on Flickr

 Tamiya 1/35 SD.Kfz. 222 by Mike Brindos, on Flickr

 Tamiya 1/35 SD.Kfz. 222 by Mike Brindos, on Flickr

I also finished assembling the Panzer IV and I've got the base paint on it as of today. I didn't do any real modifications on the kit as it's pretty detailed as is. I did change the shovel and relocated it to the left side of the hull. I also reshaped it and added my own stowage bracket to it. The only other thing I've done was to make the antenna movable so I can lower it and raise it. I still need to deal with the seams on the Gunner, but I did get the TC prepped and ready for paint.

 Tamiya 1/35 Panzer IV D by Mike Brindos, on Flickr

 Tamiya 1/35 Panzer IV D by Mike Brindos, on Flickr

 Tamiya 1/35 Panzer IV D by Mike Brindos, on Flickr

 Tamiya 1/35 Panzer IV D by Mike Brindos, on Flickr

I almost forgot to mention I filled the seam at the front of the tank with a stretched sprue weld bead.

The main color I'm starting with on this build is Vallejo's Basalt Grey 70.869 because it's dark and it's got that tinge of Blue to the tone that's a good place to start. But I plan on using my own custom mixed color of early German Green-Grey as a highlight.

 Vallejo Basalt Grey test by Mike Brindos, on Flickr

I used the Basalt Grey on these fuel drums and I love the tone that the color produces without filters.

 Vallejo Basalt Grey test by Mike Brindos, on Flickr

I finished the crew for my Leopard A1 and I can't get a good picture of them no matter what I've tried. This washed out picture will have to do I guess.

 IMG_20231216_110749948_HDR by Mike Brindos, on Flickr

I finally got results I like and I can't get a decent picture lol.

To wrap this up I'm showing my Sherman Dio. I hope you guys like it. Like I said above, I really want Pine trees and I'll be replacing the weird trees I have when I can get some supplies to make such trees.

 IMG_20231217_131442890_HDR by Mike Brindos, on Flickr

 IMG_20231217_131425657 by Mike Brindos, on Flickr

 IMG_20231217_131409004 by Mike Brindos, on Flickr

My collection is starting to build up.

 IMG_20231217_131522099 by Mike Brindos, on Flickr


Until next time! Thanks for taking a look.


- Mike Brindos "Lost Boy"

  • Member since
    January 2015
  • From: Tumwater, WA.
Posted by M. Brindos on Monday, December 18, 2023 7:49 PM

So far the results of this little chromatic experiment are looking possitive.

 Chromatic grey experiment by Mike Brindos, on Flickr

The fuel drum shows the Basalt Grey sample in comparison to my Green-grey. I chose the chromatic method for this experiment but left most of the Basalt Grey under the fenders and the bottom of the tank. My poor lighting doesn't show the contrast much but the Basalt shows up in all of the shadows.

 Chromatic grey experiment by Mike Brindos, on Flickr

I can't wait to see how it turns out after dot filtering.

- Mike Brindos "Lost Boy"

  • Member since
    November 2009
  • From: SW Virginia
Posted by Gamera on Monday, December 18, 2023 8:05 PM

Oh those look fantastic Mike!!! 

Have you tried the little pine trees that show in craft stores around Christmas? Some of them are decent looking. Even the awful ones look okay if you cover them with 'snow' material. 

And hope you feel better. I've seem to be grouchy and annoyed all the time but that's nothing compared to depression. I think it comes from getting old though.  

"I dream in fire but work in clay." -Arthur Machen


  • Member since
    January 2015
  • From: Tumwater, WA.
Posted by M. Brindos on Monday, December 18, 2023 8:23 PM

Gamera

Oh those look fantastic Mike!!! 

Have you tried the little pine trees that show in craft stores around Christmas? Some of them are decent looking. Even the awful ones look okay if you cover them with 'snow' material. 

And hope you feel better. I've seem to be grouchy and annoyed all the time but that's nothing compared to depression. I think it comes from getting old though.  


I've been looking at those little pine trees, but they look too toy-like for what I envision and you know how I can be with how I want things to look lol.

- Mike Brindos "Lost Boy"

  • Member since
    January 2015
  • From: Tumwater, WA.
Posted by M. Brindos on Thursday, December 21, 2023 2:11 PM

Update time!

I've been working on the Panzer IV exclusively since my last update. I've got everything above the fenders done and I just have to muddy it below the fenders and I'll only have the figures left to complete the build.

 Tamiya 1/35 Panzer IV D by Mike Brindos, on Flickr

 Tamiya 1/35 Panzer IV D by Mike Brindos, on Flickr

 Tamiya 1/35 Panzer IV D by Mike Brindos, on Flickr

 Tamiya 1/35 Panzer IV D by Mike Brindos, on Flickr

In the end I couldn't see a difference in my chromatic experiment with the Blue toned Basalt Grey and my Green toned custom mixed German Green-grey. It all blended together after I modulated and filtered anyways. It all just looks grey lol.

So far I'm happy with the results I've gotten. The oil streaking worked out well and the oil pin wash turned out okay too. I did have some areas where the enamel thinner ate through my base layers of paint, but they were easy to repair. However, now I remember why I usually prime in Black lol. 

Well... mud and dirt time.

- Mike Brindos "Lost Boy"

  • Member since
    January 2015
  • From: Tumwater, WA.
Posted by M. Brindos on Thursday, December 21, 2023 7:49 PM

Okay, I'm calling the Panzer IV complete for now. I'm sure I'll find little things to fix or change to my liking later.

 Tamiya 1/35 Panzer IV D by Mike Brindos, on Flickr

 Tamiya 1/35 Panzer IV D by Mike Brindos, on Flickr

 Tamiya 1/35 Panzer IV D by Mike Brindos, on Flickr

 Tamiya 1/35 Panzer IV D by Mike Brindos, on Flickr

 Tamiya 1/35 Panzer IV D by Mike Brindos, on Flickr

 Tamiya 1/35 Panzer IV D by Mike Brindos, on Flickr

Still one figure to clean up before I paint up the crew for this beast.

But then, on to the next.

Edit: I almost forgot to finish the Jack! 

- Mike Brindos "Lost Boy"

  • Member since
    November 2009
  • From: SW Virginia
Posted by Gamera on Thursday, December 21, 2023 8:16 PM

Looks good! I've tried the streaking but I always tend to overdo it. 


"I dream in fire but work in clay." -Arthur Machen


  • Member since
    January 2015
  • From: Tumwater, WA.
Posted by M. Brindos on Thursday, December 21, 2023 8:30 PM

Gamera

Looks good! I've tried the streaking but I always tend to overdo it. 


Thanks, Cliff! I have to admit I was nervous about the streaking. I went real easy on it at first and I went too heavy with the thinner which caused me to lose some of the undercoat. It's been a while since I've used that technique. It slowly came back to me as I moved from the turret to the hull. I should've started on the bottom first lol.

- Mike Brindos "Lost Boy"

  • Member since
    January 2015
  • From: Tumwater, WA.
Posted by M. Brindos on Friday, December 22, 2023 5:59 PM

Thanks to the magnifier I had to revisit the Commander for my King Tiger and I'm super happy I did.

 Tamiya 1/35 King Tiger Commander by Mike Brindos, on Flickr

 Tamiya 1/35 King Tiger Commander by Mike Brindos, on Flickr

 Tamiya 1/35 King Tiger Commander by Mike Brindos, on Flickr

It's like going from a fuzzy picture to a High Def one. Night and day.

Before:

 1/35 Tamiya King Tiger TC by Mike Brindos, on Flickr

Maybe I should finish his ride next?

- Mike Brindos "Lost Boy"

  • Member since
    November 2009
  • From: SW Virginia
Posted by Gamera on Friday, December 22, 2023 9:54 PM

Looks great!!! I can sorta do faces but I'd never be able to get all those tiny medals and rank insignia painted that well. 

"I dream in fire but work in clay." -Arthur Machen


  • Member since
    August 2021
Posted by lurch on Friday, December 22, 2023 11:12 PM

That looks fantastic Mike. I think you did a great job on it.

  • Member since
    January 2015
  • From: Tumwater, WA.
Posted by M. Brindos on Friday, December 22, 2023 11:18 PM

Gamera

Looks great!!! I can sorta do faces but I'd never be able to get all those tiny medals and rank insignia painted that well. 


Thanks, Cliff. Credit goes to all of the practice, a magnifier, and a steady hand. 

Oh, and tiny brushes lol.

I've been putting a lot of effort into this area again because it just adds more life to my models. That, and scale. I keep hearing how we relate to things in scale better when we can see how we would measure up to them in our heads. Besides, I have the time right now. 

And thank you for responding. I really appreciate that.

- Mike Brindos "Lost Boy"

  • Member since
    January 2015
  • From: Tumwater, WA.
Posted by M. Brindos on Friday, December 22, 2023 11:20 PM

lurch

That looks fantastic Mike. I think you did a great job on it.


Thank you. It's good to hear that I'm not the only one enjoying these efforts. It means a lot to me these days.

- Mike Brindos "Lost Boy"

  • Member since
    January 2021
Posted by JoeSMG on Saturday, December 23, 2023 12:17 PM

Great job on your Panzer IV it came out beautifully. The light hand on the weathering makes the pain job pop without overwhelming it. Commander came out nicely too.

- Joe the SMG

  • Member since
    January 2015
  • From: Tumwater, WA.
Posted by M. Brindos on Monday, December 25, 2023 8:06 PM

JoeSMG

Great job on your Panzer IV it came out beautifully. The light hand on the weathering makes the pain job pop without overwhelming it. Commander came out nicely too.


Thank you very much! I've migrated to the "less is more" camp over the years. I've done the beat up look a few times now and it's a lot more work lol. I guess I'm getting lazy.

- Mike Brindos "Lost Boy"

  • Member since
    January 2015
  • From: Tumwater, WA.
Posted by M. Brindos on Monday, December 25, 2023 8:16 PM

Got a bug in my bonnet and painted up the figure for the 222 last night. I was in the final round of detail painting where the epoulettes were saved for last and I found that I hadn't noticed that his left epoulette was malformed. Last night I just sighed, shrugged, and decided I didn't want to have to repaint that entire shoulder after attempting a fix.

This morning I woke up and it was obviously clear that I could repair the shoulder board easily with Milliput and minimum repainting. Since this figure has very little decoration because he's just a simple private, so the shoulder boards are one of the very few details so I spruced them up a tad by adding the missing buttons I don't usually bother with.

 Tamiya 1/35 SD.Kfz. 222 by Mike Brindos, on Flickr

Just a small amount of Milliput corrected the issue easily.

 Tamiya 1/35 Sd.Kfz. 222 by Mike Brindos, on Flickr

And fixed...

 Tamiya 1/35 SD.Kfz. 222 by Mike Brindos, on Flickr

That was probably one of the easiest corrections I've ever done.

 Tamiya 1/35 Sd.Kfz. 222 by Mike Brindos, on Flickr

I even managed to get all three colors on his hat pin. You can't even see it without magnification, but it's there. I don't even know why I did that. lol.

Anyways... That was fun. Thanks for taking a look. 

- Mike Brindos "Lost Boy"

JOIN OUR COMMUNITY!

Our community is FREE to join. To participate you must either login or register for an account.

SEARCH FORUMS
FREE NEWSLETTER
By signing up you may also receive reader surveys and occasional special offers. We do not sell, rent or trade our email lists. View our Privacy Policy.