- Member since
January 2003
- From: Utah - USA
|
Posted by wipw
on Friday, July 23, 2004 8:10 AM
Thanks, everyone!
Ausf: Man! What is it with you?? Never satisfied!! Now you want closeups of the friggen' tools?? lol I'll see what my camera can do. It doesn't seem to like to get too much closer than these, but I'll give it a try.
Build: It feels great. I can't believe it's taken me this long on this one. Man hour wise, it's taken me much less time than any German tank I've done. Too much else going on, I guess, and got too hung up on those nasty kit tracks!
fledgrau: I put my upper hull on long ago. The sponson bottoms are molded on the hull bottom, so it won't gain you much by waiting to mount the upper hull. However, you might knock off less bits from the upper hull if you glue it on after the tracks are done. There are a few big cautions here. One, the plates on the back of the lower hull where the idlers mount are aparently shown on the wrong sides on the instruction sheet. Look at Dwight's post on his Firefly to see a discussion here. Dwight mounted a different set that's in the kit, I chose to reverse sides of the ones called for. I have no idea which set of plates is more prototypical. Two, the shafts of the sprockets are too long. If you don't shorten them, they will stick out way too far and not line up with the road wheels. They are about 3/8 inch too long, I believe. Trim a little off, insert into the hull and check the alignment. Trim a little more, if necessary. Don't worry if they wind up a touch short. The tracks will hold them in alignment. Three, DO NOT glue the sprockets to the hull. If you do, you will have a difficult, if not impossible, time getting the tracks past them. There isn't a lot of clearance there. I wound up actually turning the sprockets while guiding the track over the return rollers to get mine in place. The tracks will hold the sprockets in place after they are secured, so they don't need to be glued in anyway. The kit tracks are a real pain. The two holes in the end connectors are not molded the same which results in the track curving. I'd recomend building in short sections using a straight edge to try and keep them as straight as possible. Also, I found that it worked a little better if I did one side of the links first and let the glue fully cure, then go back and do the other side. But even then it was, a mess. I'm really glad I popped for the $35 and got the Friuls. Others have managed to get the kit tracks to work and they look great. For me, it just wasn't worth it. Also, they have a bunch of parts numbered wrong. I think it's the C sprue. If you see any parts for C with a high number, they aren't there. These numbers were for an earlier version of the kit. Look at your other sprues, I think it's V, and you'll find the parts with the same number. For example, C42 would really be V42. Ask questions on the forum. We'll be happy to help.
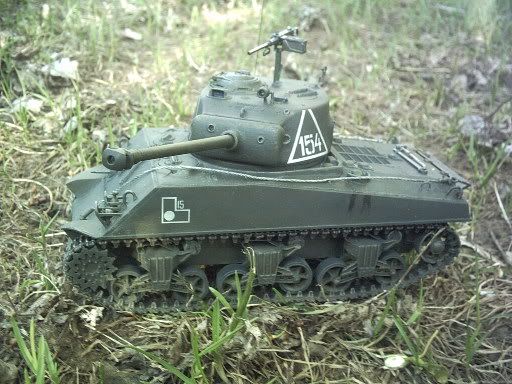
zokissima: Actually I didn't use "OD" paint. What I used was Humbrol Bronze Green. It's #75. For the drybrushing, I lightened it with a little to a lot of Humbrol #34, Matt White. (I don't like to mix brands of paint, if I can avoid it.) It's really a cool looking color. Of course, it looks a lot different in the pictures than it is in reality.
Thanks, again, everyone. I appreciate the comments.
Bill
==========================================================
DML M4A2 Red Army
==========================================================
  
==========================================================
-- There is a fine line between "hobby" and "mental illness". (Author unknown)
|