SEARCH FINESCALE.COM

Enter keywords or a search phrase below:

Buff's Firefly finally finished

2250 views
26 replies
1 rating 2 rating 3 rating 4 rating 5 rating
  • Member since
    December 2003
  • From: Montreal
Buff's Firefly finally finished
Posted by buff on Thursday, August 26, 2004 4:41 PM
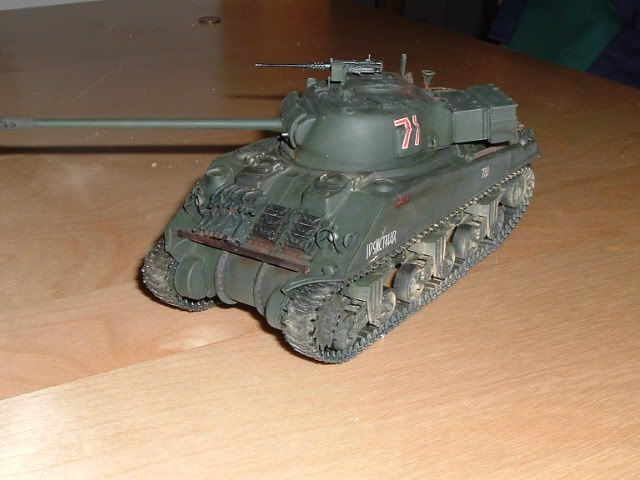
It took a while, but I'm done. Not too bad for 5 months work. It's the DML Firefly Vc. This is the 3rd kit I've finished since starting up again last Christmas, although 1 of them was for MTD. First time with PE, resin tracks, adding AM stuff, and making my own weld seams. There are a couple of small goofs with the build, especially a seam along the gun barrel.
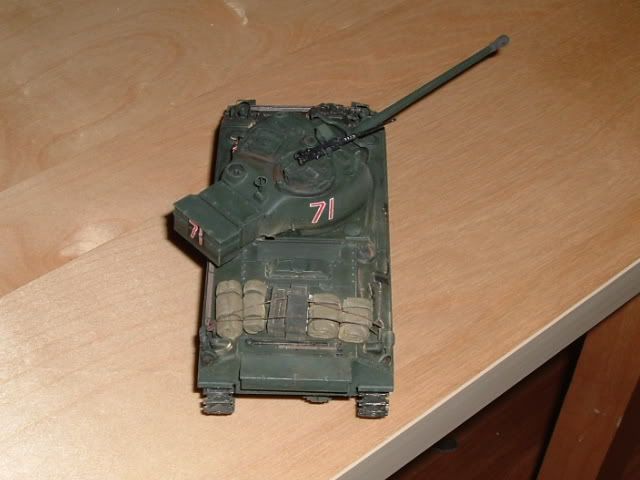
The tracks come from Accurate Armour. They were very easy to mold with a hair dryer, but a pain to cut in order to get the right length. The stowage on the back deck is from the Verlinden British military vehicle set. The extra track lengths on the glacis come from the kit.
I pre-shaded in Model Master flat black. The base coat is Tamiya Japanese Army Green washed in artist's waters. I also washed with some pastels in some places. I dry-brushed with lightened J.A. green. I put on some pastels for dust, but the raw sienna is but too orange. I'm pretty happy with the painting, but I think I could have done more with the dry-brushing.
I got lots of help on this. Many thanks to Shermanfreak, Build22, Wipw and Dwight, among others. Constructive criticism is always welcome


On the bench: 1/32 Spit IXc

  • Member since
    December 2002
  • From: PA
Posted by JWest21 on Thursday, August 26, 2004 4:50 PM
Looks great! What did you use to tie down the stowage?
Jason "There is a very fine line between "hobby" and "mental illness." -D. Barry
  • Member since
    November 2005
Posted by Anonymous on Thursday, August 26, 2004 5:27 PM
Buff It looks great. cant wait to get started on mine.
  • Member since
    July 2004
Posted by JP66 on Thursday, August 26, 2004 5:53 PM
Nice tank and a great job, Buff. I will try something like this asap. Approve [^]

  • Member since
    July 2003
  • From: Philippines
Posted by Dwight Ta-ala on Thursday, August 26, 2004 6:05 PM
Now that's really a mean looking Sherman! Good to see that you got through the tracks. The stowage is a very nice addition, too.

Great job overall.

  • Member since
    April 2004
  • From: sunny imperial beach
Posted by yw18mc on Thursday, August 26, 2004 6:43 PM
Very nice job Shermanfreak, Build22, Wipw, and Dwight. You picked an exceptional contractor for this build, and the quality of the build shows. Maybe this is the way for me to become a better modeller? You know! kind of have a group tech input build. That way I can get the best from each of you. All kidding aside, you did a first class job "Buff", my compliments. semper fi, mike
mike
  • Member since
    December 2003
  • From: Montreal
Posted by buff on Thursday, August 26, 2004 8:58 PM
QUOTE: What did you use to tie down the stowage?

I used dark green sewing thread. I filled one of the little "pots" in my palette with Tamiya red-brown, ran the thread through the paint, and rubbed the paint in with my fingers (I wore latex gloves). Then I hung it up to dry. I thought it would look too thin to be in scale, but I think it turned out ok.
QUOTE: You know! kind of have a group tech input build. That way I can get the best from each of you.

There is a massive amount of info on these forums. All we have to do is ask, and somebody will either answer or tell us where to find the answer. So why not ask? The kit would never have turned out as well as it did without the input, and I certainly would not have had as much fun building it.Big Smile [:D]

On the bench: 1/32 Spit IXc

  • Member since
    July 2003
  • From: Ozarks of Arkansas
Posted by diggeraone on Thursday, August 26, 2004 11:02 PM
Buff you done a fine job a very fine job.Digger
Put all your trust in the Lord,do not put confidence in man.PSALM 118:8 We are in the buisness to do the impossible..G.S.Patton
  • Member since
    December 2002
  • From: United Kingdom / Belgium
Posted by djmodels1999 on Friday, August 27, 2004 12:48 AM
looks great!
  • Member since
    August 2003
  • From: South Australia
Posted by South Aussie on Friday, August 27, 2004 12:57 AM
Thumbs Up [tup] Great work buff, keep up the good work and thanks for sharing.
Wayne I enjoy getting older, especially when I consider the alternative.
  • Member since
    November 2005
Posted by Anonymous on Friday, August 27, 2004 3:12 AM
Looks great Buff, I really like the use of JA green. Thumbs Up [tup]
Next time try "burnt sienna" instead of "raw sienna" and it will be more brown and less orange.
  • Member since
    November 2005
Posted by Anonymous on Friday, August 27, 2004 6:28 AM
Great job on the Firefly. Just might have to go get that kit now.
  • Member since
    May 2003
  • From: Upstate NY
Posted by Build22 on Friday, August 27, 2004 6:30 AM

Great job, Buff Thumbs Up [tup]

Excellent ! I like the way the green came out. Great job on the stowage


Nice model !


Jim [IMG]
  • Member since
    April 2004
  • From: The cornfields of Ohio
Posted by crockett on Friday, August 27, 2004 6:33 AM
Outstanding work on the Tiger killer!
  • Member since
    December 2009
  • From: West Grove, PA
Posted by wildwilliam on Friday, August 27, 2004 6:53 AM
Buff,
nice work!
congrats on moving it from the bench to the shelf!
what's next?
  • Member since
    December 2003
  • From: Montreal
Posted by buff on Friday, August 27, 2004 7:08 AM
QUOTE: Next time try "burnt sienna" instead of "raw sienna" and it will be more brown and less orange.

Got it! Thanks for the tip.
QUOTE: what's next?

Tamiya's Churchill mark VII. It has some extras that would look good in a diorama, so I'll try that next. I've never built dioramas before, and I'd like to give it a try.
Thanks to all for the compliments.

On the bench: 1/32 Spit IXc

  • Member since
    November 2005
Posted by Anonymous on Friday, August 27, 2004 2:17 PM
Buff: Burnt Sienna will still be rather reddish (great for Viet Nam) so you may want to look at "Raw Umber" and "Burnt Umber" as well, both are more brown than their Sienna counterparts.
  • Member since
    December 2003
  • From: Montreal
Posted by buff on Friday, August 27, 2004 2:36 PM
Derek, thanks for the tip.

On the bench: 1/32 Spit IXc

  • Member since
    February 2003
Posted by ponch on Friday, August 27, 2004 3:35 PM
Nice build!!!


  • Member since
    July 2004
  • From: Texas
Posted by wbill76 on Friday, August 27, 2004 4:54 PM
Nice finished build buff, the time and effort really paid off! The others have given you good suggestions with the washes, I prefer to stick with the umbers vs. the siennas for the same orange vs. brown reasons.

Only suggestion I've got for your fantastic build is to explore using steel or gunmetal on your spare track links (either drybrushed or thinned/washed depending on your preference) and equipped tracks to give them more of a rubber look on the blocks and a metallic look on the connector links.

Excellent work on the stowage and details, especially for a first time effort with some of the AM stuff! Thumbs Up [tup]

  • Member since
    December 2003
  • From: Montreal
Posted by buff on Friday, August 27, 2004 6:07 PM
QUOTE: explore using steel or gunmetal on your spare track links (either drybrushed or thinned/washed depending on your preference) and equipped tracks to give them more of a rubber look on the blocks and a metallic look on the connector links.

I have to admit, the tracks are the weak point in terms of painting. They were the furthest from what I wanted. I painted them a mixture of royal blue, flat black and red brown, then washed with pastels and artist's water colours and dry-brushed with the blue/black (but no red brown). I got the idea from Lynn Kessler's "How to Build Armor Dioramas", though I didn't copy him exactly. Those tracks are all steel, btw. The track pads weren't rubber. I plan on using gunmetal as a base for the tracks on my next kit. The Churchill had all steel tracks, so I think it will work better. Thanks for the suggestions. I really appreciate the input.

On the bench: 1/32 Spit IXc

  • Member since
    July 2004
  • From: Texas
Posted by wbill76 on Friday, August 27, 2004 8:13 PM
Buff,

My apologies on the rubber block comment...I always forget the difference between the US rubber chevron and the Brit steel chevron. While scratching my head about what is or is not correct for Sherman-family tracks, I stumbled across this neat little source for info on the Sherman family...right here in our own backyard it turns out. Big Smile [:D]

http://www.finescale.com/fsm/objects/pdf/shermanspecifics.pdf
  • Member since
    December 2003
  • From: Montreal
Posted by buff on Saturday, August 28, 2004 7:06 PM
No need to apologize.
What a great little resource. Thanks for the link.

On the bench: 1/32 Spit IXc

  • Member since
    November 2005
Posted by Anonymous on Saturday, August 28, 2004 7:39 PM
Wow, beautiful paint job. I dream of being able to weather like that. Bow [bow]Bow [bow]Bow [bow]


M.
  • Member since
    July 2004
  • From: Texas
Posted by wbill76 on Saturday, August 28, 2004 8:12 PM
Buff,

Funny thing about that link is it came up first on Google when I typed in Sherman Tracks T48...I never even thought to do a forum search first. Big Smile [:D]
  • Member since
    December 2003
  • From: Montreal
Posted by buff on Saturday, August 28, 2004 9:08 PM
QUOTE: I never even thought to do a forum search
I wouldn't have either. We don't see many pdf files in the forums. And Cookie Sewell is a real expert.
QUOTE: Wow, beautiful paint job. I dream of being able to weather like that.

Thanks for the kind words. Believe me, I'm no genius at this. I am still very inexperienced. I've had a lot of advice from some people who really know their stuff. The biggest difference I've found between this kit and the last one I did was that I never did any painting procedure for the first time on the kit itself. Pre-shading, base coat, Future, dull coat, decals, washing were all done on a practice piece first. I eliminated tons of mistakes that way, and it made a real difference in how the kit came out.

On the bench: 1/32 Spit IXc

  • Member since
    July 2003
  • From: Toronto, Ontario, Canada
Posted by zokissima on Sunday, August 29, 2004 11:01 AM
Very nice build. Looks like all the AM parts add a nice touch. I'm still a little wary of using any AM, but looking at results like these helps me along the way Smile [:)]
JOIN OUR COMMUNITY!

Our community is FREE to join. To participate you must either login or register for an account.

SEARCH FORUMS
FREE NEWSLETTER
By signing up you may also receive reader surveys and occasional special offers. We do not sell, rent or trade our email lists. View our Privacy Policy.